
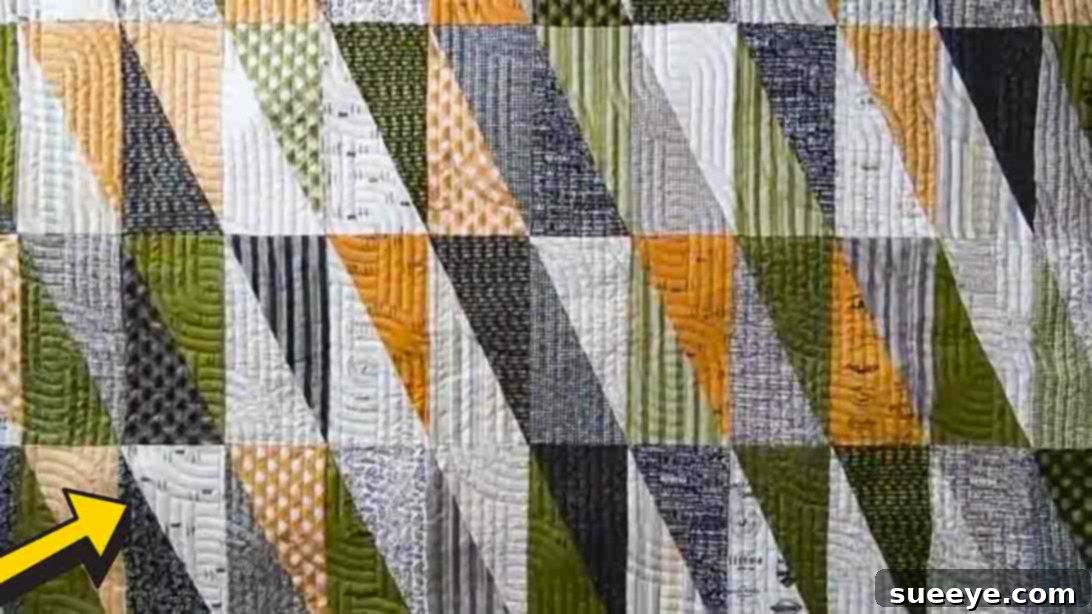
Are you searching for an exciting yet straightforward quilting project that makes the most of your beautiful layer cakes? Look no further! This fantastic quilt pattern, inspired by Moonkin Stitchery’s delightful tutorial, is precisely what you need. This project simplifies the quilting process, requiring just one bundle of your favorite fabric layer cake to create a stunning finished piece. Its remarkable speed and ease mean you could potentially complete this entire quilt top in a single day, even if you’re a complete beginner to the world of quilting.
RELATED: Layer Cake Shake Shortcut Quilt Tutorial
Beyond being a quick personal project, this pattern is also a wonderful solution for crafting a last-minute, heartfelt, and personalized gift for your loved ones. It has become a go-to design whenever I’m looking to create something beautiful swiftly using layer cakes, or simply when I want to enjoy a relaxing session of creative sewing. To master this charming quilt, you can follow the detailed video tutorial provided below for a step-by-step visual guide, or continue reading for comprehensive written instructions designed to walk you through every stage of the process.
This “Pike’s Peak Layer Cake Quilt” pattern offers a unique geometric design that is both visually striking and surprisingly simple to achieve. It’s an excellent way to showcase the various prints within your layer cake, creating a cohesive and dynamic look without intricate piecing. Get ready to transform a stack of pre-cut fabrics into a cozy, cherished quilt that will be admired for years to come.
Essential Materials for Your Pike’s Peak Layer Cake Quilt
Before embarking on your quilting journey, gather all the necessary supplies. Having everything organized will ensure a smooth and enjoyable crafting experience. Here’s a comprehensive list of what you’ll need:
- One Layer Cake Fabric Bundle: Typically consists of 42 pre-cut 10-inch by 10-inch squares. Choose a collection with fabrics you adore, as they will form the heart of your quilt.
- Rotary Cutter: A sharp rotary cutter is crucial for precise, clean cuts. Ensure your blade is new or recently replaced for optimal performance and safety.
- Self-Healing Cutting Mat: A large, self-healing mat protects your work surface and prolongs the life of your rotary blade. A rotating mat is highly recommended for this project, as it allows you to easily turn your fabric without repositioning your body, making repetitive cuts faster and more accurate.
- Quilt Rulers: You will need a standard rectangular ruler for initial cuts and a specialized half-rectangle ruler will greatly simplify the unique angles in this design. If you don’t have one, careful marking with a standard ruler is possible.
- Sewing Machine: A reliable sewing machine in good working order, ready to stitch with a consistent ¼-inch seam allowance.
- Coordinating Thread: High-quality polyester or 100% cotton thread that complements your chosen layer cake fabrics.
- Iron and Ironing Board: Essential for pressing seams flat and crisp, which dramatically improves the accuracy and final appearance of your quilt.
- Quilting Pins or Fabric Clips: For holding fabric pieces together securely before sewing.
- Fabric Scissors: For any small trimming tasks.
- Batting: The middle layer of your quilt, providing warmth and texture. Choose a size appropriate for a throw quilt (e.g., 60″ x 70″).
- Backing Fabric: The fabric for the back of your quilt. Allow for a few extra inches on all sides compared to your quilt top for easier basting.
- Binding Fabric: Enough fabric to cut 2.5-inch wide strips to go around the entire perimeter of your finished quilt.
Step-by-Step Directions: Crafting Your Pike’s Peak Quilt
Follow these detailed instructions to bring your Pike’s Peak Layer Cake Quilt to life. Precision in cutting and sewing is key for a beautiful outcome.
Step 1: Precision Cutting and Half-Rectangle Creation
This initial step transforms your 10-inch layer cake squares into the unique units that form the Pike’s Peak design. Accuracy here will simplify all subsequent steps.
- Prepare Your Layer Cakes: Take each of your 42 (or desired number) 10-inch layer cake squares. For each 10-inch square, you will be creating two smaller rectangles.
- First Cut: From each 10-inch square, cut two 5-inch by 10-inch rectangles. This means you will effectively cut the 10-inch square in half. After this step, if you start with 42 layer cake squares, you will have 84 rectangles measuring 5 inches by 10 inches.
- Creating Half-Rectangles (HRTs): Now, you will use your half-rectangle ruler. Place the ruler on a 5-inch by 10-inch rectangle, aligning the 9-inch mark of the ruler with the bottom edge of your fabric. This ruler is designed to cut at a specific angle. Carefully cut along the ruler’s edge. As you cut, you’ll notice small triangular pieces, often called “dog ears,” forming at the corners. Snip these off as you go; this makes for neater seams later.
- Second Half-Rectangle Cut: Rotate your cutting mat (or the fabric piece) 180 degrees. This is where a rotating mat truly shines! Position your half-rectangle ruler again, using the 9-inch mark, and cut the second half-rectangle piece from the same 5-inch by 10-inch rectangle.
- Yield per Rectangle: From each original 5-inch by 10-inch rectangle, you will end up with two perfectly angled half-rectangle units. Repeat this process for all your 5-inch by 10-inch rectangles until you have a stack of these angled units.
- Mix and Match: Once all your half-rectangle units are cut, lay them out and rotate the fabrics around to mix them up. The beauty of layer cakes is the coordinating prints, and randomly mixing them creates an appealing, cohesive look. You want to ensure a good distribution of colors and patterns when pairing them.
- Sewing Units Together: Take two mixed half-rectangle units and sew them together along their long diagonal edge with a precise ¼-inch seam allowance. Press your seams open or to one side, whichever you prefer for your quilting style; consistency is key. When sewn and pressed, these two units will form a new rectangle that measures 4½ inches by 9 inches. These are your foundational building blocks for the quilt.
Step 2: Assembling Your Quilt Blocks and Top
With all your individual units sewn, it’s time to construct the larger quilt blocks and then piece together the entire quilt top.
- Forming Quilt Blocks: Take two of your newly sewn 4½-inch by 9-inch rectangular units. Orient them so they create a specific design when placed side by side – typically forming an arrow or chevron shape depending on the direction of the angled seams. Sew these two units together along their 9-inch side, again using a ¼-inch seam allowance. Press your seams carefully. This completes one full quilt block.
- Repeat for All Blocks: Continue this process until all your 4½-inch by 9-inch units have been combined into these larger quilt blocks. You should now have a collection of complete quilt blocks ready for layout.
- Layout Your Quilt Top: Once all your blocks are complete, it’s time for the exciting step of arranging them. Lay them out on a clean floor or a large design wall in a 6 by 7 block layout. This means you will have 6 blocks wide and 7 blocks long. Experiment with the orientation of each block to create a pleasing overall design, such as an undulating zig-zag or a series of strong directional arrows. Take a step back and view your layout from a distance to ensure you like the visual flow.
- Sewing Blocks into Rows: Beginning with the top row, sew the 6 blocks together, matching seams carefully. Use pins to align your blocks precisely, especially where seams meet. Press the seams for each row. For easier assembly in the next step, consider pressing the seams of alternate rows in opposite directions (e.g., seams in row 1 pressed to the left, seams in row 2 pressed to the right). This technique, called “nesting seams,” helps the seams lock together when you join the rows.
- Joining Rows to Complete the Quilt Top: Once all 7 rows are sewn, it’s time to join them. Pin the first row to the second row, carefully aligning all the vertical seams. Sew with a ¼-inch seam allowance. Repeat this process until all rows are joined. Take your time, matching points carefully for a professional finish. Press your final quilt top thoroughly. You now have a completed Pike’s Peak Layer Cake Quilt top!
Beyond the Quilt Top: Finishing Your Pike’s Peak Masterpiece
Creating the quilt top is a major accomplishment, but a quilt isn’t truly finished until it’s been basted, quilted, and bound. These steps add durability, warmth, and the final touch of artistry to your project.
Step 3: Basting Your Quilt Sandwich
Basting is the process of temporarily securing the three layers of your quilt – the backing, batting, and quilt top – together. This prevents shifting during the quilting process.
- Prepare Your Space: Clear a large, flat surface (the floor works well). Lay your backing fabric wrong side up, smoothing out all wrinkles. Use painter’s tape to secure the edges to the floor, ensuring it is taut but not stretched.
- Add the Batting: Center your batting evenly over the backing fabric. Smooth it out thoroughly, making sure there are no creases or bumps.
- Place the Quilt Top: Carefully center your Pike’s Peak quilt top right side up over the batting. Again, smooth it meticulously from the center outwards, removing any wrinkles.
- Secure the Layers: Choose your basting method.
- Pin Basting: Use curved safety pins (quilting pins) to secure the layers, placing them every 4-6 inches across the entire quilt. Ensure pins go through all three layers.
- Spray Basting: Use a temporary fabric adhesive spray. Lift sections of your quilt top and batting, spray the batting lightly, and then smooth the layers back down. Work in small sections to avoid missed spots or creases.
Whichever method you choose, ensure the layers are firmly held together, preventing any movement while quilting.
Step 4: The Art of Quilting
Quilting is the process of stitching through all three layers of your quilt sandwich. This not only permanently joins the layers but also adds texture and dimension to your quilt.
- Choose Your Quilting Design: For a beginner-friendly project like the Pike’s Peak quilt, simple straight lines are often effective and elegant.
- Stitch-in-the-Ditch: Quilt along the seam lines of your pieced blocks. This hides your stitches and emphasizes the piecing.
- Straight Line Quilting: Quilt parallel lines either horizontally, vertically, or diagonally across your quilt. Use a walking foot on your sewing machine to help feed all three layers evenly and prevent puckering. A ruler can help guide your lines for consistency.
- Free Motion Quilting: (More advanced) If you’re feeling adventurous, free motion quilting allows you to draw designs with your needle. This requires practice and a special darning foot for your machine.
- Begin Quilting: Start quilting from the center of your quilt and work your way outwards. This helps to push any fullness towards the edges, minimizing puckering. Take your time, maintain an even stitch length, and enjoy the process of bringing your quilt to life with texture.
- Trim Excess: Once quilting is complete, trim any excess batting and backing fabric, squaring up your quilt edges to match the quilt top perfectly.
Step 5: Adding the Perfect Binding
The binding is the final edge finish for your quilt, protecting the raw edges and adding a decorative frame.
- Prepare Binding Strips: Cut 2.5-inch wide strips from your binding fabric. The length needed will be your quilt’s perimeter plus about 10-12 inches for joining and overlap. Join these strips together using diagonal seams to create one long continuous strip. Press the seams open, then press the entire binding strip in half lengthwise, wrong sides together.
- Attach to the Quilt: With your sewing machine, sew the raw edge of the folded binding strip to the raw edge of your quilt top, right sides together, using a ¼-inch seam allowance. Start somewhere in the middle of one side, leaving an unsewn tail of about 6-8 inches at both the start and end for joining. Miter the corners by stopping ¼-inch from the corner, backstitching, cutting the thread, then folding the binding strip up at a 45-degree angle, and then down to create a crisp corner. Resume sewing from the corner.
- Join Binding Ends: Once you’ve sewn around the entire quilt, join the two unsewn binding tails using a diagonal seam to create a continuous loop. Trim the seam allowance and press open. Finish sewing the remaining section of binding to the quilt.
- Finish the Binding: Fold the binding over to the back of the quilt. You can either hand stitch it in place for a traditional, invisible finish, or machine stitch it from the front by “stitching in the ditch” along the seam line, catching the binding on the back. Both methods create a durable and attractive edge.
Tips for Quilting Success with Layer Cakes
To ensure your Pike’s Peak quilt project is as smooth and enjoyable as possible, consider these helpful tips:
- Pre-Wash Fabric (or Not): Some quilters pre-wash their fabrics to prevent shrinking and color bleeding. Others prefer not to, to maintain fabric sizing and crispness. If you don’t pre-wash your layer cake, be sure to pre-wash your batting and backing if they are made of natural fibers to avoid differential shrinking after the quilt is finished.
- Accurate Seam Allowance: A consistent ¼-inch seam allowance is paramount in quilting. Invest in a ¼-inch presser foot for your sewing machine, or practice on scraps to achieve this accuracy. Even slight variations can throw off your block sizes.
- Press, Don’t Iron: When pressing seams, use an up-and-down motion (“press”) rather than sliding the iron back and forth (“iron”). This prevents stretching and distorting your fabric.
- Chain Piecing: To save time and thread, use chain piecing when sewing multiple identical units. Sew one unit, then feed the next unit directly under the needle without lifting the presser foot or cutting the thread. You’ll have a chain of units that you can snip apart later.
- Check for Squareness: Periodically check your blocks and rows for squareness with a ruler. If they’re slightly off, it’s easier to correct small issues early on than trying to fix a skewed quilt top.
- Take Breaks: Quilting should be enjoyable! If you feel frustrated or tired, step away for a bit. A fresh perspective often helps resolve challenges.
- Label Your Rows: As you sew your rows, consider labeling them with sticky notes or numbered pins. This helps keep your carefully planned layout in order before joining them.
- Utilize Good Lighting: Good lighting is essential for accurate cutting and sewing, reducing eye strain and helping you spot errors.
Why Choose the Pike’s Peak Layer Cake Quilt?
The Pike’s Peak quilt pattern stands out for several compelling reasons, making it an excellent choice for both new and experienced quilters:
- Showcases Layer Cakes Beautifully: This pattern is specifically designed to highlight the coordinated prints within a layer cake, requiring minimal additional fabric.
- Beginner-Friendly: While it involves angled cuts, the repetitive nature and clear steps make it accessible for those new to quilting, providing a rewarding learning experience.
- Quick to Finish: Utilizing pre-cut fabrics significantly speeds up the preparation phase, allowing you to move quickly to the fun part of piecing and seeing your quilt come together.
- Visually Dynamic: The angled half-rectangle triangles create a striking, directional pattern that adds a modern and sophisticated touch to any home decor.
- Versatile for Gifting: A finished Pike’s Peak quilt makes a thoughtful and unique gift for birthdays, holidays, housewarmings, or baby showers.
Embrace the joy of creating with this simple yet stunning layer cake quilt pattern. You’ll love the process, and the result will be a cherished handmade item.
We hope this expanded tutorial inspires you to start your own Pike’s Peak Layer Cake Quilt! Don’t forget to watch the accompanying video tutorial from Moonkin Stitchery for a visual guide that complements these written instructions perfectly. Happy quilting, and we can’t wait to see your beautiful creations!
Pike’s Peak Layer Cake Quilt Pattern Tutorial Video
For a visual walkthrough of each step, refer to the original video tutorial:
Watch the full video tutorial by Moonkin Stitchery here!