
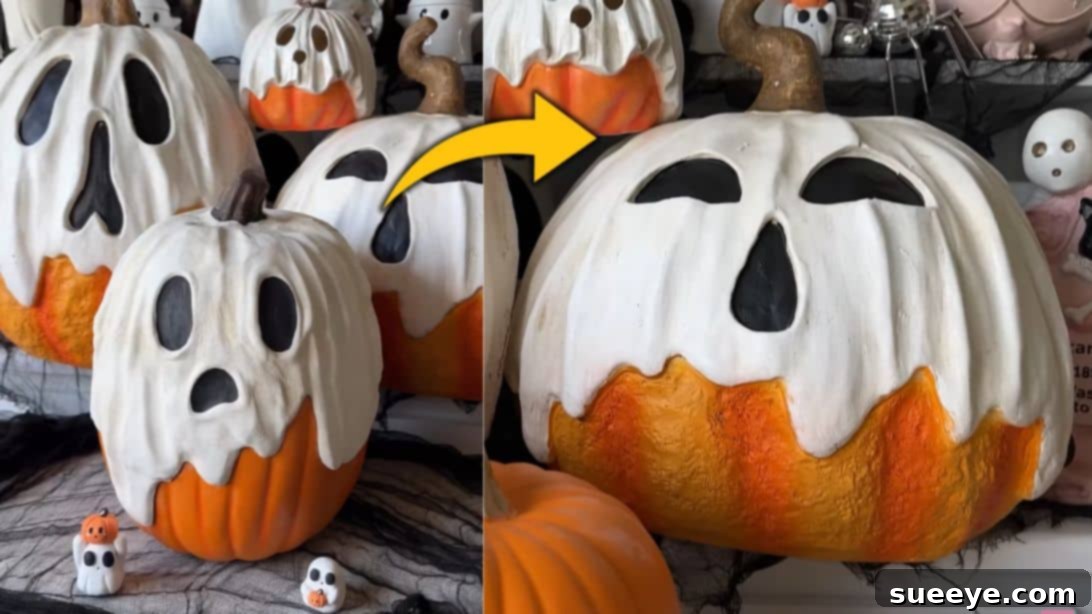
As the leaves begin to turn and a crisp chill fills the air, our thoughts inevitably drift to Halloween, a season brimming with creative possibilities for home decor. Recently, a particular DIY craft has been making waves across social media feeds, captivating crafters and enthusiasts alike: the adorable yet elegant ghost pumpkin. Inspired by delightful tutorials, such as the one shared by InTheWorkPlace, this project transforms an ordinary faux pumpkin into a hauntingly beautiful centerpiece using simple air dry clay. Its widespread popularity is no surprise—it’s incredibly cute, remarkably easy to make, and offers a sophisticated touch that belies its DIY origins. Many might initially perceive this project as complex, but trust me, it’s surprisingly straightforward. Whether you’re a seasoned crafter familiar with air dry clay or a complete beginner, you’ll find the steps intuitive and the process highly rewarding. Get ready to embark on a fun crafting journey that culminates in a truly unique Halloween decoration.
This charming ghost pumpkin stands out not just for its ease but also for its stunning, high-end appearance. Once completed, it looks less like a homemade project and more like a designer Halloween piece you might discover in an upscale boutique. Imagine the compliments you’ll receive from guests as they admire your craftsmanship this spooky season! It’s the perfect way to add a personalized, artistic flair to your autumn and Halloween displays without breaking the bank. Crafting your own decorations allows for endless customization, ensuring your home decor reflects your unique style. Beyond its aesthetic appeal, this project offers a wonderful opportunity to engage in a relaxing and creative activity. Dive into this tutorial, and prepare to elevate your Halloween decor with a piece that’s both impressive and deeply satisfying to create.
RELATED DIY: Dollar Tree Light Up Ghost DIY (Less Than 5 Dollars)
For those eager to explore more DIY Halloween projects, consider adding these to your crafting list: Cute Mini Sherpa Ghosts DIY. These offer another fantastic way to personalize your holiday decorations and keep the creative spirit alive throughout the season.
Essential Materials for Your Ghost Pumpkin DIY
Gathering your materials is the first exciting step in any DIY project. For this enchanting ghost pumpkin, you’ll find most items are readily available and affordable. Here’s a comprehensive list to ensure you have everything you need for a smooth crafting experience:
- Faux Pumpkin: The foundation of your ghostly creation. Choose a pumpkin size that fits your decorative vision. Faux pumpkins are ideal because they provide a sturdy, reusable base and won’t rot like real pumpkins, allowing your ghost pumpkin to last for many seasons to come. You can find these at craft stores, dollar stores, or even discount retailers during the fall season.
- Air Dry Clay: This is the star material that will transform your pumpkin. Air dry clay is incredibly beginner-friendly, as it hardens simply by exposure to air, eliminating the need for a kiln or baking. It’s pliable, easy to work with, and takes on beautiful textures. Opt for a good quality white or natural-colored air dry clay for the best results, as it provides a clean canvas for painting if desired.
- Water: Your secret weapon for achieving a smooth, seamless finish. Water helps to moisten the clay, making it more pliable, and is essential for blending seams and creating those flowing, ghostly drapery effects. Keep a small bowl of water nearby while you work.
- Rolling Pin: To flatten your air dry clay evenly. A standard kitchen rolling pin works perfectly, but if you don’t have one, a sturdy cylindrical object like a smooth glass bottle or PVC pipe can also do the trick. Consistency in clay thickness is key for even drying and a uniform look.
- Toothpick or Clay Sculpting Tool: For adding delicate details like the ghostly mouth, textures, or smoothing out smaller areas. A simple toothpick is surprisingly effective for fine lines and small indentations.
- X-Acto Knife or Craft Blade: Necessary for cutting the clay, especially to create the distinct wavy edge of your ghost’s drape. Always exercise caution when using sharp tools. If an X-Acto knife isn’t available, a butter knife or even a plastic knife can be used for softer cuts, though it might not provide as clean an edge.
- Sandpaper (Fine-Grit) and PPE (Personal Protective Equipment): (Optional but recommended) After the clay has fully dried, fine-grit sandpaper can be used to smooth out any rough edges or imperfections, giving your ghost pumpkin a more refined finish. If sanding, always wear a dust mask (part of PPE) to avoid inhaling clay dust, and work in a well-ventilated area.
- Parchment Paper or Wax Paper: (Optional but recommended) Laying parchment paper on your workspace prevents the clay from sticking to your table and makes cleanup much easier. It also provides a non-stick surface for rolling and shaping the clay.
- Ruler Guides or Spacers: (Optional) These can be placed on either side of your clay when rolling to ensure a consistent thickness. This is particularly helpful for beginners aiming for uniformity.
- Paint (Black and/or White): For adding facial features like eyes and a mouth. Acrylic craft paints work wonderfully on air dry clay. Black paint creates classic spooky eyes and mouths, while white paint can be used for touch-ups or to enhance the ghostly effect.
- Paint Brushes: A small detail brush is essential for painting the delicate features, while a broader brush might be useful if you decide to paint the entire clay drape a uniform color.
Having all these materials ready before you start will make the crafting process much more enjoyable and efficient. Now, let’s get into the step-by-step instructions!
Crafting Your Ghost Pumpkin: A Step-by-Step Guide
Creating your enchanting ghost pumpkin is a satisfying process that allows for both precision and artistic freedom. Follow these steps carefully to bring your spooky vision to life:
Step 1: Preparing Your Clay Drape
Begin by taking a generous portion of your air dry clay. On a clean, flat surface (preferably covered with parchment paper for easy release), use your rolling pin to flatten the clay. The goal is to achieve an even thickness throughout the sheet. Aim for a thickness that isn’t too thin (which can lead to cracking during drying or fragility) nor too thick (which makes it heavy and harder to drape). Approximately 1/8 to 1/4 inch (3-6 mm) is usually ideal. Once you have a uniformly rolled sheet, carefully use your X-Acto knife or craft blade to cut a wavy, organic shape. This wavy edge will form the bottom of your ghost’s flowing drape, adding to its ethereal appearance. Before cutting, hold the rolled clay sheet against your faux pumpkin to ensure it’s sufficiently sized to cover the top and drape down the sides to your desired length. You want it large enough to comfortably wrap around the pumpkin’s upper half, but not so oversized that it becomes unwieldy to manage.
Step 2: Draping and Sculpting the Ghostly Form
With your wavy clay sheet ready, gently lift it and carefully place it over the top of your faux pumpkin. Begin to press the clay against the pumpkin, allowing it to take on the pumpkin’s natural curvature. As you drape it, use your fingers to gently smooth out any creases or air bubbles that form between the clay and the pumpkin surface. Now, here’s where the magic of water comes in: moisten your fingertips slightly and use them to further smooth the clay, blending any seams or rough areas. Water is excellent for creating a seamless, polished look. If you notice any areas that look too thin or sparse, or if you want to add more volume to a particular “drip,” simply add small pieces of fresh clay. Use a bit of water to seamlessly connect these new pieces to the existing drape, blending them until they appear as one continuous form. The beauty of this ghost is in its unique, organic look – actively work to make the “drippings” or folds appear different from each other. Create a mix of short, long, flowing, and more angular drips to give your ghost character and movement. Remember, perfection isn’t the goal; a slightly uneven, rustic texture often enhances the charmingly spooky aesthetic.
Step 3: Crafting Features and Drying
Once you are satisfied with the overall drape and form of your ghost, it’s time to add the iconic facial features. Using your fingers, gently press indentations into the clay to create the eyes and nose. You can make them round, oval, or even triangular – let your creativity guide you! For more defined edges or sharper points, a toothpick or a small sculpting tool can be very helpful. To enhance the illusion of a draped cloth, use the toothpick to lightly score some vertical lines into the clay, particularly around the areas where the “cloth” would naturally gather or fold. These subtle lines add depth and texture. Once you are completely happy with your design, it’s crucial to let your ghost pumpkin dry thoroughly. Place it in a well-ventilated area, away from direct sunlight or extreme heat/cold, which can cause rapid drying and cracking. Drying can take anywhere from 24 to 72 hours, or even longer for thicker pieces. Patience is key! If, during the drying process, you notice any small cracks appearing, don’t fret. This is common with air dry clay. To fix them, simply mix a small amount of clay with a few drops of water to create a thick paste. Apply this paste to the cracks, smoothing it over with a damp fingertip or tool. Let the repaired areas dry completely. This repair method makes your ghost pumpkin appear flawless. Ensure the entire piece is bone-dry before proceeding to the next step, as painting too early can trap moisture and lead to issues.
Step 4: Painting and Finishing Touches
With your ghost pumpkin completely dry and any cracks repaired, it’s time for the final artistic flourish: painting the facial features. Using your small detail brush and black acrylic paint, carefully fill in the indented eyes and nose. Take your time to create crisp, clean lines. If you wish to add more character, consider adding tiny white dots to the black eyes to mimic a reflection, giving your ghost a slightly more animated or “alive” look. For an extra touch of permanence and durability, especially if you plan to display your ghost pumpkin outdoors or want to protect it from dust and moisture, apply a clear sealant. A matte sealant will preserve the natural, rustic look of the clay, while a glossy sealant will give it a more polished, ceramic-like finish. Spray sealants are often the easiest to apply, ensuring an even coat. Follow the product instructions for application and drying times. This sealing step is optional but highly recommended for longevity. Your charming, spooky ghost pumpkin is now complete and ready to take pride of place in your Halloween decor!
Unlock Your Creativity with a Ghost Pumpkin DIY
The DIY ghost pumpkin project offers an exceptional opportunity to infuse your Halloween decor with personal charm and handmade elegance. From the initial roll of clay to the final brushstroke of paint, each step is designed to be enjoyable and accessible, regardless of your crafting skill level. What makes this project truly special is the ability to create a decoration that looks far more intricate and expensive than it actually is, proving that stunning home accents don’t have to come with a hefty price tag. It’s an ideal craft for individuals, families, or even groups looking for a fun, creative activity during the autumn season.
Beyond its aesthetic appeal, crafting provides a wonderful sense of accomplishment and a unique outlet for self-expression. You can experiment with different pumpkin sizes, vary the ghost’s facial expressions, or even introduce subtle textures to the clay before it dries. Imagine a collection of ghost pumpkins, each with its own personality, adorning your mantelpiece, porch, or entryway. You could even incorporate small battery-operated LED tea lights inside the faux pumpkin before adding the clay drape, creating a soft, eerie glow that truly brings your ghost to life after dark.
This ghost pumpkin DIY is more than just a craft; it’s an invitation to embrace the spirit of Halloween with creativity and flair. It’s a testament to how simple materials can be transformed into something truly magical with a little imagination and effort. So, gather your materials, set aside some time, and prepare to be delighted by the captivating ghost pumpkin you create. Share your finished masterpieces with friends and family, and inspire others to discover the joy of homemade Halloween decor. Happy crafting, and have a wonderfully spooky season!