
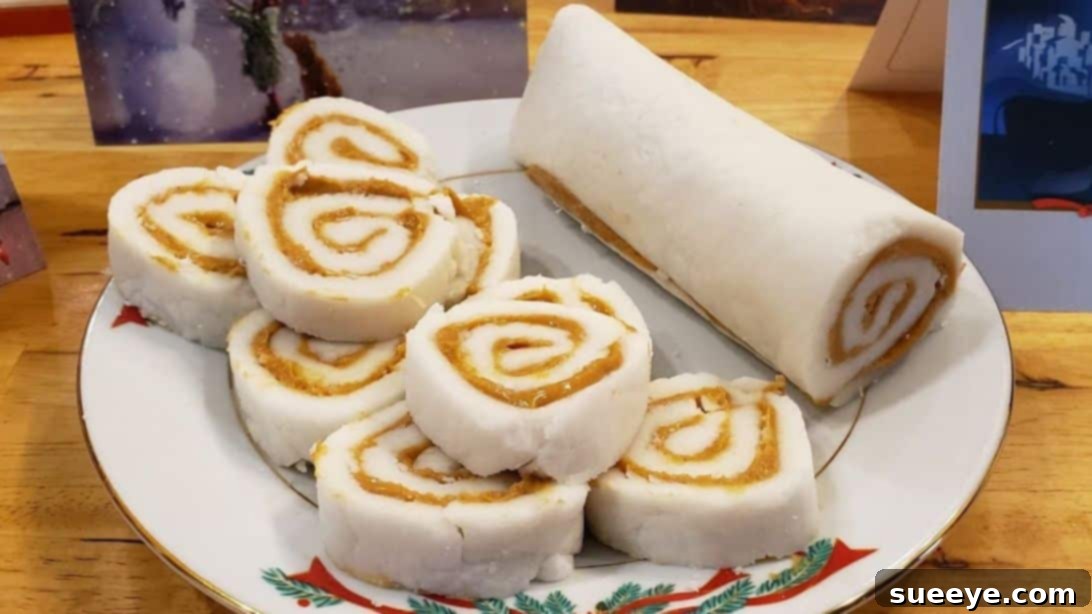
The Ultimate 6-Ingredient Peanut Butter Pinwheels Candy Recipe: A Sweet Nostalgia Trip
Prepare to be enchanted by one of the most beloved and delightfully simple homemade candies: Peanut Butter Pinwheels. This iconic recipe, inspired by the wonderful insights from The Hillbilly Kitchen – Down Home Country Cooking on YouTube, is more than just a treat; it’s a journey back to simpler times, where quality ingredients and straightforward methods create pure magic. Not only do these pinwheels boast a captivating swirled appearance, but their taste is absolutely divine – a perfect harmony of sweet, creamy, and nutty flavors that melts in your mouth.
I find myself making batches of these delightful candies constantly, ensuring my fridge is always stocked for whenever a craving strikes. They are an instant hit with anyone who tries them, consistently earning rave reviews from friends and family alike. Beyond personal indulgence, Peanut Butter Pinwheels are an exceptional choice for any occasion. Whether you’re hosting a party, gathering with loved ones, or looking for that special sweet touch during the holidays, these candies are guaranteed to be a crowd-pleaser. Their beautiful pinwheel design makes them a stunning addition to any dessert platter, while their irresistible flavor ensures they’ll disappear quickly!
Why You’ll Fall in Love with These Peanut Butter Pinwheels
- Simplicity at Its Best: With just six core ingredients and no baking required, this recipe is incredibly beginner-friendly.
- Nostalgic Flavor: It brings back the comforting taste of classic homemade candies, reminiscent of childhood treats.
- Visually Stunning: The striking brown and white swirl makes them a beautiful addition to any dessert spread.
- Versatile Treat: Perfect for holiday gift-giving, party platters, or simply a delightful everyday snack.
- Crowd-Pleaser: Everyone, from kids to adults, adores the sweet and savory balance of these pinwheels.
- Make-Ahead Friendly: They store wonderfully in the fridge, allowing you to prepare them in advance.
Essential Ingredients for Your Pinwheel Masterpiece: Six Simple Items
Crafting these delectable pinwheels requires only a handful of common pantry staples. The magic lies in how these simple ingredients come together to create such a rich and satisfying candy.
- 2½ cups of granulated sugar: Provides the foundational sweetness and helps form the candy’s structure.
- ½ cup of white corn syrup: Crucial for achieving that signature chewy texture and preventing crystallization.
- ½ cup of water: Helps dissolve the sugar and corn syrup, creating the syrup base.
- 3 egg whites: Whipped to perfection, they lend a light, fluffy body to the candy and absorb the hot syrup.
- Powdered sugar, as needed: Essential for dusting your work surface, preventing stickiness, and aiding in the rolling process.
- 1½ jars or 18 ounces of peanut butter: The star of the show! Use creamy peanut butter for the smoothest texture and rich flavor that defines these pinwheels.
Recommended Equipment for a Smooth Process
Having the right tools will make your candy-making experience much more enjoyable and efficient:
- Heavy-bottomed Saucepan: For heating the sugar syrup evenly.
- Stand Mixer with Whisk Attachment: Absolutely invaluable for whipping egg whites to stiff peaks and incorporating the hot syrup safely and effectively. A hand mixer can work, but a stand mixer is highly recommended.
- Heat-Proof Spatula: For stirring the syrup and scraping down the bowl.
- Measuring Cups and Spoons: For accurate ingredient quantities.
- Large Work Surface: A clean countertop or a large cutting board for kneading and rolling the dough.
- Plastic Wrap: Essential for chilling the rolls before slicing.
- Sharp Knife: For clean, precise slices of your finished pinwheels.
Step-by-Step Directions: Creating Your Peanut Butter Pinwheels
Follow these detailed instructions to create perfectly swirled, irresistibly delicious peanut butter pinwheels.
Step 1: Preparing the Syrup and Whipping Egg Whites
Begin by placing a medium-sized, heavy-bottomed saucepan on your stove over medium-high heat. Carefully add the granulated sugar and white corn syrup, along with the ½ cup of water. Stir these ingredients together gently to combine. Allow the mixture to heat, stirring occasionally to ensure the sugar dissolves evenly, until it reaches a full, rolling boil. This process typically takes about 5 to 7 minutes. The syrup needs to be hot enough to effectively cook and stabilize the egg whites, but we are not looking for a specific temperature at this stage, just a good boil.
While your sugar syrup is heating, prepare your stand mixer. In the clean, dry bowl of your stand mixer, add the three egg whites. Begin beating the egg whites on medium-high speed. Continue beating until they transform into beautiful, fluffy, stiff peaks. This means when you lift the whisk, the egg whites hold their shape firmly. Once achieved, you can set the mixer bowl aside temporarily while you finish with the syrup.
Step 2: Combining Syrup and Egg Whites to Form the Dough
Once your sugar syrup has come to a boil and your egg whites are whipped to stiff peaks, it’s time for the crucial step of combining them. Return the bowl of whipped egg whites to your stand mixer, ensuring the whisk attachment is securely in place. Turn the mixer on to a low-medium speed. Slowly and carefully, pour the hot sugar syrup into the egg whites in a thin, steady stream. It’s vital to do this gradually to temper the egg whites and prevent them from cooking too quickly. Continue beating as you pour, allowing the syrup to fully incorporate.
After all the syrup has been added, continue beating the mixture on medium-high speed. As it beats, you’ll notice the mixture thickening and becoming very glossy. This process continues until the mixture cools down significantly and starts to form a dough-like consistency that pulls away from the sides of the bowl. Throughout this beating phase, make sure to occasionally stop the mixer and scrape down the sides of the bowl, as well as the mixer attachment, with a spatula to ensure everything is thoroughly combined. This can take anywhere from 5 to 10 minutes or even longer, depending on your mixer and the initial temperature of the syrup and egg whites. The goal is a firm, pliable “dough.”
Step 3: Kneading, Rolling, and Filling the Pinwheels
Once your candy mixture has reached a firm, dough-like consistency, liberally dust your clean work surface (a large countertop or baking mat works best) with powdered sugar. This step is crucial to prevent sticking. Transfer the candy dough from the mixer bowl onto your prepared surface. Using your hands, gently squeeze and gather the dough into a cohesive ball. Begin kneading the dough, much like you would bread dough, but with a lighter touch, until it becomes smooth and uniform. If it’s too sticky, add more powdered sugar to your hands and the surface.
Once the dough is smooth, divide it into 4 equal portions. Take one portion and gently flatten it into a rectangular shape using your hands or a rolling pin. Aim for a thickness of about ¼ to ½ inch. Now, take your creamy peanut butter and spread a generous, even layer all over the top surface of the flattened dough, leaving a small border around the edges. Carefully, starting from one of the longer sides, tightly roll the dough up into a log. Repeat this process for the remaining three portions of dough.
Step 4: Chilling and Slicing for Perfect Pinwheels
After you’ve rolled all four logs, individually wrap each roll tightly with plastic wrap. This helps them maintain their shape and prevents them from drying out. Place the wrapped rolls inside the refrigerator to chill for at least 1 hour, or until they are firm enough to slice cleanly. Chilling is essential for achieving those beautiful, distinct pinwheel swirls.
Once thoroughly chilled and firm, unwrap one log at a time. Using a sharp knife, slice the log into uniform pinwheel shapes, approximately ½ inch thick. Arrange your beautiful Peanut Butter Pinwheels on a platter. Serve immediately and enjoy the delightful combination of sweet and nutty flavors! You’ll be amazed at how a few simple ingredients can create such a spectacular homemade candy.
Pro Tips for Perfect Peanut Butter Pinwheels Every Time
Achieving candy perfection is easy with these helpful hints:
- Accurate Measurements Are Key: Candy making is a science. Ensure you precisely measure all ingredients for the best results.
- Don’t Rush the Syrup: Allow the sugar syrup to come to a full, rolling boil. This ensures proper dissolution of sugar and affects the final texture.
- Slow and Steady Syrup Pour: When adding the hot syrup to the egg whites, pour it in a very thin, steady stream. This tempers the egg whites gradually, preventing them from scrambling and ensuring a smooth, cohesive candy base.
- Whip Egg Whites Until Stiff: Fully whipped, stiff egg whites are crucial for incorporating the syrup and creating the candy’s fluffy yet firm texture.
- Generous Powdered Sugar: Don’t be shy with the powdered sugar on your work surface and hands. This prevents the sticky dough from adhering and makes kneading and rolling much easier.
- Chill Thoroughly: The chilling step is non-negotiable! It firms up the candy, making it easy to slice and preventing it from squishing. An hour is usually sufficient, but longer is fine.
- Use Creamy Peanut Butter: For the classic smooth pinwheel texture, creamy peanut butter is recommended. Natural peanut butter tends to be oilier and can separate, making it harder to spread and integrate.
- Clean Equipment for Egg Whites: Ensure your mixer bowl and whisk are impeccably clean and free of any grease or oil before whipping egg whites, as even a tiny speck can prevent them from whipping properly.
Creative Variations to Customize Your Candy
While the classic peanut butter pinwheel is utterly delightful, don’t hesitate to experiment with these delicious variations:
- Chocolate Swirl: After spreading the peanut butter, drizzle a thin layer of melted chocolate over it before rolling.
- Nutella Twist: Substitute half or all of the peanut butter with Nutella for a rich chocolate-hazelnut flavor.
- Different Nut Butters: Explore almond butter or cashew butter for alternative flavor profiles. Be mindful of consistency differences, as some might be oilier.
- Mini Chocolate Chips: Sprinkle a small handful of mini chocolate chips over the peanut butter layer before rolling for added texture and chocolatey goodness.
- Chopped Nuts: Finely chop some roasted peanuts or other nuts and sprinkle them over the peanut butter for extra crunch.
- Flavor Extracts: Add a few drops of vanilla extract or almond extract to the egg white mixture during the beating phase for an extra layer of flavor.
Storage Tips: Keeping Your Pinwheels Fresh
Proper storage ensures your homemade Peanut Butter Pinwheels remain delicious for days:
- Refrigerator: Store sliced pinwheels in an airtight container in the refrigerator for up to 1-2 weeks. Layer them with parchment paper if stacking to prevent sticking.
- Freezer: For longer storage, you can freeze the sliced pinwheels. Place them in a single layer on a baking sheet to freeze solid, then transfer them to a freezer-safe airtight container or bag for up to 2-3 months. Thaw in the refrigerator or at room temperature before serving.
- Uncut Rolls: If you’ve made the logs but haven’t sliced them yet, wrap them very tightly in plastic wrap and store them in the refrigerator for up to a week. Slice as needed.
Frequently Asked Questions About Peanut Butter Pinwheels
Q: Why did my candy not set or become too sticky?
A: This is usually due to the sugar syrup not being hot enough or not being beaten long enough after adding to the egg whites. Ensure the syrup comes to a full, rolling boil. Also, the mixture needs to be beaten until it cools down significantly and forms a thick, pliable dough that pulls away from the bowl.
Q: Can I use natural peanut butter?
A: It’s generally not recommended for this recipe. Natural peanut butter tends to be oilier and can separate, making it difficult to spread evenly and potentially altering the candy’s texture. Creamy, no-stir peanut butter works best.
Q: My egg whites didn’t whip up properly. What went wrong?
A: Even a tiny amount of fat or grease (from the bowl, whisk, or even yolk) can prevent egg whites from whipping to stiff peaks. Ensure your equipment is meticulously clean and dry, and be careful not to get any yolk into the whites.
Q: Can I make this without a stand mixer?
A: While possible with a very powerful hand mixer, a stand mixer is highly recommended, especially for the long beating process after adding the hot syrup. It’s much safer and less strenuous.
Q: How do I get clean slices?
A: Ensure the candy logs are thoroughly chilled and firm before slicing. Use a very sharp knife. You can also wipe the knife blade clean between slices to prevent sticking.
Conclusion: Your New Favorite Homemade Candy
Peanut Butter Pinwheels are a testament to the fact that the most incredible treats often come from the simplest of recipes. With just six ingredients, you can create a candy that is visually appealing, incredibly delicious, and packed with nostalgic charm. Whether you’re a seasoned candy maker or trying your hand at homemade sweets for the first time, this recipe is forgiving, fun, and yields truly spectacular results. So go ahead, gather your ingredients, follow these steps, and prepare to delight yourself and everyone around you with these charming, irresistible Peanut Butter Pinwheels. Happy candy making!
*These amazing images are all credited to The Hillbilly Kitchen – Down Home Country Cooking via YouTube. Check her other content and follow for more!