
The Ultimate Flaky Pie Crust: Paula Deen’s Tried-and-True Recipe
Every great pie begins with a phenomenal crust. A flaky, tender, and buttery foundation can elevate any filling, transforming a simple dessert or savory dish into an unforgettable culinary experience. If you’ve been searching for that consistently perfect pie crust recipe, look no further. The legendary Paula Deen has truly outdone herself with this remarkable recipe, delivering a pie crust that comes out absolutely perfect every single time. It’s a game-changer for home bakers and seasoned chefs alike.
What makes this recipe stand out is its simplicity, relying on just a few key ingredients to achieve extraordinary results. Not only is it incredibly easy to make, but it’s also wonderfully versatile. You can whip up a batch (or several!) and easily freeze them for later use, making meal prep and spontaneous baking a breeze. Imagine having a homemade, ready-to-use pie crust waiting in your freezer for those moments when a pie craving strikes, or unexpected guests arrive. This recipe empowers you to create delicious pies in bulk, saving you time and effort down the line.
I have personally used this exceptional crust for a myriad of creations, and it never disappoints. From the comforting warmth of a savory chicken pot pie to the sweet delight of a fresh strawberry pie, and even a rich, decadent chocolate cream pie, this crust has proven to be the ideal companion. Its delicate flakiness and rich, buttery flavor complement both sweet and savory fillings beautifully, ensuring every bite is a pure delight. Prepare to impress your family and friends with this foolproof recipe that will quickly become your go-to for all your pie-making adventures.
Essential Ingredients for Your Perfect Pie Crust:
Crafting the perfect pie crust doesn’t require a long list of exotic items. In fact, the magic lies in a few fundamental ingredients, each playing a crucial role in achieving that coveted flaky and tender texture. The success of this recipe hinges on using cold ingredients and handling them minimally, preventing the butter from melting and the gluten from overdeveloping. Here’s what you’ll need:
- All-Purpose Flour: The primary structural component of your pie crust. Sifting it helps ensure a light, airy texture.
- Cold Unsalted Butter: This is the star of a truly flaky pie crust. Using unsalted butter allows you to control the seasoning, and keeping it ice-cold is paramount. As the butter melts in the oven, it releases steam, creating those wonderful pockets of flakiness.
- Granulated Sugar: A touch of sugar not only adds a subtle sweetness that balances the savory notes of the butter but also aids in browning the crust to a beautiful golden hue.
- Fine Sea Salt: Salt is essential for enhancing the overall flavor of your crust, preventing it from tasting bland. It brings out the richness of the butter and complements your pie filling.
- Ice Water: Using ice-cold water is critical. It helps to keep the butter solid and prevents the gluten in the flour from becoming too elastic, which could result in a tough crust. The less water you use, the more tender your crust will be, so add it gradually.
Remember, the quality of your ingredients directly impacts the final taste and texture of your pie crust. Opt for high-quality butter and fresh flour for the best results.
Step-by-Step Guide to Your Flaky Pie Crust:
Step One: Preparing the Dry Ingredients and Incorporating Cold Butter
Begin by taking a large mixing bowl. Into this bowl, you will sift your dry ingredients: the all-purpose flour, granulated sugar, and fine sea salt. Sifting isn’t just for removing lumps; it also aerates the flour, which contributes to a lighter, more tender crust. After sifting, give them a quick whisk to ensure they are thoroughly combined. Now comes the critical part: incorporating the butter. Ensure your butter is ice-cold; you can even cube it and chill it in the freezer for 10-15 minutes prior. Cut your cold butter into small, pea-sized pieces. Add these butter pieces to your flour mixture. Using your fingertips, a pastry blender, or even a food processor (pulsing carefully), work the butter into the dry ingredients. The goal is to break down the butter until the mixture resembles coarse cornmeal, with some larger pea-sized pieces of butter still visible. These pockets of butter are what create the glorious flakiness when baked. Do this process slowly and gently, handling the mixture as little as possible to prevent the butter from melting from the warmth of your hands. You absolutely do not want your butter to melt too much at this stage. Once you’ve achieved the desired crumbly texture, cover the bowl and place it in the refrigerator to chill for at least 30 minutes. This chilling period is crucial as it re-solidifies the butter and relaxes the gluten in the flour, making the dough easier to work with later.
Image by. Paula Deen via YouTube video.
Step Two: Hydrating the Dough with Ice Water
After the initial chilling period, retrieve your butter-flour mixture from the refrigerator. It’s time to add the ice water. This step requires a delicate hand and keen observation. Begin by adding about 1/4 cup of your ice water to the bowl. Using a fork or your clean hands, gently mix the water into the dry ingredients. You’re looking for the dough to just come together. The exact amount of water needed can vary depending on the humidity and your flour, so avoid adding too much too quickly. Add additional water, a tablespoon at a time, mixing lightly after each addition, until the mixture starts to clump together and can form a shaggy ball when pressed. The dough should not be sticky or overly wet, but rather just hydrated enough to hold its shape. Overmixing at this stage will develop the gluten, leading to a tough crust, so stop mixing as soon as the dough comes together. Once the dough forms a cohesive ball, gently gather it. On a clean counter, spread out a sheet of wax paper or parchment paper. Place the dough ball onto the paper, then wrap it up tightly. This protects the dough and keeps it from drying out. Return the wrapped dough to the refrigerator for another 30 minutes. This second chilling period is equally important, allowing the flour to fully hydrate and the gluten to relax even further, which will make rolling out the dough much easier and prevent it from shrinking during baking.
Step Three: Rolling Out Your Perfect Pie Crust
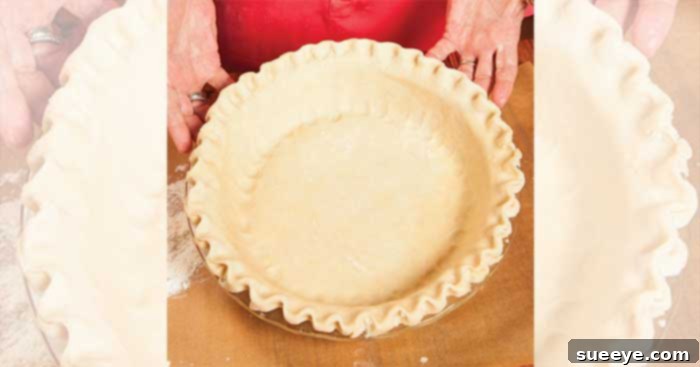
Once your dough has thoroughly chilled, it’s time to roll it out. Lightly dust a clean, dry cutting board or a large, flat surface with all-purpose flour. Place your chilled dough ball onto the floured surface. Liberally coat your rolling pin with flour as well to prevent sticking. Begin rolling out your pie crust from the center outwards, rotating the dough periodically to ensure an even thickness and to prevent it from sticking to the surface. If the dough starts to stick, gently lift it and add a little more flour underneath and on top. Don’t be afraid to use a good amount of flour, but brush off any excess before transferring the crust. The key is to roll with even pressure. For a beautifully circular shape, employ a spiral technique, working your way around the dough and gradually expanding its diameter. Aim for a thickness of about 1/8 inch. You’ll want to roll the dough a little bit further than a 10-inch circumference to comfortably fit most standard pie plates, allowing for a nice overhang for crimping or decorative edges. Carefully transfer the rolled dough to your pie plate by gently folding it in half or quarters, then unfolding it into the plate. Fit it snugly into the plate without stretching it, as stretching can cause it to shrink back during baking. Trim any excess dough, leaving about a 1-inch overhang, and then crimp or decoratively finish the edges as desired.
Image by. Paula Deen via YouTube video.
Step Four: Final Touches and Freezing Instructions
With your pie crust perfectly placed in its pie plate, there’s one more optional but highly recommended step, especially if you’re making a custard-based pie or want a beautifully golden finish. Lightly brush the bottom of the pie crust with a little bit of egg wash (one egg whisked with a tablespoon of water). This creates a protective barrier, helping to prevent the dreaded “soggy bottom” by sealing the crust’s surface. It also contributes to a lovely golden sheen once baked. If your recipe calls for blind baking, now would be the time to prick the bottom of the crust with a fork, line it with parchment paper, and fill it with pie weights or dried beans before baking. For many pies, you can proceed directly to filling and baking.
Freezing Your Pie Crusts for Future Use:
One of the fantastic benefits of this recipe is its freezer-friendliness. You can prepare multiple pie crusts and freeze them for a significant period before baking, ensuring you always have a homemade crust on hand. To freeze, either wrap the entire pie-dough ball tightly in plastic wrap and then aluminum foil, or fit the rolled-out crust into a pie plate, wrap it well with plastic wrap and then foil, and place it in the freezer. Pre-shaped crusts in pie plates are incredibly convenient. They can be frozen for up to 3-6 months. When you’re ready to use a frozen crust, you can often bake it directly from frozen, adding a few extra minutes to the baking time, or allow it to thaw in the refrigerator for a few hours before filling and baking as usual. This makes preparing for holidays or weeknight desserts incredibly easy and efficient, bringing the joy of homemade pie to your table whenever you desire.
Expert Tips for a Flawless Pie Crust:
- Keep Everything Cold: This cannot be stressed enough. Cold butter means flaky crust. Cold water means tender crust. Even chilling your mixing bowl and pastry blender can make a difference in warmer kitchens.
- Don’t Overwork the Dough: Minimal handling prevents gluten development, which leads to tough crusts. Mix just enough for the ingredients to come together.
- Use a Pastry Blender or Your Fingertips: While food processors are quick, using a pastry blender or your fingertips gives you more control over the butter incorporation, ensuring some larger pieces remain for flakiness. If using a food processor, pulse only a few times.
- Chill, Chill, Chill: The two chilling periods (after butter incorporation and after water addition) are non-negotiable. They allow the butter to firm up and the gluten to relax, making the dough easier to roll and preventing shrinkage.
- Flour Your Surface (but not too much): A lightly floured surface prevents sticking, but excessive flour can make your dough tough and dry. Brush off any visible excess flour from the rolled dough before transferring.
- Roll Evenly: Aim for a consistent thickness (about 1/8 inch) throughout the crust. Uneven thickness can lead to uneven baking.
- Blind Baking: For custard pies or pies with very wet fillings, blind baking (pre-baking) your crust is crucial to prevent sogginess. Prick the bottom with a fork, line with parchment paper, fill with pie weights, and bake according to your specific pie recipe’s instructions.
- Adjust for Sweet or Savory: While this recipe is versatile, for very sweet pies, you might add an extra teaspoon of sugar. For extremely savory pies, you could slightly increase the salt or even add a pinch of garlic powder or dried herbs to the dry mix for an extra flavor dimension.
Paula Deen’s Perfect Pie Crust: Your Gateway to Incredible Pies
With Paula Deen’s expert guidance, creating a truly perfect pie crust from scratch is not only achievable but also incredibly rewarding. This recipe demystifies the process, making it accessible even for novice bakers, while still delivering the professional results that experienced bakers crave. The secret lies in understanding the role of each ingredient, particularly the cold butter, and exercising patience with the chilling times. Whether you’re preparing a beloved family recipe or experimenting with new fillings, this flaky, tender, and richly flavored crust will provide the ideal foundation. Say goodbye to store-bought crusts and embrace the satisfaction of homemade perfection. Bake it, fill it, and savor the compliments!