
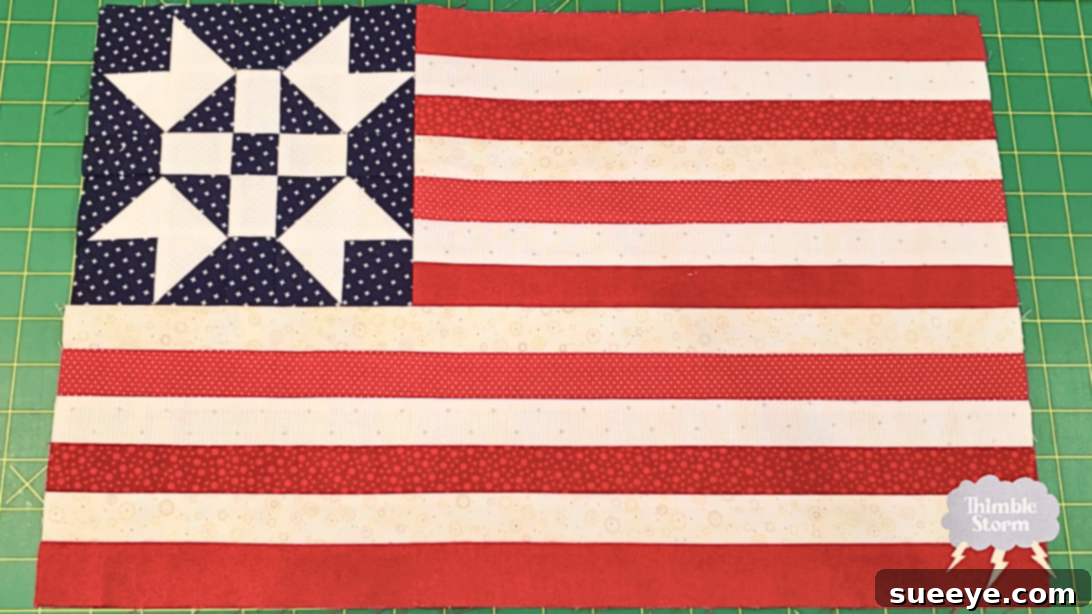
Craft Your Own Patriotic Masterpiece: An Easy 4th of July Flag Quilt Block Tutorial
As the vibrant spirit of Independence Day draws near, the excitement of creating festive decorations fills the air. Beyond the classic wreaths and charming trinkets that adorn our homes, there’s a unique joy in crafting something truly special and enduring: a handmade quilt. Quilting offers a wonderful way to express patriotism and celebrate the 4th of July with a personal touch that lasts far beyond a single holiday.
If you’re looking for a project that combines creativity, skill, and a deep sense of national pride, then you’ve come to the right place. This detailed guide will walk you through creating a beautiful and iconic 4th of July Flag Quilt Block. It’s an ideal project for both seasoned quilters and enthusiastic beginners eager to dive into the world of fabric and stitches.
RELATED: Quick & Easy Flag Potholder Sewing Tutorial
Inspired by the brilliant designs of Thimble Storm on YouTube, this particular quilt block stands out as a versatile piece of decor. Imagine it proudly displayed on your wall, transforming a plain space into a patriotic statement, or integrated into a larger quilt project to create a stunning full-sized flag quilt. Its timeless appeal makes it perfect for seasonal celebrations, gifting, or simply adding a touch of Americana to your home year-round.
We believe that anyone can create beautiful things with the right guidance. That’s why we’ve meticulously broken down each step, providing clear written instructions that complement Thimble Storm’s excellent video tutorial. So gather your fabrics, prepare your sewing machine, and get ready to stitch together a piece of art that truly embodies the spirit of the Fourth of July.
Essential Materials for Your 4th of July Flag Quilt Block
Before you embark on this exciting quilting journey, it’s crucial to have all your supplies ready. Quality materials not only make the process smoother but also ensure a beautiful and lasting finished product. Here’s a comprehensive list of what you’ll need to create your patriotic quilt block:
- Blue Print Fabric: Choose a rich, deep blue for the “starry field” of your flag. A subtle print can add texture and interest, but ensure it doesn’t detract from the overall flag design.
- Red Print Fabric: Select a vibrant red for the stripes. Like the blue, a delicate print can enhance the quilt’s visual appeal, giving it a unique character.
- White Print Fabric: A crisp white is essential for the alternating stripes and to provide contrast. Look for a fabric that complements your chosen red and blue.
- Ruler: A high-quality quilting ruler (preferably clear acrylic with grid lines) is indispensable for precise measurements, ensuring your cuts are perfectly straight and accurate.
- Needle and Thread: Opt for a good quality polyester or cotton thread in a neutral color (like white or light grey) that will blend seamlessly with your fabrics. Ensure your sewing machine needle is sharp and appropriate for quilting.
- Scissors or Rotary Cutter and a Cutting Mat: While sharp fabric scissors work, a rotary cutter with a self-healing cutting mat is highly recommended for speed, accuracy, and ease when cutting multiple fabric layers. This tool is a quilter’s best friend!
- Iron, for pressing: A good steam iron is vital for pressing seams flat as you go. Proper pressing makes a significant difference in the finished appearance and accuracy of your quilt blocks.
- Sewing Machine: A functional sewing machine is at the heart of this project. Ensure it’s in good working order and you’re comfortable with its basic operations.
- Pattern: Click here to download the free PDF pattern. This pattern provides all the cutting dimensions and assembly diagrams you’ll need. Make sure to download and print it before you begin.
How to Construct Your Stunning 4th of July Flag Quilt Block: A Step-by-Step Guide
Accuracy and patience are your best friends in quilting. Follow these detailed steps carefully, and remember that consistent seam allowances and diligent pressing will lead to a beautiful, professional-looking quilt block.
Step 1: Preparing Your Fabric and Arranging the “Star” Units
Begin by downloading and printing the provided pattern. This pattern is your blueprint for success. Carefully cut your blue, red, and white fabrics according to the precise dimensions specified in the instructions. Take your time with this crucial step; accurate cutting is the foundation of a well-made quilt block. Once your pieces are cut, you will start assembling the cornerstone of your flag: the blue field with its white “stars.”
Arrange three white squares and one blue square together to form a small block unit. Envision this as a miniature representation of the starry field. Repeat this arrangement three more times. Crucially, as you create each of these four block units, alternate the position of the blue square. This strategic placement, as clearly demonstrated in the accompanying video tutorial, is essential for creating the varied “star” patterns within the larger blue field of your flag block. Lay out all four units to ensure the blue squares are positioned correctly before stitching.
Step 2: Stitching the Starry Field and Adding Sashing
With your four “star” block units carefully arranged, it’s time to bring them to life with your sewing machine. Stitch the individual squares within each unit together using a consistent ¼-inch seam allowance. As you stitch, make sure to press your seams after each seam is sewn. Pressing as you go helps to flatten the fabric, align subsequent pieces more accurately, and ensures your block lays flat and smooth without bulk. For this stage, press seams towards the darker fabric where possible, or press them open for minimal bulk, depending on your preference and the pattern’s guidance.
Next, you’ll add a distinctive element to each block unit. Stitch a blue square onto all empty corners of each block unit diagonally. This technique creates a ‘snowball’ effect or corner-cut look, where the white fabric peeks out, forming the appearance of stars against the blue background. After stitching, carefully trim the excess fabric from behind the stitched blue square, leaving a ¼-inch seam allowance. Then, press these newly formed corners open. This step is critical for defining the “stars” in your blue field.
Finally, introduce the “sashing” – narrow strips of fabric that will separate and frame your four newly created block units. Stitch the sashing strips to go in between each block unit, then stitch these sashed units together to form the complete blue field section of your flag. Press all seams meticulously. Once this major component is assembled, set the entire blue field block aside while you prepare the stripes.
Step 3: Creating the Iconic Red and White Stripes
Now, shift your focus to the vibrant red and white stripes that complete the flag’s design. Take your pre-cut red and white fabric strips and carefully arrange them in an alternating pattern, just like the stripes on an actual flag. Precision is key here to achieve that classic, crisp look.
Stitch these alternating red and white strips together lengthwise. Maintain your consistent ¼-inch seam allowance for each seam. Just as before, press the seams open or towards the darker fabric as you go along. This regular pressing is paramount to keeping your stripe section flat and square, preventing any distortion. Once all strips are sewn together into a larger striped panel, you will then cut this panel into two sets of identical striped sections. These two sets will form the lower, striped portion of your flag quilt block.
Finally, arrange the blue field section and your two striped sections together. Carefully position them according to the overall flag design (typically the blue field in the upper left, with the stripes extending to the right and below). Stitch these major pieces together, again ensuring a ¼-inch seam. Once assembled, give the entire block a final, thorough press. This last pressing step helps to square up the block and gives it a finished, professional appearance.
Tips for Quilting Success
Achieving a beautiful quilt block relies on a few fundamental techniques. Always remember to use a ¼-inch seam allowance consistently. This is the standard in quilting and ensures all your pieces fit together perfectly. Pressing is not optional; it’s an integral part of the quilting process that influences the accuracy and flatness of your blocks. Don’t be afraid to use your seam ripper if a seam isn’t perfect – a little correction goes a long way. Finally, consider using good quality cotton fabrics; they are easier to work with, press beautifully, and will make your finished quilt more durable and enjoyable for years to come.
Beyond the Block: Creative Ways to Use Your Flag Quilt
Once you’ve mastered this beautiful 4th of July Flag Quilt Block, the possibilities are endless! This single block can be a stunning standalone piece, framed and displayed as patriotic wall art. Imagine a series of these blocks sewn together to create a larger quilt, a festive table runner, or even a set of decorative throw pillows. You could also incorporate this block into a larger sampler quilt, combining it with other patriotic or holiday-themed designs. Let your creativity soar and find unique ways to showcase your handmade craftsmanship!
*All image credit belongs to Thimble Storm via YouTube. Follow and subscribe to her channel for more inspiring quilting tutorials and projects!
Embrace the Spirit of Independence Day with Your Handmade Quilt
There’s immense satisfaction in creating something beautiful with your own hands, especially when it carries such symbolic meaning. This Easy 4th of July Flag Quilt Block is more than just a craft project; it’s a celebration of skill, patience, and patriotism. We hope this comprehensive tutorial, alongside Thimble Storm’s fantastic video, empowers you to create a cherished piece for your home or as a thoughtful gift. Happy quilting, and a very happy Independence Day!