
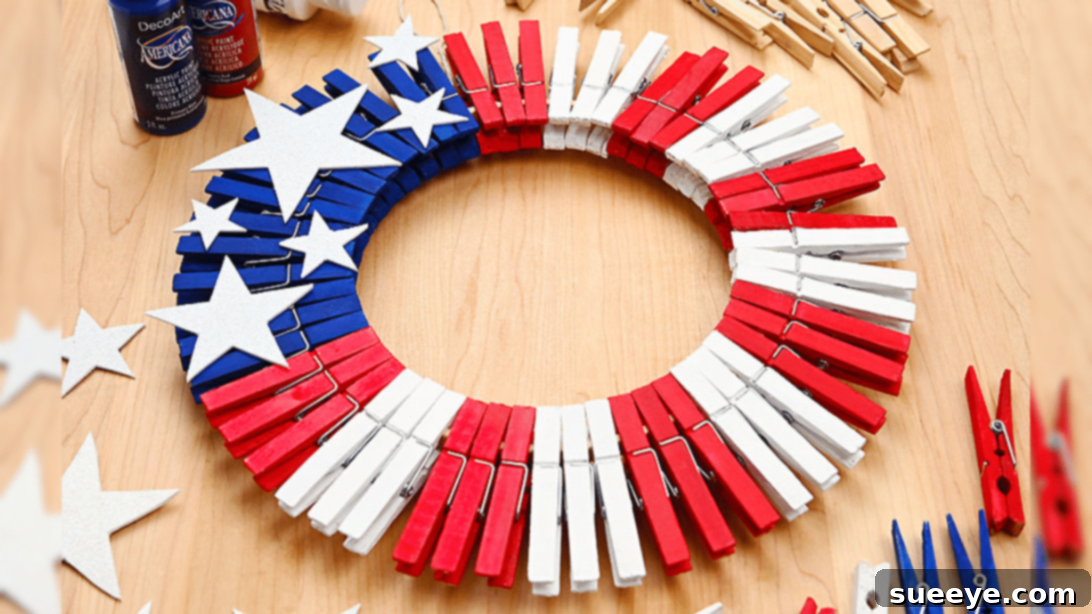
Craft Your Own Stunning Patriotic Clothespin Wreath for the 4th of July
Looking for a creative and charming way to adorn your home for Independence Day? Dive into the world of DIY crafting with this delightful patriotic wreath made from simple wooden clothespins. This beautifully handmade wreath is not only a fantastic decorative piece but also offers the flexibility to be customized to any size and design you envision. Unleash your inner artist and follow this comprehensive guide to create a unique display of national pride.
This easy-to-follow tutorial is inspired by the brilliant craftsmanship of One Little Project on YouTube, ensuring a rewarding crafting experience for all skill levels.
Why Choose a DIY Patriotic Clothespin Wreath?
Embracing DIY projects for your holiday decorations offers numerous benefits. Beyond the joy of creating something with your own hands, a homemade patriotic clothespin wreath provides a personal touch that store-bought items simply cannot match. It’s an incredibly cost-effective way to decorate, utilizing readily available and inexpensive materials. Crafting also serves as a wonderful therapeutic activity, allowing you to relax and express your creativity. This particular wreath design stands out for its charming rustic appeal, vibrant colors, and the ability to be easily customized to fit your specific aesthetic preferences or existing decor theme. Imagine the pride you’ll feel when guests admire your unique, handcrafted Independence Day display!
RELATED: Enhance your patriotic theme further with these Easy DIY Patriotic Mason Jar Lanterns – a perfect complement to your new wreath!
Essential Materials for Your 4th of July Clothespin Wreath
Gathering your supplies is the first exciting step in any DIY project. For this patriotic clothespin wreath, you’ll need a few basic items, most of which can be found at your local craft store. The beauty of this project lies in its simplicity and the affordability of the materials. Here’s a detailed list to get you started:
- Wooden Clothespins (approximately 53 pieces): These are the stars of our project! Standard wooden clothespins work perfectly. While 53 is a good starting point for an 8-inch hoop, you might need slightly more or fewer depending on your chosen hoop size and how tightly you space them.
- Acrylic Paint (Red, White, and Blue): High-quality acrylic paints will provide vibrant, lasting color. Choose shades that resonate with the classic American flag. A small bottle of each color should be more than enough.
- Embroidery Hoop (8 inches or any size you prefer): The embroidery hoop forms the foundation of your wreath. An 8-inch hoop creates a lovely compact wreath, but feel free to go larger for a more significant statement piece. Ensure it’s a two-piece hoop that can be separated.
- Foam Stars or Silver Glitter Craft Foam: To add that quintessential patriotic sparkle! You can purchase pre-cut foam stars or buy a sheet of silver glitter craft foam and cut your own stars using a stencil or cookie cutter.
- Tacky Glue: A strong, reliable craft glue like Tacky Glue is essential for securely attaching the foam stars and holding the wreath together. It dries clear and provides a firm bond.
- Paintbrush: A small to medium-sized paintbrush will be perfect for coating your clothespins evenly. Having a few different sizes can be helpful for detail work if you choose to add any.
Having all your materials organized before you begin will make the crafting process much smoother and more enjoyable.
Crafting Your Patriotic Masterpiece: A Step-by-Step Guide
Step 1: Preparing Your Clothespins with a Splash of Color
The first crucial step involves transforming your plain wooden clothespins into vibrant red, white, and blue components. Carefully pull apart each clothespin, separating the two wooden halves from the metal spring mechanism. This makes painting much easier and ensures full coverage. Using your paintbrush, apply a generous, even coat of acrylic paint to all sides of each wooden half. Be sure to cover every surface for a professional finish. Once painted, lay them out on a protected surface (like newspaper or parchment paper) and allow them to dry completely for at least 30 minutes. Depending on the paint’s opacity and your desired vibrancy, you might opt for a second coat, letting it dry thoroughly again.
Step 2: Assembling Your Patriotic Palette
Once all the painted clothespin halves are perfectly dry, it’s time to reassemble them. Carefully put the metal spring back into each pair of wooden halves, ensuring they function properly. This process will create your collection of colorful clothespins ready for assembly. For an 8-inch hoop, aim for a distribution of colors that mimics the flag: approximately 14 pieces of blue, 18 pieces of white, and 21 pieces of red clothespins. This specific count is a guideline; you may need to adjust these numbers slightly if your embroidery hoop is a different size, or if you prefer a denser or looser arrangement. The key is to have a good balance of colors to create that iconic patriotic look.
Step 3: Building the Wreath Foundation
Now, let’s construct the base of your wreath. Take your embroidery hoop and unscrew the tightening mechanism, separating the two circular pieces. You’ll primarily be working with the inner, smaller circle for attaching the clothespins. Set the outer hoop aside for later. Begin by attaching the blue clothespins to the center part of the inner hoop. These will form the “union” section of your flag-inspired wreath. Clip them on tightly, ensuring they are placed as close together as possible, creating a continuous, full appearance. Once the blue section is complete, continue adding the white and red clothespins in an alternating pattern, as beautifully demonstrated in the video tutorial. Maintain consistent spacing and closeness to achieve a cohesive and visually appealing design.
Step 4: Adding the Finishing Touches and Securing Your Creation
With all your colorful clothespins securely clipped onto the inner hoop, it’s time for the final decorative elements. Carefully stick your foam stars onto the blue portion of the wreath. Arrange them thoughtfully to emulate the stars on the American flag. Once the stars are in place, retrieve the outer piece of your embroidery hoop that you set aside earlier. Dab a thin line of tacky glue along the inner edge of this outer hoop. Carefully fit this glued outer hoop back over the clothespins and align it with the inner hoop. Screw the tightening mechanism back into place, securing both hoops and the clothespins firmly. This step ensures your wreath is robust and holds its shape. Allow the glue to dry completely – ideally for several hours or overnight – before handling or hanging your stunning new patriotic wreath.
Unleash Your Creativity: Customization Ideas for Your Wreath
While the classic red, white, and blue design is timeless, this clothespin wreath offers endless possibilities for personalization. Don’t be afraid to let your imagination run wild! Here are a few ideas to inspire your unique creation:
- Glitter Galore: Before reassembling the clothespins, sprinkle fine glitter onto the wet paint for an extra dazzling effect. Consider red glitter for the red pins, blue for the blue, and iridescent for the white.
- Ribbon Embellishments: Weave a patriotic ribbon through the clothespins or tie a large bow at the top or bottom of the wreath for an elegant touch. Gingham or striped ribbons can add charming texture.
- Alternative Adornments: Instead of foam stars, try small wooden stars, star-shaped buttons, or even small American flag charms for the blue section. You could also incorporate small fake berries or tiny flowers for a more whimsical look.
- Varying Color Patterns: While the tutorial suggests a specific count, experiment with different ratios of red, white, and blue to create unique stripe patterns or color blocks.
- Personalized Centerpiece: Attach a small wooden letter or a personalized tag to the center of the wreath, perhaps with your family initial or a patriotic message.
- Multi-Textured Stars: Use different materials for your stars – felt, cardstock, or even small painted rocks – to add depth and interest.
Remember, this is your creation! Feel free to mix and match these ideas or come up with entirely new ones to make your patriotic wreath truly one-of-a-kind.
Tips for Crafting a Flawless Clothespin Wreath
To ensure your DIY patriotic clothespin wreath turns out beautifully and lasts for many celebrations, keep these helpful tips in mind:
- Paint Quality Matters: Invest in good quality acrylic paints. They offer better coverage, vibrant colors, and durability, reducing the need for multiple coats.
- Even Coats: When painting, apply thin, even coats to avoid drips and ensure smooth drying. Patience during drying times is key to preventing smudges.
- Protect Your Workspace: Always lay down newspaper, a craft mat, or an old tablecloth to protect your surfaces from paint and glue.
- Test Your Glue: Before applying glue to the final wreath, do a small test on a scrap piece of material to ensure it dries clear and holds well.
- Tight Spacing: For a full and lush wreath, ensure your clothespins are clipped as close together as possible on the embroidery hoop. Any gaps can detract from the finished look.
- Secure the Outer Hoop: Take extra care when reattaching the outer embroidery hoop. The glue and the tightened screw mechanism are vital for the wreath’s structural integrity.
- Child-Friendly Activity: This project is fantastic for involving older children! Supervise them with painting and gluing, and let them choose star placements for an engaging family activity.
Displaying and Caring for Your Handmade Wreath
Once your magnificent patriotic clothespin wreath is complete and fully dry, it’s ready to take pride of place in your home! This versatile decoration can be displayed in various ways:
- Front Door Welcome: Hang it on your front door to greet guests with a festive, patriotic welcome. For outdoor use, consider applying a clear sealant spray to protect the paint from weather elements.
- Wall Decor: Adorn an interior wall in your living room, dining area, or entryway. It makes a charming focal point.
- Mantlepiece Accent: Lean it against the wall on your fireplace mantle, perhaps flanked by other patriotic decorations like the mason jar lanterns.
- Window Display: Hang it in a window for a beautiful display visible from both inside and outside your home.
- Table Centerpiece: Lay it flat as a centerpiece on a dining table or coffee table, perhaps with a candle or a small vase of flowers in the middle.
Caring for Your Wreath:
To ensure your DIY clothespin wreath remains beautiful year after year, store it carefully. When the holiday season is over, gently wipe it clean with a dry cloth to remove any dust. Store it in a sturdy box or a wreath storage bag in a cool, dry place to prevent damage and maintain its vibrant colors. With proper care, this lovely wreath can become a cherished part of your annual 4th of July celebrations for many years to come.
Conclusion: Your Handcrafted Symbol of Patriotism
Creating this easy DIY patriotic clothespin wreath is more than just a craft project; it’s an opportunity to infuse your home with personal charm and celebrate the spirit of the 4th of July. With minimal materials and straightforward steps, you can fashion a truly unique piece of decor that reflects your creativity and national pride. Whether you stick to the classic design or add your own personal flair, this handmade wreath is sure to be a conversation starter and a cherished addition to your holiday decorations. So grab your supplies, put on some festive music, and enjoy the fulfilling process of bringing this beautiful wreath to life!
A special thank you to One Little Project via YouTube for the inspiring tutorial. Be sure to visit her channel and subscribe for more fantastic DIY ideas!