
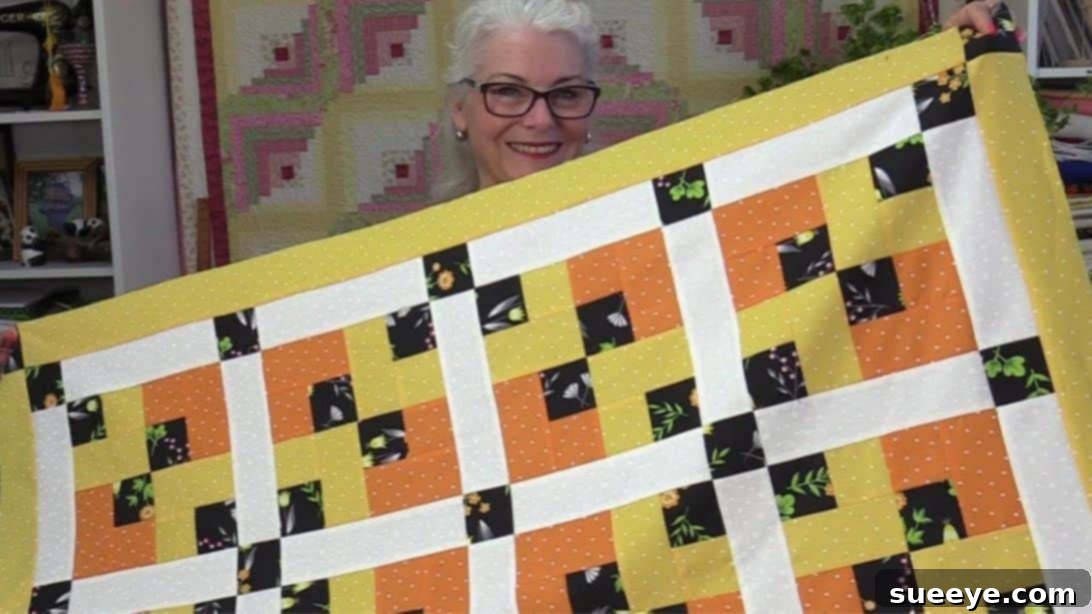
Mastering the Elegant 1-Block Quilt: A Beginner-Friendly Project
Are you eager to dive into the world of quilting but feel intimidated by complex patterns or an overwhelming stash of fabrics? Or perhaps you have a few cherished fabric choices and are unsure how to bring them together into a cohesive, beautiful design? Look no further! This ingenious quilt project, inspired by the talented SewVeryEasy on YouTube, offers a delightful solution. It’s so neat, simple, and satisfying that you’ll quickly want to apply this versatile method to countless other fabric combinations. Even absolute beginners can confidently tackle this project and achieve a professional-looking quilt with ease.
Quilting is a wonderfully rewarding craft that allows you to transform simple pieces of fabric into a functional work of art. This particular design stands out for its clarity and accessibility, making it an ideal starting point for anyone new to sewing or quilting. You don’t need an elaborate collection of fabrics; in fact, its beauty lies in using just a few well-chosen colors to create a striking visual impact. Get ready to unlock your creative potential and sew a gorgeous quilt that you’ll be proud to display!
Gather Your Essential Quilting Supplies
Before embarking on any quilting adventure, gathering all your materials is key. For this project, precision in cutting and sewing will yield the best results, so ensure your tools are sharp and accurate. Here’s a list of what you’ll need, along with some tips for selection:
- Black Fabric: This will serve as your contrasting or background color, providing definition and visual interest to your blocks. Choose a high-quality quilting cotton that is easy to work with.
- Yellow Fabric: One of your primary accent colors. Ensure it complements your orange fabric and provides a good contrast against the black.
- Orange Fabric: Your second primary accent color. Again, select a fabric that harmonizes with yellow and stands out against the black.
- Desired Fabric for Sashing: Sashing strips are used to frame and separate your quilt blocks, adding to the overall design. This fabric can match one of your main colors or introduce a subtle new shade. An 8½-inch width is specified for this project, so consider how this will impact your design.
- Marking Pen or Pencil: Essential for precise measurements and marking cutting lines or sewing guides. A heat-erasable pen or a fabric chalk pencil works wonderfully.
- Ruler: A clear acrylic quilting ruler (at least 6×24 inches) is highly recommended for accurate straight cuts.
- Rotary Cutter and Cutting Mat (Highly Recommended): While a needle and thread are listed, a rotary cutter makes cutting multiple fabric strips and squares incredibly fast and precise, minimizing human error. A self-healing cutting mat is crucial to protect your work surface.
- Needle and Thread: For sewing. Choose a good quality polyester or cotton thread that matches your fabric colors, especially the sashing and background.
- Iron and Ironing Board: Absolutely vital for pressing seams after each step. Proper pressing ensures flat, neat blocks and a smooth quilt top.
- Sewing Machine: A reliable sewing machine with a quarter-inch foot (if available) will make stitching accurate seams much easier and more consistent.
- Fabric Scissors: For any smaller snips or trimming.
- Safety Pins or Basting Spray: For securing the quilt sandwich later (batting, backing, and quilt top).
- Batting: The middle layer of your quilt, providing warmth and dimension.
- Backing Fabric: The fabric for the underside of your quilt.
Before you begin cutting, it’s a good practice to pre-wash and press all your fabrics. This helps to prevent shrinkage and color bleeding after your quilt is finished, ensuring your hard work stands the test of time.
Step-by-Step Directions: Crafting Your Beautiful Quilt
This project is designed with simplicity and impact in mind. Follow these detailed instructions carefully, paying close attention to measurements and pressing techniques, and you’ll soon have a stunning quilt top ready for finishing.
Step 1: Precision Cutting and Initial Block Assembly
Accuracy at this stage is paramount for a perfectly aligned quilt. Take your time with each cut and seam.
- Prepare Your Strips: Begin by cutting your black, yellow, and orange fabrics into strips. For the main components, you will need multiple strips, each precisely 2½ inches in width. The exact number of strips will depend on the overall size you wish for your quilt, but for this specific pattern, ensure you have enough to create the required units.
- Sewing Color Combinations: Take one black strip and sew it lengthwise to one yellow strip. Use a ¼-inch seam allowance. Repeat this process, sewing a black strip to an orange strip. Press your seams open or to one side (consistently choose one method for the entire quilt) for a flat finish. You will now have long strip sets combining black/yellow and black/orange.
- Sub-Cutting the Strip Sets: From these sewn strip sets (black/yellow and black/orange), sub-cut them into smaller units, each measuring 2½ inches in width. This means you will be cutting perpendicular to your seam line. You’ll aim for a total of 36 of these small units from each color combination (36 black/yellow units and 36 black/orange units). These units will form the building blocks of your diagonal design.
- Preparing Remaining Strips: You should have some leftover strips of yellow and orange fabric. Cut these remaining yellow and orange strips into 4½-inch widths. From these wider strips, you will again cut individual units, aiming for 36 pieces of each color (36 yellow 4½-inch squares/rectangles and 36 orange 4½-inch squares/rectangles).
- Black Fabric Squares: For the remaining black fabric, cut it into 25 individual squares, each measuring 2½ inches. These will be used as connector squares.
- Assembling the Small Block: Now, let’s create the foundational small block. Take one of your 4½-inch orange strips (or squares, depending on its dimension after cutting). Lay this full orange piece on the left. To its right, place one of your black and orange 2½-inch units. Carefully align the edges and sew them together with a ¼-inch seam allowance. This combination forms a small, distinct block. Repeat this assembly process to create multiple such blocks, ensuring consistent size and alignment.
Step 2: Constructing Large Blocks and the Quilt Top
This stage involves assembling your small units into larger, visually appealing blocks and then connecting them to form the quilt top.
- Yellow Small Blocks: Repeat the process from Step 1, item 6, using the 4½-inch yellow strips and the black/yellow 2½-inch units to create similar small blocks, but with the yellow dominant color. Ensure you have an equal number of these yellow-based small blocks.
- Dividing and Arranging: Once you have all your orange and yellow small blocks, divide them into two piles of each color. Now, you’ll start forming the larger blocks that create the striking diagonal pattern.
-
Assembling Large Diagonal Blocks:
- Take two orange small blocks and position them diagonally opposite each other. The key here is to have their “dark corner” (where the black fabric meets the orange) pointing *inward* towards the center of your imagined larger block.
- Next, lay two yellow small blocks on the diagonal gaps created by the orange blocks. For these yellow blocks, their “dark corner” should be pointing *outward*. This specific arrangement creates the distinctive diagonal flow of the pattern. Refer to the SewVeryEasy video for a clear visual guide on this crucial placement.
- Sew these four small blocks together. It’s often easiest to sew them in two units (e.g., the top-left orange with the top-right yellow, and the bottom-left yellow with the bottom-right orange) and then stitch these two larger units together down the center to form one complete “large block.” Press all seams flat.
- Constructing the Quilt Center: Arrange four of these newly formed large blocks. At the very center of these four blocks, place one of your 2½-inch black square fabrics. This black square acts as a central focal point and connector.
- Adding the Sashing: Now it’s time to introduce the sashing. Select your desired sashing fabric. For this design, cut sashing strips to be 8½ inches in width (or whatever size you prefer for your design, ensuring it complements your block size). Sew these sashing strips around the four large blocks and the central black square, effectively framing this central section of your quilt.
- Expanding with Sashing and Border: Once the central sashing is in place, continue adding the same set of sashing strips around the entire perimeter of what you’ve sewn so far. This expands the quilt top and prepares it for the border. Finally, add your chosen border fabric around the very edges of the quilt. Borders give a finished look, can add extra size, and provide another opportunity for color and pattern. Press all seams meticulously.
Congratulations! At this point, you have successfully completed your quilt top. The intricate yet simple design, created from just a few basic blocks, should now be beautifully evident.
Finishing Your Quilt: From Top to Cozy Blanket
Completing the quilt top is a major accomplishment, but there are a few more steps to transform it into a functional and beautiful blanket.
The Quilt Sandwich: Batting and Backing
Your quilt top is just one layer. The next step is to create the “quilt sandwich,” which consists of three layers: the quilt top, batting, and backing fabric.
- Batting: This is the soft, fluffy middle layer that gives your quilt warmth, loft, and texture. Batting comes in various materials (cotton, polyester, wool, blends) and thicknesses. Choose one that suits your desired warmth and drape. Cut your batting a few inches larger than your quilt top on all sides.
- Backing Fabric: This is the fabric for the underside of your quilt. It should also be cut a few inches larger than your quilt top. You can use a single piece of wide-back fabric or piece together standard width fabrics to achieve the desired size.
- Basting: Once you have all three layers, you need to secure them together so they don’t shift during the quilting process. This is called basting. You can use safety pins (often curved quilters’ pins work best), basting spray adhesive, or even long hand stitches (thread basting). Lay your backing fabric face down, then the batting, and finally your quilt top face up, smoothing out all wrinkles before basting.
Quilting the Layers
Quilting is the process of stitching through all three layers of your quilt sandwich. This adds durability, prevents the batting from shifting, and creates texture and design on the surface.
- Machine Quilting: Many quilters use their home sewing machines for this. You can do “stitch in the ditch” (sewing along the seams of your blocks), straight-line quilting (using a walking foot), or free-motion quilting (using a darning foot and dropping your feed dogs to create intricate designs).
- Hand Quilting: For a traditional touch, you can hand quilt with a needle and special quilting thread, creating beautiful small stitches.
Choose a quilting pattern that complements your block design and your skill level. For a beginner, simple straight lines or stitching along the existing seams can be very effective.
The Binding: The Final Touch
The binding is the fabric strip that encases the raw edges of your quilt, providing a clean, durable, and attractive finish. It’s the final frame for your masterpiece.
- Prepare Binding Strips: Cut long strips of fabric (usually 2½ inches wide) from your chosen binding fabric. These are typically cut on the cross-grain or bias, then sewn together end-to-end to create one continuous strip long enough to go around the entire perimeter of your quilt, plus a few extra inches.
- Attach Binding: Fold the binding strip in half lengthwise and press. Then, sew the raw edge of the binding to the raw edge of your quilt top, carefully mitering the corners.
- Finish Binding: Flip the folded binding over to the back of the quilt and either hand-stitch it in place for an invisible finish or machine-stitch it for speed and durability.
Tips for Quilting Success
- Pressing is Key: Pressing is not ironing. Lift and place your iron to press seams flat after every single seam. This prevents distortion and ensures your blocks lie flat.
- Accurate Seam Allowance: A consistent ¼-inch seam allowance is critical in quilting. Invest in a ¼-inch presser foot for your machine if you don’t have one.
- Sharp Tools: Use a sharp rotary cutter blade and good quality needles to ensure clean cuts and smooth stitches.
- Chain Piecing: For repetitive steps (like sewing many black strips to colored strips), use chain piecing. Don’t cut the thread between units; feed one after another, then cut them apart later. This saves time and thread.
- Patience and Practice: Quilting is a skill that improves with practice. Don’t get discouraged by imperfect first attempts. Each project is a learning opportunity.
- Watch Tutorials: Videos, especially from experienced quilters like SewVeryEasy, can provide invaluable visual guidance for techniques that are hard to describe in text.
Customizing Your 1-Block Quilt
While the black, yellow, and orange color scheme creates a striking visual, this 1-block design is incredibly versatile. Here are some ideas for customization:
- Color Palette: Experiment with different color combinations. Consider a cool palette (blues, greens, purples), a monochromatic scheme with varying shades of one color, or even a rainbow effect. The black can be replaced with any dark solid (navy, charcoal, deep brown) for a different feel.
- Fabric Prints: Instead of solids, try incorporating small-scale prints or tone-on-tone fabrics. Ensure there’s enough contrast between your “light” and “dark” elements to maintain the visual clarity of the pattern.
- Size Variations: To make a larger quilt, simply make more large blocks and adjust your sashing and border lengths accordingly. For a smaller project like a table runner or placemat, reduce the number of blocks you construct.
- Sashing & Border Play: The sashing and border fabrics offer another layer of design opportunity. Use a contrasting color, a subtle print, or even a variegated fabric to add interest.
Conclusion: Your Beautiful Handmade Quilt Awaits!
This “Lovely Quilt Using 1 Block and Few Sashing” pattern, expertly demonstrated by SewVeryEasy, truly lives up to its name. It’s a fantastic entry point into the world of quilting, offering a manageable yet incredibly satisfying project for beginners. By focusing on a simple block design and cleverly using sashing, you can achieve a sophisticated and visually dynamic quilt with minimal complexity.
The journey from cutting your first strips to laying out your finished quilt top is filled with small victories and moments of creative joy. And remember, the beauty of a handmade quilt lies not just in its perfection, but in the care and intention put into every stitch. So, gather your fabrics, fire up your sewing machine, and embark on this delightful quilting adventure. You’ll not only create a stunning quilt but also gain valuable skills and confidence to tackle even more ambitious projects in the future.
*All these images are credited to SewVeryEasy via YouTube. We highly recommend visiting her channel and subscribing for more inspiring and easy-to-follow quilting tutorials!