
Jeans are undeniably a cornerstone of almost every wardrobe, celebrated globally for their incredible versatility, unparalleled comfort, and an enduring sense of style that transcends fleeting trends. From casual outings to semi-formal events, a well-fitting pair of jeans can adapt to countless occasions. However, finding that absolutely perfect pair often comes with a persistent challenge: the length. Many people frequently encounter jeans that are just a tad too long, leading to a dilemma. While traditional hemming typically involves a permanent process of cutting and sewing, a significant number of denim enthusiasts hesitate to alter their beloved jeans in such a way, fearing the loss of the original hem’s distinctive finish or the irreversible nature of the change.
Whether you’re contending with a new pair that pools around your ankles or you’re determined to maintain the integrity of your jeans’ factory-finished hem, there’s an ingenious solution that allows you to achieve the ideal length without making a single cut. This method not only saves your original hem but also offers a reversible alteration, making it a fantastic choice for anyone looking for flexibility and precision. Popular YouTube creator Made By April demonstrates this brilliant technique, guiding you step-by-step on how to tailor your jeans to the perfect length effortlessly and without any permanent modifications.
RELATED: For another quick denim modification, learn How To Taper Your Jeans In 5 Minutes.
In this comprehensive guide, we’ll delve into Made By April’s clever approach, showing you exactly how to adjust the length of your jeans while meticulously preserving their original structure and iconic hem. This method is remarkably quick, surprisingly easy, and requires no advanced sewing expertise, making it accessible to even absolute beginners. You don’t need to be a seasoned seamstress or tailor to master this smart trick; with just a few basic supplies and some patience, you can achieve professional-looking results right at home. Learn it today by following the detailed video tutorial and step-by-step instructions below. Bid farewell to the frustration of tripping over overly long jeans and embrace the comfort and confidence that come with perfectly tailored denim. A huge thank you to Made By April for sharing this fantastic and practical sewing tutorial. Be sure to explore their channel for more innovative sewing tips, tricks, and DIY projects just like this one.
How to Effortlessly Shorten Jeans Without Cutting and Preserve the Original Hem
The desire to shorten jeans without cutting is a common one, driven by several practical and aesthetic considerations. The factory hem on a pair of jeans is often a distinctive feature, characterized by its unique stitching, slight fading, and sometimes a distressed look that’s hard to replicate. When you cut and re-hem jeans, you inevitably lose this original detail. This no-cut method provides a solution, allowing you to temporarily or semi-permanently adjust the length while keeping the original hem intact. It’s ideal for designer jeans where maintaining authenticity is important, or for those who simply prefer a non-destructive alteration that can be reversed later if desired.
Beyond preserving aesthetics, this technique offers a level of flexibility that traditional hemming doesn’t. If you grow taller, want to wear different shoe styles, or decide to sell your jeans in the future, you can easily undo the alteration without any lasting impact on the garment. This makes it a highly economical and sustainable choice, extending the life and versatility of your denim collection. Let’s gather the necessary tools and get started on transforming your too-long jeans into a perfectly fitting pair.
Essential Tools and Materials for Your No-Cut Jean Hemming Project
Before you begin tailoring your jeans, ensure you have all the necessary supplies readily available. Gathering your tools beforehand will make the process smoother and more efficient, allowing you to focus on achieving that perfect fit.
- Jeans: The pair you wish to shorten. Make sure they are washed and dried to account for any potential shrinkage before you begin.
- Sharp Needle: A strong, sharp needle designed for denim or heavy fabrics will make stitching much easier and prevent bending or breaking.
- Durable Thread: Choose a thread color that closely matches your jeans’ existing stitching to make your work virtually invisible. For added strength, consider using a denim-specific thread or a strong polyester thread.
- Ruler or Measuring Tape: Essential for precise measurements to ensure both legs are shortened equally and to your desired length.
- Fabric Marker or Chalk: Used for clearly marking your stitch line on the fabric. Ensure it’s a type that can be easily removed or will fade over time.
- Fabric Scissors: While we’re not cutting the jeans for length, you might need scissors to trim excess thread. A good pair of fabric scissors ensures clean cuts.
- Iron and Ironing Board: Crucial for pressing the fabric flat before and after stitching, which helps set the new hem and gives your finished work a crisp, professional appearance.
- Pins (Optional but Recommended): Useful for temporarily holding the folded fabric in place once you’ve determined the desired length, allowing you to try on the jeans and confirm the fit before marking or stitching.
Step-by-Step Guide: How to Shorten Your Jeans Without Cutting
Follow these detailed instructions carefully to achieve a perfectly tailored look while preserving your jeans’ original hem. Precision and patience are key to a professional finish.
Step 1: Preparing Your Jeans and Marking the New Length
The first and most critical step is accurately determining and marking your desired new length. This ensures a symmetrical and flattering fit. Start by putting on your jeans with the shoes you intend to wear most often with them. This allows you to visualize the ideal hem length naturally. Carefully fold the bottom hem of one leg upwards until it reaches your desired length. Use pins to temporarily secure this fold in place. Walk around, sit down, and check in a mirror to ensure you’re happy with the length and how it drapes. Adjust as needed until it’s perfect.
Once satisfied with the pinned length, take off the jeans. Lay them flat on a clean, hard surface, ensuring they are smooth and free of wrinkles. Using your ruler, measure the distance from the original hem edge up to where you want your new, shortened hem to sit. Let’s say you want to shorten them by 2 inches. You will then measure 2 inches from the *bottom edge* of the original hem and draw a straight, horizontal line across the entire circumference of the jeans leg using your fabric marker or chalk. This line will serve as your primary guide for the internal fold and where your stitching will begin. Ensure this line is consistent all the way around.
Now, let’s prepare for stitching. Thread your needle with a double strand of thread for extra strength, matching the color to your jeans as closely as possible. Knot the end. You will begin stitching by inserting your needle from the inside of the jeans, coming up through the existing bottom seam (the original hem stitching line) on the *outer* side of the fabric. This hides your knot. Then, move your needle about a quarter to a half-inch *up* from that point and insert it into the fabric along the marked line you just drew. Do not pull the thread all the way through yet; leave a small loop. This technique helps to “anchor” your stitch subtly.
Step 2: Executing the Gathering Stitch and Securing the New Hem
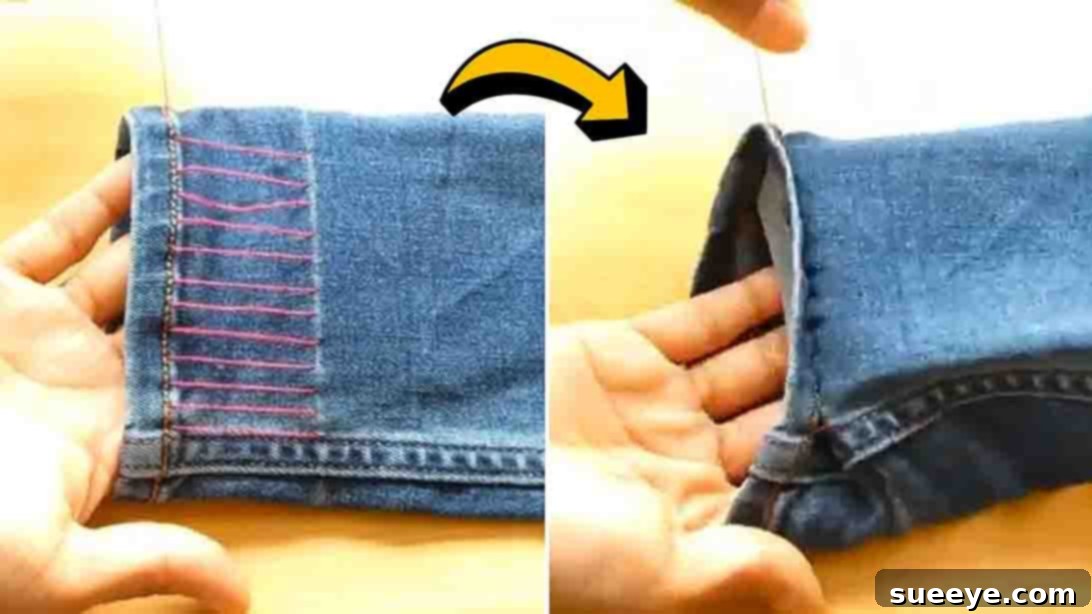
With your initial stitch started, continue making small, even running stitches along the marked line you drew. Aim for consistent stitch length and spacing, perhaps about 1/4 to 1/2 inch per stitch, depending on the denim thickness and your comfort level. The goal here is not to create a tight, visible seam, but rather a gathering stitch that will pull the excess fabric inward. As you stitch, ensure you are only going through one layer of the denim, the inner layer that will form the fold.
Once you’ve stitched approximately halfway around the circumference of the jeans leg, gently pull the working thread. You’ll notice the fabric beginning to gather and cinch inward, effectively creating an internal fold that shortens the visible length of the jeans. Pull until the fabric gathers smoothly and the original hem sits at your desired height. Be careful not to pull too tightly, as this can create puckering or an uneven finish. The key is an even, gentle tension. Once you’re satisfied with the gathering, secure this section with a small, discreet knot or backstitch to prevent it from loosening while you continue.
Now, proceed to stitch the remaining half of the marked line around the leg, repeating the same gathering technique. Once you reach your starting point, or have stitched all the way around, gently pull the thread again to ensure an even gather across the entire leg opening. Secure your stitching firmly with several small backstitches or knots, carefully trimming any excess thread close to the fabric. The objective is to create an internal, neat fold that pulls the original hem upwards without damaging it or creating bulk.
Repeat these exact steps for the other jeans leg opening. It’s crucial to measure and stitch both legs with the same precision to ensure a balanced and symmetrical finish. After both legs have been stitched and gathered, the final step involves pressing. Lay your jeans flat and use a warm iron to carefully press the newly sewn part. This step is vital as it helps to flatten the internal fold created by your gathering stitch, sets the fabric, and gives the new hem a crisp, professional appearance. Pressing also helps to hide the stitching further and makes the alteration virtually invisible from the outside. Once pressed, try on your jeans to admire your perfectly tailored, original-hemmed denim!
Expert Tips for a Flawless No-Cut Jean Hem
Achieving a professional-looking finish with this no-cut method requires attention to detail. Here are some additional tips to help you get the best results:
- Pre-Wash Your Jeans: Always wash and dry your jeans before starting any alteration. Denim can shrink, and pre-washing ensures that your measurements are accurate for the final garment size.
- Practice Makes Perfect: If you’re new to hand sewing or this specific technique, consider practicing on an old pair of jeans or a scrap piece of heavy fabric first. This will help you get a feel for the stitch and the gathering process.
- Use Quality Thread: A strong, durable thread (like polyester or a denim-specific thread) is essential. It needs to withstand the tension of the gathering and the wear and tear of regular use. Matching the thread color closely to your jeans’ existing stitching will make your work virtually invisible.
- Consistent Stitching: Strive for even stitch lengths and spacing. While the stitches will be mostly hidden on the inside, consistency ensures an even gather and a smoother internal fold.
- Don’t Over-Gather: Pull the thread just enough to achieve your desired length without creating excessive puckering or an unnatural bulge. The goal is a smooth, subtle internal fold.
- Ironing is Your Best Friend: Don’t skip the pressing step. A good iron and steam will dramatically improve the appearance of your finished hem, making it look crisp, flat, and professionally done.
- Check Both Legs: After stitching and before final pressing, double-check that both legs are precisely the same length. Minor adjustments can often still be made by gently manipulating the gather.
- Consider Fabric Thickness: Thicker, more rigid denim might require a stronger needle and more effort to stitch through. Stretchier denim might gather more easily but also be more prone to puckering if pulled too tight. Adjust your technique accordingly.
Why This No-Cut Method Is a Game-Changer for Your Denim
This ingenious method of shortening jeans without cutting is more than just a quick fix; it’s a revolutionary approach to denim alteration that offers numerous benefits:
- Preserves Original Hem: This is arguably the biggest advantage. The distinct, often worn or faded look of a factory hem is maintained, which is crucial for the authentic aesthetic of jeans, especially premium or designer brands.
- Completely Reversible: Unlike traditional hemming that involves cutting fabric, this method is fully reversible. If you change your mind, want to wear different shoes, or wish to sell your jeans, you can simply remove the stitching, and your jeans will revert to their original length, completely undamaged.
- No Sewing Machine Required: This technique is entirely achievable with basic hand-sewing skills, making it accessible to everyone, regardless of whether they own a sewing machine or have experience with one.
- Cost-Effective: Avoid the expense of professional tailoring. With a few affordable supplies, you can achieve a custom fit at a fraction of the cost.
- Empowering DIY Project: Learning to alter your own clothes can be incredibly satisfying. This simple yet effective method empowers you to take control of your wardrobe and achieve a personalized fit.
- Maintains Resale Value: For high-quality or designer jeans, preserving the original hem can significantly maintain their resale value, as unaltered garments are often more desirable to buyers.
Maintaining Your Perfectly Altered Jeans
After you’ve successfully shortened your jeans using this no-cut method, proper care will ensure the longevity of your alteration and the overall garment:
- Wash Inside Out: Always turn your jeans inside out before washing. This helps protect the outer fabric, minimizes fading, and also protects your hand-stitched hem from excessive friction during the wash cycle.
- Use Cold Water: Washing in cold water helps prevent further shrinkage and preserves the fabric’s color and integrity. It’s also gentler on the stitching.
- Gentle Cycle: Opt for a delicate or gentle cycle on your washing machine to reduce stress on the denim and the internal hem.
- Air Dry or Low Heat: Whenever possible, air dry your jeans by laying them flat or hanging them. If using a dryer, choose a low heat setting to prevent excessive heat from stressing the stitching or causing further shrinkage. High heat can also cause the denim to become rigid or brittle.
- Re-Press if Needed: If the internal fold or hem loses its crispness after washing, a quick re-press with an iron will restore its professional appearance.
By following these simple care instructions, your perfectly tailored, original-hemmed jeans will continue to look great and serve you well for many wears to come.
Conclusion: Embrace the Perfect Fit with No Cutting!
Gone are the days of struggling with ill-fitting, too-long jeans or compromising the unique character of your denim through permanent alterations. This ingenious method of shortening jeans without cutting offers a fantastic blend of practicality, aesthetic preservation, and reversibility. It’s a testament to how simple techniques can yield incredibly satisfying and professional results, empowering you to achieve a custom-tailored look right from the comfort of your own home.
Whether you’re a seasoned DIY enthusiast or someone just starting their journey into personalizing their wardrobe, this tutorial provides all the guidance you need. With a few basic supplies and a willingness to try, you can transform your jeans, ensuring they fit perfectly every time, complement your chosen footwear, and reflect your personal style flawlessly. So, gather your needle and thread, and get ready to experience the joy of perfectly hemmed jeans, all while keeping that cherished original finish intact. Say hello to confidence and comfort, and wave goodbye to dragging hems!