
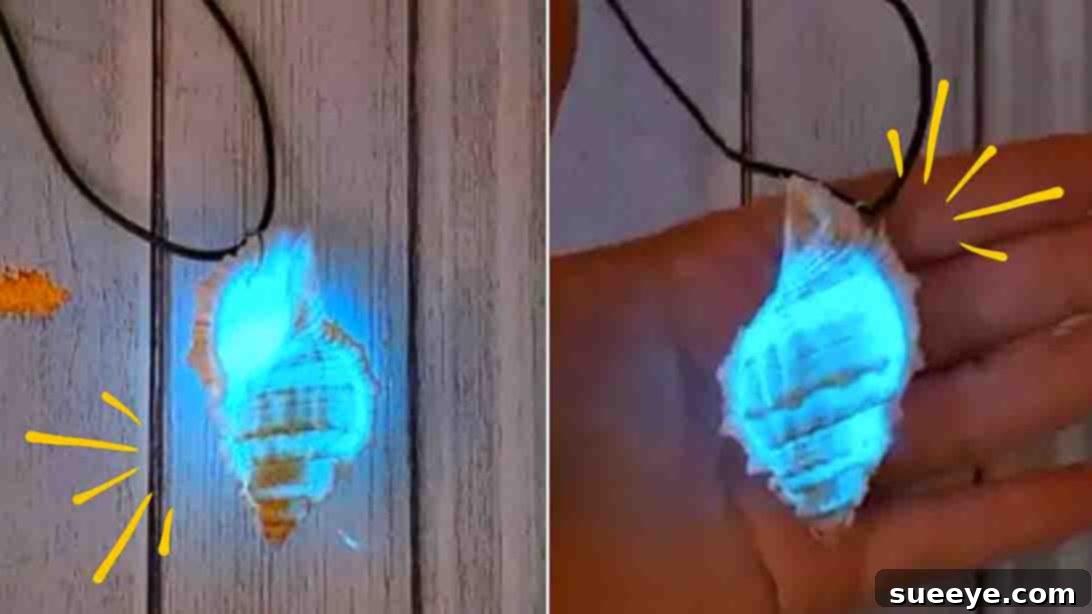
Imagine the serenity of an evening stroll along the shoreline, the gentle rhythm of waves under a sky full of stars. Now, picture enhancing that magical moment with a unique, luminous accessory: a stunning glow-in-the-dark seashell necklace, handcrafted by you. If this vision sparks your imagination, then get ready to dive into a captivating DIY project that transforms ordinary seashells into extraordinary, radiant treasures. This engaging craft, inspired by the creative brilliance of Soul Shards on YouTube, is perfect for anyone who loves collecting natural wonders and turning them into beautiful, wearable art.
This comprehensive guide will lead you through the enchanting world of DIY jewelry making, focusing on creating your very own luminous seashell necklace. We’ll explore the essential materials, master effective techniques, and provide inspiration to craft a truly unique piece that captures the magic of the ocean. Whether you’re an experienced crafter seeking your next project or a beginner eager to explore the wonders of resin and glow powder, this tutorial promises to ignite your creativity and illuminate your personal style. Follow along with our detailed instructions below to make this mesmerizing piece of handmade glowing jewelry.
RELATED: Glowing DIY Idea: Mason Jar Patio Lights
Why Craft Your Own Glow-in-the-Dark Seashell Necklace?
Beyond the simple joy of creating, making a DIY glow-in-the-dark seashell necklace offers numerous benefits and a deeply satisfying experience. It’s an opportunity to transform natural elements into something truly personal and magical. Here are just a few reasons why this project stands out:
- Personalized Expression: Each seashell is unique, making every necklace a one-of-a-kind statement piece that reflects your individual style and connection to nature.
- Unique Gifts: A handmade glowing seashell necklace makes an incredibly thoughtful and distinctive gift for friends, family, or anyone who appreciates bespoke, ocean-inspired jewelry.
- Sustainable Crafting: Repurpose seashells collected from your beach adventures, turning natural souvenirs into lasting memories rather than letting them go to waste.
- Relaxing Hobby: The process of cleaning shells, mixing resin, and assembling your necklace can be a meditative and enjoyable way to unwind and engage your creative faculties.
- Conversation Starter: Prepare for compliments and intriguing questions when you wear a necklace that mysteriously glows in the dark, showcasing your crafting prowess.
- Embrace the Magic: There’s something undeniably captivating about an object that radiates its own light. This project taps into that sense of wonder, bringing a touch of enchantment to your everyday life.
The Science of Shine: Understanding Glow Powder and Resin
At the heart of this project lies the fascinating combination of glow powder and resin. Understanding how these materials work together will enhance your crafting experience and help you achieve the best results for your glowing seashell necklace.
- Glow Powder (Phosphorescence): Also known as phosphorescent pigment, glow powder absorbs light energy (from sunlight, UV light, or even artificial light) and then slowly releases it as a visible glow in the dark. The longer and more intensely it’s charged, the brighter and longer it will glow. Available in various colors, aqua and green are typically the brightest.
- Epoxy Resin: This is a two-part liquid system consisting of a resin (Part A) and a hardener (Part B). When mixed in precise ratios, a chemical reaction occurs, causing the liquid to cure and harden into a durable, clear, and often glossy solid. For jewelry, a clear casting resin is ideal, as it allows the glow powder to shine through effectively.
When glow powder is suspended within the clear, cured resin, it’s protected and held securely in place, allowing the phosphorescent particles to perform their magic without degradation. The resin also gives the seashell a beautiful, smooth finish and structural integrity.
Safety First: When working with resin and glow powder, always ensure good ventilation. Wear appropriate personal protective equipment, including gloves and eye protection, to avoid skin contact and inhalation of fumes or fine dust. Read the manufacturer’s instructions for your specific resin and glow powder carefully.
Gather Your Treasures: Essential Materials
To embark on this exciting DIY journey, gather the following items. Quality materials ensure a beautiful and long-lasting handmade glowing necklace.
- Glow Powder: Choose your favorite color! Aqua and green are popular for their intense glow. Ensure it’s a fine pigment suitable for resin.
- Seashell: Select a clean, dry seashell that has a natural cavity or can be partially filled. Scallop shells, oyster shells, or even larger fragments with interesting shapes work wonderfully. Ensure it’s sturdy enough for drilling.
- Cord: A durable necklace cord, such as waxed cotton, leather, or a strong synthetic fiber. Consider the length you desire for your necklace.
- Mixing Cups: Small, disposable plastic or silicone cups for mixing resin.
- Mixing Sticks: Wooden craft sticks, silicone stirrers, or similar tools for thorough mixing.
- Epoxy Resin (Part A & B): A clear casting epoxy resin suitable for jewelry. Always follow the manufacturer’s specific mixing ratios.
- Jump Ring: A small metal ring used to connect the seashell pendant to the necklace cord. Opt for a size appropriate for your shell and cord.
- Small Hand Drill or Dremel with a Tiny Drill Bit: Essential for creating a hole in the seashell for the jump ring. Use a bit specifically designed for drilling delicate materials like shell or glass.
- UV Light Source (Optional but Recommended): A UV flashlight or black light is ideal for quickly charging your glow powder and seeing the immediate results.
- Safety Gear: Gloves, safety glasses, and a well-ventilated workspace are crucial when working with resin.
- Protective Surface: A silicone mat, wax paper, or plastic sheet to protect your work area from resin spills.
- Rubbing Alcohol or Acetone: For cleaning tools or spills if needed.
Crafting Your Luminous Keepsake: Step-by-Step Guide
With your materials gathered and safety precautions in mind, let’s begin the exciting process of creating your very own DIY glow-in-the-dark seashell necklace. Each step is designed to be clear and easy to follow, ensuring a stunning result.
Step 1: Preparing the Luminous Resin Fill
The first step involves creating the glowing heart of your necklace. Precision in mixing resin is key for a successful cure and a brilliant glow.
Begin by carefully weighing 20 grams (approximately 0.7 oz) of Resin Part A and 20 grams of Resin Part B into separate clean mixing cups. For optimal curing and to avoid stickiness, it’s critical to adhere strictly to the 1:1 ratio. Pour both parts into a single, larger mixing cup. Using your mixing stick, stir the resin slowly and thoroughly for at least 3-5 minutes. Scrape the sides and bottom of the cup frequently to ensure all parts are fully combined. Slow stirring minimizes air bubbles, which can detract from the final appearance.
Once the resin is mixed, add a generous amount of your chosen aqua glow powder. Start with about one tablespoon per 40g of resin, but feel free to add more until you achieve a concentration that promises an intense glow. Mix the glow powder into the resin until it’s evenly dispersed, ensuring no clumps remain. This uniform distribution is vital for a consistent glow.
Carefully pour the glowing resin mixture into the natural cavity of your chosen seashell. Fill it to a level that looks appealing, typically just below the rim. If your seashell has an uneven bottom, you might prop it up with some clay or tape to keep the resin level while it cures. Once poured, gently blow over the surface of the resin (or use a heat gun on a very low setting, held far away) to pop any remaining surface bubbles.
Leave your filled seashell in a dust-free, temperature-controlled environment for twenty-four hours (or according to your resin’s specific curing time). This allows the resin to fully set and harden. Once cured, the surface should be hard and non-tacky. After it’s completely set, carefully mark the exact spot where you intend to drill the hole for the pendant’s hang point. Choose a spot that allows the shell to hang attractively and balanced.
Step 2: Drilling and Assembling Your Necklace
Now that your glowing resin insert is perfectly cured, it’s time to transform your shell into a wearable pendant.
Using a small hand drill or a Dremel tool fitted with a tiny drill bit (e.g., 1mm or 1.5mm), carefully drill a small hole at the marked spot on your seashell. Drill slowly and steadily to prevent cracking the shell, especially around the resin-filled area. It’s often helpful to place the shell on a soft but firm surface, like a piece of wood or a thick cloth, to provide support while drilling.
After drilling, gently rinse the seashell with water to remove any drill dust or shell fragments. Use a soft brush or cloth to ensure all debris is gone, as any remaining dust can dull the shine or interfere with the jump ring. Thoroughly wipe the seashell dry, ensuring there’s no moisture left.
Next, take your jump ring. Using two pairs of jewelry pliers, gently twist the jump ring open (never pull it apart, as this can weaken the metal). Slide the open jump ring through the freshly drilled hole in your seashell. Once securely in place, use your pliers to carefully twist the jump ring closed, ensuring the ends meet perfectly without any gaps. A well-closed jump ring will prevent your pendant from accidentally detaching.
Finally, attach your chosen necklace cord to the jump ring. Thread the cord through the jump ring, then tie a secure knot to create your necklace. You might opt for a simple slip knot if you want an adjustable length, or a fixed knot if you prefer a specific drop. Ensure the knot is strong and neat.
To reveal the full brilliance of your new creation, “charge” the seashell with a UV light source. Hold a UV flashlight over the glowing resin for a few seconds, and watch as your DIY glow-in-the-dark seashell necklace comes to life with an ethereal radiance! Alternatively, expose it to bright sunlight for a few minutes. Your stunning, handmade glow-in-the-dark seashell necklace is now complete and ready to wear!
Tips for a Perfect Luminous Seashell Necklace
To ensure your glowing seashell pendant is truly spectacular and lasts for years, consider these additional tips and creative enhancements:
- Shell Selection: Experiment with different types and sizes of seashells. Flat, shallow shells work well for a subtle glow, while deeper shells allow for a more pronounced resin fill. Ensure shells are thoroughly cleaned and dry before use.
- Glow Powder Colors: While aqua and green are the brightest, don’t hesitate to try other colors like blue, purple, or even orange glow powders for different effects. You can also layer different colors of glow powder within the resin for a multi-dimensional glow.
- Avoiding Bubbles: Aside from slow mixing, warming your resin bottles slightly before mixing can reduce viscosity and help bubbles rise to the surface. After pouring, you can use a toothpick to manually pop any visible bubbles.
- Adding Sparkle: For an extra touch of glamour, consider mixing fine glitter or iridescent flakes into your glow powder and resin mixture. This adds sparkle during the day and enhances the glow at night.
- Finishing Touches: After curing, you can optionally sand any rough edges of the resin or shell with fine-grit sandpaper for a smoother finish. A clear coat of resin on the back of the shell can also provide a more polished look and reinforce the shell’s integrity.
- Caring for Your Necklace: To maintain its glow, expose your necklace to light regularly. When not in use, store it in a clean, dry place away from direct sunlight for prolonged periods, which can sometimes fade resin over time.
- Troubleshooting: If your resin doesn’t cure properly, it might be due to incorrect mixing ratios or insufficient mixing. If it’s tacky, you might be able to apply another thin, properly mixed layer. If the glow is weak, ensure you’re using a high-quality glow powder and charging it adequately.
Beyond Necklaces: Other Glowing Seashell Crafts
The technique learned in creating this DIY glow-in-the-dark seashell necklace can be applied to a myriad of other creative projects. Let your imagination soar with these additional ideas:
- Glowing Seashell Keychains: Use smaller shells to create unique keychains that are easy to spot in the dark.
- Luminous Earrings: Select tiny, matching shells to craft enchanting glow-in-the-dark earrings.
- Fairy Garden Accents: Place glowing shells strategically within a fairy garden or terrarium for a magical nighttime ambiance.
- Decorative Ornaments: Create larger glowing shell ornaments to hang on a mantel, use as part of a mobile, or even as unique holiday decorations.
- Wall Art: Mount an array of glowing seashells on a piece of reclaimed wood or canvas for a captivating piece of beach-themed wall art.
- Resin Coasters with Shells: Incorporate smaller glow-in-the-dark shells into resin coasters for a practical yet enchanting home decor item.
DIY Glow-In-The-Dark Seashell Tutorial: Your Radiant Creation Awaits
Crafting a glow-in-the-dark seashell necklace is more than just a DIY project; it’s an opportunity to connect with nature, unleash your creativity, and produce something truly magical. The satisfaction of wearing a piece you’ve poured your heart and hands into, especially one that carries the serene beauty of the ocean and the wonder of light, is immense. This project, lovingly inspired by the brilliant insights from Soul Shards, offers a straightforward yet deeply rewarding creative journey.
So, gather your seashells, prepare your workspace, and let the magic of glow powder and resin transform your beach finds into luminous keepsakes. We encourage you to embark on this fantastic adventure and share your unique handmade glowing jewelry creations with the world. Happy crafting!