
Crafting the Timeless Mother’s Choice Remake Quilt: A Detailed Guide
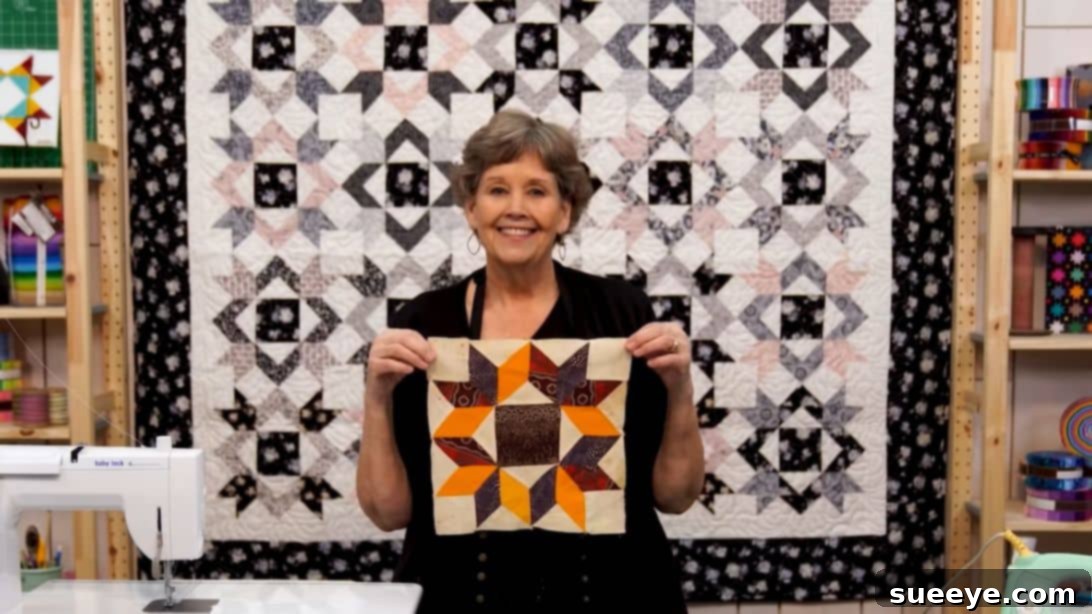
Embark on a delightful quilting journey with the exquisite Mother’s Choice Remake Quilt, a stunning design brought to life by the experts at Missouri Star. While its intricate appearance might initially suggest a challenge, rest assured, this pattern is surprisingly accessible and a true joy to create. Thanks to the wonderfully clear and simplified instructions provided by Jenny Doan, even novice quilters will find themselves confidently navigating each step. This project demystifies complex-looking patterns, revealing them to be clever combinations of fundamental quilting units. Imagine the awe and admiration from friends and family when they behold your finished masterpiece, a testament to your newfound or honed quilting skills. This quilt isn’t just a craft project; it’s an heirloom in the making, promising both a rewarding process and a beautiful, lasting result.
The Mother’s Choice Remake Quilt stands out for its clever construction, which relies on just three distinct block types: the center block, the corner block, and the side block. Each of these components is remarkably straightforward to assemble, primarily utilizing familiar quilting basics. You’ll become adept at creating classic flying geese blocks, precise half-square triangles, and adding “snowball” corners to achieve a crisp, tailored look. The genius lies in how these simple units combine to form a design of striking elegance. This beloved vintage quilt pattern is known by several enchanting names, each hinting at its timeless appeal: “Dove in the Window,” evoking a sense of peaceful contemplation; “Fringed Square,” suggesting a delicate, detailed border; and “Laurel Wreath,” symbolizing victory and enduring beauty. With such a rich history and a simplified approach, this quilt promises a satisfying and inspiring creative experience for all skill levels.
RELATED: Discover more vintage charm with the Vintage Blossom Quilt With Jenny Doan, another fantastic pattern from Missouri Star that celebrates classic quilting techniques.
Essential Materials for Your Mother’s Choice Remake Quilt
Gathering your materials is the exciting first step in any quilting project. For this Mother’s Choice Remake Quilt, we’ve outlined the precise measurements to ensure your success. Choosing your fabrics is where your personal style truly shines – consider a vibrant array of prints for a lively quilt, or a more subdued palette for a classic, sophisticated feel. The yardage listed below is typically sufficient for a throw-sized quilt, but remember to adjust quantities if you plan to create a larger bed quilt.
- 1 roll of 2 1/2″ print strips: Often referred to as a “Jelly Roll,” these pre-cut strips are a quilter’s best friend, saving you significant cutting time. Choose a roll with a cohesive color story or a diverse mix for a scrappier look.
- 1 roll of 2 1/2″ background strips: Select a background fabric that will make your print strips pop. A solid cream, white, or light gray is a popular choice for achieving contrast, but don’t hesitate to experiment with subtle prints for added texture.
- 1/2 yard of inner border fabric: This fabric will create a delicate frame around your quilt blocks, providing a visual transition between the pieced blocks and the outer border.
- 1 3/4 yards of outer border fabric (includes block center squares): The outer border adds significant visual weight and helps square up your quilt top. A portion of this fabric will also be used for the central squares within each quilt block, ensuring continuity.
- 3/4 yard of binding fabric: Binding is the finishing touch that encases the raw edges of your quilt, providing durability and a polished look. Consider a coordinating solid or a print that ties all your fabrics together.
- 4 3/4 yards of backing fabric: The backing is the foundation of your quilt. While it’s largely unseen, it contributes to the quilt’s overall feel and drape. A wide-back fabric can minimize seams, or you can piece together standard width fabrics for a creative backing.
- Coordinating Thread: High-quality polyester or cotton thread that matches or blends with your fabrics.
- Quilting Batting: A layer of batting (e.g., cotton, polyester, blend) of your desired loft and fiber content, sized appropriately for your quilt (typically slightly larger than your quilt top).
- Basic Quilting Tools: Rotary cutter, cutting mat, quilting ruler (at least 6″ x 24″), sewing machine, iron and ironing board/pressing mat, fabric scissors, fabric marking tool, and plenty of pins or wonder clips.
Crafting Your Mother’s Choice Remake Quilt: Step-by-Step Instructions
Precision is key in quilting, so remember to maintain an accurate 1/4-inch seam allowance throughout this project. Pressing correctly after each seam will also make a significant difference in how your blocks come together, resulting in a flat and professional-looking quilt top.
Step 1: Constructing the Base Unit
Begin by selecting one 2 1/2″ light print square and one 2 1/2″ background square. Place these two squares right sides together, ensuring all edges are perfectly aligned. Sew a precise 1/4″ seam along one side of the aligned squares. After sewing, gently finger-press the seam open or to one side to set the stitches, then take it to your ironing board for a crisp press. Next, retrieve a 4 1/2″ by 2 1/2″ light print rectangle. With right sides together, align the long edge of this rectangle with the newly created unit (the joined 2 1/2″ squares), and sew another 1/4″ seam. This will transform your unit into a larger, elongated square. Press this seam carefully to ensure a flat finish. This carefully constructed base unit will serve as a foundational element for your corner blocks.
Step 2: Creating the Snowballed Corner Blocks
Now, let’s craft the distinctive corner blocks that define the Mother’s Choice design. Take one of the units you created in Step 1. Get two 2 1/2″ background squares. Place one 2 1/2″ background square onto one corner of your base unit, right sides together, aligning the raw edges. Using a fabric marking tool, draw a diagonal line from one corner to the opposite corner of the small background square. Sew directly on this drawn line. Repeat this process for a second 2 1/2″ background square on the opposite corner of the same unit, ensuring the diagonal lines create a distinct angle, as illustrated in the provided image. Once both diagonal seams are sewn, carefully trim off the excess fabric, leaving a 1/4″ seam allowance from your sewn line. Press these “snowball” corners open to reveal the finished corner block. You will need a total of four identical corner blocks to complete one full Mother’s Choice quilt block, so repeat this step three more times.
Step 3: Assembling the First Set of Flying Geese
Flying geese blocks are a staple in quilting and add dynamic movement to any design. For your first set, take one 4 1/2″ x 2 1/2″ print rectangle – this will be your “goose.” Then, take two 2 1/2″ background squares – these will form your “sky.” Place one background square onto one end of the rectangle, right sides together, aligning with one short edge. Draw a diagonal line from corner to corner across the background square. Sew precisely along this drawn line. Trim off the corner, leaving a 1/4″ seam allowance, and press the seam open so the background fabric folds out to create a triangle shape. Repeat this exact process with the second background square on the opposite end of the same rectangle. When finished, you will have a perfect flying geese unit. Ensure your seams are flat and points are crisp. You will need four pieces of this specific flying geese block, so repeat the construction process three more times.
Step 4: Creating the Second Set of Flying Geese (Color Reversed)
To create visual interest and define the arrow pattern in your main block, we will make a second set of flying geese with the colors swapped. This time, take one 4 1/2″ x 2 1/2″ background rectangle (your “goose”) and two 2 1/2″ print squares (your “sky”). Follow the exact same steps as in Step 3: place a print square on one end of the background rectangle, draw a diagonal line, sew, trim, and press. Repeat with the second print square on the other end. This reversal of colors will provide a striking contrast when these units are assembled later. Just like the first set, you will need four pieces of this second, color-reversed flying geese unit. Precision in cutting and sewing here will ensure clean, sharp points in your finished blocks.
Step 5: Forming the Dynamic Arrow Pattern
With both sets of flying geese now complete, it’s time to combine them to create the captivating arrow pattern that makes this quilt so distinctive. Take one flying geese unit from Step 3 (print rectangle with background skies) and one flying geese unit from Step 4 (background rectangle with print skies). Place them right sides together, carefully aligning their long edges. Pay close attention to nesting your seams at the point where the “sky” triangles meet, this helps create a perfect arrow tip. Sew a 1/4″ seam along the aligned edge. Press the seam open or to one side, whichever helps reduce bulk. When you open this unit, you will see a beautifully defined arrow shape, with one color forming the arrow’s head and the other forming its tail. Repeat this process for all four pairs of flying geese to create four identical arrow units.
Step 6: Assembling the Full Mother’s Choice Block
Now comes the exciting part – bringing all your meticulously crafted components together to form a complete Mother’s Choice block. Start with your 4 1/2″ square, which will serve as the central anchor of your block. This square is usually cut from the outer border fabric to tie the design together. Arrange the four arrow units (created in Step 5) around this center square, positioning them so that their points direct inwards towards the middle, forming a distinctive motif. Next, place your four corner blocks (from Step 2) into the four corners of this arrangement. Visually confirm that your layout matches the provided image for correct orientation. The most effective way to sew these components together is to assemble them in rows. First, sew the three units of the top row together, then the three units of the middle row (center square and two arrow units), and finally the three units of the bottom row. Press the seams in each row. Once all three rows are sewn and pressed, carefully align the rows, nesting seams where necessary, and sew them together with a 1/4″ seam allowance. Press the final seams open or to one side to reduce bulk and create a flat, symmetrical block. You’ve now completed your first stunning Mother’s Choice Remake Quilt block!
Step 7: Assembling the Quilt Top
Once you have constructed enough Mother’s Choice blocks to achieve your desired quilt size, it’s time to bring them all together. Arrange your finished blocks into rows, playing with the orientation of each block to create a visually appealing overall pattern. Sew the blocks within each row together, paying close attention to seam alignment for crisp intersections. After sewing each row, press the seams for a flat finish. For alternate rows, consider pressing seams in opposite directions to allow for ‘nesting’ when you join the rows, which helps achieve perfect points. Once all your rows are sewn, join the rows to each other, carefully pinning at seam intersections. Press the entire quilt top generously. Now, attach your inner border, followed by your outer border. Measure your quilt top in several places to get an average length and width, then cut your border strips accordingly to prevent wavy borders. This careful bordering frames your beautiful piecing.
Step 8: Layering and Quilting
With your quilt top complete, the next step is to create the “quilt sandwich.” Lay your backing fabric right side down on a clean, flat surface, smoothing out any wrinkles. Tape it securely to the floor or table to keep it taut. Next, center your batting layer on top of the backing. Finally, carefully place your pieced quilt top right side up on top of the batting, making sure it’s centered and smooth. Baste all three layers together using your preferred method: safety pins, basting spray, or hand basting stitches. This crucial step prevents the layers from shifting during quilting. Now, quilt your creation! You can choose straight-line quilting, stitch-in-the-ditch to emphasize your piecing, or explore free-motion quilting for a more artistic flair. The quilting process adds texture, stability, and character to your finished piece.
Step 9: Finishing with Binding
The final touch for your Mother’s Choice Remake Quilt is the binding, which provides a durable and attractive edge. Trim any excess batting and backing so they are flush with the edges of your quilt top. Prepare your binding strips by joining them end-to-end to create one continuous strip, then press them in half lengthwise. Attach the binding to the front of your quilt, aligning the raw edges of the binding with the raw edges of the quilt. Miter the corners for a neat finish. Once sewn to the front, flip the binding over to the back of the quilt and hand-stitch or machine-stitch it in place. This final step protects the raw edges and gives your quilt a professional, complete look, ready for snuggling or display.
Your Completed Mother’s Choice Remake Quilt
Congratulations! You’ve successfully completed the stunning Mother’s Choice Remake Quilt. This journey, guided by simple instructions and a little patience, culminates in a truly beautiful and meaningful textile art piece. The timeless design, with its elegant “Dove in the Window” or “Laurel Wreath” motif, is a testament to the enduring appeal of classic quilting patterns. We encourage you to personalize your future quilts with unique fabric selections, exploring different colorways and print combinations to make each project distinctly yours. Enjoy the comfort and beauty of your new quilt, a handmade treasure that will be cherished for years to come.