
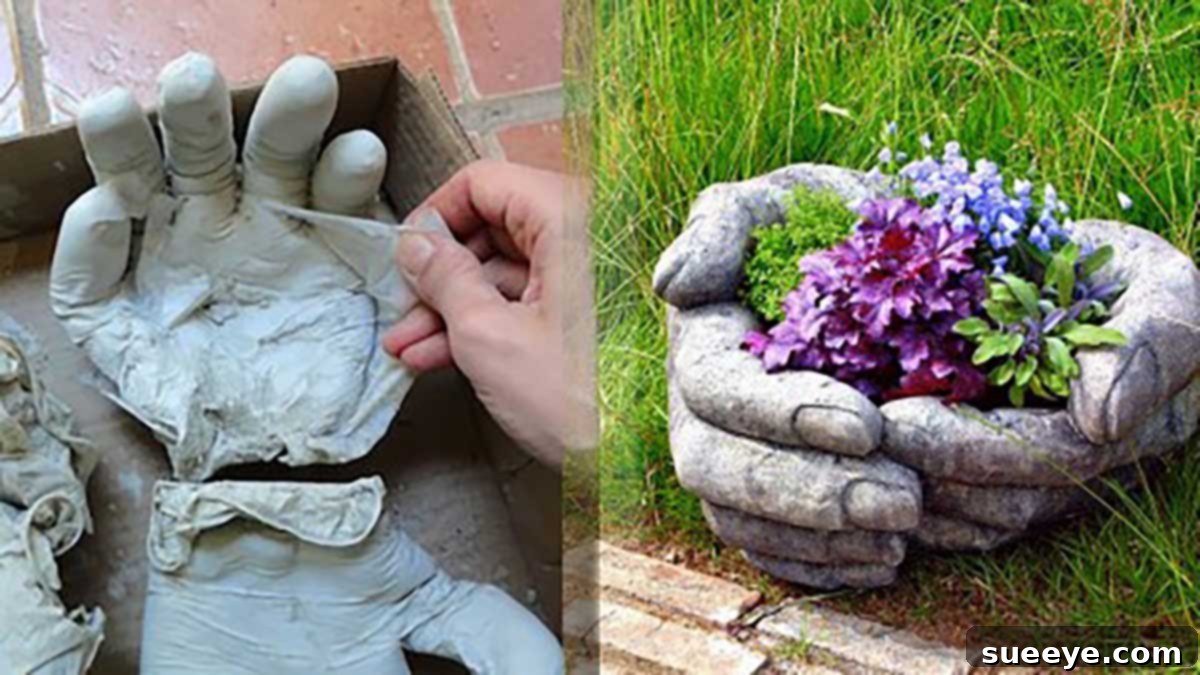
Crafting Personality: Your Guide to DIY Concrete Hand Planters
There’s an undeniable charm to concrete planters, isn’t there? Their raw, industrial aesthetic adds a sophisticated touch to any setting, whether indoors or out. But what if you could take that inherent charm and infuse it with a touch of personal flair, a dash of quirky uniqueness that truly makes a statement? Enter the world of DIY concrete hand planters – an ingenious way to bring both elegance and whimsy into your home and garden.
Imagine graceful concrete hands emerging from the earth, cradling vibrant succulents or delicate blooms. These captivating planters are more than just vessels for plants; they are conversation starters, pieces of art that reflect your creativity. While commercially available versions of these unique hand planters often come with a surprisingly hefty price tag, the good news is that crafting your own is incredibly straightforward and budget-friendly. This guide will walk you through everything you need to know to create these stunning pieces, turning a simple bag of concrete into cherished decorative elements.
Why Choose DIY Concrete Hand Planters? Unveiling the Benefits
Opting for a DIY approach to creating your concrete hand planters offers a multitude of advantages beyond just cost savings. It’s an opportunity to engage in a rewarding creative process that yields truly personalized results.
Unbeatable Affordability
One of the primary motivators for many DIY enthusiasts is the significant cost reduction. A single bag of concrete, combined with a few inexpensive supplies, can produce multiple hand planters at a fraction of the cost of purchasing just one from a boutique store. This makes it an incredibly accessible project for anyone looking to enhance their decor without breaking the bank.
Embrace Unique Personalization
When you craft your own, no two hand planters will ever be exactly alike. Each crease, every subtle curve of the ‘hand’ will bear the mark of your creation, offering an unparalleled level of uniqueness that mass-produced items simply cannot match. You can experiment with different glove sizes, hand positions, and even concrete colors to achieve a look that perfectly complements your personal style and existing decor.
The Joy of Creation and Self-Expression
There’s immense satisfaction in creating something beautiful and functional with your own hands. This project is not just about the end product; it’s about the journey of transforming raw materials into a work of art. It’s a wonderful way to express your creativity, de-stress, and feel a tangible sense of accomplishment when you display your finished pieces.
Durability That Lasts
Concrete is renowned for its strength and resilience. Once properly cured, your DIY concrete hand planters will be incredibly durable, capable of withstanding various weather conditions if placed outdoors. This makes them a long-lasting addition to your garden or home decor, offering years of beauty with minimal upkeep.
Gathering Your Tools: What You’ll Need
The beauty of this project lies in its simplicity. You won’t need an arsenal of specialized tools, just a few key items that are readily available at most hardware or craft stores.
The Essential Ingredients: Concrete and Gloves
- Bag of Concrete Mix: A standard concrete mix designed for general purpose use will work perfectly. Quikrete or similar brands are excellent choices. Ensure it’s a fine-grain mix for smoother results, as large aggregates can hinder the detailing of the hand shape. Consider the bag size based on how many planters you intend to make.
- Rubber House Cleaning Gloves: These are the star of the show! Opt for sturdy, durable rubber gloves that won’t easily tear. The size of the gloves will determine the size of your concrete hands. Experiment with different sizes – larger gloves for more prominent displays, smaller ones for delicate arrangements or gift items. Heavy-duty kitchen or industrial cleaning gloves are ideal.
Mixing and Shaping Supplies
- Large Mixing Bucket: A sturdy plastic bucket or an old washing basin is perfect for mixing your concrete. It needs to be large enough to comfortably mix the batch of concrete required for your chosen number of hands.
- Water: Essential for mixing the concrete to the right consistency.
- Trowel or Stirring Stick: For thoroughly mixing the concrete and water. An old garden trowel or a strong wooden stick will suffice.
- Stands or Supports (Optional but Recommended): To help shape the concrete hands as they dry. These could be old containers, sand, gravel, or even other buckets that allow the gloves to be propped up in the desired ‘cupped hand’ position.
- Safety Gear: Always wear a dust mask when handling dry concrete mix to avoid inhaling particles. Rubber gloves are already part of the project, but safety glasses are also a good idea.
For the Finishing Touches
- Assortment of Plants: Once your concrete hands are dry, fill them with your favorite succulents, small flowering plants, or even air plants. Their unique form perfectly complements a wide variety of greenery.
- Drainage Material (Optional): Small pebbles or gravel at the bottom of the hand cavity can help with drainage for your plants.
- Concrete Sealer (Optional): To protect the concrete from moisture, staining, and enhance its longevity, especially if placed outdoors or used with live plants.
- Sandpaper or Grinding Tool (Optional): For smoothing out any rough edges once the concrete has fully cured.
The Simple Steps to Crafting Your Concrete Hands
While this isn’t a direct step-by-step tutorial (we’ll link to an excellent visual guide below!), understanding the general process will build your confidence for this rewarding DIY adventure.
1. Prepare Your Workspace and Mix the Concrete
Choose a well-ventilated area, preferably outdoors or in a garage. Lay down a tarp or old newspapers to protect your surface. Don your safety gear (mask and gloves). In your large mixing bucket, combine the dry concrete mix with water according to the manufacturer’s instructions. The key is to achieve a consistency similar to thick pancake batter or mud – wet enough to pour and mold, but not so watery that it’s runny. A thicker consistency will hold its shape better.
2. Fill the Gloves
Carefully pour or spoon the mixed concrete into each rubber glove. Fill them completely, making sure to work the concrete into the fingers to eliminate any air bubbles. Gently tap and shake the gloves to help the concrete settle and ensure it fills every nook and cranny. You want a solid, dense concrete hand.
3. Shape Your Hands
This is where the magic happens! Once the gloves are filled, you’ll need to strategically prop them up to create the desired ‘cupped hand’ or ‘holding’ gesture. You can use sand, gravel, or even other bowls/buckets to create a mold that supports the glove in the position you want. Curl the fingers slightly inwards to form a natural bowl for plants. This step is crucial for defining the final look of your planter.
4. The Waiting Game: Curing and Drying
Patience is key! Concrete needs time to cure and dry properly to reach its full strength. This usually takes at least 24-48 hours, but sometimes longer depending on humidity and temperature. For best results, allow them to cure in a cool, shaded area. You might even want to mist them with water occasionally during the initial curing phase to prevent them from drying too quickly and cracking. Do NOT rush this stage.
5. Demolding and Finishing
Once the concrete is completely hard and dry, it’s time to carefully remove the rubber gloves. This can be a bit tricky; you might need to cut the gloves away with scissors. Be gentle to avoid damaging your newly formed concrete hands. After demolding, inspect your planters. If there are any rough edges, you can gently sand them down. For added protection and a finished look, apply a concrete sealer, especially if they will be exposed to moisture or outdoor elements.
Creative Ways to Display Your Concrete Hand Planters
The versatility of these unique planters means they can enhance virtually any space. Here are some ideas to inspire your decorating:
Welcoming Entryway Accents
As mentioned, placing a pair by your front door creates an incredibly welcoming and distinctive display. Imagine guests being greeted by these artistic hands, overflowing with vibrant annuals or resilient succulents. They immediately convey a sense of warmth and originality to your home’s exterior.
Garden Focal Points
Incorporate them into your garden beds as whimsical focal points. A collection of concrete hands, each holding a different plant, can create an enchanting tableau. Their neutral grey tone provides a beautiful contrast to the lush greens and bright colors of your garden flora.
Chic Indoor Decor
Bring the charm indoors! These planters look stunning on bookshelves, coffee tables, office desks, or even bathroom vanities. They add an industrial-chic touch that blends seamlessly with various interior design styles, from modern minimalist to rustic farmhouse. They are perfect for displaying air plants, small cacti, or other low-maintenance indoor greenery.
Thoughtful, Handmade Gifts
Struggling to find the perfect gift for a friend or family member? A handmade concrete hand planter, perhaps filled with a beautiful succulent, makes an incredibly thoughtful and personal present. It’s a gift that truly shows you care and have invested time and creativity into its creation.
Beyond the Basics: Customization and Care
Once you’ve mastered the basic technique, feel free to experiment! You can add concrete dye to your mix for colored hands, or paint them after they’re cured. Consider distressing them for an aged look, or leaving them in their natural, raw state for an authentic concrete aesthetic.
For plant care, remember that concrete is porous. If you’re planting directly into the hands, ensure good drainage. Adding a layer of gravel at the bottom before potting soil can help. For outdoor use, a sealant is highly recommended to protect the concrete from moisture, frost, and UV rays, which can cause deterioration over time.
Embrace Your Inner Crafter!
The journey from a simple bag of concrete to a collection of captivating hand planters is an incredibly satisfying one. These DIY concrete hand planters are more than just a home decor trend; they are a statement of individuality, a testament to the beauty of handmade creations, and a charming way to bring life and personality to any corner of your world.
Ready to get started? For a comprehensive visual guide, we highly recommend checking out the original tutorial that inspired this project. Many excellent resources, like DIY Fun Ideas, offer step-by-step photos that complement this overview and help bring the process to life. Their site provides fantastic detailed instructions for those who prefer visual guidance over a video tutorial:
Find detailed step-by-step photos and additional insights at:
DIY Fun Ideas – DIY Concrete Hand Planters & Bowls
Happy crafting, and prepare to receive countless compliments on your uniquely expressive concrete hand planters!