
Master the Art of the New Year’s Star Quilt Block: Your Ultimate Guide
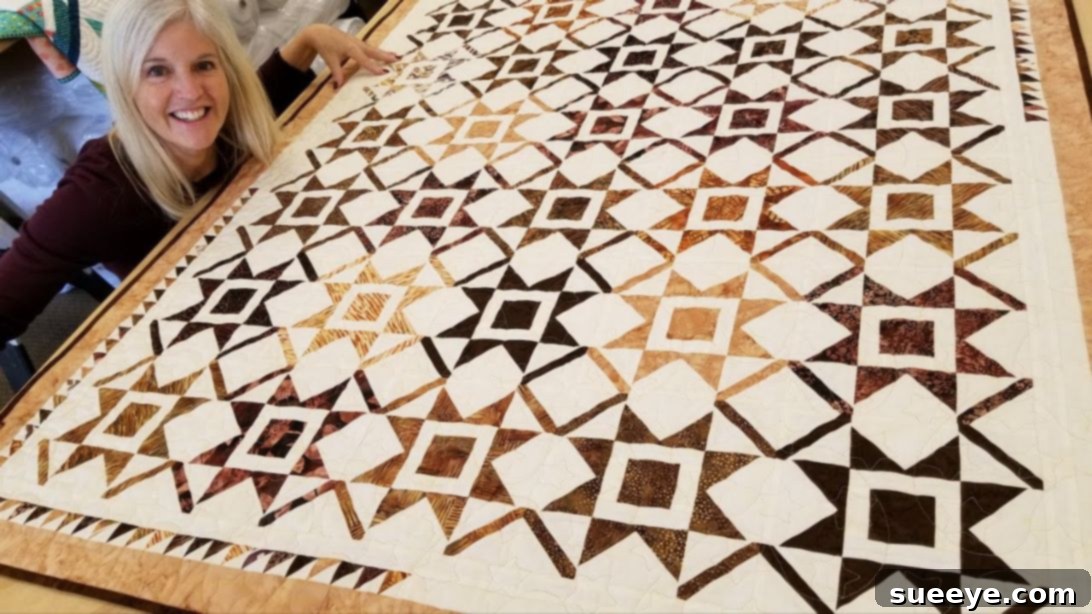
Embark on an exciting quilting journey with one of the most captivating and rewarding star patterns you’ll ever encounter: the exquisite New Year’s Star Quilt Block, brilliantly designed by the quilting experts at Jordan Fabrics. While its intricate appearance might initially suggest a complex endeavor, rest assured that this visually stunning block is surprisingly approachable. This comprehensive tutorial will guide you through each step with clarity and precision, ensuring that even confident beginners can achieve magnificent results with ease. Prepare to transform simple fabric pieces into a dazzling star that will be the focal point of any quilting project. For a visual walkthrough, don’t forget to watch the accompanying video tutorial provided by Jordan Fabrics, complementing these detailed written instructions.
The New Year’s Star Quilt Block is not just a pattern; it’s an opportunity to create something truly special. Its symmetrical beauty and bold design make it perfect for celebratory themes, holiday decorations, or simply as a striking addition to a larger quilt. By following our step-by-step guide, you’ll not only construct a beautiful block but also hone valuable quilting skills, from precise cutting to expert seam pressing. Let’s gather our materials and begin crafting this magnificent star!
Essential Materials for Your New Year’s Star Quilt Block
Successful quilting begins with selecting the right materials and having the necessary tools at hand. For this New Year’s Star Quilt Block, the fabric requirements are modest, making it an excellent project for using up scraps or diving into pre-cuts. Precision is key in quilting, so ensure your cutting tools are sharp and accurate.
- Feature Fabric:
- One (1) 10-inch Layer Cake square, or
- One (1) 2½-inch Jelly Roll strip.
- Choosing your feature fabric: This fabric will form the star points and central square, so select a print that truly shines. Layer Cake squares offer a generous canvas for cutting multiple pieces, while a Jelly Roll strip provides a continuous piece for efficiency. Consider a vibrant print or a fabric with a festive motif to enhance the “New Year’s Star” theme.
- Background Fabric:
- One (1) 3-inch Width of Fabric (WOF) strip.
- Understanding WOF: “Width of Fabric” typically refers to the selvage-to-selvage measurement of fabric as it comes off the bolt, usually between 42 to 44 inches wide. This strip will create the essential contrast that makes your star pop. A solid, light-colored fabric like white, cream, or a subtle tone-on-tone print works beautifully to highlight the star’s points.
- General Quilting Supplies:
- Rotary Cutter, Mat, and Rulers: Essential for precise and efficient cutting. A good quality ruler with clear markings will be invaluable.
- Sewing Machine: In good working order, threaded with an appropriate all-purpose polyester or cotton thread.
- Iron and Ironing Board: Crucial for pressing seams accurately, which contributes significantly to a flat and well-constructed block.
- Fabric Scissors: For any smaller cuts or trimming threads.
- Pins or Fabric Clips: To hold fabric pieces securely in place before sewing.
- Seam Ripper: Every quilter’s essential companion, just in case!
Having these tools and materials ready before you start will streamline your quilting process and help you maintain accuracy throughout the project.
Step-by-Step Instructions: Crafting Your New Year’s Star Quilt Block
Follow these detailed instructions carefully to construct your stunning New Year’s Star Quilt Block. Remember, precision in cutting and pressing are your best friends in quilting.
Step 1: Precision Cutting of Feature Fabric
From your chosen feature fabric – either the 10-inch Layer Cake square or the 2½-inch Jelly Roll strip – you will need to cut specific smaller pieces. Use your rotary cutter, mat, and ruler for clean, accurate cuts. Accuracy at this stage directly impacts the final shape and alignment of your star.
- Cut nine (9) pieces of 2½-inch squares. These will form the central element and the corner sections of your star points.
- Cut four (4) pieces of 1 x 5-inch strips. These strips will be incorporated into the corner units of the block.
Organize these cut pieces immediately to avoid confusion as you progress through the steps.
Step 2: Preparing the Background Fabric Components
Now, turn your attention to the 3-inch Width of Fabric (WOF) background strip. This fabric will provide the necessary contrast and structure around your star’s points and central unit. Again, meticulous cutting is paramount.
- Cut four (4) pieces of 3-inch squares.
- Cut four (4) pieces of 3 x 4-inch rectangles.
- Cut two (2) pieces of 4 x 1¼-inch rectangles.
- Cut two (2) pieces of 2½ x 1¼-inch rectangles.
Once all pieces are cut, it’s a good practice to double-check your measurements against the instructions. Labeling your fabric stacks (e.g., “2.5-inch squares,” “3×4-inch rectangles”) can also be incredibly helpful, especially for more complex blocks.
Step 3: Constructing the Heart of the Star Block
The very center of your New Year’s Star block starts to take shape in this step. This central unit acts as the focal point from which the star points will radiate. It should finish as a 4-inch square before it’s incorporated into the larger block.
Begin by selecting one (1) of the 2½-inch feature fabric squares. This will be the absolute core of your star. Next, take the two (2) 1¼ x 2½-inch background rectangles and sew one to the top edge and one to the bottom edge of your central square. Use a precise ¼-inch seam allowance. After stitching, press the seams towards the center square. This technique helps to reduce bulk where seams meet later and creates a crisper finish.
Subsequently, take the two (2) 1¼ x 4-inch background rectangles. Sew one to each of the remaining sides of your now-elongated central unit. Once these are sewn, press these seams towards the center as well. This consistent pressing direction ensures a smooth, flat central block. When completed and pressed, this unit should measure exactly 4 inches by 4 inches, ready to anchor your star design.
Step 4: Crafting the Dynamic Star Points
This is where the magic of the star truly begins to emerge! You will create four identical star points that radiate outwards from your central block. This technique is often used to create flying geese or similar angled units efficiently.
Gather eight (8) of the 2½-inch feature fabric squares and four (4) of the 4 x 3-inch background rectangles. Take one 2½-inch square and use a fabric marking tool to draw a diagonal line from one corner to the opposite corner. This line will serve as your sewing guide.
Now, place this marked square right sides together onto the lower right-hand corner of one of the 4 x 3-inch background rectangles. Ensure the raw edges are aligned perfectly. Stitch precisely along the drawn diagonal line. For efficiency and to create an extra unit, sew a second seam approximately ½-inch away from your first stitching line, towards the outer corner of the rectangle.
With both lines stitched, carefully cut the fabric between the two sewn lines. You will now have two distinct units. Set aside the smaller half-square triangle unit created by the outer seam – this can be saved for a border or another project! Take the larger unit that forms the star point. Press the seam allowance towards the print fabric, directing it towards the lower right corner. This ensures the background fabric folds neatly under the print, creating a clean, defined point.
Repeat this entire process with a fresh 2½-inch print square, placing it on the lower left-hand corner of the same 4 x 3-inch background rectangle. Draw, stitch, cut, and press as before. The result should be a crisp 4 x 3-inch star point unit, featuring two angled print sections against the background. You need a total of four (4) of these star point units, so repeat the entire process three more times until all eight 2½-inch squares and four 4 x 3-inch background rectangles have been used to create four perfect star points.
Step 5: Forming the Decorative Corner Squares
The corner squares of your New Year’s Star quilt block add another layer of detail and frame the star beautifully. These units combine the remaining feature fabric strips with background triangles.
Retrieve the four (4) 1 x 5-inch feature fabric rectangles and the four (4) 3-inch background squares. Take each 3-inch background square and cut it in half diagonally from one corner to the opposite corner. This will yield two (2) right-angle triangles from each square, giving you a total of eight background triangles.
Now, take one of the 1 x 5-inch print rectangles. Carefully center one background triangle on top of one end of the rectangle, aligning the raw edges. The longest edge of the triangle should run perpendicular to the rectangle. Sew along the edge where the triangle meets the rectangle, using a ¼-inch seam allowance. Press the seam allowance towards the triangle to create a neat finish.
Repeat this process on the opposite end of the same rectangle, centering another background triangle and sewing it in place. Once sewn and pressed, you will see a small amount of excess print fabric extending beyond the triangle points. Carefully trim off this excess fabric at each corner, creating a clean, crisp 3-inch square unit. This unit now has a central print strip framed by background triangles. Repeat this entire process three more times to create a total of four (4) identical corner blocks for your quilt block.
Step 6: Assembling the New Year’s Star Quilt Block
With all your individual components prepared – the central block, the four star points, and the four corner squares – it’s time to bring them all together to form the complete New Year’s Star Quilt Block. Think of this as a classic nine-patch layout, where you’ll arrange your units into three rows, each containing three squares.
First, lay out all your constructed units on a flat surface, such as your design wall or a large table, following the arrangement shown in the image below. This visual reference is crucial for correct placement. The central block goes in the middle, surrounded by the star points, and the corner squares fill the outer corners.
- Top Row: Place a corner square, then a star point, then another corner square.
- Middle Row: Place a star point, then your central block, then another star point.
- Bottom Row: Place a corner square, then a star point, then another corner square.
Carefully align the raw edges of the units within each row and pin them together. Sew the units of each row together using an accurate ¼-inch seam allowance. Now comes a critical step for flat and well-matched seams: pressing.
- For the **top and bottom rows**, press the seam allowances *away* from the center unit of each row.
- For the **center row**, press the seam allowances *towards* the central block.
This alternating pressing technique is known as “nesting seams.” It allows the seams from adjoining rows to interlock when you sew the rows together, reducing bulk and ensuring perfectly aligned points where your seams meet. After pressing, your three rows are ready to be joined.
Pin the top row to the middle row, carefully matching all seam intersections. The nested seams should naturally fit together. Stitch along this pinned edge. Then, pin the bottom row to the combined top and middle rows, again matching seams meticulously. Stitch this final seam. Once all three rows are sewn together, give your finished block a final, thorough press. Press the seam allowances of the two major seams (where the rows join) *away* from the center row. This helps flatten the entire block and gives it a professional finish. Your stunning New Year’s Star Quilt Block is now complete!
Why Choose the New Year’s Star Quilt Block?
The New Year’s Star Quilt Block isn’t just another pattern; it’s a timeless design that offers versatility, visual appeal, and a rewarding challenge for quilters of varying skill levels. Here’s why this particular block stands out:
- Stunning Visual Impact: The intricate arrangement of points and colors creates a dynamic starburst effect that immediately draws the eye. It’s a block that looks far more complicated than it actually is, impressing onlookers with your quilting prowess.
- Versatile Application: This block is incredibly adaptable. Make several to create a striking full-sized quilt, or use just one as a standalone mini-quilt for wall décor. It’s also perfect for smaller projects like festive cushion covers, table runners, placemats, or even as the central motif for a tote bag.
- Skill-Building Opportunity: While straightforward in its construction, this block offers excellent practice for fundamental quilting techniques. You’ll refine your precision cutting, master the scant ¼-inch seam allowance, and perfect your pressing methods – all essential skills for advancing your quilting journey. The star point construction, in particular, is a fantastic technique to add to your repertoire.
- Celebratory Theme: True to its name, the “New Year’s Star” evokes a sense of celebration, hope, and new beginnings. Using bright, festive fabrics can amplify this theme, making it ideal for holiday-themed projects or gifts. However, by simply changing your fabric choices, it can suit any season or décor style.
Expert Tips for Quilting Success
To ensure your New Year’s Star Quilt Block turns out perfectly, keep these professional tips in mind:
- The Scant ¼-Inch Seam: In quilting, a “scant ¼-inch seam” is often preferred. This means your seam allowance is just a thread’s width less than a true ¼-inch. This tiny adjustment accounts for the thickness of the thread and the fabric, ensuring your finished block measures precisely what it’s supposed to. Test your sewing machine on scrap fabric to find your perfect scant ¼-inch seam.
- Pressing with Care: Pressing is not ironing. When pressing, you lift and place the iron, rather than sliding it, which can distort your fabric. Always press seams flat first, then press them open or to one side as directed. A dry iron is often best, or use steam sparingly, especially if your fabric is prone to stretching.
- Chain Piecing: To save time and thread, use chain piecing when sewing multiple identical units. Sew one set of pieces, then without lifting the presser foot or cutting the thread, feed the next set of pieces directly under the needle. This creates a “chain” of sewn units that can be cut apart later.
- Organize and Label: With multiple pieces and units being created, keeping them organized is crucial. Use small trays, zip-top bags, or even sticky notes to label your cut pieces and completed units for each step.
- Fabric Selection: For a dramatic star effect, choose fabrics with good contrast between your feature fabric and background. If your feature fabric is busy, a solid or tone-on-tone background will help the star pattern stand out.
- Square Up Your Block: After the entire block is assembled, use a large square ruler to “square up” your block. Trim off any tiny excess fabric around the edges to ensure it measures a perfect square (usually around 12.5 inches unfinished for this block, depending on initial cuts). This step is vital for ensuring your blocks fit together perfectly if you’re making a larger quilt.
Unleash Your Creativity: Variations and Customization
While the classic New Year’s Star Quilt Block is beautiful, don’t hesitate to personalize it! Here are a few ideas to spark your creativity:
- Color Palette Power: Experiment with different color schemes. Imagine a patriotic star in reds, whites, and blues, or a calming star in various shades of blues and greens. A scrappy star, using multiple small print scraps for the feature fabric, can also create a wonderfully unique look.
- Fussy Cutting: For the central 2½-inch square, consider fussy cutting a specific motif from your fabric. If you have a fabric with small flowers, animals, or other distinct images, carefully cut the square to center one of these motifs for a charming detail.
- Background Play: While a solid background provides excellent contrast, a subtle patterned background (like a tone-on-tone or a small geometric print) can add texture and depth without distracting from the star itself.
- Border Variations: The half-square triangles you set aside in Step 4 can be incorporated into a narrow border around your finished block, or even saved to create another small project.
Conclusion: Your Shining New Year’s Star
Congratulations! You’ve successfully navigated the steps to create the magnificent New Year’s Star Quilt Block. What might have appeared daunting at first has now transformed into a beautiful, tangible piece of your quilting journey. This block, with its striking points and elegant design, is a testament to the power of precise cutting, careful sewing, and deliberate pressing.
Whether this block is the beginning of a larger, festive quilt, a charming wall hanging, or a thoughtful handmade gift, its impact is undeniable. The skills you’ve honed and the confidence you’ve gained in mastering this pattern will serve you well in all your future quilting endeavors. We encourage you to share your finished New Year’s Star creations with the quilting community and tag Jordan Fabrics – they love to see your beautiful work!
Thank you for choosing this tutorial to guide you. Happy quilting, and may your creative stars always shine brightly!