
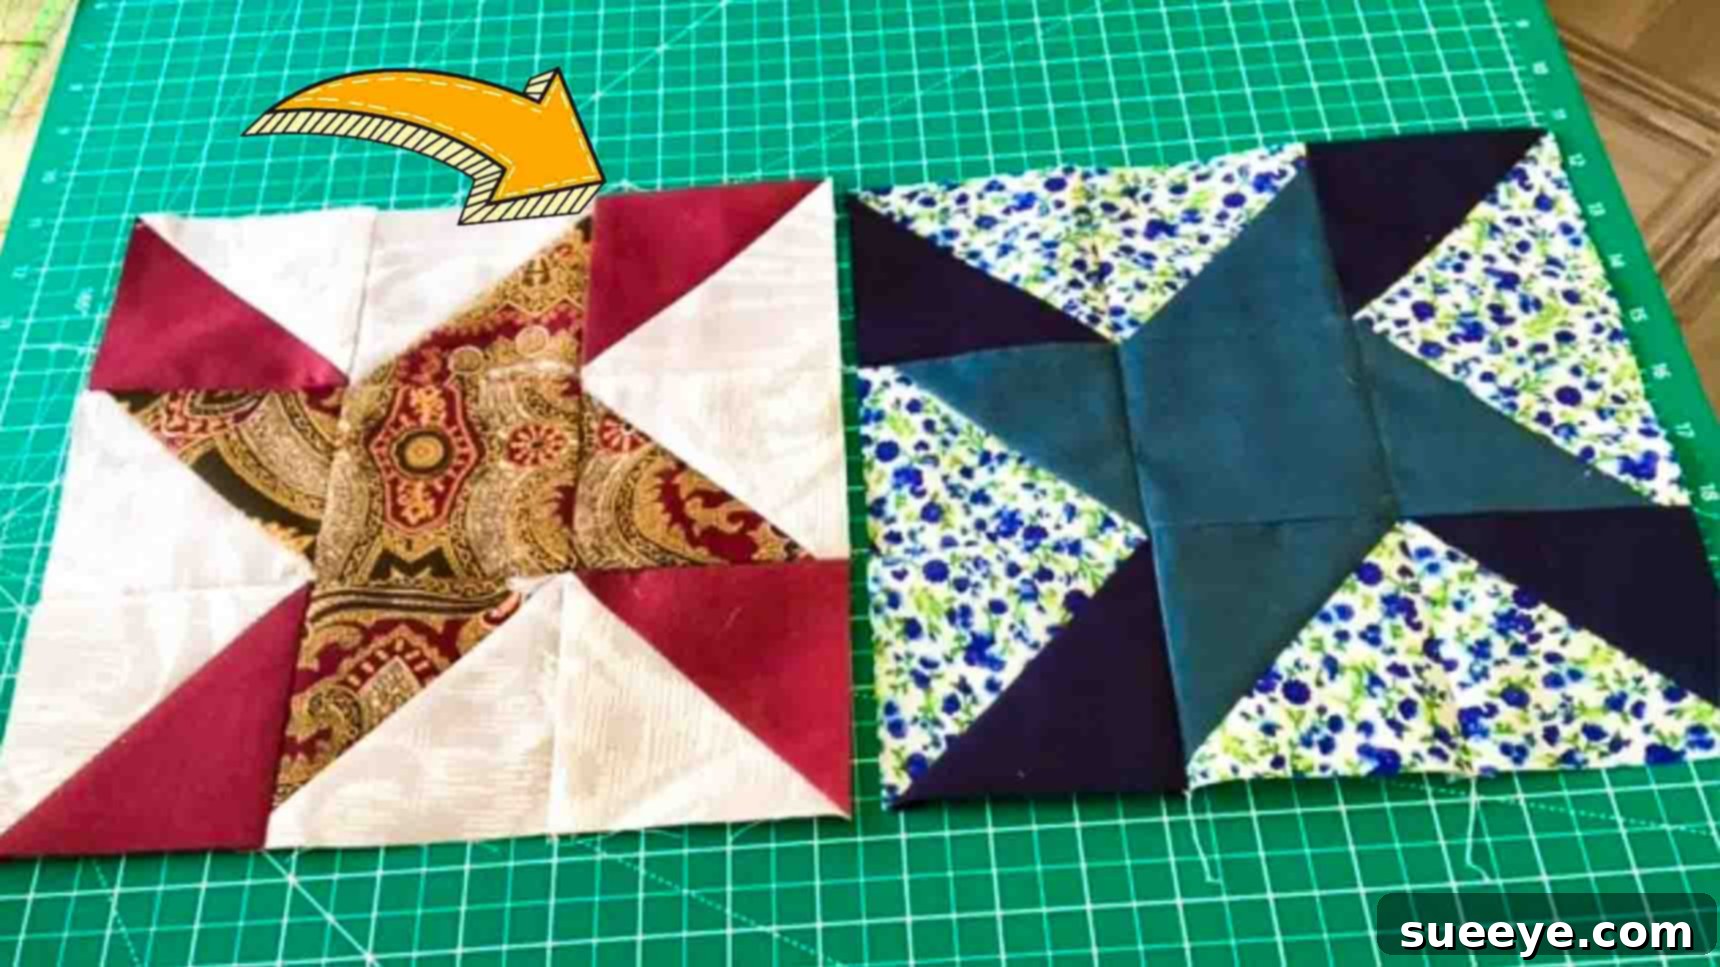
Mastering the Eccentric Star Quilt Block: A Beginner’s Guide to Patchwork Success
Embarking on your quilting journey? If you’re searching for a rewarding and beginner-friendly project, you’ve landed in the perfect place. We understand the excitement and perhaps a touch of apprehension that comes with starting a new craft, especially one as intricate as quilting. But fear not! This comprehensive guide will walk you through creating a stunning piece that’s both beautiful and surprisingly simple: the Eccentric Star block.
Inspired by the fantastic tutorial from The Melody of Sewing on Youtube, this patchwork block quilt project is specifically designed for novices. Its straightforward construction means no complicated techniques are required, ensuring you’ll achieve fantastic results right from the start. This project is ideal for honing your basic sewing skills or for crafting a heartfelt, personalized gift for someone special. Even seasoned quilters will find joy and a refreshing simplicity in making this charming block. Follow along with our detailed instructions and watch the video tutorial for a visual step-by-step guide.
Why the Eccentric Star Block is Perfect for Beginners
The Eccentric Star block offers a unique blend of visual appeal and simplicity, making it an excellent choice for those new to quilting. Its “eccentric” nature comes from the playful arrangement of half-square triangles, creating a dynamic, almost spinning effect that captivates the eye without demanding advanced techniques. Unlike some complex star patterns, this block relies on fundamental cutting and sewing skills, allowing you to build confidence with each stitch.
- Skill Development: Perfect for practicing accurate cutting, consistent seam allowances, and pressing techniques – the foundational pillars of quilting.
- Quick Gratification: The block comes together relatively quickly, providing a sense of accomplishment that encourages you to continue your quilting adventure.
- Versatile Design: While stunning on its own, this block can be replicated to create larger quilts, incorporated into bags, pillows, or even table runners.
- Visually Striking: Despite its ease, the final result is a beautiful, intricate-looking star that will impress friends and family.
Gathering Your Quilting Essentials
Before diving into the creative process, gathering the right tools and materials is crucial for a smooth and enjoyable experience. High-quality fabric and precise cutting tools are your best friends in quilting. Here’s what you’ll need:
- Four Different Colors of Fabric: Choose medium-weight quilting cottons that contrast well with each other. Consider a mix of prints and solids, or varying shades of a similar color palette to create depth. Aim for at least a fat quarter (approximately 18″ x 22″) of each color to ensure you have enough.
- Background Fabric: A solid, lighter-colored fabric (like white, cream, or a pale gray) often works best to make your star colors truly pop. This will form the contrasting backdrop for your star points.
- Rotary Cutter: A sharp rotary cutter (45mm is standard) is essential for precise, straight cuts. It’s much faster and more accurate than scissors for quilting.
- Cutting Mat: Protect your work surface and your rotary blade with a self-healing cutting mat. A 18″ x 24″ mat is a good versatile size to start with.
- Quilting Ruler: A clear acrylic quilting ruler (at least 6″ x 24″ or a square 12.5″ x 12.5″ for squaring up) with clear measurements and angles is indispensable for accurate cutting and trimming.
- Sewing Machine: A basic sewing machine capable of a straight stitch is all you need. Ensure it’s in good working order and has a fresh needle.
- Thread: High-quality 100% cotton thread that matches or blends with your fabrics.
- Iron and Ironing Board: Crucial for pressing seams neatly and ensuring flat blocks.
- Fabric Marker or Pencil: For drawing diagonal lines on your fabric squares.
- Pins or Fabric Clips: To hold fabric pieces securely in place before sewing.
Step-by-Step Guide: Crafting Your Eccentric Star Block
Accuracy is key in quilting, especially in the cutting and initial sewing stages. Take your time with each step, and remember that practice makes perfect!
Step 1: Preparing Your Fabric and Creating Half-Square Triangles (HSTs)
This initial step involves creating the foundational units of your star block: half-square triangles, often abbreviated as HSTs. These versatile units are a staple in many quilt patterns and mastering them here will serve you well in future projects.
- Cut Your Squares: From each of your four main colored fabrics, cut one 4 ½” x 4 ½” square. Similarly, cut four 4 ½” x 4 ½” squares from your background fabric. This will give you four colored squares and four background squares.
- Mark Your Diagonal Lines: Take each of your four background fabric squares. Using a fabric marker or pencil and your quilting ruler, draw a single diagonal line from one corner to the opposite corner. This line will serve as your guide for cutting later.
- Pair and Pin: Place one main colored fabric square on top of each background fabric square, right sides together. Ensure all edges are perfectly aligned. Pin them securely in place to prevent shifting during sewing.
- Sew the Seams: With your sewing machine, sew a seam on both sides of the diagonal line you just drew. Maintain a consistent ¼” seam allowance from the drawn line. This means you will have two parallel stitch lines on each paired square.
- Cut and Press: Once sewn, carefully cut right along the drawn diagonal line between your two stitch lines. You will now have two triangular units from each pair. Open these units up and press the seam allowances open (or to the darker fabric side, if preferred, for less bulk). You’ve just created eight half-square triangles (HSTs)!
- Trim to Size: This is a critical step for ensuring your block lays flat and squares up nicely. Using your quilting ruler and rotary cutter, carefully trim each of your eight HSTs to a precise 4″ x 4″ square. This step corrects any slight inaccuracies in your sewing and ensures all your units are uniform.
Step 2: Assembling Your Eccentric Star Block
Now that you have your individual components, it’s time to arrange and stitch them into the beautiful Eccentric Star pattern. This step involves carefully laying out your pieces and then sewing them together, row by row.
- Lay Out the Design: Take one solid 4″ x 4″ square (from your main colored fabrics – perhaps one of the colors not used to make HSTs, or an extra background square for the center). Place this solid square in the very center of your design area. Then, arrange the eight half-square triangles around it, forming a pinwheel-like pattern. Refer to the image above for the precise layout. The “eccentric” nature often comes from ensuring the dark and light sections of your HSTs are consistently oriented to create that dynamic star effect. Take your time to get the orientation just right – it makes all the difference!
- Sew the Units into Rows: Once you are satisfied with your layout, begin sewing the individual units together to form three distinct rows. Usually, you’ll sew three squares together for the top row, three for the middle, and three for the bottom. Always use a consistent ¼” seam allowance. Pin each small seam before sewing to ensure accuracy.
- Sew the Rows Together: After pressing the seams of each individual row (you can press seams open or towards the darker fabric, alternating directions for rows to help “nest” them), carefully align the rows with each other. Pin them precisely, paying close attention to where the seams meet to ensure your points align. Stitch the rows together with a ¼” seam allowance.
- Final Pressing: Once the block is fully assembled, give it a final press. Pressing is crucial for setting seams and creating a flat, crisp quilt block. You can press the seams open or to one side, depending on your preference and how it affects the bulk of the seams. Your Eccentric Star block is now complete!
Expanding Your Vision: Creating a Full Quilt
One completed Eccentric Star block is a fantastic achievement, but the real magic of quilting lies in combining multiple blocks to create a larger masterpiece. The beauty of this pattern is its repeatability.
- Replicate the Block: Simply repeat Steps 1 and 2 to create as many Eccentric Star blocks as needed for your desired quilt size. Consistency in your cutting and sewing will ensure all your blocks are the same size, making the final assembly much easier.
- Calculating Quilt Size: Determine the overall dimensions of the quilt you wish to make (e.g., a lap quilt, twin, queen, or king size). Measure your finished block and calculate how many blocks you’ll need both horizontally and vertically to reach your desired dimensions. For instance, if your finished block is 12″ x 12″ and you want a 60″ x 72″ lap quilt, you’d need 5 blocks across and 6 blocks down (30 blocks total).
- Sashing and Borders: To enhance your design, consider adding sashing (strips of fabric sewn between blocks) and borders (strips around the perimeter of the quilt top). Sashing can provide visual separation and an opportunity to introduce another color or pattern. Borders frame your quilt and can help adjust its final size.
- Quilt Top Assembly: Once you have all your blocks and any sashing/border pieces, you’ll sew them together into rows, and then sew the rows together to form the complete quilt top.
Essential Quilting Tips for Beginners
Quilting is a journey of learning and discovery. Here are a few tips to help ensure your early projects are successful and enjoyable:
- Accuracy is Paramount: While minor imperfections are part of the handmade charm, strive for accuracy in every cut and seam. A ¼” seam allowance is standard in quilting; invest in a ¼” foot for your machine if you don’t have one.
- Press, Don’t Iron: When quilting, you “press” your seams, lifting and setting the iron down, rather than “ironing” with a back-and-forth motion. This prevents distorting your fabric pieces.
- Test Your Seam Allowance: Before starting your project, sew a few test strips of fabric together and measure your seam allowance to ensure it’s precisely ¼”. Adjust your machine if necessary.
- Take Breaks: If you find yourself getting frustrated, step away for a bit. Come back with fresh eyes, and the solution often becomes clear.
- Enjoy the Process: Quilting is a creative outlet. Don’t let the pursuit of perfection overshadow the joy of creating something beautiful with your own hands.
Beyond the Star: Project Inspirations
The Eccentric Star block is incredibly versatile. Once you’ve mastered creating a single block, the possibilities for incorporating it into various projects are endless:
- Quilted Pillows: Use one or four blocks to create a stunning throw pillow for your sofa.
- Table Runners or Placemats: A few blocks sewn together can form an elegant centerpiece for your dining table.
- Wall Hangings: Frame a single block or a small grouping to add a touch of handmade art to your home.
- Tote Bags: Incorporate the block into the design of a fabric tote bag for a personalized accessory.
- Baby Quilts: Repeat the block several times to create a charming and cozy baby quilt – a perfect gift for new parents.
Your Quilting Journey Begins Here!
Congratulations on taking the first step into the wonderful world of quilting with the Eccentric Star block! This project offers an ideal blend of challenge and reward, setting you up for success in your future quilting endeavors. Remember, every master quilter started with a single stitch, and every beautiful quilt began with a single block.
Don’t be afraid to experiment with different fabric combinations and make this design truly your own. Share your finished Eccentric Star blocks and projects with us – we love seeing your creativity! Keep practicing, keep learning, and most importantly, keep enjoying the process of bringing beautiful fabric to life. Happy quilting!