
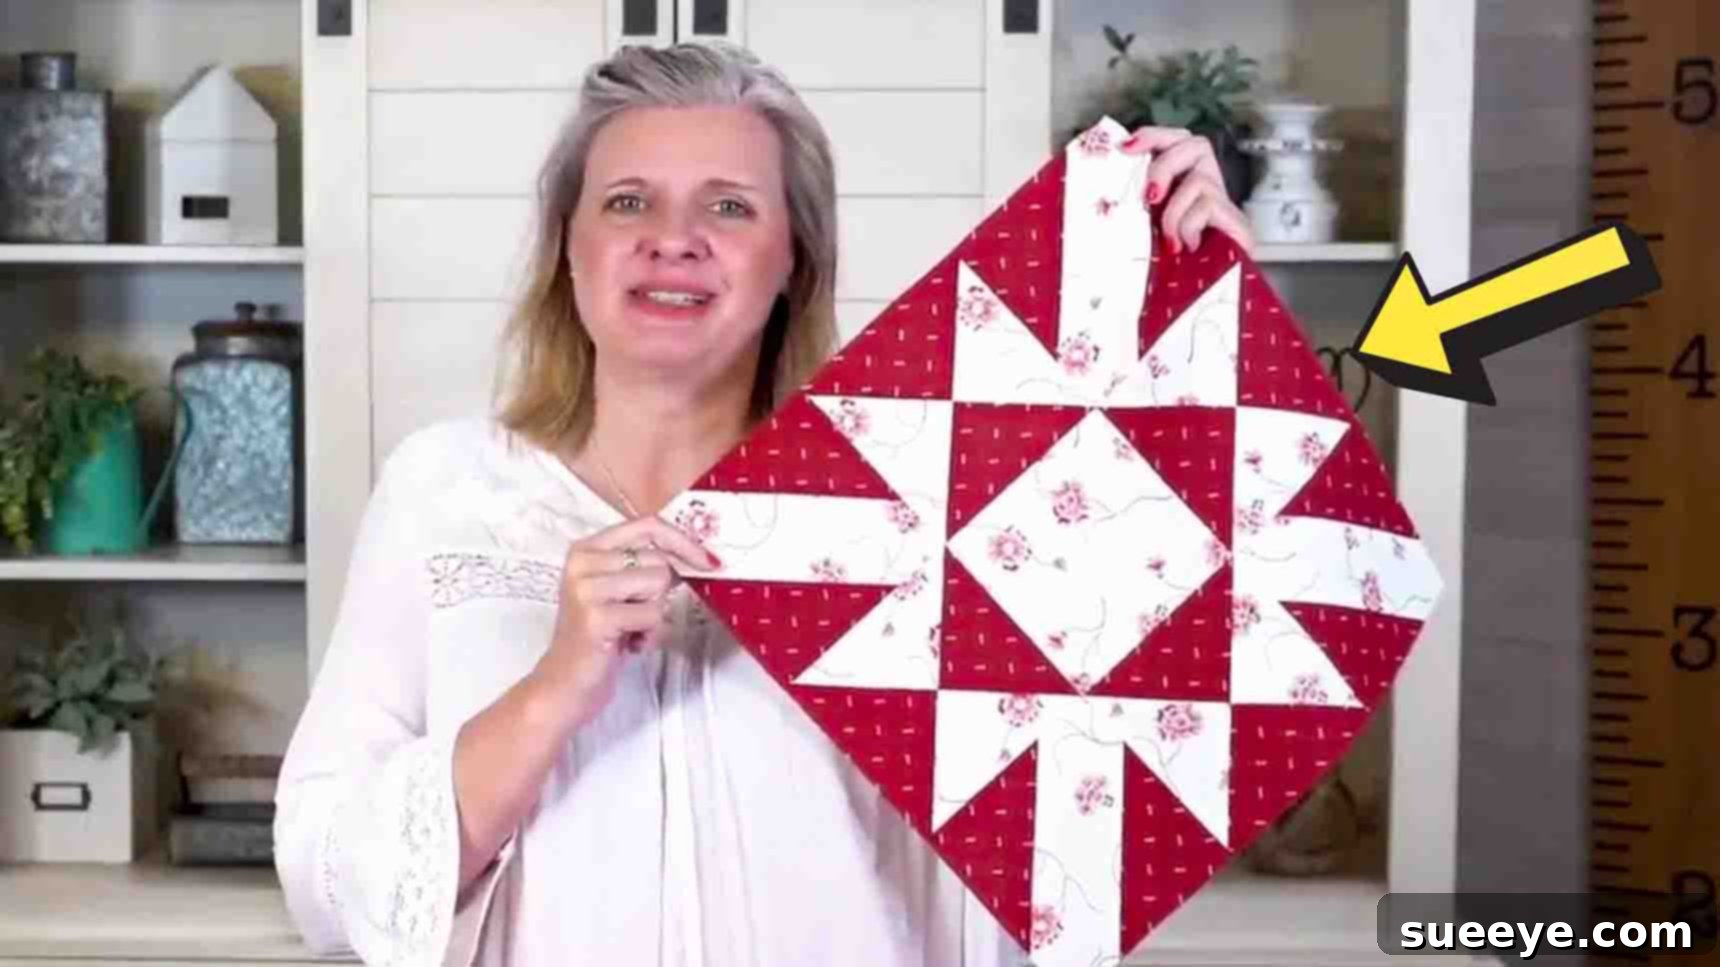
Mastering the Turnabout Quilt Block: A Classic Vintage Design Tutorial
Step into the timeless world of quilting with the captivating Turnabout Quilt Block. This classic and vintage design, popularized by experts like Fat Quarter Shop, is a true showstopper. Its intricate appearance belies a surprisingly straightforward construction, making it an ideal project for quilters of all experience levels, from eager beginners to seasoned enthusiasts. The Turnabout Block boasts incredible versatility, beautifully adapting to a wide range of fabric choices and color palettes, ensuring your finished quilt will be a unique masterpiece.
In this comprehensive guide, we’ll walk you through every step of creating this stunning block. We’ll cover everything from selecting your fabrics and precise cutting techniques to the detailed piecing process and final assembly. Get ready to transform your fabric stash into a beautiful quilt that exudes charm and elegance. Follow along with our detailed instructions and learn the secrets to mastering the Turnabout Quilt Block – a design that will surely become a cherished addition to your quilting repertoire. For a visual demonstration, the original tutorial from Fat Quarter Shop on Youtube is an excellent companion to these written instructions.
Essential Materials for Your Turnabout Quilt
Gathering the right materials is the first crucial step in creating any beautiful quilt. For this Turnabout Quilt Block tutorial, we’ve outlined the specific fabric requirements for a standard throw quilt size. Remember, precise measurements and quality materials contribute significantly to a successful and satisfying quilting experience. Always pre-wash your fabrics if you’re concerned about shrinkage or color bleeding, especially when combining light and dark prints.
For a Throw Quilt Size:
- Light Print Fabric: 2 & 5/8 yards (This will be your primary lighter background fabric, offering contrast.)
- Dark Print Fabric: 3 & 1/4 yards (This fabric will create the striking “turnabout” effect and provide depth.)
- Setting Stars Fabric: 7/8 yard (Used for creating the star points or sashing elements that frame your blocks.)
- Binding Fabric: 5/8 yard (Essential for finishing the edges of your quilt neatly and durably.)
- Backing Fabric: 3 & 1/2 yards (The fabric for the back of your quilt, providing warmth and a finished look.)
- Free Pattern: Make sure to download the official pattern for detailed diagrams and any additional insights. You can access it directly from the Fat Quarter Shop website.
- Basic Quilting Supplies: Rotary cutter, self-healing mat, quilting ruler, sewing machine, thread, pins, iron, and ironing board.
Choosing your fabrics is where your creativity truly shines! Don’t be afraid to experiment with different prints and colors. The key to the Turnabout Block’s visual impact lies in the clear distinction between your light and dark fabrics, so choose contrasting tones that complement each other beautifully.
Precision Cutting Instructions for Your Quilt Block
Accuracy in cutting is paramount in quilting, as it directly impacts how well your pieces fit together and the overall crispness of your finished block. Take your time with these steps, using a sharp rotary cutter and a reliable quilting ruler on a self-healing mat for the best results. These measurements are for creating a single Turnabout Quilt Block; you will need to repeat these cuts to create multiple blocks for your throw quilt.
Light Print Fabric:
- Fabric A: Cut 2 squares measuring 6 & 1/2 inches by 6 & 1/2 inches. (These larger squares will form part of your hourglass units.)
- Fabric B: Cut 5 squares measuring 5 & 1/2 inches by 5 & 1/2 inches. (These will serve as the center square of your block and outer corner units.)
Dark Print Fabric:
- Fabric C: Cut 2 squares measuring 6 & 1/2 inches by 6 & 1/2 inches. (Similar to Fabric A, these contribute to the hourglass units, providing contrast.)
- Fabric D: Cut 8 squares measuring 4 inches by 4 inches. (These smaller squares are essential for creating the unique corner elements of your block.)
Double-check all your measurements before making the final cut. Even a slight discrepancy can throw off your block’s dimensions, making piecing more challenging later on. Organizing your cut pieces by fabric letter will also streamline the assembly process.
Step-by-Step Directions to Construct Your Turnabout Quilt Block
Now that your materials are ready and your fabrics are precisely cut, it’s time to bring the Turnabout Quilt Block to life. Follow these detailed instructions carefully, paying close attention to seam allowances and pressing techniques, as these small details make a big difference in the final outcome of your block.
Step 1: Crafting the Corner Units (Snowball Technique)
This step focuses on creating the distinctive corner elements of your block, often referred to as a “snowball” technique. You’ll combine a larger light square with smaller dark squares to achieve this effect. Each Turnabout Block requires four of these corner units.
- Take one Fabric B square (your 5 & 1/2-inch light square) and one Fabric D square (your 4-inch dark square).
- On the wrong side of your Fabric D square, use a ruler and a fabric marking pen to draw a diagonal line from one corner to the opposite corner. This line will serve as your stitching guide.
- Place the Fabric D square right sides together onto one corner of your Fabric B square. Align the drawn line so it runs from the outer corner towards the center of the Fabric B square. Pin securely to prevent shifting.
- Stitch directly on the drawn line. Maintain a consistent 1/4-inch seam allowance throughout this process.
- After sewing, carefully trim the excess fabric, leaving a 1/4-inch seam allowance beyond your stitched line. This trimmed piece can be discarded or saved for future scrap projects (though this block doesn’t specifically create HSTs from the trimmings).
- Press the seam open or towards the darker fabric (Fabric D) for a crisp finish. Pressing towards the darker fabric often helps reduce shadowing if your light fabric is thin.
- Repeat this process with another Fabric D square, attaching it to the diagonally opposite corner of the same Fabric B square. Again, draw the line, pin, stitch, trim, and press.
- You have now created one “snowballed” corner unit. Repeat steps 1-7 three more times to create a total of four corner units for your quilt block. Ensure all four units are consistent in size and construction.
Step 2: Constructing the Hourglass Blocks
The hourglass blocks are another key element that gives the Turnabout Quilt its dynamic visual appeal. These units are formed by combining your Fabric A (light) and Fabric C (dark) squares, creating striking contrast. Each Turnabout Quilt Block requires four hourglass units.
- Take one Fabric A square (6 & 1/2-inch light square) and one Fabric C square (6 & 1/2-inch dark square). Place them right sides together, aligning all edges perfectly.
- On the wrong side of one of the squares (it doesn’t matter which, but often the lighter one is easier to mark), draw a diagonal line from corner to corner. Then, draw a second diagonal line from the other set of corners. You should have an “X” marked on your fabric.
- Stitch a scant 1/4-inch seam on both sides of each drawn line. This means you will sew four lines, parallel to the drawn lines, effectively creating four seam lines that will yield four Half Square Triangles (HSTs) from these two squares.
- Once stitched, cut along both original drawn diagonal lines. You will now have four separate units.
- Carefully press each of these four units open. You can press towards the darker fabric or press the seams open, whichever you prefer for less bulk. These are now your Half Square Triangle units.
- Now, to form an hourglass block, take two of these HST units. Arrange them so that the light triangle of one unit opposes the dark triangle of the other, forming a square with a distinct “X” pattern in the center. The pattern often dictates the specific orientation.
- Pin these two HST units together, carefully matching the center seams. Stitch them together with a 1/4-inch seam allowance.
- Press the seam open or to one side. This completes one hourglass unit.
- Finally, trim your finished hourglass unit to 5 & 1/2 inches by 5 & 1/2 inches. Using a square-up ruler designed for HSTs can greatly assist in achieving precise cuts. Repeat this process until you have a total of four hourglass units. Precision trimming is crucial here for your block to lay flat and align perfectly.
Step 3: Assembling the Turnabout Quilt Block
With your corner units and hourglass blocks complete, it’s time for the exciting part: assembling them into the iconic Turnabout Quilt Block. This is where the magic happens, and the pattern truly comes to life.
- Lay Out Your Units: Arrange your pieced units on a flat surface, such as a design wall or a large table, to form a 3×3 grid.
- Place your remaining Fabric B light square (5 & 1/2 inches) at the absolute center of your grid.
- Position your four corner units (from Step 1) in the four corners of the grid. Pay close attention to the orientation of the dark triangles in these units. They should all point inwards, towards the center square, or as indicated by the specific Turnabout pattern layout.
- Place your four hourglass units (from Step 2) in the remaining four side positions, surrounding the center Fabric B square. Again, observe the pattern’s suggested orientation carefully. The “turnabout” effect largely depends on the precise placement and rotation of these hourglass blocks. Often, the dark points of the hourglass units will connect to the dark points of the corner units, creating a continuous flow.
- Chain Piecing Rows: Once you are satisfied with your layout, begin sewing the units together into rows.
- Take the three units from your top row. Place the first and second unit right sides together, pin, and sew with a 1/4-inch seam allowance. Press the seam to one side (e.g., towards the center unit).
- Then, attach the third unit to the second, right sides together, pin, and sew with a 1/4-inch seam. Press this seam in the opposite direction (e.g., away from the center unit). This alternate pressing creates “nesting seams” when you join the rows, reducing bulk.
- Repeat this process for the middle row and the bottom row, ensuring your seam allowances are consistent and your pressing directions alternate.
- Joining the Rows: Now you have three completed rows. It’s time to join them to form your complete block.
- Place the top row and the middle row right sides together. Carefully align all the vertical seams, “nesting” them together by pressing in opposite directions. Pin generously at each seam intersection to prevent shifting.
- Sew the two rows together with a 1/4-inch seam allowance, taking care not to stretch the fabric.
- Press this horizontal seam open or to one side.
- Finally, attach the bottom row to the combined top and middle rows in the same manner: right sides together, nesting seams, pinning, sewing with a 1/4-inch seam, and pressing.
- Final Pressing: Give your completed Turnabout Quilt Block a final, thorough press. Lay it flat and check its dimensions. It should measure 15 & 1/2 inches by 15 & 1/2 inches (or the finished size indicated in your specific pattern for a throw quilt). Your block is now complete!
Tips for Quilting Success with the Turnabout Block
Achieving a professional-looking quilt involves attention to detail and embracing a few best practices. Here are some additional tips to ensure your Turnabout Quilt Block comes out perfectly every time:
- Maintain a Scant 1/4-inch Seam: The “scant” 1/4-inch seam is slightly less than a full 1/4-inch. This tiny adjustment accounts for the fabric taken up by the thread and the fold of the seam, helping your blocks finish at the exact desired size. Practice on scrap fabric to find your machine’s perfect scant 1/4-inch.
- Pressing Matters: Always press, don’t iron. Pressing involves lifting and setting the iron down, while ironing involves sliding it. Sliding the iron can stretch your fabric, distorting your block. Pressing keeps your fabric stable and flat.
- Trim with Precision: After creating your hourglass units, trimming them to the correct size (5 & 1/2 inches) is non-negotiable. This squaring-up process ensures all your components are uniform, leading to perfectly matching seams when you assemble the final block.
- Starch for Stability: Using a light spray starch or fabric sizing on your fabric before cutting can add stability, making it easier to cut accurately and prevent stretching during sewing. This is especially helpful with bias edges.
- Chain Piecing: For efficiency, especially when making multiple blocks, use chain piecing. This involves feeding units through your machine one after another without lifting the presser foot or cutting threads in between. It saves time and thread!
- Test Your Stitch: Before starting on your main project, do a test stitch on a scrap piece of fabric. Check your tension and stitch length. A slightly shorter stitch length (around 2.0 to 2.5 mm) can create more durable seams for quilting.
- Embrace Your Creativity: While the instructions guide you, remember this is your project. Experiment with different fabric combinations – consider batiks for texture, solids for a modern look, or florals for a cottage feel. The Turnabout Block shines with strong contrast, so play with your light and dark choices!
Why Choose the Turnabout Quilt Block?
The Turnabout Quilt Block isn’t just another pattern; it’s a testament to classic quilt design, offering both aesthetic appeal and practical benefits for any quilter.
- Visually Dynamic: The unique construction creates a captivating illusion of movement and depth, making the finished quilt truly eye-catching. The alternating light and dark elements seem to “turn” with each block, hence its name.
- Versatile Design: This block looks fantastic whether used in a traditional setting with coordinating prints or in a modern context with bold solids and graphic patterns. It works beautifully for large bed quilts, cozy throw blankets, decorative wall hangings, or even smaller projects like placemats and tote bags.
- Skill-Building Opportunity: While beginner-friendly, the Turnabout Block offers opportunities to refine essential quilting skills such as precise cutting, consistent 1/4-inch seam allowances, and accurate pressing. Mastering this block builds confidence for more complex patterns.
- Timeless Appeal: As a vintage design, the Turnabout Block carries a rich history and a classic charm that never goes out of style. A quilt made with this block will be treasured for generations.
- Customization Potential: By simply changing the light and dark fabric selections – from subtle tone-on-tone to high-contrast vibrant hues – you can dramatically alter the look and feel of your final project, making each Turnabout Quilt uniquely yours.