
Mastering the Hunter’s Star Quilt Block: An Easy Guide for Quilters
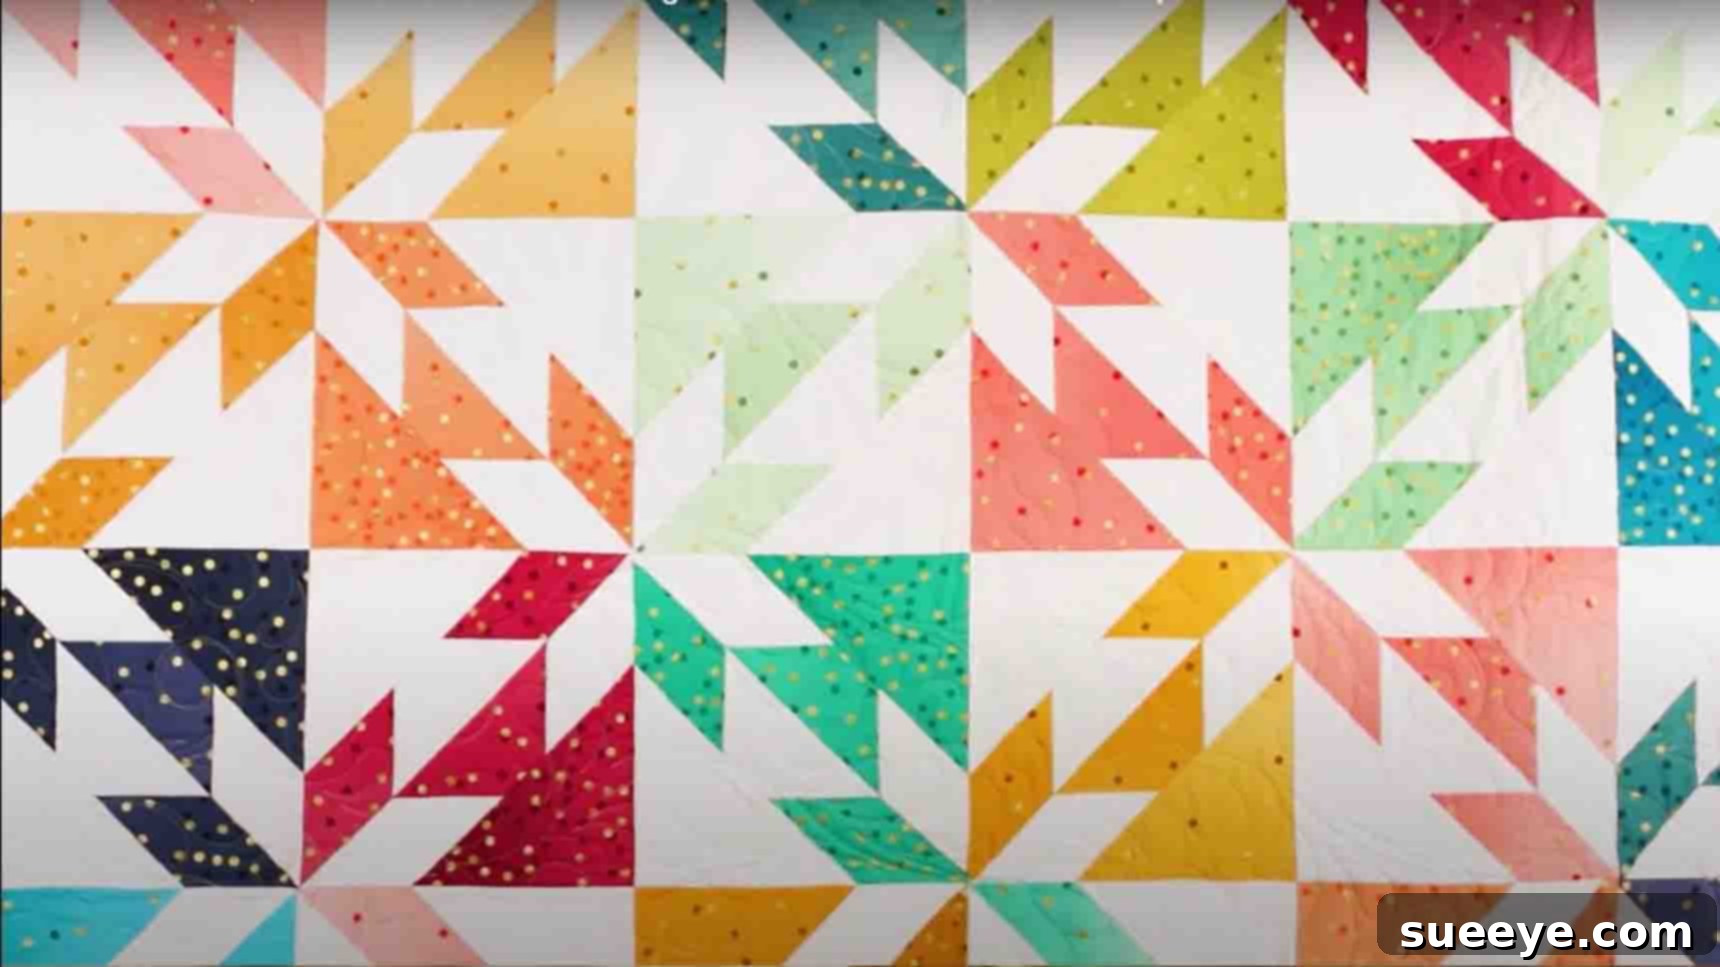
The Hunter’s Star quilt block is a beloved classic in the quilting world, renowned for its dynamic visual appeal and the mesmerizing three-dimensional effect it creates. For many quilters, especially those just starting their journey, its intricate design might seem daunting at first glance. However, fear not! I’ve discovered a wonderfully straightforward method to construct this gorgeous block, thanks to an excellent tutorial from Fat Quarter Shop on YouTube. This approach simplifies what traditionally might be considered a complex pattern, making it accessible and enjoyable for quilters of all skill levels. This tutorial is so exceptionally clear and easy to follow that I’ve wholeheartedly adopted it as my go-to method for creating this stunning block. Get ready to transform your quilting projects with this simplified technique.
Why the Hunter’s Star Quilt Block is a Must-Try
Beyond its striking aesthetics, the Hunter’s Star offers a unique blend of challenge and reward. Its clever construction creates a vibrant secondary pattern when multiple blocks are joined, giving the illusion of depth and movement within a quilt. This pattern isn’t just beautiful; it’s incredibly versatile. You can use Hunter’s Star blocks to create breathtaking full-sized quilts, charming wall hangings, elegant table runners, or even smaller decorative items like placemats and pillows. Mastering this block not only expands your quilting repertoire but also builds confidence in tackling more intricate designs. It’s a testament to how simple geometric shapes, when precisely cut and sewn, can combine to form something truly spectacular. The feeling of accomplishment upon completing your first perfect Hunter’s Star block is incredibly satisfying and motivates you to explore endless creative possibilities.
Essential Materials for Your Hunter’s Star Block
Before diving into the construction of your Hunter’s Star quilt block, gathering all the necessary materials is crucial. Precision is paramount in quilting, and having the right tools at hand will ensure a smoother, more enjoyable process and a more accurate finished block. You’ll need standard quilting supplies, including a rotary cutter with a sharp blade, a self-healing cutting mat, and various quilting rulers for accurate measurements. A reliable sewing machine, quality cotton thread, an iron, and a pressing mat are also indispensable. For pinning, consider both fine glass-head pins and wonder clips for different stages of assembly. The beauty of the Hunter’s Star often comes from the contrast between your chosen fabrics, so select your “block print” fabrics carefully against your “block background” fabrics to make the star truly pop. Ensure your fabrics are pre-washed and pressed to prevent shrinking and achieve the best results.
Block Print Fabric Requirements: (The Star Points)
- 1 – 6 1/2″ square (Fabric A)
- 1 – 5″ square (Fabric B)
- 1 – 3 1/4″ x 10 3/4″ rectangle (Fabric C)
- 1 – 3 1/4″ x 8″ rectangle (Fabric D)
Block Background Fabric Requirements: (The Surrounding Area)
- 1 – 6 1/2″ square (Fabric E)
- 1 – 5″ square (Fabric F)
- 1 – 3 1/4″ x 10 3/4″ rectangle (Fabric G)
- 1 – 3 1/4″ x 8″ rectangle (Fabric H)
- For a printable guide, you can click here to access the free pattern provided by Fat Quarter Shop.
Choosing your fabrics is an exciting part of the process. For beginners, it’s often recommended to start with high-contrast fabrics to clearly see the different components of the star. A lighter background and a darker print for the star will make the design stand out beautifully. Don’t be afraid to experiment with colors and patterns as you gain confidence.
Step-by-Step Directions to Create Your Hunter’s Star Quilt Block
Step 1: Crafting the Primary Units (Light and Dark)
Your journey begins with precise cutting of all your fabric pieces according to the measurements provided. Accuracy at this stage will significantly impact the final outcome of your block. Once your pieces are cut, take Fabric B and Fabric F squares and cut each of them diagonally once, from corner to corner. This will yield four triangles in total (two from B and two from F) that will form the cornerstone of your units.
Now, let’s assemble the “light” unit. Select one triangle from Fabric B and one rectangle from Fabric H. Align the raw edges of these two pieces and stitch them together using a consistent 1/4″ seam allowance. This seam allowance is critical for accurate block construction, so practice maintaining it if you’re new to quilting. After stitching, press the seam open or towards the darker fabric, as per your preference or the specific instructions in the free pattern, to reduce bulk. Next, take your Fabric G rectangle and add it to the assembly, aligning it along the longer raw edge of the Fabric H piece. Stitch with a 1/4″ seam and press again. With these pieces joined, use your quilting ruler to line it up diagonally on the left side of the unit, and carefully trim away the excess fabric, ensuring a clean, straight edge that will contribute to the star’s points. You will make one of these “light” units for each Hunter’s Star block you plan to create.
For the “dark” unit, the process is quite similar but uses the contrasting fabrics. Take one triangle from Fabric F and a rectangle from Fabric D. Stitch these two pieces together with a 1/4″ seam allowance and press. Then, attach your Fabric C rectangle to the bottom of this unit, stitch it, and press. Finally, trim this dark unit diagonally, just as you did with the light unit, ensuring both units are symmetrical and ready for the next stage of assembly. The consistency in pressing and trimming at this stage is what will give your Hunter’s Star its sharp, crisp points.
Step 2: Assembling the Block’s Central Star
With your light and dark units prepared, it’s time to bring them together to form the striking center of your Hunter’s Star. Place one light unit and one dark unit right sides together. Carefully align them, paying close attention to where the seams intersect. These intersections are crucial for creating sharp points in your star, so it’s a good practice to “nest” the seams (where one seam is pressed in one direction and the other in the opposite, allowing them to butt up against each other) and use pins to secure these points precisely. Pin generously to prevent any shifting as you sew.
Take your pinned unit to your sewing machine and stitch along the entire length using a consistent 1/4″ seam allowance. Once sewn, press the seam open or, ideally, towards the darker fabric. Pressing towards the dark helps to hide the seam allowance and prevents it from showing through lighter fabrics, contributing to a cleaner finish. After pressing, you will have a larger unit that still needs to be trimmed. Use your ruler to square up this unit, making sure all edges are straight and perpendicular, and that the unit measures consistently according to the pattern’s specifications. This ensures that when you join multiple blocks, they will fit together seamlessly.
Now, it’s time to add the corners to your unit, a technique often seen in flying geese blocks. Retrieve your Fabric A and Fabric E squares. On the wrong side of each square, use a fabric marker or pencil to draw a diagonal line from one corner to the opposite corner. These lines will be your stitching guides. Place one of your Fabric A (dark) squares on a corner of your newly assembled unit, aligning the raw edges and ensuring the drawn diagonal line runs across the corner you wish to form. Pin it securely in place. Then, take one of your Fabric E (light) squares and place it on the opposite corner of the unit, again aligning raw edges and making sure its diagonal line is positioned correctly. Pin this in place as well.
Stitch directly on the lines you’ve drawn on both Fabric A and Fabric E squares. After stitching, you’ll have excess fabric on the outside of your seam lines. Using your rotary cutter, trim a 1/4″ away from your seam line on both sides. This trimming creates the necessary seam allowance for the corner triangles. Discard the trimmed triangles (or save them for future scrap projects!). Finally, press the corner triangles open, again pressing towards the darker fabric whenever possible. This will reveal the completed corner units, forming the iconic points of the Hunter’s Star. Repeat this process for all four corners of your block, meticulously pressing after each addition to ensure flatness and accuracy.
Step 3: Final Touches and Block Inspection
Once all the pieces are sewn together and pressed, your Hunter’s Star quilt block is almost complete! The final crucial step is to square up your block. Using a large square ruler, carefully trim your block to the pattern’s specified finished size (e.g., 12.5 inches square for an unfinished block). Align the ruler with the diagonal lines of the star to ensure that the points are centered and the block is perfectly square. This step is vital for ensuring all your blocks will fit together neatly when you assemble your quilt top.
Take a moment to inspect your finished block. Check for sharp points, flat seams, and overall symmetry. Don’t be discouraged if your first block isn’t absolutely perfect; quilting is a skill that improves with practice. The beauty of handmade items lies in their unique character. If you’re making multiple blocks for a larger project, strive for consistency in size and seam allowances across all of them.
Tips for Success in Quilting Your Hunter’s Star
Achieving a beautiful Hunter’s Star quilt block, especially with its sharp points and dynamic visual effects, relies on a few key quilting principles. Incorporating these tips into your practice will not only enhance the quality of your blocks but also make the quilting process more enjoyable and less frustrating.
- Precision is Paramount: As reiterated throughout this tutorial, accurate cutting and consistent seam allowances are the backbone of successful quilting. Invest in good quality cutting tools – a sharp rotary blade, a reliable self-healing mat, and clear acrylic rulers. Take your time with each cut and double-check measurements before cutting.
- Pressing Matters: Pressing is as important as sewing. It’s not just about flattening fabric; it sets stitches, squares up units, and directs seam allowances to reduce bulk. When directed to “press toward the dark,” this technique helps prevent darker fabrics from shadowing through lighter ones. Use a dry iron unless specified, and always press, don’t iron (gliding the iron can distort fabric).
- Master the Scant Quarter-Inch Seam: A true 1/4-inch seam in quilting is actually a “scant” quarter-inch. This means it’s a thread or two less than a full 1/4 inch. This tiny difference accounts for the thickness of the thread and the fold of the fabric when the seam is pressed, ensuring your finished units measure precisely. Practice sewing a scant quarter-inch seam on scrap fabric until it becomes second nature.
- Chain Piecing for Efficiency: If you’re making multiple Hunter’s Star blocks, consider chain piecing. This involves sewing several identical units one after another without lifting the presser foot or cutting threads in between. Once all units are sewn, you can then snip them apart. This method saves time and thread and can help maintain consistent seam allowances.
- Use Quality Fabric and Thread: High-quality 100% cotton quilting fabric is easier to work with, less prone to fraying, and will result in a more durable and beautiful quilt. Similarly, good quality polyester or cotton thread will ensure strong seams that withstand time and use.
- Practice Makes Perfect: Don’t be discouraged if your first few blocks aren’t perfect. Quilting is a skill that develops with practice. Each block you make will teach you something new, improving your technique and eye for detail.
- Embrace the Process: Remember to enjoy the creative journey. Quilting is a meditative and rewarding craft. Allow yourself to be immersed in the colors, textures, and the satisfaction of watching beautiful patterns emerge from simple fabric pieces.
Unleash Your Creativity: Design Ideas with the Hunter’s Star
Once you’ve mastered the Hunter’s Star quilt block, a world of design possibilities opens up. This versatile block can be used in countless ways, from small, quick projects to large, intricate quilts. Here are some ideas to spark your creativity:
- Single Block Wonders: A single Hunter’s Star block can make a stunning hot pad, a decorative pillow cover, or the center of a mini quilt. These smaller projects are excellent for practicing the block and experimenting with color combinations without committing to a large project.
- Repeated Pattern Quilts: The most common application is creating an entire quilt top from multiple Hunter’s Star blocks. When placed side-by-side, the blocks interact to form fascinating secondary patterns, such as interlocking diamonds or zigzags, adding another layer of visual interest to your quilt.
- Color Play and Gradients: Experiment with different color palettes. You could create a gradient effect by gradually changing the shades of fabric in successive blocks, moving from light to dark or through a rainbow spectrum. A monochromatic scheme (different shades of the same color) can yield a sophisticated and subtle design, while a scrappy approach with various prints offers a lively, eclectic look.
- Sashing and Borders: Introduce sashing (strips of fabric between blocks) to give your eyes a rest and to frame each Hunter’s Star. Adding cornerstones (small squares at the intersections of sashing) can also enhance the design. Borders around the quilt top provide a finishing touch and can be used to incorporate additional fabrics or design elements.
- Mixing with Other Blocks: While the Hunter’s Star is beautiful on its own, it can also be combined with simpler blocks like plain squares or Four-Patch blocks to create unique layouts and break up the intensity of the star pattern. This can offer balance and visual pathways for the eye to follow.
- Scale Variations: Once comfortable with the basic block, challenge yourself by adjusting the dimensions to make smaller or larger Hunter’s Star blocks. A smaller block might be perfect for a baby quilt, while a larger one could become the focal point of a bedspread.
The beauty of quilting lies in its endless possibilities for personal expression. Don’t be afraid to deviate from traditional layouts and create something truly unique that reflects your style and vision.
Conclusion: Your Hunter’s Star Journey Begins Here
The Hunter’s Star quilt block, once perceived as a challenge, is now within your grasp thanks to this simplified method. By following these step-by-step instructions, utilizing precise cutting and careful pressing, you’re well on your way to creating stunning, sharp-pointed stars that will add elegance and dynamic appeal to any quilting project. Whether you’re a beginner taking your first steps into complex patterns or an experienced quilter seeking a more efficient technique, this approach promises satisfying results.
Remember that every stitch you make and every block you complete builds your skill and confidence. Embrace the process, enjoy the transformation of fabric into art, and revel in the beauty of your handmade creations. The Hunter’s Star is more than just a pattern; it’s an opportunity to explore symmetry, contrast, and the timeless art of quilting. So, gather your materials, watch the excellent tutorial from Fat Quarter Shop, and embark on your Hunter’s Star journey today. Happy quilting!