
Embark on a rewarding quilting journey with one of the most beloved and deceptively simple patterns: the Four-Patch Variation Quilt Block. If you’re searching for a beginner-friendly quilt pattern that promises impressive results without the complexity, look no further. This exquisite design, generously shared by Cut and Create on YouTube, is an ideal project for newcomers to the world of fabric artistry. While its intricate appearance might suggest advanced skills are required, this block is, in fact, one of the easiest patterns you’ll ever encounter as a beginner.
The beauty of the Four-Patch Variation lies in its versatility and the stunning visual impact it creates with minimal effort. It quickly becomes a favorite for many quilters, even experienced ones, due to its elegant finish and the satisfaction it brings. I’ve personally crafted numerous projects using this block, and I wholeheartedly recommend experimenting with a “scrappy” approach for the smaller four-patch sections. This technique allows you to incorporate a delightful mix of fabrics, making each block truly unique and adding a personal touch to your finished quilt. Dive into this captivating quilt project today and experience the joy of creating something beautiful with your own hands. Follow our detailed step-by-step instructions below, inspired by the wonderful tutorial from Cut and Create, to master this stunning quilt block.
Why This Quilt Block Is Perfect for Beginners
The Four-Patch Variation Quilt Block stands out as an exceptional starting point for anyone venturing into quilting. Its construction relies on basic sewing techniques and simple geometric shapes, making it highly accessible. Unlike more complex patterns that might involve intricate angles or numerous small pieces, this block utilizes straightforward squares and rectangles, minimizing potential frustration and maximizing enjoyment. For beginners, consistency in seam allowance and precise cutting are crucial skills to develop, and this pattern provides the perfect practice ground.
Furthermore, the repetitive nature of creating multiple identical blocks allows you to build confidence and refine your technique with each piece. You’ll quickly become proficient in cutting, pinning, sewing, and pressing – fundamental skills that form the backbone of all quilting projects. The immediate visual gratification of seeing your fabric pieces transform into a cohesive and beautiful block is incredibly motivating and encourages continued learning. This pattern doesn’t just teach you how to make a quilt; it teaches you the joy and satisfaction of the quilting process itself.
Understanding the Four-Patch Variation
At its core, a traditional four-patch quilt block is created by sewing four smaller squares together to form a larger square, resembling a window pane. The “variation” in this particular block adds an extra layer of visual interest and dimension without adding significant difficulty. By strategically placing rectangles around a central four-patch unit and combining it with larger squares, we achieve a dynamic and sophisticated design that looks far more intricate than it truly is.
Fabric selection plays a pivotal role in the final appearance of your Four-Patch Variation Quilt Block. Choosing contrasting colors for Fabric A and Fabric C will make the central four-patch element pop, while Fabric B can serve as a strong background or a complementary anchor. Opting for a scrappy look within the smaller 3 1/2″ squares means using a variety of different fabrics for those two pieces, resulting in a vibrant, eclectic feel for your quilt. Alternatively, selecting a cohesive color palette will give your quilt a more harmonious and modern aesthetic. Consider the overall theme and mood you wish to convey before selecting your fabrics, as these choices will significantly define your finished masterpiece.
Materials for Your Four-Patch Variation Quilt Block
Before you begin sewing, gathering all your materials is essential. High-quality cotton quilting fabric is recommended for its ease of use, durability, and vibrant colors. Always pre-wash and press your fabrics to prevent shrinking and set colors, ensuring a professional finish for your quilt. Accuracy in cutting is paramount, so invest in a good rotary cutter, cutting mat, and quilting ruler.
Fabric A: (Contrasting or Main Pattern)
- 2 – 3 1/2″ x 3 1/2″ squares
- 2 – 3 1/2″ x 6 1/2″ rectangles
Fabric B: (Background or Complementary)
- 2 – 6 1/2″ x 6 1/2″ squares
Fabric C: (Accent or Second Main Pattern)
- 2 – 3 1/2″ x 3 1/2″ squares
Additional Essential Quilting Tools:
- Sewing Machine with a 1/4″ presser foot
- High-quality polyester or cotton thread (matching or neutral)
- Rotary Cutter, self-healing Cutting Mat, and Acrylic Quilting Ruler
- Fabric Scissors
- Quilting Pins or Wonder Clips
- Iron and Ironing Board
- Seam Ripper (just in case!)
Step-by-Step Directions: Creating Your Four-Patch Variation Quilt Block
The key to a successful quilt block lies in meticulous preparation and precise execution. Take your time with each step, focusing on accuracy, especially with your seam allowances and pressing techniques. Remember, a perfectly pressed seam can make all the difference in how your finished block lays flat and looks.
Step 1: Constructing the Central Units
To begin, carefully cut all your fabric pieces according to the material list provided above. For clarity and ease of organization, it’s highly recommended to use three distinct colors of fabric (Fabric A, B, and C) and label your cut pieces accordingly. This visual distinction will help you differentiate between the various components as you assemble your block.
Now, let’s create the foundational units for your central four-patch section. Take two of the 3 1/2″ x 3 1/2″ squares from different colors – one from Fabric A and one from Fabric C. Place them right sides together, ensuring all edges are aligned perfectly. Pin these two squares along one edge to secure them, preventing any shifting during sewing. Using your sewing machine, sew along this pinned edge with a consistent 1/4″ seam allowance. The 1/4″ seam is standard in quilting and is crucial for your blocks to measure correctly when finished.
Once sewn, gently press the seam open. Pressing seams open helps to reduce bulk and creates a flatter, more precise block. Alternatively, you can press the seam to one side, usually towards the darker fabric, if preferred. The goal is a flat, crisp seam. You now have a two-patch unit. Repeat this process with the remaining 3 1/2″ x 3 1/2″ squares (one Fabric A and one Fabric C) to create a second identical two-patch unit.
Next, take the two 3 1/2″ x 6 1/2″ rectangles from Fabric A. Sew one of these rectangles onto either side of the two-patch unit you just created. Ensure the right sides are together and align all raw edges. Pin in place and sew with a 1/4″ seam allowance. Press the seams open or to one side, again aiming for a flat finish. This step transforms your simple two-patch into a larger, more complex central unit. Repeat this for the second two-patch unit and the remaining 3 1/2″ x 6 1/2″ rectangles, so you have two mirror-image central units.
Step 2: Assembling the Complete Quilt Block
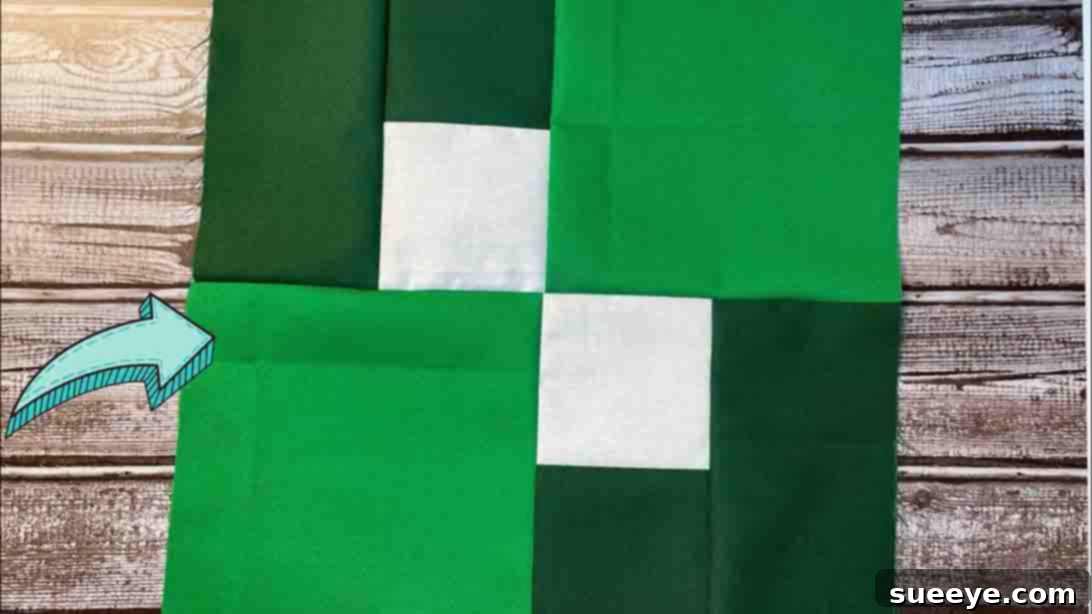
Now that you have your two central units, it’s time to bring all the pieces together to form the complete Four-Patch Variation Quilt Block. Lay out your components on a flat surface, such as your cutting mat or ironing board, to visualize the final arrangement before sewing. Arrange the two central units side-by-side. The smaller, contrasting squares (from Fabric A and C) should now form a visible “four-patch” element in the middle, surrounded by the Fabric A rectangles.
Next, take the two 6 1/2″ x 6 1/2″ squares from Fabric B. These squares will form the corners of your block, providing a striking frame. Place one 6 1/2″ x 6 1/2″ square (Fabric B) on the top-left corner and the other on the bottom-right corner of your laid-out design. The remaining two corners (top-right and bottom-left) will be completed by the rectangles of your central units. This layout should create a cohesive 3×3 grid pattern, even though the pieces are not all the same size.
To assemble, you will sew this layout together in rows. First, take the top-left Fabric B square and sew it to the top-right central unit. Ensure right sides are together, align edges, pin, and sew with a 1/4″ seam allowance. Press the seam open. Then, take the bottom-left central unit and sew it to the bottom-right Fabric B square, following the same procedure for pinning, sewing, and pressing. You now have two distinct rows.
Finally, with your two sewn rows, place them right sides together, carefully aligning the seams where the central units meet. Pin generously along the long edge to ensure perfect alignment. Sew these two rows together with a 1/4″ seam allowance. After sewing, carefully press this final seam open or to one side, ensuring the entire block lies wonderfully flat and square. Congratulations, you have completed one Four-Patch Variation Quilt Block! Take a moment to admire your work. For a larger quilt, simply repeat these steps to create as many blocks as needed for your desired quilt size, then piece them together.
Expert Tips for Quilting Success
Achieving a beautiful and professional-looking quilt block is all about attention to detail. Here are some invaluable tips to enhance your quilting journey:
- Precision is Key: Always cut your fabric pieces as accurately as possible. Even a slight deviation can throw off your block’s dimensions. Use sharp rotary blades and ensure your fabric is laid flat and square on the mat.
- Master the 1/4″ Seam: The consistent 1/4-inch seam allowance is the golden rule of quilting. Practice until you can achieve it reliably. A 1/4″ foot for your sewing machine can be a game-changer.
- Press, Don’t Iron: When quilting, we “press” seams, which involves lifting and placing the iron, rather than “ironing” back and forth, which can stretch and distort the fabric. Pressing creates crisp, flat seams that contribute to a perfectly square block.
- Chain Piecing: For efficiency, especially when making multiple identical units, consider chain piecing. This involves sewing multiple units in a continuous chain without cutting threads between them, saving time and thread.
- Fabric Choices Matter: Don’t be afraid to experiment with different fabric types, colors, and prints. The contrast and balance of your fabric choices significantly impact the visual appeal of your Four-Patch Variation Quilt Block.
- Stay Organized: Label your fabric pieces and keep your workspace tidy. This prevents mistakes and makes the process more enjoyable.
- Don’t Fear the Seam Ripper: Everyone makes mistakes. Embrace your seam ripper as a tool for improvement, not failure. It’s better to unpick and redo a seam than to leave an error that will bother you later.
Taking Your Quilt Further: Beyond the Block
Once you’ve mastered the Four-Patch Variation Quilt Block and created several units, you’re ready to assemble them into a full quilt top! This opens up a whole new world of design possibilities:
- Sashing: Consider adding strips of fabric (sashing) between your blocks to create visual separation and a clean look. Cornerstones, small squares placed where sashing strips intersect, can add another layer of design.
- Borders: Frame your quilt top with borders. These can be simple solid strips or multi-layered, adding size and enhancing the overall aesthetic.
- Layering: Once your quilt top is complete, you’ll need to create a “quilt sandwich” by layering the quilt top, batting (the cozy middle layer), and backing fabric.
- Quilting: This is the process of stitching through all three layers to hold them together and add texture. You can do this by hand or machine, with simple straight lines or intricate free-motion designs.
- Binding: The final step is to finish the raw edges of your quilt with binding – fabric strips sewn around the perimeter to create a clean, durable edge.
Four-Patch Variation Quilt Block: Your Next Quilting Adventure
This comprehensive guide to the Four-Patch Variation Quilt Block aims to empower you with the knowledge and confidence to create beautiful textile art. It’s a testament to how simple shapes, when combined with careful execution, can yield truly spectacular results. Whether you’re making a cozy throw, a decorative wall hanging, or a practical baby quilt, this block is an excellent choice. Embrace the journey of fabric selection, precise cutting, careful sewing, and satisfying pressing. The world of quilting is incredibly rewarding, offering a creative outlet and the immense satisfaction of crafting something meaningful with your own hands. We encourage you to try this project today, share your creations, and continue exploring the endless possibilities within the art of quilting. Happy stitching!