
Master the Double Monkey Wrench Quilt Block: An Easy & Rewarding Project
Embark on your next captivating quilting adventure with the stunning Double Monkey Wrench Quilt Block! Whether you’re a seasoned quilter searching for a quick and satisfying project or a beginner eager to dive into the world of fabric artistry, this pattern is an absolute delight. Don’t let its intricate appearance fool you; this block, championed by creators like Cut and Create on YouTube, is remarkably simple to construct and surprisingly fast to bring to life. Prepare to be amazed by how easily you can create a visually striking design that will impress everyone.
The Double Monkey Wrench pattern stands out for its unique blend of traditional charm and modern appeal. It’s a fantastic way to showcase beautiful fabrics and experiment with vibrant color combinations. Imagine transforming a collection of your favorite fabrics – perhaps ones you’ve been saving for “just the right project” – into a dynamic and cohesive design. This block is truly a chameleon, adapting beautifully to a wide array of fabric choices, from bold geometrics to delicate florals. It offers an endless canvas for creativity, making it a go-to design for quilters who love to play with color and print.
RELATED: Looking for more variations? Explore the Simple Monkey Wrench Variation Quilt Block Tutorial to expand your quilting repertoire.
Why the Double Monkey Wrench Quilt Block is Your Next Must-Try Project
The allure of the Double Monkey Wrench Quilt Block extends far beyond its aesthetic appeal; it offers a uniquely satisfying quilting experience for several reasons. Firstly, its modular design means you’ll be creating individual blocks that can later be assembled into larger quilts, table runners, placemats, or even decorative wall hangings. This modularity makes the project manageable and allows you to see progress quickly, which is incredibly motivating for quilters of all levels.
Secondly, the pattern effectively utilizes various fabric cuts, providing an excellent opportunity to dig into your fabric stash. Have a few favorite prints or solids you’ve been hoarding? This is the perfect project to bring them to life! The interplay between contrasting and complementary fabrics in this design creates a captivating visual rhythm, making each completed block a small work of art. The “popping” color combinations mentioned earlier aren’t just an observation; they’re a testament to the pattern’s inherent ability to make fabrics sing.
Finally, the instructional video from Cut and Create simplifies the process, breaking down complex steps into easily digestible segments. This makes learning accessible and enjoyable, ensuring that even those new to specific techniques like half-square triangles can follow along with confidence. Engaging with a well-produced tutorial transforms the learning curve into a smooth, rewarding journey, empowering you to create a beautiful quilt block with precision and joy.
Choosing the Right Fabrics for Your Double Monkey Wrench Quilt
Fabric selection is arguably one of the most exciting aspects of any quilting project, and the Double Monkey Wrench Quilt Block truly shines when thoughtful fabric choices are made. For this pattern, you’ll be working with three distinct fabric types: Fabric A (a solid, often black as recommended), Fabric B (a printed fabric), and Fabric C (another printed fabric). Each plays a crucial role in defining the block’s visual impact.
Fabric A (the anchor): The recommendation for a solid black fabric for ‘Fabric A’ is brilliant because black provides a strong contrast that makes the other colors and patterns truly pop. It acts as a visual anchor, grounding the more vibrant elements. However, don’t feel limited to black. Consider other deep solids like navy blue, forest green, or even a rich charcoal gray. A solid white or cream can also create a completely different, lighter aesthetic, offering a fresh and airy feel to your quilt. The key is to choose a solid that contrasts well with your chosen printed fabrics.
Fabric B & C (the stars of the show): These are your opportunity to let your personality shine! When selecting Fabric B and C, think about how they interact with each other and with Fabric A. You could opt for two complementary prints, such as a floral paired with a geometric, or two contrasting prints that share a common color palette. For example, if Fabric A is black, you might choose a vibrant floral for Fabric B and a subtle polka dot in a coordinating color for Fabric C. Alternatively, you could use two very different prints that create a dynamic interplay – perhaps a bold stripe and an abstract design. Consider scale too: a mix of large and small prints can add depth and interest without overwhelming the design. High-quality 100% cotton quilting fabrics are always recommended for their ease of use, durability, and vibrant color retention.
Materials: Crafting Your Double Monkey Wrench Quilt Block
Before you begin sewing, gathering all your materials is essential. Precision in cutting is paramount for successful quilting, so ensure your rotary cutter is sharp and your cutting mat is clean. The following measurements are for a single Double Monkey Wrench Quilt Block, which finishes at approximately 8.5 inches square (untrimmed). You will need multiple blocks to create a larger quilt, so adjust quantities accordingly.
What You’ll Need:
Fabric A (e.g., solid black or a deep solid):
- 1 – 4 1/2″ square
- 2 – 5″ squares
Fabric B (e.g., a primary printed fabric):
- 4 – 2 1/2″ x 4 1/2″ strips
Fabric C (e.g., a secondary printed fabric):
- 4 – 2 1/2″ x 4 1/2″ strips
- 2 – 5″ squares
Preparation: Accurate Cutting is Key for Perfect Quilt Blocks
The foundation of any beautiful quilt lies in precise cutting. Even a slight inaccuracy can throw off the entire block, leading to mismatched seams and uneven edges. Take your time with this crucial step. Always use a sharp rotary cutter, a self-healing cutting mat, and a reliable quilting ruler. Double-check all measurements before making a cut.
Before cutting, it’s often a good practice to press your fabrics to remove any wrinkles or creases. This ensures your measurements are as accurate as possible. For consistency, stack similar pieces (e.g., all 2 1/2″ x 4 1/2″ strips) and cut them simultaneously, but be mindful not to stack too many layers, as this can lead to inaccurate cuts. If you’re new to rotary cutting, practice on some scrap fabric first to get a feel for the tools.
Directions: Step-by-Step Guide to Your Double Monkey Wrench Quilt Block
Step 1: Crafting Strip Sets and Half-Square Triangles (HSTs)
This initial step involves creating two fundamental components of your quilt block: strip sets and half-square triangles (HSTs). Precision here will ensure your block comes together beautifully.
First, take your Fabric B and Fabric C 4 – 2 1/2″ x 4 1/2″ strips. Pair them up, right sides together, and sew them along one long edge using a precise 1/4″ seam allowance. You will create four strip sets in total (two from Fabric B and two from Fabric C, each paired with its counterpart in the other fabric, if that’s how you’re configuring it for variety). Once sewn, press these strip sets open to ensure flatness. You can press the seam allowance towards the darker fabric to minimize show-through, or press open for flatter seams, depending on your preference and the density of your fabric.
Next, let’s create your half-square triangles. Take one 5″ square of Fabric A and one 5″ square of Fabric C. Place them right sides together, aligning all edges perfectly. Using a ruler and a fabric marker or pencil, draw a diagonal line from one corner to the opposite corner. This line will serve as your cutting guide. Now, sew a scant 1/4″ seam allowance on both sides of this drawn line. A “scant” 1/4″ seam means slightly less than a true 1/4″. This minuscule adjustment accounts for the fabric taken up by the thread, ensuring your finished HSTs are the correct size when pressed open. After sewing, carefully cut along your drawn diagonal line. Press these two new units open. You now have two beautiful HSTs. Repeat this process with the remaining 5″ squares of Fabric A and Fabric C to yield a total of four HSTs.
Finally, accuracy is key! Trim all your newly made half-square triangles and the sewn strip units to exactly 4 1/2″ squares. Use a square-up ruler with a diagonal line for precise HST trimming. Align the diagonal line of your ruler with the diagonal seam of your HST to ensure the point is perfectly centered. This trimming step is non-negotiable for a professional-looking quilt block, as it corrects any minor discrepancies from sewing.
Step 2: Assembling Your Double Monkey Wrench Quilt Block
With all your components trimmed and ready, it’s time for the exciting part: assembling your Double Monkey Wrench block. This step involves laying out your pieces in the correct configuration and then stitching them together in rows, much like building a puzzle.
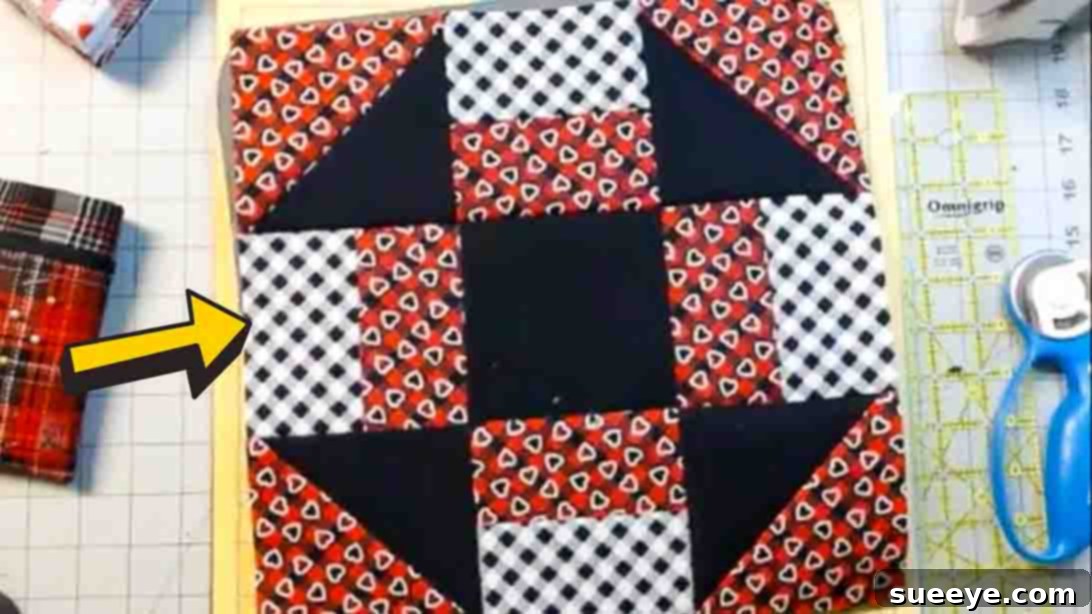
Begin by laying out the central Fabric A 4 1/2″ square on a flat surface. This will form the core of your block. Next, take your four meticulously crafted half-square triangles (HSTs). These will be placed in each of the four corners surrounding the central square. Orient them so that the printed fabric side faces outwards, creating a dynamic visual flow from the center. Pay close attention to the orientation of the diagonal seams; they should create a pinwheel effect or point in a consistent direction for the desired pattern.
Now, fill in the remaining spaces. Take your four strip sets (the units you created by sewing Fabric B and C strips together). Place one strip set in each of the four positions between the corner HSTs. Essentially, you’re arranging a 3×3 grid: HST – Strip Set – HST in the top row, Strip Set – Fabric A – Strip Set in the middle row, and HST – Strip Set – HST in the bottom row. Double-check your layout against the tutorial image or diagram to ensure every piece is in its correct spot and orientation.
Once you are satisfied with your layout, it’s time to sew. Sew the pieces together in rows first. Begin with the top row, stitching the three units (HST, Strip Set, HST) together with a consistent 1/4″ seam allowance. Repeat this for the middle row (Strip Set, Fabric A square, Strip Set) and the bottom row (HST, Strip Set, HST). Press the seams within each row. A common practice is to press the seams in alternating directions for adjacent rows. For example, press seams in the top row to the left, the middle row to the right, and the bottom row to the left. This technique helps the seams nest together perfectly when you join the rows, reducing bulk and improving accuracy.
Finally, sew these three completed rows together, again using a 1/4″ seam allowance. Align the raw edges carefully and make sure your seam allowances from the previous step are nested correctly. Stitch the top row to the middle row, then stitch this combined unit to the bottom row. Once stitched, give your entire block a final, thorough press. Pressing from the front and back, ensuring all seams lie flat, is crucial for a crisp, professional finish. You have successfully completed your Double Monkey Wrench Quilt Block!
Tips for Quilting Success with Your Double Monkey Wrench Block
Achieving a perfectly pieced quilt block is incredibly satisfying, and a few key practices can elevate your quilting game. Firstly, maintain a consistent 1/4-inch seam allowance throughout the entire project. This is arguably the most critical factor for accurate piecing. Using a specialized 1/4-inch presser foot for your sewing machine can be immensely helpful. Secondly, pressing correctly can make a significant difference. Avoid ironing, which can stretch and distort fabric; instead, gently “press” by lifting and setting the iron down. As mentioned, pressing seams open or to the darker fabric, and alternating directions between rows, will lead to flatter, more precise blocks.
Don’t be afraid to use pins! They are your best friend for aligning fabric pieces, especially when matching seams. Pin generously at intersections where seams meet to ensure they line up perfectly. Finally, remember that quilting is a journey, not a race. Take your time, enjoy the process, and don’t be discouraged by small imperfections. Each stitch is part of your unique creative expression. If something doesn’t look quite right, it’s okay to use a seam ripper; even experienced quilters use them regularly!
Expanding Your Quilt Project: From Block to Blanket
Once you’ve mastered the Double Monkey Wrench Quilt Block, the possibilities are endless! One completed block is just the beginning. To create a larger project, such as a throw quilt, a bed runner, or even a full-sized quilt, simply make multiple blocks following the same steps. Consider making blocks in varying color schemes to add even more visual interest. You can then sew these blocks together, often with sashing (strips of fabric sewn between blocks) to create a grid, and then add borders around the perimeter for a polished finish.
Experiment with different arrangements of the blocks to see how the overall pattern changes. The Double Monkey Wrench is particularly dynamic, creating secondary patterns when multiple blocks are joined. This makes it an excellent choice for a quilt that truly mesmerizes the eye. Don’t forget to consider a backing fabric and batting to complete your quilt, along with a quilting method (machine quilting or hand quilting) and binding.
Conclusion: Your Journey into the Joy of Quilting
The Double Monkey Wrench Quilt Block is more than just a pattern; it’s an invitation to explore the joyful and rewarding world of quilting. Its accessibility for beginners, combined with its appeal to experienced quilters, makes it a timeless choice for anyone looking to create something beautiful with fabric. The vibrant designs you can achieve with clever fabric choices and precise piecing will leave you with a sense of accomplishment and a stunning piece of textile art.
We encourage you to watch the full video tutorial by Cut and Create for visual guidance and additional tips. Their expertise will help illuminate each step, ensuring your quilting journey is smooth and successful. Embrace the creative process, enjoy the transformation of fabric into a unique design, and proudly display your magnificent Double Monkey Wrench creation!