
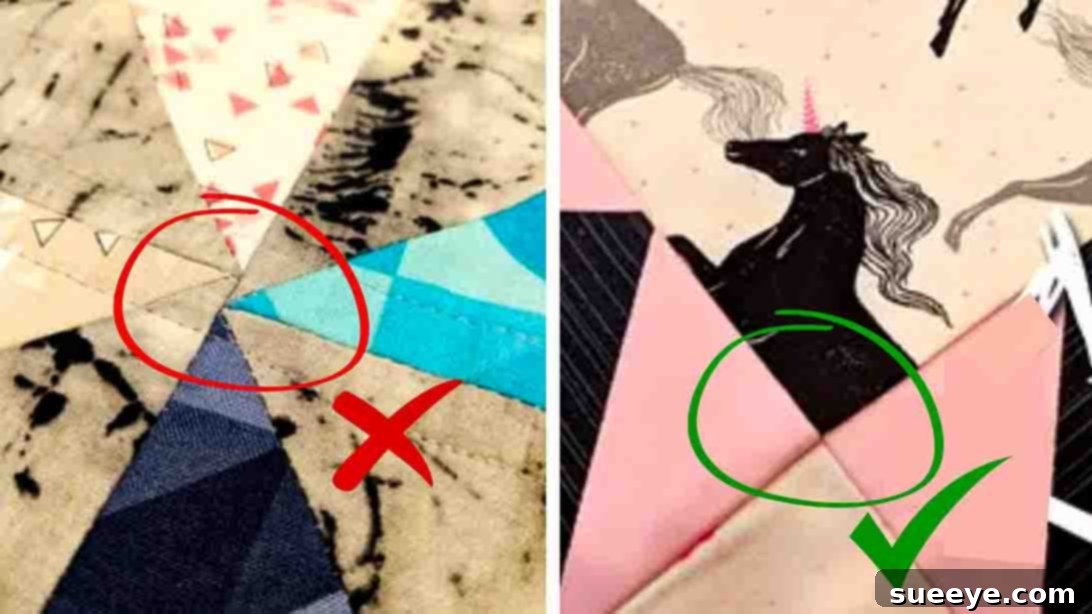
Mastering the Art of Nesting Seams: Achieve Perfect Quilting and Sewing Projects
In the intricate world of sewing and quilting, precision speaks volumes. Every stitch, every seam, and every fabric square contributes to a final masterpiece. Among the many techniques crafters strive to perfect, the art of nesting seams stands out as a critical skill. It’s the silent secret behind those immaculately aligned patterns and crisp, professional finishes that truly make a project shine.
Nesting seams is a specialized method of aligning and interlocking adjacent seams, ensuring a flawless transition where two pieces of fabric meet. When mastered, this technique eradicates unsightly bulk, prevents mismatched points, and elevates the overall quality of your work from amateur to artisanal. Conversely, overlooking or not mastering this fundamental step can compromise the structural integrity and aesthetic appeal of your entire project, leading to misaligned patterns, bulky intersections, and a less-than-perfect result.
But fear not, aspiring quilters and sewers! This comprehensive guide is designed to demystify the process of nesting seams. We’ll walk you through the precise steps, offer invaluable tips, and highlight common pitfalls to avoid. Whether you’re a beginner seeking foundational knowledge or an experienced crafter aiming for even greater perfection, you’ll discover how to integrate this essential habit into your sewing routine.
RELATED: 9 Quilting Techniques You Might Not Know About
The Undeniable Importance of Nesting Seams in Craftsmanship
Why Precision Matters: Elevating Your Sewing and Quilting
The beauty of a sewn or quilted project often lies in its precision. When patterns align perfectly, points meet with exactitude, and seams lie flat, the finished item achieves a level of polish that is instantly recognizable. Nesting seams is directly responsible for many of these desirable outcomes. It’s not just about neatness; it’s about structural integrity and visual harmony. Imagine a quilt where every corner of every block meets seamlessly, creating a cohesive and visually pleasing design – this is the power of properly nested seams.
Beyond Aesthetics: Practical Benefits of Perfectly Nested Seams
- Achieving Professional Results: Nesting seams is a hallmark of high-quality craftsmanship. It ensures that your project looks as if it were made by a seasoned expert, with clean lines and sharp corners.
- Ensuring Accuracy and Precision: By locking seams together, you create precise meeting points, which is especially crucial when piecing together intricate patterns, multiple blocks, or geometric designs. It eliminates guesswork and drastically reduces instances of misaligned points.
- Reducing Bulk: This is one of the most significant advantages. When seams are nested, they lie in opposite directions at their intersection, effectively distributing the fabric thickness. This prevents bulky “bumps” that can make pressing difficult, distort the fabric, and even cause issues with quilting through multiple layers.
- Preventing “Dog Ears” and Misaligned Points: Bulky seams often lead to fabric distortion, creating small, unwanted fabric protrusions or “dog ears” at corners. Nesting eliminates this, ensuring crisp, flat intersections.
- Saving Time and Frustration: While it might seem like an extra step, mastering seam nesting ultimately saves time. By ensuring accuracy upfront, you minimize the need to unpick poorly aligned seams, a common and frustrating occurrence for many crafters.
Understanding the Fundamentals: What Exactly Are Nested Seams?
At its core, nesting seams involves strategically pressing the seam allowances of adjacent fabric pieces in opposing directions. When you bring these two pieces together to stitch them, the opposing seam allowances literally “lock” or “nest” into each other. This creates a tiny, almost invisible channel where the stitch line will run, guiding your needle to achieve a perfect match. Instead of two bulky seam allowances piling on top of each other, they interlock, creating a flatter, less cumbersome intersection.
Consider two quilt blocks, each with a seam pressed to one side. When you go to join these blocks, you ensure that the seam allowance of the first block is pressed, for example, to the left, while the seam allowance of the second block is pressed to the right. As you bring the fabric edges together, you can feel these pressed seams “butt up” against each other, creating a small, natural guide. This is the moment of nesting, and it’s where the magic of alignment happens.
Laying the Foundation: Essential Preparation for Flawless Seams
Before you even think about nesting, success hinges on meticulous preparation. Precision in earlier steps directly impacts the ease and effectiveness of nesting your seams.
The Role of Accurate Cutting and Consistent Seam Allowance
The journey to perfect seams begins long before the needle touches the fabric. Accurate cutting is paramount. If your fabric pieces are not cut precisely to size, with straight edges and true angles, achieving perfectly matched seams will be an uphill battle. Use a rotary cutter, a good quality mat, and rulers to ensure every piece is exactly as it should be.
Equally important is maintaining a consistent seam allowance throughout your project. Most quilting and sewing patterns call for a 1/4-inch seam allowance. Using a scant 1/4-inch foot or marking your seam line can help maintain this consistency. Deviations in seam allowance, even slight ones, can throw off your alignment and make nesting seams significantly more challenging.
Mastering the Press: Preparing Seams for Optimal Nesting
Pressing is not ironing. Ironing involves moving the iron back and forth, which can stretch and distort fabric. Pressing involves lifting and placing the iron, applying heat and steam to set the fabric. For nesting seams, careful pressing of each individual seam is critical. After stitching two pieces of fabric together, immediately press the seam. For nesting, seams are typically pressed to one side rather than open. It’s crucial to alternate the pressing direction of adjacent seams – if the seam of one block is pressed to the left, the seam of the block it will join must be pressed to the right. This alternating pattern is what creates the “lock” for nesting.
A hot iron, possibly with steam (depending on your fabric type), and a flat, stable ironing surface are essential tools. Take your time to press each seam completely flat, ensuring there are no ripples or puckers. A well-pressed seam lays the perfect foundation for successful nesting.
Step-by-Step Guide: How to Flawlessly Nest Your Seams
With your fabric accurately cut and individual seams meticulously pressed, you’re ready to bring your pieces together. The following steps, often demonstrated by experts like ISeeStarsQuilting, outline a simple yet highly effective method for nesting seams.
Step 1: Pressing Individual Seams with Purpose
Begin by taking your chain-pieced blocks or individual fabric units, and ensure all existing seams are pressed flat. For nesting, the critical element is the direction of your pressed seam allowances. You need to ensure that when two pieces are to be joined, their respective seam allowances are pressed in opposite directions. For example, if you have a row of blocks, press the seams of the first block to the right, the next block to the left, and so on. This alternating pattern is the backbone of successful nesting. Use a dry, hot iron and firm pressure to set these seams crisply. A pressing mat or even a seam roll can aid in achieving perfectly flat seams without distorting the fabric.
Step 2: Precision Alignment – Locking Your Seams Together
Now, bring the two fabric pieces you intend to join right sides together. Focus on the seam lines that will meet. Using your fingers, gently feel for the subtle ‘ridge’ or ‘bump’ created by the pressed seam allowances. One seam allowance will be pressed one way, and the adjacent one will be pressed in the exact opposite direction. Carefully align these two pressed seams so that they “butt up” against each other and interlock. You should feel them snug into place, creating a smooth, flat surface on the side facing you. This ‘locking’ mechanism is the essence of nesting and is what guides your needle for a perfect match.
Step 3: Securing Your Seams with Strategic Pinning
Once you’ve perfectly aligned the nesting seams, it’s crucial to secure them in place before stitching. Insert a pin directly through the exact point where the seams nest. You can insert the pin perpendicular to the seam line, ensuring it pierces through the nested seam allowance on both fabric layers. Repeat this process for every seam intersection along the row you are joining. While some experienced sewers prefer to hold the seams aligned as they sew without pins, for beginners or for projects requiring maximum precision, pinning is highly recommended. It provides that extra layer of security, preventing shifting as you stitch.
Step 4: Stitching for Success and Smooth Transitions
With your seams expertly nested and pinned, take your fabric to the sewing machine. Begin stitching, maintaining your consistent seam allowance. As you approach each pin, remove it just before your needle reaches it. Sew slowly and deliberately over the nested seam intersections. The nested seams will guide your needle, helping to keep your stitch line perfectly straight and your seam allowances aligned. Continue in this manner until you’ve sewn the entire row or block, ensuring each nested seam is handled with care.
Step 5: The Final Press – Setting Your Masterpiece
Once you’ve stitched your newly joined row, it’s time for a final press. For the newly created seam, you can typically press it open for minimal bulk, or press it to one side, depending on the overall construction and the specific needs of your project. If you’re aiming for the absolute least amount of bulk in your quilting, pressing this final seam open will further distribute the fabric layers. Use a pressing cloth if needed to protect your fabric, and apply firm, steady pressure to set the seam. This final pressing step locks in your hard work, creating a beautifully flat and professional finish. You’ll immediately notice the difference in how crisp and perfectly aligned your new seam appears.
Common Pitfalls and How to Avoid Them
Overcoming Challenges in Seam Nesting
Even with the best intentions, mistakes can happen. Being aware of common pitfalls can help you avoid them:
- Inadequate Pressing: Not pressing individual seams flat or pressing them in inconsistent directions is the number one cause of failed nesting. Ensure every seam is crisp and correctly oriented before attempting to nest.
- Pressing All Seams in the Same Direction: This completely defeats the purpose of nesting. Remember the alternating pattern for opposing seams.
- Rushing the Alignment: Trying to quickly “feel” for the nested seams without proper attention can lead to slight misalignments. Take your time to gently butt the seams together until you feel that distinct “lock.”
- Distorting Fabric with Pins: While pinning is recommended, avoid over-pinning or using pins that are too thick, which can stretch or distort the fabric, especially at the critical intersection points. Fine, sharp pins are best.
- Not Checking Alignment Before Stitching: Always do a quick visual check before you start sewing. Lift the top fabric slightly to peek at the nested seam to confirm it’s perfectly aligned. It’s much easier to adjust before stitching than to unpick afterward.
Elevating Your Skill: Advanced Tips for Expert Seam Nesting
Exploring Alternative Techniques: Spinning and Finger Pressing
For those looking to take their seam nesting to the next level, especially at four-way intersections, consider the “twirl” or “spinning” seams technique. Instead of pressing the final seam entirely open or to one side, you can open up the four-way intersection and “spin” the seam allowances around, creating a miniature pinwheel effect. This distributes bulk incredibly effectively and results in an even flatter center point. Additionally, don’t underestimate the power of finger pressing for quick, temporary creases before bringing out the iron. This can be especially useful for setting small seams or quickly checking alignment.
The Power of Practice and Auxiliary Tools
Like any skill, mastering seam nesting comes with practice. The more you do it, the more intuitive it becomes. Start with simpler projects and gradually move to more complex ones. Consider using pressing aids like a clapper to achieve extra-flat seams, or a shot of starch or “Best Press” spray to give your fabric more body and make it easier to handle and press. These tools, combined with consistent practice, will significantly enhance your ability to achieve perfectly nested seams every time.
Conclusion: Embrace the Journey to Perfect Seams
Nesting seams is more than just a technique; it’s a testament to dedication and attention to detail in your sewing and quilting endeavors. By taking the time to prepare your fabric, meticulously align your seams, and press with precision, you are not just joining pieces of fabric—you are crafting a foundation of excellence for your entire project. The satisfaction of seeing perfectly matched points and smooth, bulk-free intersections is incredibly rewarding, transforming your handmade items into true works of art.
Embrace the journey of perfecting your seam nesting. With each project, you’ll find yourself growing more confident and skilled, consistently producing results that reflect a truly professional finish. So, set up your sewing space, heat up that iron, and prepare to elevate your quilting and sewing to an entirely new level of precision and beauty!