
The Fail-Proof Method for Perfectly Poached Eggs Every Time
Few culinary delights rival the simple elegance of a perfectly poached egg. With its firm, delicate white cradling a luscious, runny yolk, it’s a staple for a reason. Whether you’re elevating your avocado toast, topping a vibrant salad, or indulging in the classic Eggs Benedict, a beautifully poached egg transforms any meal into a gourmet experience. It’s truly a testament to culinary perfection.
However, the journey to a flawless poached egg can often be fraught with frustration. Many home cooks grapple with whites that disintegrate into wisps in the water, or yolks that emerge either too firm or stubbornly runny. The traditional methods often feel like a delicate dance, where one wrong move can turn your breakfast dreams into a scrambled mess. If you’ve ever found yourself battling with a pot of swirling water, only to pull out a less-than-ideal egg, you’re not alone.
RELATED: How to Peel a Soft Boiled Egg Without a Spoon
If you’ve experimented with various techniques—from swirling the water to adding a splash of vinegar directly to the pot—and still haven’t achieved consistent success, prepare to have your world changed. We’re thrilled to share a revolutionary technique championed by the culinary experts at Epicurious. This innovative approach promises a fail-proof path to perfectly poached eggs, every single time. It’s a method so reliable, you’ll wonder how you ever poached eggs any other way. Not only does it guarantee impeccable results, but it also allows you to prepare multiple eggs simultaneously, streamlining your cooking process. Get ready to impress yourself and your guests with consistently stunning poached eggs!
Before you start cooking, make sure your ingredients are top-notch. Here’s another vital tip for your kitchen endeavors: How To Tell If Eggs Are Fresh.
Why Poached Eggs Are a Culinary Delight
Poached eggs hold a special place in the hearts of food lovers worldwide. Their unique texture—a firm yet tender white encasing a rich, creamy yolk—offers a delightful contrast that elevates simple dishes. The beauty of a poached egg lies not just in its taste but also in its versatility. It’s the star of brunch classics, a healthy addition to light lunches, and even a sophisticated topping for dinner entrees.
Imagine the richness it brings to a classic Eggs Benedict, with its velvety hollandaise sauce. Picture it nestled atop a crisp piece of avocado toast, the yolk gently spilling over the creamy green. Beyond these staples, poached eggs are fantastic in a variety of settings: on a bed of sautéed greens, alongside smoked salmon, crowning a bowl of ramen, or even enhancing a simple lentil soup. Their delicate flavor and luxurious texture make them a gourmet touch accessible to any home cook.
The Common Pitfalls of Poaching Eggs
While the allure of poached eggs is undeniable, achieving them perfectly can feel like a kitchen Everest for many. Traditional methods often present several hurdles that lead to less-than-ideal results. One of the most frequent complaints is the dreaded “wispy whites,” where the egg white separates and disperses into the water, rather than clinging neatly to the yolk. This usually happens when eggs aren’t fresh, or the water temperature isn’t just right.
Another common issue is an inconsistent yolk. Some eggs emerge with yolks that are too firm, losing that desirable runny center, while others might be undercooked, making them difficult to handle. Overcrowding the pot, boiling the water too aggressively, or not using enough acidity are all factors that contribute to these poaching problems. It’s these frustrations that make many home cooks shy away from attempting poached eggs, but with the right technique, these challenges can be easily overcome.
Introducing the Fail-Proof Poaching Technique
Forget everything you thought you knew about poaching eggs. This groundbreaking method, generously shared by Epicurious, is designed to eliminate common pitfalls and deliver consistent, picture-perfect poached eggs every single time. The secret lies in a clever pre-soak that prepares the egg for its gentle bath, ensuring the whites coagulate beautifully and stay intact. This technique is not just about getting good results; it’s about guaranteeing excellence and simplifying a process that many find intimidating.
The beauty of this method lies in its simplicity and its scientific approach. By understanding how proteins react to acidity, this technique ensures the egg whites set quickly and neatly, preventing them from scattering in the poaching water. It’s a game-changer for anyone who loves poached eggs but dreads the uncertainty of traditional methods. Get ready to elevate your breakfast and brunch game with newfound confidence.
Preparing for Perfect Poached Eggs: What You’ll Need
To embark on your journey to perfect poached eggs, gathering the right ingredients and equipment is crucial. This method emphasizes simplicity, requiring only a few basic kitchen staples you likely already have on hand. The quality of your ingredients, particularly your eggs, will significantly impact the final outcome, so choose wisely.
Ingredients:
- Fresh Eggs: The fresher the eggs, the better they will poach. Fresh eggs have tighter whites that are less likely to spread.
- 1 cup White Distilled Vinegar: This is the magic ingredient for the pre-soak. White vinegar works best due to its consistent acidity and neutral flavor.
- 1 cup Water (for the soak): Used in conjunction with vinegar to create the perfect soaking solution.
- Water (for poaching): Enough to fill your pot to about 3-4 inches deep.
- Pinch of Salt and Black Pepper: For seasoning your finished eggs to perfection.
Equipment:
- Large Bowl: Wide enough to comfortably hold your eggs for soaking without overcrowding.
- Medium to Large Pot: A deep pot is essential for poaching to ensure the eggs are fully submerged and have enough space.
- Ladle: For carefully transferring the soaked eggs to the simmering water.
- Slotted Spoon: Indispensable for gently removing the poached eggs from the water and draining excess liquid.
- Clean Kitchen Towel or Paper Towels: For blotting the eggs dry before serving, preventing a watery plate.
Step-by-Step Guide: How to Poach Eggs Perfectly
Follow these detailed steps to achieve consistently perfect poached eggs using the Epicurious method. Each stage is crucial for ensuring firm whites and a delightfully runny yolk.
Step 1: The Vinegar Soak – Your Secret Weapon
Begin by preparing your special soaking solution. In a large bowl, combine 1 cup of white distilled vinegar with 1 cup of water. Stir the mixture well to ensure it’s fully integrated. This acidic bath is the key to preventing the egg whites from spreading in the hot water later on. The vinegar helps to pre-coagulate the proteins in the egg white, making them more resilient.
Carefully crack your eggs directly into this vinegar-water solution. You can crack as many eggs as you wish, provided they have enough space and are not overcrowded in the bowl. Gently swirl the bowl a few times to ensure that the acidic solution fully envelops each egg white. This step is crucial for even protein coagulation. Allow the eggs to soak for precisely 10 minutes. This timing is critical: soaking them for too long can impart a subtle vinegar flavor to the eggs, while not soaking them long enough may still result in runny, wispy whites. You’ll know they’re ready when the outer layer of the egg white turns opaque white, indicating that the proteins have begun to set.
Step 2: Preparing the Poaching Water
While your eggs are soaking, prepare your poaching pot. Fill a medium to large pot with water to a depth of approximately 3 to 4 inches. The depth is important to ensure the eggs are fully submerged during cooking. Place the pot on the stove over medium-high heat and bring the water to a light simmer. The ideal poaching temperature is not a rolling boil but rather a gentle simmer, characterized by very small, infrequent bubbles rising from the bottom of the pot and a visible wisp of steam. This gentle heat is crucial to prevent the eggs from being violently tossed around, which can tear the delicate whites.
Step 3: The Gentle Transfer
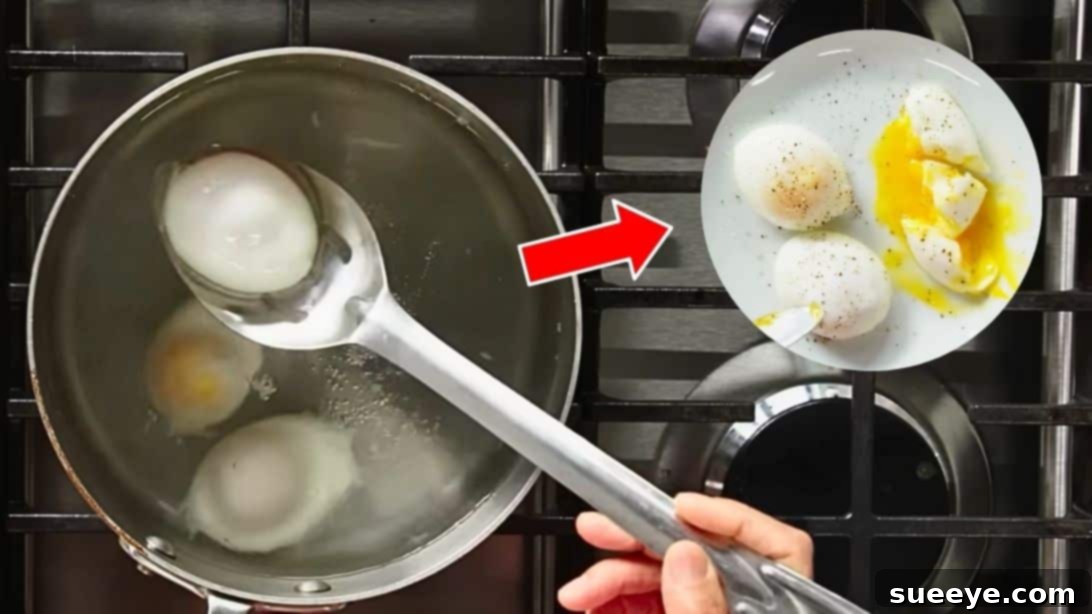
Once your poaching water is at the perfect simmer and your eggs have soaked for 10 minutes, it’s time for the transfer. Using a slotted ladle, carefully scoop out each egg from the vinegar solution. It’s important to lift some of the vinegar solution along with the egg, as this helps maintain the egg’s integrity during the transfer. Gently lower each egg into the simmering water. Avoid dropping them from a height, which can cause the whites to break or disturb the yolk. If you’re poaching multiple eggs, ensure they are placed one by one, giving them enough space in the pot to cook without touching each other. This prevents them from sticking together and allows for even cooking.
Step 4: Poaching to Perfection
Allow the eggs to poach for 2 to 3 minutes. This timeframe typically results in a perfectly set egg white with a beautifully runny yolk, which is the hallmark of a great poached egg. For a slightly firmer yolk, you can extend the cooking time by another 30 seconds to a minute, but be careful not to overcook them. The whites should appear fully opaque and firm to the touch, while the yolk, still nestled within, should remain soft and slightly wobbly. You can gently test the firmness of the white with your slotted spoon without disturbing the yolk.
Step 5: Draining and Drying
Once your eggs have reached your desired doneness, use your slotted spoon to carefully remove each egg from the poaching water, one at a time. Hold the spoon over the pot for a moment to allow any excess water to drain away. Then, gently blot the bottom of each egg on a clean kitchen towel or a few layers of paper towels. This crucial step removes any residual water, preventing your plate from becoming soggy and ensuring a clean presentation. Place the perfectly poached eggs onto your serving plate or directly onto your chosen dish.
Step 6: Season and Serve
Now for the final flourish! Season your freshly poached eggs with a generous pinch of fine sea salt and freshly cracked black pepper. The simple seasoning enhances their natural flavor beautifully. Serve them immediately while they are warm and at their peak. Enjoy your perfectly poached eggs with your favorite accompaniments, be it creamy avocado toast, savory Eggs Benedict, or a fresh, crisp salad. The effort is minimal, but the reward is immense!
Expert Tips for Poached Egg Perfection
Beyond the step-by-step guide, a few extra insights can elevate your poached egg game even further. Mastering these nuances will ensure your eggs are not just good, but consistently exceptional.
Freshness Matters Immensely
The fresher your eggs, the better they will poach. Fresh eggs have a thicker albumen (egg white) that holds its shape more effectively, leading to fewer wisps and a tidier appearance. Older eggs tend to have thinner whites that spread more readily. To check for freshness, place an egg in a glass of water: a fresh egg will lie flat on its side, while an older egg will stand on end or float.
Maintain a Gentle Simmer
Resist the urge to boil the water aggressively. A rolling boil will agitate the eggs, causing the whites to tear and making it difficult to achieve a smooth, compact shape. A gentle simmer, with small bubbles and steam, provides the perfect environment for slow, even cooking that respects the egg’s delicate structure.
Don’t Overcrowd the Pot
While this method allows for cooking multiple eggs, avoid cramming too many into the pot at once. Overcrowding lowers the water temperature and can lead to uneven cooking. Give each egg ample space to swirl gently and cook independently. For best results, cook no more than 3-4 eggs in a standard medium pot at a time.
Practice Makes Perfect
Like any culinary skill, poaching eggs benefits from practice. Don’t be discouraged if your first few attempts aren’t absolutely flawless. With each try, you’ll gain a better feel for the timings and visual cues. This Epicurious method significantly reduces the learning curve, making success much more attainable.
Make Ahead and Reheat (Yes, You Can!)
If you’re hosting a brunch or meal prepping, you can poach eggs in advance. Once cooked, transfer them to an ice bath to stop the cooking process and chill completely. Store them in a container of cold water in the refrigerator for up to two days. To reheat, simply place them in a bowl of hot (not boiling) water for about 30-60 seconds, or until warmed through, then blot and serve.
Creative Ways to Enjoy Your Perfect Poached Eggs
Once you’ve mastered the art of the perfect poached egg, a world of culinary possibilities opens up. Beyond the classic breakfast, these versatile eggs can enhance a multitude of dishes, adding a touch of gourmet sophistication to any meal.
- Classic Eggs Benedict: The quintessential choice. Serve your poached eggs on toasted English muffins with Canadian bacon (or ham) and a generous drizzle of homemade hollandaise sauce.
- Avocado Toast Deluxe: Elevate your favorite avocado toast by topping it with a perfectly poached egg. The runny yolk combines with the creamy avocado for an unforgettable flavor and texture experience.
- Poached Eggs on a Bed of Greens: For a light and healthy meal, place a warm poached egg on a bed of sautéed spinach, asparagus, or mixed greens. A drizzle of olive oil and a sprinkle of Parmesan cheese complete this elegant dish.
- Shakshuka with Poached Eggs: While traditionally made with baked eggs, poached eggs can be a delicious alternative in a simmering pan of spicy tomato sauce. The rich yolk beautifully complements the vibrant flavors.
- Elevated Ramen or Noodle Bowls: Add a luxurious touch to your homemade ramen or any noodle soup by gently placing a poached egg on top just before serving. The yolk enriches the broth and adds a creamy element.
- Smoked Salmon & Bagel: Pair a poached egg with smoked salmon, cream cheese, and a toasted bagel for a sophisticated brunch option that’s both satisfying and visually appealing.
- Asparagus with Poached Egg and Prosciutto: A simple yet elegant appetizer or light lunch. Arrange blanched asparagus spears, drape with thin slices of prosciutto, and top with a warm poached egg.
Troubleshooting Common Poaching Problems
Even with a fail-proof method, understanding how to diagnose and fix common issues can further perfect your technique. Here are some quick solutions to typical poached egg challenges:
- Ragged or Spreading Whites: This is almost always due to old eggs. Ensure you are using the freshest eggs possible. It can also happen if the soaking time was too short, or if the poaching water was boiling too vigorously.
- Yolk Not Runny Enough (Overcooked): The cooking time was too long. Adjust your poaching time down by 30-60 seconds next time. Remember that larger eggs might need a touch more time, while smaller eggs less.
- Egg Tastes Like Vinegar: You likely soaked the eggs for too long (over 10 minutes) or perhaps added too much vinegar to the soaking solution. Stick to the 10-minute rule and the 1:1 ratio.
- Eggs Sticking to the Pot: Ensure your pot has enough water (3-4 inches deep) and consider using a non-stick pot if possible. Also, avoid overcrowding, which can lead to eggs touching and sticking.
- Yolk Breaks During Transfer: You might be cracking the eggs too forcefully or handling them too roughly with the ladle. Be extra gentle when cracking and transferring from the soaking bowl to the pot.
With this comprehensive guide and the ingenious Epicurious method, you are now equipped to conquer the world of poached eggs. Say goodbye to guesswork and hello to consistent perfection. The secret lies in the simple, yet effective, vinegar soak that prepares your eggs for a flawless transformation. This technique not only delivers beautiful results every time but also makes the process enjoyable and stress-free. So go ahead, crack those eggs, and delight in the unparalleled joy of a perfectly poached egg, ready to elevate any dish. Happy poaching!