
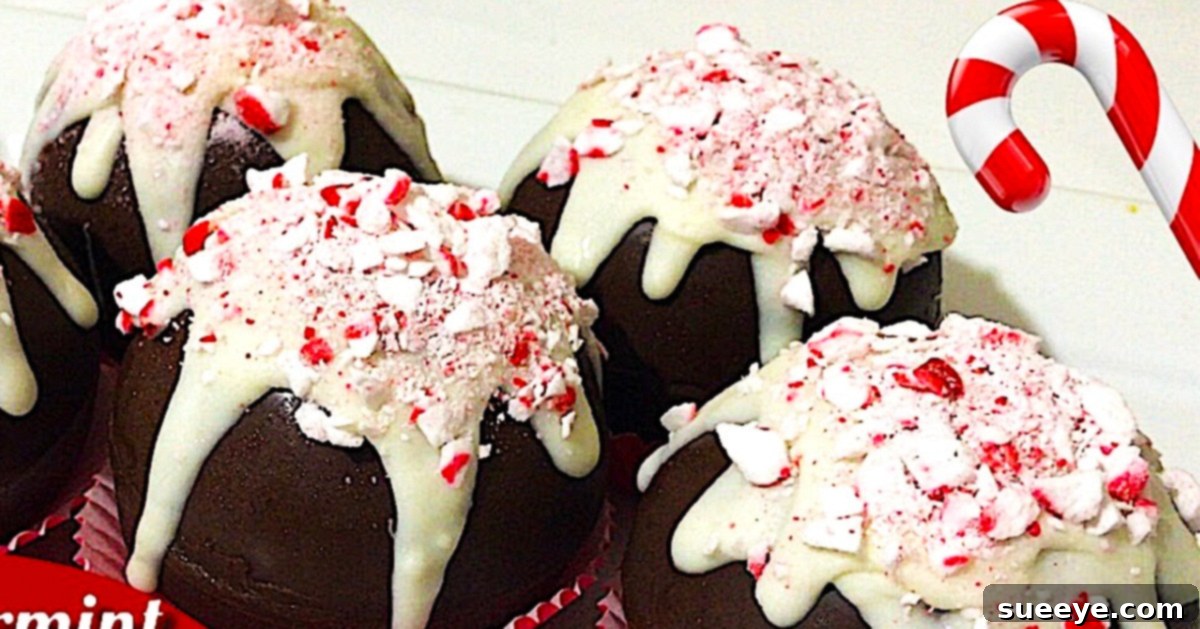
Craft Your Own Magical Peppermint Mocha Hot Chocolate Bombs: The Ultimate DIY Guide
The holiday season brings with it a symphony of delightful aromas and comforting flavors, and few are as cherished as the classic combination of peppermint and chocolate. Imagine encapsulating this festive magic into a delightful sphere that, when introduced to warm milk, dramatically bursts open to reveal a rich, creamy, and wonderfully aromatic beverage. This is the enchanting world of hot chocolate bombs, and today, we’re diving into crafting the most exquisite version: the Peppermint Mocha Hot Chocolate Bomb. Inspired by the brilliant tutorial from Kiwanna’s Kitchen on YouTube, this guide will empower you to create these captivating treats, perfect for gifting, entertaining, or simply indulging in a moment of pure holiday bliss. Whether you’re a seasoned DIY enthusiast or a newcomer to the kitchen, these bombs are surprisingly simple to make, incredibly rewarding, and significantly more affordable than their store-bought counterparts. Get ready to impress your loved ones and elevate your hot chocolate experience to an art form!
Hot chocolate bombs have taken the culinary world by storm, offering a unique and interactive way to enjoy a classic comfort drink. The sheer delight of watching the chocolate shell melt away, releasing a cascade of cocoa, mini marshmallows, and other hidden treasures, is a spectacle in itself. The peppermint mocha flavor profile adds a sophisticated twist, blending the refreshing coolness of peppermint with the robust notes of coffee and the smooth richness of chocolate. This isn’t just a drink; it’s an experience, a miniature performance that culminates in a perfectly blended, gourmet hot chocolate. And the best part? You have complete control over the ingredients, allowing for personalization that caters to every taste and dietary preference. Prepare to transform simple ingredients into edible works of art that promise warmth, joy, and a touch of holiday enchantment with every sip.
Ingredients for Your Peppermint Mocha Magic
Crafting these delectable hot chocolate bombs requires a few key ingredients. Opting for quality components will undoubtedly elevate the final taste and texture, ensuring a truly premium beverage experience.
- White Chocolate Almond Bark: Essential for creating visually appealing decorative drizzles and for adding a sweet, creamy contrast. Almond bark is specifically formulated for easy melting and setting, making it ideal for this application.
- Milk Chocolate Almond Bark: This forms the primary shell of your hot chocolate bombs. Its rich, familiar flavor pairs perfectly with both peppermint and coffee, providing a smooth, melting texture. Ensure it’s good quality for the best results.
- Soft Peppermint Candy, Chopped: The star of the peppermint flavor! Finely chop or crush soft peppermint candies (like candy canes) to integrate into the filling and for decorative sprinkles. This provides a delightful crunch and an invigorating burst of mint.
- Mini Marshmallows: No hot chocolate is complete without them! Mini marshmallows are perfect for fitting inside the bombs, eagerly floating to the surface as the chocolate melts, adding sweetness and a comforting texture.
- High-Quality Hot Cocoa Mix: The foundation of your drink. Choose a mix you genuinely love. You can even combine different types for a more complex flavor profile.
- Instant Nonfat Dry Milk Powder (Optional but Recommended): This secret ingredient can add extra creaminess and richness to your hot chocolate, making it feel more luxurious and satisfying, almost like a barista-made drink.
- Instant Coffee or Espresso Powder: Crucial for the “mocha” aspect! Instant coffee dissolves easily and provides that deep, roasted coffee note without requiring brewing. Adjust the amount to your desired coffee intensity.
- Additional Toppings (Optional): Consider chocolate chips, extra crushed peppermint, sprinkles, or even a dash of cinnamon for added flavor and visual appeal.
Essential Tools for Hot Chocolate Bomb Success
Beyond the ingredients, having the right tools on hand will streamline the process and help you achieve professional-looking results with ease.
- Silicone Sphere Mold: This is non-negotiable! Silicone molds designed for spherical shapes (like half-spheres) are crucial for forming the chocolate shells. Look for molds that are food-grade and flexible for easy removal.
- Microwave-Safe Bowls or Double Boiler: For melting your chocolate bark smoothly and preventing scorching.
- Small Spatula or Spoon: To spread the melted chocolate evenly into the molds.
- Pastry Brush (Optional): Can be helpful for spreading a thin, even layer of chocolate in the molds.
- Parchment Paper or Silicone Mat: For a non-stick surface when working with chocolate and letting the shells set.
- Small Ziploc Bag or Piping Bag: For decorative drizzles of melted white chocolate.
- Gloves (Optional): To avoid fingerprints on the finished chocolate shells, especially if gifting.
Step-by-Step Directions: Crafting Your Peppermint Mocha Hot Chocolate Bombs
Creating these delightful bombs is a fun and surprisingly straightforward process. Follow these detailed steps to ensure perfectly formed, delicious hot chocolate bombs every time.
-
Prepare Your Workstation and Melt the Chocolate
Before you begin, ensure your silicone mold is clean and completely dry. Lay out a sheet of parchment paper or a silicone mat for resting your chocolate shells. Now, let’s melt the chocolate. Take your milk chocolate almond bark and break it into smaller pieces. Place these in a microwave-safe bowl. Heat in 30-second intervals, stirring thoroughly after each interval, until the chocolate is smooth and fully melted. Be careful not to overheat, as this can cause the chocolate to seize or burn. A double boiler method (placing a heatproof bowl over a saucepan of simmering water) can also be used for more controlled melting.
-
Forming the Chocolate Shells
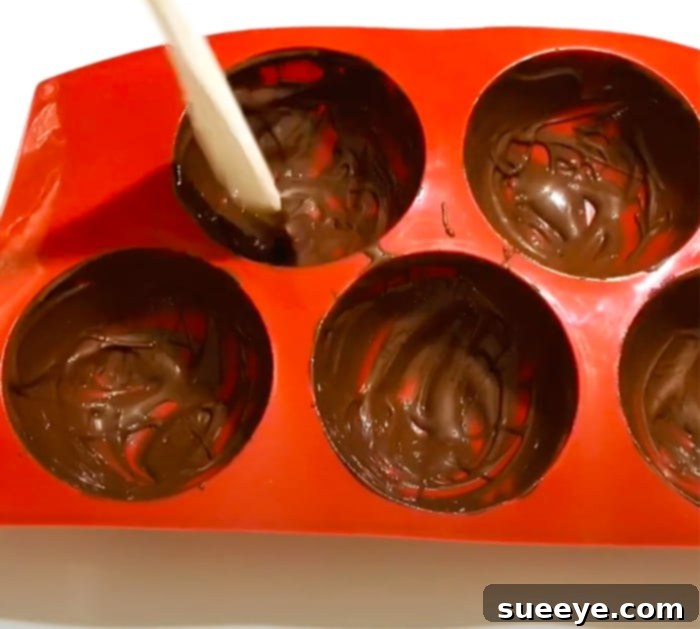
Once your milk chocolate is perfectly melted and smooth, spoon a small amount into each cavity of your silicone sphere mold. Use the back of the spoon, a small spatula, or a clean pastry brush to spread the melted chocolate evenly up the sides of the mold. The goal is to create a solid, even layer that isn’t too thin (which could lead to breakage) nor too thick (which makes the bomb overly heavy). Ensure there are no gaps or thin spots. Gently tap the mold on your countertop a few times to release any air bubbles and help the chocolate settle evenly.
-
Chill and Reinforce for Durability
Carefully transfer the filled silicone mold to the refrigerator. Chill for approximately 2-3 minutes, or until the chocolate is firm to the touch but still slightly pliable. Remove from the refrigerator and apply a second layer of melted chocolate, focusing on any thinner areas or edges to reinforce the shells. This second layer is crucial for preventing your bombs from cracking or breaking when handled. Repeat the chilling process until the chocolate is completely firm and easily releases from the mold. Once firm, gently pop out the chocolate half-spheres and place them on your parchment-lined surface.
-
Prepare the Flavorful Filling
In a separate small bowl, combine your hot cocoa mix, instant nonfat dry milk powder (if using), and instant coffee or espresso powder. Stir these ingredients together thoroughly to ensure an even distribution of flavors. This mixture will be the heart of your hot chocolate bomb, delivering that rich peppermint mocha taste.
-
Filling the Half-Spheres with Goodness
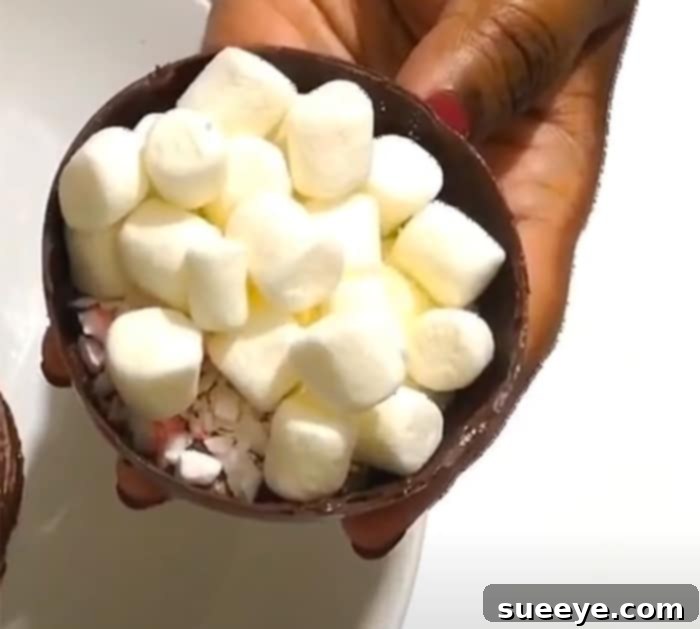
Now comes the fun part! Take half of your chocolate spheres – these will be your “bottom” halves. Into each bottom half, spoon a generous amount of your prepared hot cocoa and coffee mixture. Next, add a small handful of mini marshmallows. For that essential peppermint crunch, sprinkle in some of your finely chopped peppermint candy. You can also add other optional fillings like chocolate chips or sprinkles at this stage. Be careful not to overfill, as you need space to seal the other half.
-

Image by Kiwanna’s Kitchen via YouTube Sealing Your Hot Chocolate Bombs
To seal your bombs, gently warm the rim of an empty chocolate half-sphere (your “top” half). You can do this by placing it rim-down on a warm plate for a few seconds (a plate heated in the microwave for 15-20 seconds works well) or by briefly dipping the rim into a shallow pool of melted chocolate. Once the rim is slightly melted, immediately place it on top of a filled bottom half, gently twisting and pressing to create a secure seal. Work quickly, as the chocolate sets fast. If any seams are visible, you can smooth them with a clean finger or a tiny dab of melted chocolate.
-
Decorating Your Masterpieces
This is where your creativity shines! Melt your white chocolate almond bark following the same method as the milk chocolate. Transfer the melted white chocolate into a small Ziploc bag, snip a tiny corner, and drizzle it artfully over your sealed hot chocolate bombs. While the white chocolate is still wet, sprinkle additional chopped peppermint candy, festive sprinkles, or even a dusting of cocoa powder for an elegant finish. Allow the decorated bombs to set completely at room temperature or in the refrigerator for a few minutes.
-
Proper Storage for Lasting Freshness
Once fully set, store your Peppermint Mocha Hot Chocolate Bombs in an airtight container at room temperature, away from direct sunlight or heat. They will generally last for several weeks, making them perfect for preparing ahead of the holiday rush or for spontaneous gifting.
Image by Kiwanna’s Kitchen via YouTube
Why Homemade Peppermint Mocha Hot Chocolate Bombs Are a Must-Try
Beyond the simple joy of creating something delicious, there are numerous compelling reasons to embrace the DIY hot chocolate bomb trend, especially with this festive peppermint mocha twist.
- Unbeatable Customization: Unlike store-bought options, making your own bombs grants you full creative license. Adjust the sweetness, increase the coffee intensity, choose your favorite type of chocolate, or experiment with different fillings. Want extra marshmallows? Go for it! Prefer a darker cocoa? You’re in charge. This level of personalization ensures every bomb is exactly to your liking.
- Significant Cost Savings: Crafting a batch of these hot chocolate bombs at home is remarkably more economical than purchasing individual bombs or gourmet hot cocoa mixes. The ingredients are readily available and affordable, allowing you to produce a larger quantity for a fraction of the price. This means more magical moments for less money!
- The Perfect Personalized Gift: These hot chocolate bombs are not just treats; they are heartfelt gifts. Packaged beautifully in clear bags, small boxes, or decorative jars, they make thoughtful stocking stuffers, host gifts, or tokens of appreciation for friends, teachers, and colleagues. The effort and personal touch involved speak volumes.
- A Fun and Engaging Activity: Making hot chocolate bombs is a fantastic activity for all ages. It’s a wonderful way to spend quality time with family during the holidays, fostering creativity and teamwork. Children will especially love the process of filling and decorating, and everyone will enjoy the grand reveal when the bombs are dropped into hot milk.
- Guaranteed Quality and Freshness: By selecting your own ingredients, you have control over the quality. You can choose premium chocolates, organic cocoa, or allergen-free options if needed. Plus, homemade treats are always fresher and often taste superior to mass-produced items, ensuring a delightful sensory experience.
Pro Tips for Perfecting Your Hot Chocolate Bombs
Achieving hot chocolate bomb perfection is easier with a few insider tips and tricks:
- Temperature Control is Key for Chocolate: When melting chocolate, avoid overheating. Chocolate scorches easily and can become grainy or seize. Use short bursts in the microwave or a gentle double boiler. If your chocolate is too hot, it will be thin and hard to work with; too cool, and it will be too thick.
- Don’t Skimp on Chocolate Layers: While it might seem tempting to make thin shells to save chocolate, two medium-thin layers are essential for sturdy bombs that won’t break during handling or dissolve too quickly.
- Warm Your Plate for Sealing: The warm plate method for sealing the two halves is a game-changer. It melts the edges just enough to create a strong, seamless bond without messy excess chocolate.
- Work with Cold Hands (or Gloves): Chocolate melts easily with body heat. If you find your chocolate shells getting too soft, wear food-safe gloves or chill your hands under cold water before handling.
- Experiment with Fillings: Once you master the basic technique, feel free to get creative! Try white chocolate chips, a sprinkle of chili powder for a Mexican mocha twist, different flavored extracts, or even a mini cookie inside.
- Ensure Molds are Spotless and Dry: Any moisture in your silicone molds can cause chocolate to seize or leave an undesirable texture. Always ensure they are perfectly clean and dry before use.
Serving Your Festive Peppermint Mocha Creation
The moment of truth! Serving your hot chocolate bomb is as much a part of the experience as making it. Here’s how to unleash its full potential:
Choose a large, sturdy mug. Gently place one Peppermint Mocha Hot Chocolate Bomb into the bottom. Heat about 8-10 ounces of milk (dairy or non-dairy, as preferred) until it’s hot but not boiling. Carefully pour the hot milk directly over the chocolate bomb. Watch the magic unfold as the chocolate shell slowly melts, releasing its hidden treasures. Stir gently until all the chocolate has dissolved and the ingredients are well combined. For an extra touch of decadence, top with whipped cream, a drizzle of chocolate syrup, and a sprinkle of crushed peppermint candy. Sip slowly and savor the rich, minty, chocolatey warmth – a perfect indulgence for a chilly day or a festive evening.
Conclusion: Embrace the Joy of Homemade Hot Chocolate Bombs
In a world where convenience often trumps creativity, taking the time to craft something as delightful as Peppermint Mocha Hot Chocolate Bombs is truly special. This recipe, inspired by Kiwanna’s Kitchen, offers more than just a drink; it provides an experience—a blend of culinary artistry, festive joy, and heartwarming indulgence. From the satisfying process of melting and molding chocolate to the magical moment the bomb erupts in your mug, every step is infused with potential for joy. These inexpensive, customizable, and utterly delicious bombs are a fantastic addition to your holiday traditions, offering a unique way to share warmth and cheer with those you love. So, gather your ingredients, embrace your inner chocolatier, and prepare to make some unforgettable memories this season. Cheers to delicious, homemade magic!