
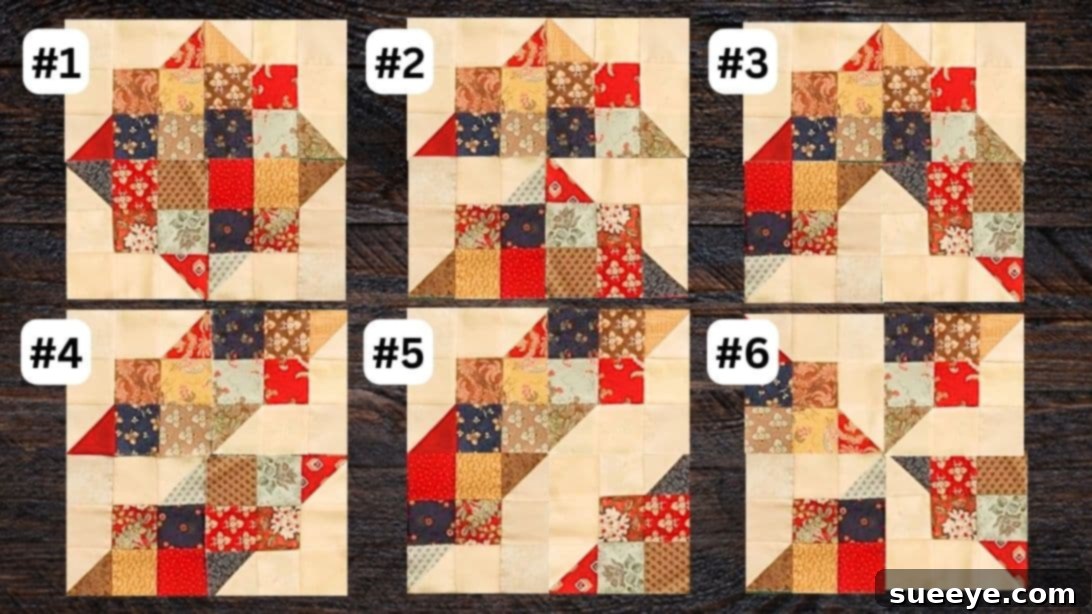
Embark on a delightful quilting journey with the fascinating Split 9-Patch Quilt Block, a timeless design that offers endless creative possibilities. This tutorial, inspired by the excellent guidance from The Sewing Studio on YouTube, transforms a classic into a modern marvel, perfect for both seasoned quilters and enthusiastic beginners. What makes this project truly special is its incredible versatility; not only is it a fantastic way to utilize your treasured fabric scraps, but the completed blocks can also be arranged in at least six distinct patterns, allowing you to personalize your quilt in unique ways. From a single decorative placemat to a full-sized quilt, the Split 9-Patch Block promises an engaging and rewarding sewing experience. Dive in and discover how easy and enjoyable it is to create stunning fabric art with precision and flair.
The traditional 9-patch block is a cornerstone of quilting, celebrated for its simplicity and the strong visual impact it creates. The “split” variation takes this classic a step further, introducing half-square triangles (HSTs) that add dynamic lines and movement to the design. This subtle change dramatically increases the block’s potential for intricate secondary patterns when multiple blocks are joined. Imagine transforming a pile of beautiful leftover fabrics – from cherished garments to remnants of previous projects – into a vibrant, cohesive design. This tutorial will guide you through each step, ensuring you achieve professional-looking results with a clear, straightforward approach. You’ll not only master the Split 9-Patch but also gain confidence in your quilting skills, especially in techniques like accurate cutting, precise seam allowances, and effective pressing – all crucial elements for successful quilting.
Before we begin, remember that quilting is as much about patience and precision as it is about creativity. Taking your time with each step, especially when cutting and pressing, will significantly impact the final outcome of your quilt blocks. This project is a fantastic opportunity to practice those fundamental skills while producing something beautiful and functional. So gather your fabrics, fire up your sewing machine, and prepare to be amazed at what you can create with just a few simple squares and a touch of imagination.
Essential Materials for Your Split 9-Patch Quilt Block
Having the right tools and materials is fundamental to any successful sewing project, and quilting is no exception. For this Split 9-Patch Quilt Block tutorial, we’ve compiled a list of essentials that will ensure a smooth and enjoyable creative process. While some items might seem optional to a beginner, they significantly contribute to the accuracy and professional finish of your quilt blocks. Investing in good quality tools will not only make the process easier but also yield better results, especially when it comes to precision, which is key in quilting.
- Dark or Medium-Colored Fabric: This will be one of the primary components of your block, providing contrast and depth. Choose a quilting cotton that is easy to work with and complements your light-colored fabric. Consider patterns or solids that will stand out.
- Light-Colored or Background Fabric: This fabric acts as a visual anchor, allowing your darker fabrics to pop. Often, a solid white, cream, or a very subtle print is chosen for this role. Ensure it contrasts well with your darker fabric to highlight the block’s design.
- Marking Pen, Pencil, or Chalk: Essential for drawing precise lines on your fabric, particularly for creating half-square triangles. A fine-line pen designed for fabric, a sharp pencil, or tailor’s chalk will work perfectly. Always test your marker on a scrap piece of fabric to ensure it disappears or washes out cleanly.
- Ruler: A clear acrylic quilting ruler with precise measurements is indispensable for accurate cutting. Look for one with clear markings, ideally 6.5 x 6.5 inches or larger, for cutting multiple squares efficiently.
- Scissors or Rotary Cutter and a Cutting Mat: While sharp fabric scissors are always useful, a rotary cutter combined with a self-healing cutting mat offers unparalleled speed and accuracy for cutting multiple fabric layers. If using a rotary cutter, ensure your blade is sharp for clean cuts.
- Needle and Thread: For machine piecing, an all-purpose polyester or cotton thread in a neutral color (like white, grey, or ecru) is usually best. Ensure your needle is appropriate for your fabric type – a sharp needle (size 80/12 or 90/14) is generally good for quilting cotton.
- Iron and Ironing Board: Crucial for pressing seams open or to the side, ensuring flat, accurate blocks. Pressing is just as important as sewing in quilting, as it dictates how your seams align and how flat your finished block will lay. A dry iron with a steam option is ideal.
- Sewing Machine: Any standard sewing machine capable of a straight stitch will work. Ensure it’s in good working order, regularly cleaned, and oiled. A quarter-inch presser foot can be incredibly helpful for maintaining consistent seam allowances.
Before you start, it’s a good practice to pre-wash and press your fabrics to prevent shrinkage and color bleeding later on. This ensures that all your fabric components will behave uniformly and maintain their integrity after your quilt is finished. Gather all your materials, organize your workspace, and prepare for a rewarding session of fabric artistry!
Step-by-Step Guide to Crafting Your Split 9-Patch Quilt Block
Creating the Split 9-Patch Quilt Block is a systematic process that combines simple shapes to form a complex and beautiful design. Precision in cutting and sewing, along with careful pressing, will be your allies in achieving a stunning result. Follow these detailed steps to bring your fabric vision to life, transforming simple squares into an intricate quilt block.
Step 1: Preparing Your Fabric and Initial Block Assembly
The foundation of any successful quilt block lies in accurate cutting. Begin by preparing your fabric squares, which will form the basis of your 9-patch block and the crucial half-square triangles (HSTs).
First, take your chosen dark or medium-colored fabrics and your light-colored or background fabrics. Using your rotary cutter and quilting ruler, carefully cut all your fabrics into precise 2½-inch squares. Consistency in this step is vital for perfectly matching seams later on. For each Split 9-Patch block, you will typically need 6 colored fabric squares and 5 light-colored (background) fabric squares. Adjust these numbers if you are planning a different layout for your final quilt.
Next, let’s assemble the central “4-patch” component of your block. Select four of your colored fabric squares. Arrange them into a 2×2 grid, alternating colors if desired, to form a basic 4-patch block. Sew these squares together in pairs first, maintaining a consistent ¼-inch seam allowance. Then, sew the two pairs together to complete the 4-patch. Press your seams, ideally pressing them open or to one side in opposite directions to help them nest later.
Now, prepare to create your first set of half-square triangles (HSTs). Take one of your background fabric squares. On the wrong side of this square, use your marking pen, pencil, or chalk and your ruler to draw a diagonal line from one corner to the opposite corner. This line will serve as a guide for your stitching.
Place this marked background square directly on top of a colored fabric square, ensuring their right sides are facing each other and all edges are perfectly aligned. Pin them together to prevent shifting. With your sewing machine, sew two seams: one seam exactly ¼ inch away from one side of your drawn diagonal line, and another seam exactly ¼ inch away from the other side of your drawn diagonal line. It’s crucial to stitch slightly outside the edge of the mark, one on each side, to create a perfect HST once cut. This ensures that when you cut along the drawn line, you have a precise seam allowance on both new triangle units.
Step 2: Completing Half-Square Triangles and Final Block Assembly
With your initial stitches laid down, it’s time to finalize your HSTs and bring your Split 9-Patch block together. This step involves precise trimming, careful pressing, and thoughtful arrangement to form the complete 9-patch design.
After sewing the two lines ¼ inch on either side of your drawn diagonal line, use your rotary cutter to trim the excess fabric. Carefully cut along the drawn diagonal line, separating the two stitched units. You will now have two raw half-square triangles. Trim the excess ¼ inch away from each stitching line. This ensures a clean, crisp edge and prepares the units for pressing.
Take one of these newly formed half-square triangle units. Press it open gently, ensuring the seam allowance is consistently pressed towards the darker fabric. This technique, known as “pressing to the dark side,” helps to minimize bulk and makes it easier to nest seams when joining blocks later. Once pressed, you can trim off any dog ears (the small triangles of fabric extending beyond the square’s edge) to tidy up your HST. Repeat this process for the second HST unit you just created. You’ll need to make several HSTs for your block, so ensure you follow these steps for each pair of colored and background squares you marked.
Now, let’s assemble the full 9-patch block. Lay out your completed fabric pieces to form the 3×3 grid of a 9-patch. Typically, for a Split 9-Patch block, you will place one half-square triangle (HST) in the top-left corner and another HST in the bottom-right corner. The remaining spaces will be filled with your background squares and the 4-patch block you created earlier. A common layout involves:
- Top Row: HST, background square, background square
- Middle Row: background square, 4-patch block, background square
- Bottom Row: background square, background square, HST
This arrangement creates the distinctive “split” effect. However, feel free to experiment with the placement of your HSTs and colored squares to achieve different looks within your block!
Once you are happy with your layout, begin stitching the squares together row by row. Sew the three squares of the top row together, maintaining that precise ¼-inch seam allowance. Repeat for the middle row and the bottom row. After sewing each row, press the seams. For the first row, press seams in one direction (e.g., to the right). For the second row, press seams in the opposite direction (e.g., to the left). For the third row, press seams in the same direction as the first row. This alternating pressing technique allows the seams to “nest” perfectly when you join the rows, creating perfectly aligned points and a much flatter block.
Finally, join the three rows together, carefully aligning the seams. Pin extensively at each seam intersection to ensure they match up perfectly. Sew the rows, press your block nice and flat, and trim to your desired unfinished block size if necessary. Congratulations, you’ve completed your first Split 9-Patch Quilt Block! Continue to make more blocks following these steps until you have enough for your desired project.
*All images for this tutorial are credited to The Sewing Studio via YouTube. We highly recommend visiting her channel and subscribing for more inspiring and detailed sewing and quilting tutorials!
Unlocking Creativity: How to Make Split 9-Patch Quilt Blocks in 6 or More Ways
One of the most exciting aspects of the Split 9-Patch Quilt Block is its incredible versatility. While each block is constructed in the same manner, the magic truly happens when you start arranging multiple blocks together. By simply rotating and repositioning your finished blocks, you can create a multitude of stunning visual effects and secondary patterns in your quilt top. This section will explore some of the fascinating ways you can combine these blocks, igniting your creativity and helping you design a truly unique quilt.
The Power of Rotation: Simple Shifts, Dramatic Results
The core of creating different patterns with the Split 9-Patch lies in the orientation of the half-square triangles (HSTs) within each block. Since each block has two HSTs typically placed diagonally, rotating the block 90, 180, or 270 degrees can completely change how those diagonal lines interact with neighboring blocks. Here are some popular arrangements to inspire you:
1. The Classic Diagonal Flow
This is perhaps the most straightforward arrangement. If you consistently orient all your Split 9-Patch blocks in the same direction, with the HSTs always pointing from the top-left to the bottom-right (or vice-versa), you will create a strong diagonal movement across your entire quilt. This creates an elegant and organized flow, making the “split” line a continuous element that runs through your design. It’s clean, modern, and highlights the linearity of the block.
2. The Pinwheel Effect
To achieve a captivating pinwheel design, you will arrange four Split 9-Patch blocks around a central point. Rotate each of the four blocks so that the “split” lines (formed by the HSTs) meet in the center, creating a swirling motion. Imagine the HSTs in the corners of these four blocks forming a larger pinwheel shape. This pattern adds dynamism and a sense of movement to your quilt, making it incredibly eye-catching.
3. The Zig-Zag or Chevron Pattern
For a striking zig-zag or chevron pattern, arrange your blocks in rows. Alternate the orientation of the blocks in each row. For instance, in one row, orient the blocks so the diagonal splits go from top-left to bottom-right. In the next row, orient them from top-right to bottom-left. When these rows are joined, the alternating diagonal lines will create a distinct zig-zag or chevron effect, bringing energy and visual interest to your quilt.
4. Creating Secondary Squares or Diamonds
By carefully arranging your Split 9-Patch blocks, you can make larger, secondary squares or diamonds appear where the corners of four blocks meet. This often happens when the light-colored background squares align to form a larger solid square, or when the darker sections align to create diamond shapes. This technique requires a keen eye for alignment but results in a wonderfully intricate quilt top where new patterns emerge from the interplay of the blocks.
5. Random or Controlled Scrappy
If you’re using a variety of fabric scraps, embracing a random arrangement can be incredibly appealing. Simply rotate each block as you add it to your design wall until a pleasing composition emerges. Alternatively, for a “controlled scrappy” look, you might rotate blocks randomly but ensure that light and dark values are evenly distributed across the quilt, preventing any one area from looking too heavy or too sparse.
6. Intersecting Lines and Grids
By strategically rotating blocks, you can create intersecting diagonal lines that form a grid-like pattern across your quilt, or even abstract designs that resemble woven baskets or lattice work. This involves a more complex arrangement where the diagonal elements of the HSTs are used to form continuous lines in specific directions, rather than just individual patterns. It often requires planning on a design wall or graph paper to visualize the flow.
Tips for Designing Your Quilt Top:
- Use a Design Wall: A flannel or batting-covered wall allows you to stick your blocks up and rearrange them easily, seeing the patterns emerge before you commit to sewing.
- Take Photos: Snap pictures of different arrangements. Sometimes, seeing it through a camera lens helps you spot patterns or areas that need adjustment.
- Step Back: Regularly step away from your design wall to view your layout from a distance. This helps you see the overall flow and identify any areas that disrupt the pattern.
- Embrace Experimentation: Don’t be afraid to try unconventional rotations. Sometimes the most unexpected arrangements yield the most beautiful results.
The Split 9-Patch Quilt Block is truly a testament to the power of simple shapes and thoughtful arrangement in quilting. Whether you choose a highly structured layout or a more organic, scrappy approach, the ability to manipulate the visual impact of each block through rotation offers an unparalleled level of creative freedom. Enjoy the process of designing and assembling your unique quilt top, knowing that each rotation brings a new possibility to life!