
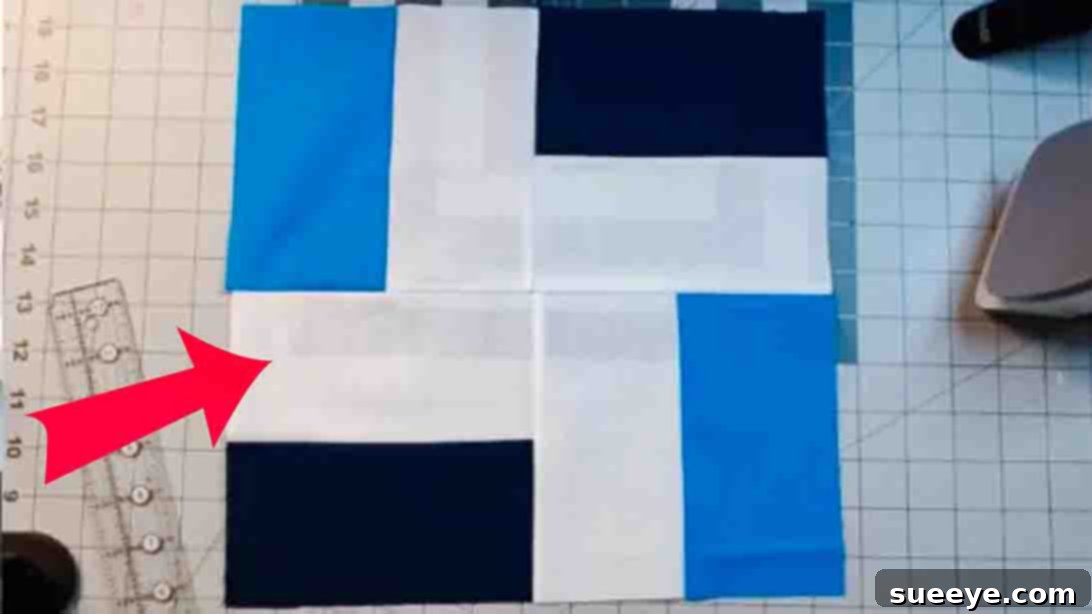
Embarking on your quilting journey can be an incredibly rewarding experience, transforming simple fabric pieces into stunning textile art. For those just starting out, or even seasoned quilters seeking a refreshingly straightforward project, finding the perfect pattern is key to building confidence and enjoying the process. Throughout my many years of quilting, one particular design consistently stands out as the ultimate recommendation for beginners: the elegant and incredibly simple Two-by-Two Quilt Block. This foundational pattern, masterfully demonstrated by Cut and Create on YouTube, offers an unparalleled ease of construction that makes it an ideal starting point for anyone eager to delve into the world of quilting.
What makes this Two-by-Two Quilt Block so perfect for new quilters? Its beauty lies in its simplicity. With minimal fabric requirements and straightforward cutting instructions, it’s exceptionally forgiving, allowing you to focus on developing fundamental quilting skills without feeling overwhelmed. I vividly recall starting my own quilting adventures with this very pattern, creating numerous personalized quilts that always brought joy. The inherent charm of this block shines through whether you choose a vibrant “scrappy” approach, utilizing various leftover fabrics, or opt for a more minimalist aesthetic with solid colors. Personally, I find solid color quilts crafted with this block incredibly appealing; their clean lines and understated elegance perfectly embody the simple, timeless beauty I adore in my creations.
Beyond its beginner-friendly appeal, the Two-by-Two Quilt Block holds a special place for experienced quilters too. It serves as an excellent “palette cleanser” project, perfect for a quick-finish endeavor that brings immediate satisfaction. Whether you’re looking to bust your fabric stash, create a thoughtful last-minute gift, or simply enjoy the meditative rhythm of a straightforward sew, this pattern promises a delightful and rewarding experience. So, if you’re ready to create something beautiful, simple, and truly yours, don’t hesitate. Let’s dive into the world of the Two-by-Two Quilt Block today and discover the joy of quilting. You’ll find the comprehensive video tutorial from Cut and Create invaluable for visual, step-by-step guidance.
Why Choose the Two-by-Two Quilt Block? Benefits for Every Quilter
This deceptively simple quilt block offers a wealth of advantages, making it a go-to choice for a diverse range of quilters. For beginners, it’s an empowering introduction to key quilting techniques. You’ll gain confidence in accurate cutting, learn to maintain a consistent seam allowance, practice pressing techniques, and understand the basic construction of a quilt block – all without the frustration often associated with more complex patterns. The repetitive nature of the block allows for mastery of these skills quickly, setting a solid foundation for future projects.
Seasoned quilters will appreciate the efficiency and versatility of the Two-by-Two block. It’s an ideal project for clearing out smaller fabric scraps, transforming them into a cohesive and visually appealing design. The rapid assembly of each block means you can quickly see progress, making it perfect for weekend projects or when you need a break from intricate designs. Furthermore, the block’s clean lines and geometric appeal lend themselves beautifully to modern and traditional aesthetics alike. Imagine a throw quilt made entirely of these blocks in varying shades of blue for a calming effect, or a baby quilt bursting with joyful, contrasting colors.
Its adaptability is another significant draw. While the basic structure remains constant, the choice of fabrics can dramatically alter the final look. Experiment with solids for a minimalist, contemporary vibe, or introduce prints for added texture and personality. You can create personalized gifts that truly reflect the recipient’s taste, or design stunning home décor items like placemats, table runners, or even wall hangings. The Two-by-Two Quilt Block is not just a pattern; it’s a canvas for your creativity.
Materials You’ll Need: Essential Supplies for Your Quilt Project
Before diving into the cutting and sewing, gathering your materials is the first crucial step. The beauty of the Two-by-Two Quilt Block is its relatively minimal fabric requirements, making it budget-friendly and perfect for using up smaller cuts from your stash. Accuracy in cutting is paramount in quilting, so ensure you have the right tools on hand.
Fabric Requirements for One Two-by-Two Quilt Block:
- Fabric A: 2 rectangles, each measuring 3 1/2″ x 6 1/2″ (Choose a vibrant color or distinct print for contrast).
- Fabric B: 2 rectangles, each measuring 3 1/2″ x 6 1/2″ (Select another complementary or contrasting color/print).
- Fabric C: 4 rectangles, each measuring 3 1/2″ x 6 1/2″ (Often chosen as a neutral background like white, cream, or a light gray to make A and B pop).
Note: These measurements are for creating one single Two-by-Two Quilt Block. To make a larger quilt, you will need to cut multiples of these fabric pieces based on your desired quilt size.
Essential Quilting Tools:
- Rotary Cutter: A sharp 45mm or 60mm rotary cutter is indispensable for precise, straight cuts.
- Self-Healing Cutting Mat: Protects your work surface and extends the life of your rotary blade.
- Quilting Rulers: A large rectangular ruler (e.g., 6″ x 24″) and a smaller square ruler (e.g., 6″ x 6″) are very helpful for accurate measurements.
- Sewing Machine: Any basic sewing machine capable of a straight stitch will work perfectly.
- Matching Thread: High-quality polyester or cotton thread that blends with or complements your fabrics.
- Iron and Ironing Board/Pressing Mat: Crucial for pressing seams flat and accurately.
- Fabric Scissors: For trimming threads and occasional fabric cuts.
- Pins or Fabric Clips: To hold fabric pieces together before sewing.
- Seam Ripper: Every quilter’s essential companion for those inevitable “learning opportunities.”
Remember to pre-wash and press your fabrics before cutting to prevent shrinkage and color bleeding, ensuring your finished quilt maintains its shape and vibrant appearance for years to come.
Directions: Crafting Your Two-by-Two Quilt Block with Ease
Follow these step-by-step instructions carefully to construct your beautiful Two-by-Two Quilt Block. Precision at each stage will result in a perfectly square and professional-looking block.
Step 1: Precise Fabric Preparation and Unit Assembly
Begin by meticulously cutting all your fabric pieces to the specified dimensions: two 3 1/2″ x 6 1/2″ rectangles for Fabric A, two 3 1/2″ x 6 1/2″ rectangles for Fabric B, and four 3 1/2″ x 6 1/2″ rectangles for Fabric C. Accuracy here is vital for a successful outcome, so take your time with your rotary cutter, ruler, and mat. Once cut, organize your pieces to keep them separate and ready for assembly. This initial organization prevents confusion and streamlines the process.
Next, we will create the first set of sub-units. Take one piece of Fabric A and one piece of Fabric C. Place them right sides together (RST), aligning one of the 6 1/2″ long edges. Pin along this edge to secure them, ensuring the fabric layers do not shift. Sew these two pieces together with a consistent 1/4-inch seam allowance along the pinned long side. After sewing, carefully press the seam open. Pressing the seam open reduces bulk, creating a flatter and more stable block. Repeat this process for the second piece of Fabric A and another piece of Fabric C, creating two identical A-C units. Set these aside.
Now, repeat the same procedure for Fabric B and Fabric C. Take one piece of Fabric B and one piece of Fabric C, place them right sides together, and sew them along a 6 1/2″ long edge using a 1/4-inch seam allowance. Press the seam open. Do this again for the remaining piece of Fabric B and another piece of Fabric C, yielding two identical B-C units. You should now have four individual two-piece units: two A-C units and two B-C units.
To assemble the first half of your Two-by-Two block, take one A-C unit and one B-C unit. Lay them out so that the Fabric C strips are positioned side-by-side. The key here is the orientation: place one unit vertically and the other horizontally next to it, ensuring that when sewn, the Fabric A and B sections will form alternating squares. A visual check at this stage helps confirm the correct layout. With right sides together, sew these two units together along the seam that will connect them. Press this final seam open. This completes your first larger unit for the Two-by-Two block. Repeat all the steps in this section to create an identical second larger unit.
Step 2: Completing the Quilt Block and Assembling Your Quilt Top
You should now have two larger identical units, each comprising Fabric A, B, and C arranged to form a distinctive half of your quilt block. The next step is to join these two units to complete the Two-by-Two Quilt Block. Place the two units right sides together, carefully aligning the central seams where the A-C and B-C sections meet. Nesting your seams (pushing one seam allowance in one direction and the other in the opposite direction) can help reduce bulk and create perfectly matched intersections. Pin generously along the long edge you are about to sew.
Sew these two units together with a precise 1/4-inch seam allowance. After sewing, press this final seam open to ensure the block lies flat. Take a moment to admire your completed Two-by-Two Quilt Block! It should measure approximately 6 1/2″ square, demonstrating a beautiful interplay of your chosen fabrics.
To create a full quilt, simply repeat these steps to construct as many Two-by-Two blocks as needed for your desired quilt size. A small baby quilt might require 9 or 12 blocks, while a large throw or bed quilt will require many more. Once you have a collection of blocks, the next exciting phase is assembling your quilt top. Start by sewing your blocks together into rows, again maintaining that consistent 1/4-inch seam allowance and carefully nesting seams where blocks meet. Press the seams in alternating directions for each row to help them interlock cleanly when you join the rows. Finally, sew your completed rows together to form the complete quilt top. Press all the final seams meticulously, and then take a step back to appreciate the burgeoning masterpiece you’ve created!
Tips for Quilting Success with the Two-by-Two Block
- Accurate Cutting is Key: Invest time in precise cutting. Even a slight discrepancy can throw off your block’s dimensions. Use a fresh rotary blade and a reliable ruler.
- Consistent Seam Allowance: A perfect 1/4-inch seam allowance (scant 1/4-inch for some) is critical. Practice on scraps to ensure your machine’s setting is spot on.
- Press, Don’t Iron: When quilting, we “press” seams, which means lifting and placing the iron, not sliding it back and forth. This prevents distorting your fabric pieces.
- Chain Piecing: To save time, use chain piecing. Sew multiple pairs of fabric pieces one after another without lifting the presser foot between them, creating a chain. Then, snip them apart.
- Nesting Seams: When joining units or blocks, try to nest your seams. Pressing seam allowances in opposite directions allows them to interlock, creating perfectly matched points.
- Square Up Blocks: After completing each block, use a square quilting ruler to trim it to the exact 6 1/2″ dimension, ensuring all your blocks are uniform before assembly.
Beyond the Block: Quilting and Finishing Your Project
Once your quilt top is complete, the journey continues with layering, quilting, and binding – the final steps that transform your fabric pieces into a durable and cherished quilt. You’ll need batting (the soft inner layer) and backing fabric (the bottom layer). These three layers are sandwiched together, basted (temporarily secured with pins, spray, or thread), and then quilted. Quilting involves stitching through all three layers to hold them together and add texture. For a beginner, simple straight-line quilting or a grid pattern can be very effective and easy to achieve.
Finally, the raw edges of your quilt will be finished with binding. This involves attaching strips of fabric around the perimeter of the quilt, sewn on one side by machine and then folded over to be hand-stitched or machine-stitched on the other side. This not only protects the edges but also adds a beautiful frame to your creation. Completing these steps will give you a finished quilt that is ready for snuggles, display, or gifting.
Two by Two Quilt Block Tutorial (Video)
For those who prefer visual learning, the comprehensive tutorial from Cut and Create offers an excellent guide. Watching the steps in action can clarify any uncertainties and provide valuable insights into best practices for cutting, sewing, and pressing.
Conclusion: Your Quilting Journey Starts Here
The Two-by-Two Quilt Block is truly a testament to the fact that beauty in quilting doesn’t always require complexity. Its simple construction yields stunning results, making it the perfect choice for anyone looking to experience the joy of creating a handmade quilt. Whether you’re a complete novice taking your first stitches or an experienced quilter seeking a quick and satisfying project, this block offers endless possibilities for creativity and personal expression. We hope this expanded guide, alongside the excellent video tutorial, empowers you to confidently tackle this delightful pattern.
Don’t wait any longer to start your quilting adventure. Gather your fabrics, set up your machine, and let the rhythmic hum of your sewing machine guide you to creating something truly special. Once you’ve completed your Two-by-Two Quilt Block, or even a full quilt, we encourage you to share your beautiful creations! Happy quilting!