
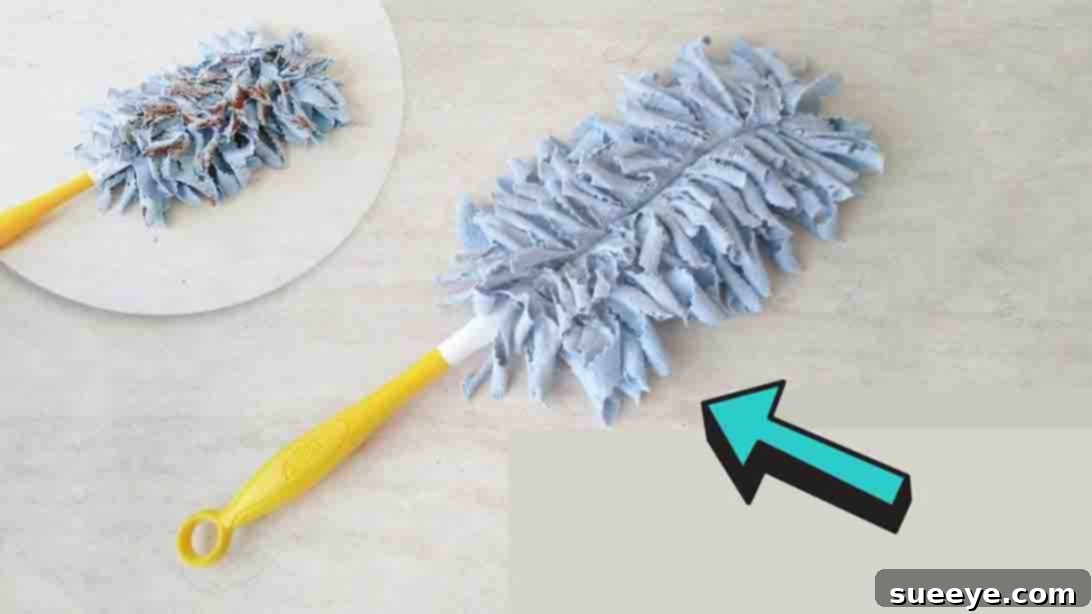
DIY Reusable Swiffer Duster Cloths: An Eco-Friendly & Budget-Saving Guide
Are you tired of constantly buying expensive, disposable Swiffer duster refills? Do you want to reduce your household waste and embrace more sustainable cleaning practices? Look no further! This comprehensive guide will walk you through creating your very own washable and reusable Swiffer duster cloths. Not only is this a fantastic way to save money in the long run, but it’s also an incredibly satisfying and beginner-friendly sewing project, perfect for anyone looking to add a touch of DIY charm to their cleaning routine.
Forget about the endless cycle of buying, using, and tossing. With just a few basic materials and a sewing machine, you can craft durable, effective dusters that can be washed and reused countless times. This project, inspired by the innovative minds at Hello Sewing, transforms simple flannel fabric into a powerful dust-attracting tool that fits perfectly onto your existing Swiffer handle. Get ready to embark on a creative journey that benefits both your wallet and the planet!
RELATED: Swiffer Duster Tip You Probably Don’t Know
Why Choose DIY Reusable Swiffer Dusters? The Benefits Unveiled
The decision to switch from disposable cleaning products to reusable alternatives is gaining momentum, and for good reason. Crafting your own Swiffer duster cloths offers a multitude of advantages that extend beyond just a fun crafting session. Let’s delve into why this DIY project is a smart choice for every home:
Significant Cost Savings Over Time
One of the most immediate and tangible benefits of making your own reusable Swiffer duster cloths is the substantial savings on cleaning supplies. Disposable duster refills, while convenient, can quickly add up, especially if you dust frequently. By investing a small amount in flannel fabric and basic sewing supplies upfront, you’ll eliminate the recurring cost of purchasing refills indefinitely. Over months and years, these savings can be quite significant, freeing up your budget for other household needs or enjoyable activities.
Embrace Eco-Friendly Cleaning and Reduce Waste
Every disposable duster you use eventually ends up in a landfill, contributing to the growing global waste problem. By choosing reusable alternatives, you actively participate in reducing this environmental burden. Each washable duster you make and reuse means one less item destined for the trash. This small but impactful change aligns with sustainable living practices and helps foster a more environmentally conscious home.
Superior Dust-Trapping Capabilities of Flannel
Flannel fabric isn’t just cozy; it’s also incredibly effective for dusting! Its soft, brushed surface creates a slight static charge that naturally attracts and holds onto dust, pet hair, and allergens. Unlike some synthetic disposable dusters that might push dust around, flannel’s unique texture ensures a thorough clean, trapping particles within its fibers until washed. You might even find your homemade dusters outperform store-bought versions in terms of dust collection.
Customization and Personalized Aesthetics
When you DIY, you’re not limited to the standard blue or white of commercial dusters. You have the freedom to choose flannel fabric in any color, pattern, or print that appeals to you! Match your cleaning tools to your home decor, select vibrant patterns to make dusting more enjoyable, or opt for neutral tones for a minimalist look. This customization adds a personal touch to an otherwise mundane household chore, making cleaning a little more fun.
Durable and Long-Lasting Performance
Designed to withstand numerous wash cycles, these homemade flannel dusters are built for longevity. With proper care, they can last for years, providing consistent cleaning power without degrading quickly like their disposable counterparts. This durability means less frequent replacement and a more reliable cleaning tool always at your disposal.
A Rewarding and Beginner-Friendly Sewing Project
For those new to sewing, this project offers an excellent opportunity to hone basic skills such as cutting fabric, straight stitching, and working with patterns. The steps are straightforward, and the outcome is immediately functional and satisfying. Experienced sewers will appreciate the quick gratification of a project that can be completed in a short amount of time. It’s a wonderful way to boost your confidence in your crafting abilities while creating something truly useful.
Essential Materials for Your DIY Swiffer Duster
Before you begin sewing, gathering all your materials will ensure a smooth and enjoyable crafting experience. This project requires only a few basic sewing supplies, making it accessible even if your sewing kit is minimal. Here’s what you’ll need:
- 1/2 Yard of Flannel Fabric: This is the star of our project! Flannel’s soft, napped surface is excellent for attracting and holding dust. Choose a durable, medium-weight flannel for best results. You can find flannel in a vast array of colors and patterns, so pick one that brings you joy. Pre-washing your flannel is a good idea to prevent shrinkage later on.
- Reusable Swiffer Pad Pattern: A precise pattern is crucial for ensuring your duster fits perfectly onto your Swiffer handle. You can download and print the free pattern from Hello Sewing here. Make sure to print it at 100% scale for accurate sizing.
- Matching Thread: Select a good quality polyester thread that matches or complements your flannel fabric. Polyester thread is strong and durable, perfect for a reusable item that will endure frequent washing.
- Fabric Marking Pen (or Chalk): Essential for transferring pattern markings onto your fabric. A pen that disappears with heat or water is ideal, ensuring no permanent marks are left on your finished duster.
- Sharp Scissors or Rotary Cutter: A good pair of fabric shears will make clean cuts. If you prefer, a rotary cutter with a self-healing mat offers precision and speed, especially for cutting multiple layers of fabric.
- Sewing Clips or Pins: These will hold your fabric layers securely in place while you cut and sew, preventing shifting and ensuring accuracy. Clips are particularly useful for thicker fabrics like flannel.
- Sewing Machine: Any basic sewing machine capable of a straight stitch will work perfectly for this project. Ensure your machine is threaded correctly and has a fresh needle suitable for medium-weight fabric.
- Iron and Ironing Board (Optional but Recommended): Pressing your fabric and seams can help achieve a more professional and crisp finish, though it’s not strictly necessary for this functional item.
- Pinking Shears (Optional but Recommended): While standard shears work fine, pinking shears create a zigzag edge that can help reduce fraying on the strips you cut later, prolonging the life of your duster.
With your materials ready, you’re set to transform these simple items into a powerful, eco-friendly cleaning tool!
Step-by-Step Guide: Crafting Your Washable Swiffer Duster
Follow these detailed instructions to create your durable and effective reusable Swiffer duster. Precision in cutting and careful stitching will ensure your duster performs wonderfully for years to come.
Step 1: Prepare Your Pattern and Cut the Flannel Fabric
The first step involves preparing your pattern pieces and meticulously cutting your flannel fabric. Accuracy here will ensure your duster fits your Swiffer handle perfectly and has the right dimensions for optimal dusting.
- Print and Cut the Pattern: Begin by printing out the free pattern (available via the link in the materials section) at 100% scale. Carefully cut out both the large and small pattern pieces along their designated lines.
- Fold the Pattern: Once cut, fold the larger pattern piece along the marked fold lines. These folds will guide you in cutting multiple fabric pieces efficiently. Set the folded pattern aside for a moment.
- Prepare Flannel for Cutting: Take your 1/2 yard of flannel fabric and fold it in half lengthwise, ensuring the raw edges are aligned. Smooth out any wrinkles.
- Position the Pattern “On the Bias”: Place the large pattern piece onto the folded flannel fabric. It’s crucial to pin the pattern on the bias – meaning at a 45-degree angle to the selvage (the finished edge of the fabric). Cutting on the bias allows the fabric to have a slight stretch, which helps the duster fit snugly and reduces fraying. Secure the pattern to the fabric with pins or sewing clips.
- Cut the First Fabric Pieces: Carefully cut around the pattern piece through both layers of flannel. Remove the pins.
- Transfer Markings: Using your fabric marking pen, transfer all the markings from the pattern onto the cut fabric pieces. These marks are essential for accurate assembly later on. Pin the fabric pieces together again to keep them paired.
- Repeat for Smaller Pieces: Take the smaller pattern piece and repeat the process: pin it on the bias onto a folded section of flannel and cut two pieces. Transfer markings and pin.
- Cut Additional Flannel Pieces: Now, unfold your main flannel fabric. Fold it along the first fold marking you made earlier, and cut two more large pieces of flannel using your previously cut fabric as a guide. Fold the flannel one more time along the second fold marking and cut the last two large pieces of flannel. This method ensures you end up with a total of eight large flannel pieces.
Step 2: Assemble, Sew, and Finish Your Duster
With all your fabric pieces cut, it’s time to bring your duster to life at the sewing machine. This step involves layering, stitching, and creating the dust-trapping fringe.
- Organize Your Pieces: After all your cutting, you should have four stacks, each containing two flannel pieces (for a total of eight flannel pieces, not including the smaller pieces). You will also have two smaller pieces.
- Mark Center Lines: For each of the eight large flannel pieces, transfer the center line marking from the pattern onto the fabric using your marking pen. This will be your guide for alignment.
- Sew Outer Lines of Small Pieces: Take the two smaller flannel pieces. Sew along the two outer lines that correspond to the markings on the pattern. Remember to backstitch at the beginning and end of your seams to secure them. This creates the foundational element for the duster’s attachment.
- Layer and Align: Now, arrange your eight large flannel pieces into four stacks of two. Take one of the sewn smaller pieces and layer it on top of a stack of two larger pieces, ensuring all center marks are perfectly aligned. This is crucial for creating a balanced and effective duster. Secure all layers together with sewing clips or pins. Repeat this process with the other smaller sewn piece and another stack of large flannel pieces.
- Flip and Repeat (if necessary): Depending on how your pieces are layered, you may need to flip the duster over to ensure symmetrical alignment and to prepare for the next sewing step. Make sure all layers are neatly stacked and aligned.
- Sew Along the Center Line: Using your sewing machine, sew a straight seam along the center line through all layers of fabric. This stitch is what holds your entire duster together and provides the structure for its attachment to the Swiffer handle. Backstitch at the beginning and end to reinforce this critical seam. Repeat for the second duster if you’re making two.
- Create the Fringe: Once the center seam is sewn, it’s time to create the “fingers” that trap dust. Using sharp scissors or pinking shears, cut 1/2-inch wide strips from the raw edges towards the center seam on all layers of the washable duster. Be careful not to cut through your center stitching! Pinking shears will create a zigzag edge that helps minimize fraying, while standard shears will give you straight fringes. These strips will create the fluffy texture that effectively grabs dust.
- Wash and Dry to Fluff: Before its first use, machine wash and dry your newly made duster. The washing and drying process is vital as it causes the flannel’s raw edges to fray slightly, creating a soft, fluffy texture that maximizes its dust-trapping ability. This step activates the duster’s full potential.
Tips for Maximizing Your DIY Swiffer Duster’s Performance
To ensure your homemade duster provides the best cleaning experience and lasts for many years, consider these helpful tips:
- Pre-Wash All Fabric: Always pre-wash and dry your flannel fabric before cutting and sewing. This prevents potential shrinkage after your duster is made and ensures your sizing remains consistent.
- Use Good Quality Flannel: Invest in a medium to heavy-weight, high-quality flannel. Better flannel will hold up longer, fluff up more effectively, and attract dust better than thinner, cheaper alternatives.
- Regular Washing is Key: Wash your reusable dusters regularly, especially after heavy dusting sessions. Simply toss them in the washing machine with your regular laundry. Avoid fabric softener, as it can reduce flannel’s static cling, which is essential for dust attraction. Tumble dry on low or air dry.
- Add a Scent Boost: For a pleasant scent while dusting, you can lightly spritz your duster with a diluted solution of water and a few drops of your favorite essential oil (like lavender or lemon) just before use.
- Ironing for Crispness (Optional): While not strictly necessary for functionality, a quick press with an iron after washing can flatten your duster for neat storage, though it will naturally fluff up again with use.
- Store Neatly: Keep your clean, fluffed dusters in a designated basket or drawer so they are always ready for action. Having several on hand allows for a rotation between uses and washes.
Troubleshooting Common DIY Duster Issues
Even with a straightforward project, you might encounter minor hiccups. Here are solutions to some common issues:
- “My duster isn’t fluffy enough!”: Ensure you washed and dried your duster after sewing. The agitation and heat are crucial for the flannel’s fibers to expand and fray, creating that desirable fluffy texture. If it’s still not fluffy, try a second wash and dry cycle, or gently hand-fluff the cut strips.
- “The fabric is fraying too much after washing.”: This is natural for flannel, especially with cut edges. Using pinking shears in Step 2 can help reduce excessive fraying. If you used regular shears, a little fraying adds to the dust-trapping ability, but excessive fraying might indicate a need for better quality flannel or more securely sewn center seams.
- “The duster doesn’t fit my Swiffer handle.”: Double-check that you printed the pattern at 100% scale and measured accurately. Slight variations in sewing machine tension or seam allowances can also affect fit. Ensure your center seam is straight and centered.
- “Dust isn’t sticking as well as I hoped.”: Ensure your flannel is free of fabric softener, which can inhibit static electricity. For an extra boost, you can rub the duster against itself or a clean surface to build up static before dusting.
DIY Swiffer Duster Cloth Tutorial: Your Journey to a Cleaner, Greener Home
Making your own reusable Swiffer duster cloths is more than just a sewing project; it’s a step towards a more sustainable and economical lifestyle. You’ll not only save money on cleaning supplies but also reduce your environmental footprint by minimizing waste. The satisfaction of cleaning your home with something you’ve crafted yourself is an added bonus!
We encourage you to try this accessible and rewarding DIY project. It’s perfect for sewers of all skill levels, offering a practical outcome that you’ll use regularly. Embrace the simplicity and effectiveness of handmade cleaning tools, and enjoy a cleaner, greener home with your very own washable Swiffer duster cloths. Happy sewing and happy dusting!