
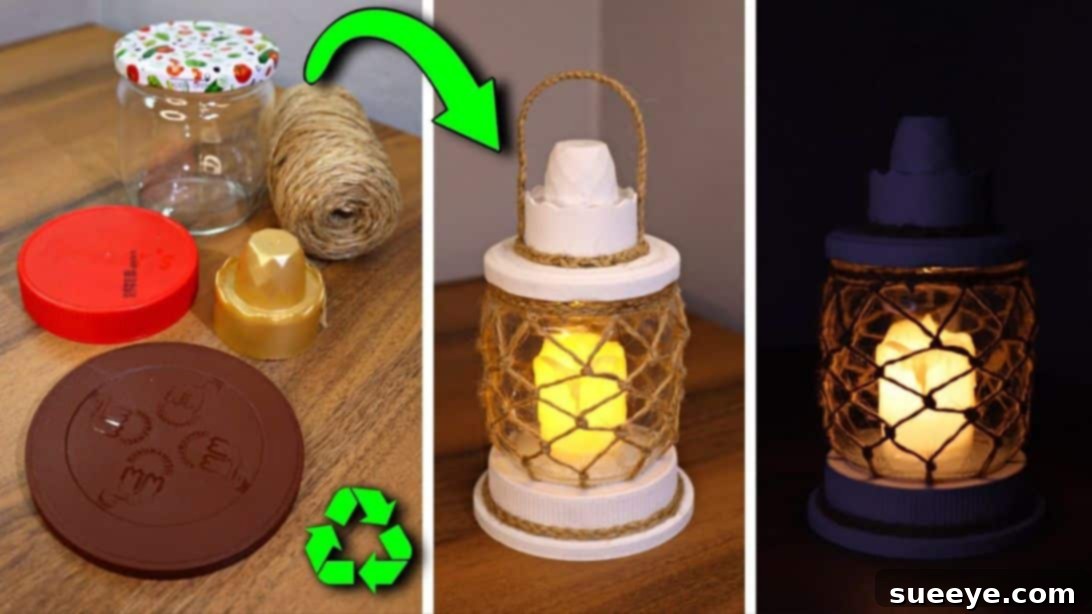
Transform Your Space: Upcycled Glass Jar Candle Holder DIY
Are you looking for a creative, budget-friendly way to enhance your home decor while also contributing to a more sustainable lifestyle? Look no further! This delightful DIY project guides you through transforming common household items – an unused glass jar and discarded plastic lids – into an elegant and charming candle holder. Perfect for gracing your dining table, illuminating a cozy reading nook, or adding a rustic touch to your bookshelves, this craft is both rewarding and simple. It’s an inspired concept from Recycling Ideas DIY on Youtube, known for their ingenious approaches to repurposing everyday containers. This project champions the beauty of upcycling, giving new life to items that might otherwise end up in landfill. Dive into the world of sustainable crafting and create something beautiful with your own hands. Follow our comprehensive instructions below to craft your very own unique candle holder.
The Art of Upcycling: Why DIY Your Decor?
In an era where environmental consciousness is paramount, upcycling offers a fantastic avenue for personal creativity and ecological responsibility. By choosing to repurpose items like glass jars and plastic lids, you actively reduce waste and decrease demand for new manufactured goods, thereby conserving resources and energy. Beyond its environmental benefits, DIY home decor provides immense personal satisfaction. There’s a unique charm and story behind every handmade item, making your home truly reflect your personality and values. This particular candle holder project is not only eco-friendly but also incredibly versatile, allowing for customization to fit any aesthetic. It’s a perfect activity for beginners and experienced crafters alike, promising a beautiful outcome that adds warmth and character to any room without breaking the bank.
Gather Your Creative Arsenal: Materials You’ll Need
One of the most appealing aspects of this project is that it utilizes materials you likely already have lying around your house or can easily source. Before you begin, ensure you have all the components ready. A little preparation goes a long way in making your crafting process smooth and enjoyable.
- Glass Jar: Opt for a clean, empty glass jar of any size you prefer. Mason jars, pickle jars, or even large jam jars work wonderfully. Ensure it’s sturdy and has a lid if possible, as the lid will be used for painting.
- Jute Rope: This natural fiber rope adds a rustic and organic texture to your candle holder. You’ll need a fair amount, so having a roll on hand is advisable. The thickness can vary, but a medium-thin rope is usually easiest to work with for knotting.
- Scissors: A sharp pair of scissors is essential for clean cuts through the jute rope.
- Acrylic Paint: White acrylic paint is suggested for a clean, minimalist look, but feel free to choose any color that complements your home decor. Acrylics are great for adhering to glass and plastic.
- Sponge Brush: Ideal for applying paint evenly to both glass and plastic surfaces, ensuring a smooth finish without brush strokes.
- Plastic Lids: You’ll need three distinct types of plastic lids for the base and top embellishments:
- Flat Lid: A standard, flat plastic lid, perhaps from a larger container or a yogurt tub.
- Thicker Lid: A slightly more substantial or taller plastic lid, which will add height and dimension to the base.
- Crown-Shaped Lid: This unique lid, often found on certain beverage bottles or cosmetic containers, will serve as a decorative element on the top. Its shape adds a touch of elegance.
- LED Candle: For safety reasons and longevity, an LED candle is highly recommended. It mimics the warm glow of a traditional candle without any fire hazards, making your beautiful creation safe for any surface and household.
- Strong Adhesive/Glue Gun: (Implicitly needed, but not listed in original materials. Crucial for assembly.) A good quality craft glue or hot glue gun with glue sticks will be indispensable for securing the jute, painted lids, and other components.
Step-by-Step Guide: Crafting Your Candle Holder
Now that you have all your materials ready, let’s embark on the creative journey. Take your time with each step, paying attention to detail, and enjoy the process of bringing your vision to life.
Step 1: Preparing the Jute Rope for the Jar Rim
Begin by taking your jute rope and carefully wrapping it once around the very top edge or rim of your glass jar. This initial piece will serve as your anchor for the hanging jute strings. Ensure it’s snug but not overly tight. Once you’ve completed a full circumference, cut the rope precisely at the point where it meets its beginning. This short piece will be the foundational loop for your decorative element. Set it aside for now.
Step 2: Creating Uniform Jute Strings for Decorative Hanging
This step requires a bit of measurement and precision to ensure a uniform and aesthetically pleasing design. Take the short piece of jute rope you just cut from the jar’s rim. Place one end of a long piece of jute onto the top edge of the jar, holding it firmly in place with one hand. With your other hand, pull the rope downwards towards the center bottom of the jar, letting it hang naturally. Mark the point on the rope where it reaches the lowest point you desire for your decorative strings. This mark represents the length from the rim to the bottom of your desired design. Now, fold the jute rope at this mark, effectively doubling its length. Cut the rope at the folded end. This doubled length will be one of your hanging strings. Repeat this process to cut numerous additional strings of the exact same length. The more strings you cut, the denser and fuller your jute design will appear around the jar. Aim for enough strings to create a beautiful, interwoven pattern around the entire circumference of the jar.
Step 3: Crafting the Jute Knots for Attachment
Now, let’s prepare the individual hanging strings for attachment to the rim piece. Take one of the short jute strings (the one you cut in Step 1 for the rim) and one of the longer, doubled jute strings you just prepared. Fold the long string neatly in half. This creates a loop at the fold and two free ends. Position the short rim string horizontally. Insert the folded loop of the long string underneath the short string, at the desired point where you want to attach it. Then, take the two free ends of the long string and thread them through the loop you just created. Pull gently but firmly to tighten the knot around the short string. This is essentially a lark’s head knot, a very secure and visually appealing knot often used in macrame. Repeat this process for all the remaining long jute strings, attaching them at regular intervals along the short rim string. Ensure the knots are evenly spaced for a symmetrical look.
Step 4: Weaving the Macrame-Inspired Jute Pattern
With all your prepared strings knotted onto the rim piece, it’s time to attach this assembly to your glass jar and begin the decorative weaving. Carefully tie the short rim string, now adorned with all the hanging long strings, securely around the rim of your glass jar. Adjust it so the knots are evenly distributed around the circumference. Once secure, take one string from every two adjacent knots and tie them together with a simple overhand knot. This will create a series of inverted “V” shapes. Continue this process, taking one string from each new knot you’ve created and pairing it with a string from an adjacent knot below it, and tying them together. Work your way down the jar, creating a beautiful, intricate macrame-like pattern. Maintain consistent tension and spacing between your knots for a neat and uniform appearance. This step allows for a lot of creativity; you can vary the distance between knots to create different net-like patterns. Continue until you reach the bottom half or third of the jar, depending on your desired design.
Step 5: Adding a Fresh Coat of Paint to the Base Elements
Now for a touch of color and refinement! Using your chosen acrylic paint and sponge brush, carefully paint the bottom exterior of the glass jar. Also, paint the jar’s original lid (if you plan to use it as part of the base) and all three of your plastic lids. White acrylic paint offers a crisp, clean, and versatile finish that highlights the natural texture of the jute. Apply thin, even coats to prevent drips and ensure a smooth, opaque finish. You might need two or three coats for full coverage, allowing each layer to dry completely before applying the next. This is crucial for durability and a professional look. Patience during the drying process will pay off. Set all painted pieces aside in a well-ventilated area until they are absolutely dry to the touch.
Step 6: Securing the Jute and Beginning the Braided Accent
Once the paint on your jar’s base is dry, it’s time to secure the ends of your macrame jute strings. Gather all the hanging jute strings at the very bottom of the glass jar. Apply a strong adhesive or hot glue to the bottom surface of the jar and firmly press the ends of the jute strings onto it, fanning them out slightly if desired, to create a neat finish. Ensure they are securely glued down to prevent unraveling. While the glue dries, take three new, separate strands of jute rope. Braid these three strands together to create a sturdy and decorative braided rope. This braided piece will serve as a lovely accent around the base of your candle holder.
Step 7: Assembling the Decorative Base
Now we’ll construct the elevated base for your candle holder, adding stability and a layered aesthetic. Take the two plastic lids you painted earlier – one flat and one thick. Decide on their arrangement; typically, the wider flat lid forms the bottom layer, with the thicker lid placed on top of it, centered. Apply a generous amount of strong adhesive or hot glue to the top surface of the flat lid and carefully center and attach the thicker lid. Once these two are securely joined, apply glue around the middle circumference of this combined base. Gently wrap and glue your braided jute string around this section, creating a neat band that visually ties the two lids together and adds another layer of texture. Ensure the ends of the braid are neatly trimmed and secured with glue. Finally, take your painted glass jar (with the jute strings secured at the bottom) and glue it firmly onto the top of this newly assembled plastic lid base. Ensure it’s centered and stable.
Step 8: Adding the Crown Top and Handle Accent
For the finishing touch on the top of your candle holder, take the original lid of the glass jar (if you used it and painted it, or a separate flat disc). Place it on top of the jar. Now, take your crown-shaped plastic lid that you painted earlier. Apply glue to the bottom edge of this crown lid and carefully center and glue it onto the top of the jar’s lid. This crown lid adds an elegant, sculptural element. Next, take another length of braided jute (or create a new one, similar to Step 6). Form it into a gentle arch to resemble a handle. Apply glue to both ends of this braided jute handle and attach them to opposite sides of the crown-shaped lid. This creates a charming visual “handle” effect, even if it’s not load-bearing, further enhancing the decorative appeal of your candle holder.
Step 9: The Grand Finale: Illuminating Your Creation
Your magnificent upcycled candle holder is almost complete! The final and most satisfying step is to place your LED candle inside the glass jar. Gently set the LED candle at the bottom of the jar. Turn it on, and watch as your handcrafted masterpiece comes to life, casting a warm, inviting glow. Step back and admire your handiwork – a beautiful, sustainable, and unique piece of home decor created entirely by you. Congratulations!
Enhancing Your DIY Experience: Tips and Variations
To make your candle holder truly unique and ensure a smooth crafting experience, consider these tips and creative variations:
- Adhesive Choice: For a quick assembly, a hot glue gun is excellent. For maximum durability and a cleaner finish (though with longer drying times), consider using a strong craft adhesive like E6000 or super glue, especially for attaching glass to plastic.
- Paint Finish: Experiment with different paint finishes. Matte, glossy, or even metallic acrylic paints can dramatically change the look of your candle holder. You could also distress the paint lightly with sandpaper for a shabby-chic effect.
- Jute Alternatives: While jute provides a rustic feel, you could use other ropes or yarns like cotton twine for a softer look, or even colorful macrame cords for a bolder statement.
- Embellishments: Don’t be afraid to add extra decorative elements! Small charms, beads woven into the jute, dried flowers, or ribbons tied around the neck of the jar can personalize your creation further.
- Theme It Up: Think seasonally or by room theme. Use red and green paint for Christmas, pastels for spring, or colors matching your bathroom decor.
- Safety First: Always use LED candles. Real flames in enclosed glass jars can overheat and pose a fire risk, especially with jute rope decorations. LED candles are safe, energy-efficient, and come in various flicker effects to mimic real flames.
- Cleaning: To clean your finished candle holder, gently wipe it with a damp cloth. Avoid harsh chemicals or submerging it in water to protect the paint and glue.
The Enduring Appeal of Handmade Home Decor
Crafting your own home decor pieces, especially those that involve upcycling, offers a multitude of benefits. Beyond the immediate satisfaction of creating something beautiful, you contribute positively to the environment by diverting waste from landfills. Each upcycled item tells a story, carrying with it a history before being transformed into something new and functional. This DIY candle holder, made from a simple glass jar and plastic lids, embodies this philosophy perfectly. It’s a testament to how ordinary objects can be reimagined with a touch of creativity and effort. Such handmade items add a unique warmth, character, and personal touch to your living spaces that mass-produced items simply cannot replicate. They become conversation starters, reflections of your personality, and cherished elements within your home.
Moreover, engaging in DIY projects can be incredibly therapeutic. The process of working with your hands, focusing on a creative task, and seeing a project through to completion can reduce stress and boost your sense of accomplishment. It’s a wonderful way to unwind and express yourself. This specific project, with its clear steps and accessible materials, is an excellent entry point into the rewarding world of crafting and upcycling.
Your New Favorite DIY Candle Holder
Congratulations on completing your upcycled glass jar candle holder! You’ve not only created a beautiful and functional piece of home decor but also participated in a sustainable practice that benefits our planet. This project by Recycling Ideas DIY serves as a fantastic reminder that beauty and utility can be found in unexpected places. Your handmade candle holder is more than just an item; it’s a reflection of your creativity, your commitment to sustainability, and your ability to transform the ordinary into the extraordinary. Place it on your mantle, use it as a centerpiece for a special occasion, or gift it to a loved one – it’s sure to be admired. We encourage you to share your creations and inspire others to embark on their own upcycling adventures!