
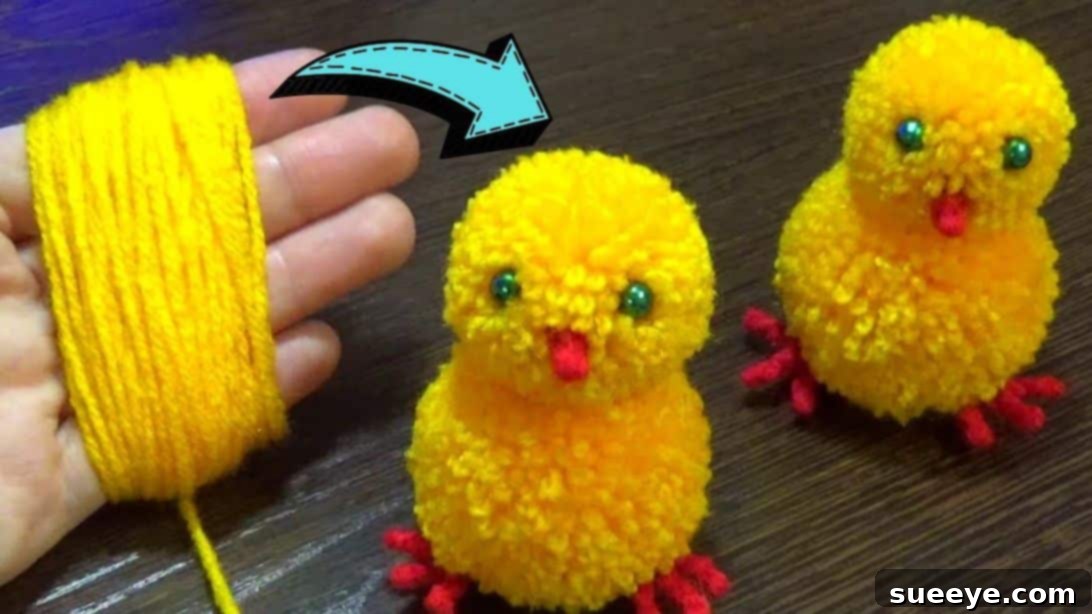
Are you looking for a delightful, budget-friendly way to add a touch of spring charm to your home this Easter? Look no further! This comprehensive tutorial will guide you through creating the most adorable yarn pom-pom chicks, perfect for decorating, gifting, or simply enjoying the crafting process. With just a few simple materials and a desire to create, you can bring these fluffy little cuties to life.
Handmade decorations infuse your home with warmth and personality, and these DIY pom-pom chicks are no exception. They’re incredibly easy to make, making them an ideal project for crafters of all ages and skill levels, including families looking for a fun Easter activity. You’ll be amazed at how quickly you can transform ordinary yarn into charming, vibrant Easter accents.
This guide draws inspiration from a fantastic video tutorial by Crafts & Ribbon Art on YouTube, ensuring you have clear, step-by-step instructions. Whether you’re a visual learner or prefer written details, we’ve got you covered. Let’s gather our supplies and start crafting these irresistibly cute little chicks!
DIY Adorable Yarn Pom-Pom Chicks: The Ultimate Easy Easter Craft Tutorial
Bringing handmade charm into your seasonal decor doesn’t have to be complicated or expensive. These super easy yarn pom-pom chicks are the perfect project to add a whimsical and festive touch to your Easter celebrations or spring decorations. Imagine these fluffy little creatures perched in an Easter basket, adorning a mantelpiece, or even given as sweet, personalized gifts. Their simple construction makes them accessible for beginners, while the potential for customization offers endless creative possibilities for experienced crafters.
Beyond their aesthetic appeal, crafting these pom-pom chicks offers a wonderful opportunity for mindful creation. The repetitive motion of wrapping yarn can be incredibly soothing, and the joy of seeing your project come together is truly rewarding. This guide is designed to make the process as straightforward and enjoyable as possible, breaking down each step into easy-to-follow instructions. You’ll learn the techniques for creating perfect pom-poms, assembling your chick, and adding those endearing little details that give each one its unique personality.
Why Make Yarn Pom-Pom Chicks?
Yarn pom-pom chicks are more than just a craft; they are a delightful addition to any spring or Easter theme. Here’s why they are an absolute must-try project:
- Cost-Effective: Made primarily from yarn, these chicks are incredibly inexpensive to create, especially if you already have a stash of yarn from previous projects.
- Beginner-Friendly: The core technique of making pom-poms is simple and requires no specialized tools, making it perfect for novice crafters or kids.
- Versatile Decor: Use them in Easter baskets, as part of a spring garland, as festive table decorations, attached to gift wrap, or even as charming ornaments.
- Personalization: Easily customize your chicks with different yarn colors, sizes, and accessories to match your personal style or decor theme.
- Quick to Make: Once you get the hang of pom-pom making, you can whip up several chicks in a relatively short amount of time, perfect for last-minute decorating.
- Engaging for All Ages: This project is fantastic for family crafting sessions. Kids can help with wrapping the yarn (with adult supervision for cutting and gluing), fostering creativity and fine motor skills.
Materials You’ll Need:
Before diving into the fun of crafting, ensure you have all your materials gathered. The beauty of this project lies in its simplicity and the minimal supplies required.
- Yellow Yarn: This will form the fluffy body and head of your chick. Choose a soft, medium-weight acrylic or wool yarn for the best results, as it will create a full and fluffy pom-pom. The brighter the yellow, the more cheerful your chicks will be!
- Red Yarn: Used for the chick’s adorable little beak and feet. A small amount is sufficient. You can also experiment with orange yarn for the beak.
- Sharp Scissors: Essential for cleanly cutting yarn and trimming your pom-poms into perfect spherical shapes. A good, sharp pair will make the process much easier and yield neater results.
- Hot Glue Gun and Glue Sticks: For securely attaching the different parts of your chick (head to body, feet, beak, and eyes). Always exercise caution when using a hot glue gun, especially if crafting with children.
- 2 Small Beads: These will become the bright, expressive eyes of your chick. Black beads are traditional, but you can experiment with other colors or even tiny buttons for a unique look. Alternatively, you could use small pieces of felt or embroider the eyes with black thread.
Step-by-Step Directions:
Now that you have all your materials, let’s get crafting! Follow these detailed steps to create your charming yarn pom-pom chick.
Step 1: Crafting the Chick’s Head (The Small Pom-Pom)
The head of your chick will be the smaller of the two pom-poms. The key to a fluffy, dense pom-pom is consistent wrapping and secure tying.
- Prepare for Wrapping: Take your yellow yarn. For the chick’s head, you’ll want to create a smaller pom-pom. Gently place three of your fingers (index, middle, and ring fingers work well for an average-sized head) together.
- Wrap the Yarn: Begin wrapping the yellow yarn around your three fingers. Aim for approximately 120 consistent wraps. The more yarn you wrap, the denser and fluffier your pom-pom will be. Keep the tension even to ensure a uniform result. Avoid wrapping too tightly, as this can make it difficult to remove the yarn from your fingers.
- Secure the Center: Once you’ve completed your wraps, carefully slide the wrapped yarn off your fingers. Take a separate, single piece of yellow yarn (about 6-8 inches long). Lay the wrapped yarn across the center of this single piece.
- Tie Tightly: Bring the ends of the single yarn piece up and over the wrapped yarn bundle. Tie a very tight knot (a double knot is highly recommended for security) around the exact center of the bundle. This central tie is crucial for holding the pom-pom together. Trim off any excessively long tails from this tying string, but leave enough to tuck in later if needed.
- Prepare for Cutting: To contain any stray yarn fibers and make cleanup easier, place a tray or a large piece of paper on your work surface.
- Cut the Loops: Using your sharp scissors, carefully cut through all the yarn loops around the entire circumference of the tied bundle. Take your time to ensure every loop is snipped.
- Shape and Trim: Once all loops are cut, your pom-pom will look a bit unruly. Gently fluff it with your fingers. Now, begin to trim the yarn evenly, gradually shaping it into a small, tight, and perfectly spherical ball. Don’t be afraid to trim quite a bit – this is what gives it that neat, professional look. Continue trimming until you are satisfied with its roundness and density. Set this small pom-pom aside.
Step 2: Creating the Chick’s Body and Assembly (The Large Pom-Pom)
The body will be a larger, fluffier pom-pom, providing a stable base for your chick. The process is similar to the head, just with more wraps.
- Prepare for Body Wrapping: For the chick’s body, you’ll need a larger pom-pom. Place four of your fingers together (index, middle, ring, and pinky fingers) for a wider base.
- Wrap More Yarn: Wrap the yellow yarn around your four fingers approximately 150 times. Again, maintain consistent tension and neatness. The extra wraps will result in a larger, more substantial pom-pom for the body.
- Secure and Tie: Carefully slide the wrapped yarn off your fingers. Use another single piece of yellow yarn to tie a very tight double knot around the exact center, just as you did for the head.
- Cut and Shape the Body: Place the tied yarn bundle over your tray. Snip through all the loops around the circumference. Fluff the yarn and then meticulously trim it, shaping it into a larger, tight, and perfectly round ball. This large pom-pom will be the chick’s body.
- Join Head and Body: Now it’s time to bring your chick to life! Heat up your hot glue gun. Apply a generous dab of hot glue to the top center of the large body pom-pom. Carefully press the small head pom-pom onto the glue, holding it firmly in place for a few seconds until the glue sets. Ensure the head is centered and securely attached.
Step 3: Adding the Finishing Touches: Feet, Beak, and Eyes
These small details are what give your pom-pom chick its adorable character. Precision and a steady hand will help here.
- Crafting the Feet:
- Take two strands of red yarn, each about 6-8 inches long. Tie them together very tightly at their center with 4-5 secure knots. This creates a small, dense bundle.
- Repeat this process two more times, so you have three small knotted bundles of red yarn.
- Now, gather these three small bundles together. Using another piece of red yarn, tie them all together securely at their combined center.
- Take the long tails from this newly formed larger bundle. Loop them sideways (forming a “foot” shape) and tie a knot to secure the loop. Trim off any excess tails neatly. This creates one chick foot.
- Repeat the entire process one more time to create the second chick foot.
- Apply a small dab of hot glue to the bottom of your chick’s body where you want each foot to be. Carefully press each red yarn foot onto the glue, holding until secure.
(Alternative for feet: For a simpler approach, you could cut three small pieces of red felt into simple claw shapes and glue them to the bottom, or create tiny braided strands of red yarn.)
- Making the Beak:
- Grab three short strands of red yarn (about 4-5 inches each).
- Knot them together very tightly at their center, about 3-4 times, to form a small, compact bundle.
- Loop the long tails from this bundle sideways and tie a knot to hold the triangular, beak-like shape. Trim any excess yarn, leaving a small, pointed beak.
- Apply a tiny dot of hot glue to the front of the chick’s head, just below where the eyes will go. Carefully attach the red yarn beak, ensuring it points slightly downwards or forwards, as desired.
- Adding the Eyes:
- Take your two small beads.
- Apply a tiny dot of hot glue to the chick’s head where each eye should be placed.
- Carefully position a bead onto each glue dot, pressing gently until it is firmly attached. Make sure the eyes are spaced appropriately and symmetrical for the cutest expression.
(Alternative for eyes: If beads aren’t available, you can cut tiny circles from black felt and glue them on, or use a small amount of black embroidery floss to stitch two tiny French knots for eyes.)
Customization and Creative Variations
The beauty of DIY crafts lies in the ability to personalize them! Here are some ideas to make your pom-pom chicks truly unique:
- Color Palette: While yellow is classic, consider making chicks in other pastel colors like light blue, pink, lavender, or mint green for a vibrant Easter display.
- Size Variations: Experiment with different numbers of fingers or pom-pom makers to create chicks of varying sizes. A family of tiny chicks alongside larger ones would be adorable!
- Adding Wings: Cut small teardrop or feather shapes from felt (yellow or a contrasting color) and hot glue them to the sides of the chick’s body for little wings.
- Hats and Bows: Dress up your chicks with miniature felt hats, tiny fabric bows, or even small flowers attached to their heads.
- Glitter and Embellishments: For a touch of sparkle, lightly spray your finished chick with adhesive and sprinkle fine glitter, or glue on tiny sequins.
- Scented Chicks: For an extra sensory touch, you could add a drop of essential oil (like lavender or chamomile) to the inner core of the pom-pom before tying it off, creating a subtle scent diffuser.
Displaying Your Adorable Chicks
Once your pom-pom chicks are complete, it’s time to show them off! Here are a few ideas for displaying your handmade treasures:
- Easter Basket Filler: Nestle them among chocolate eggs and plastic grass in an Easter basket.
- Spring Garland: String several chicks together with colorful beads or felt flowers to create a charming garland for a mantel or doorway.
- Table Centerpiece: Arrange them around a vase of spring flowers or in a decorative nest for a delightful table centerpiece.
- Gift Toppers: Tie a pom-pom chick onto a gift bag or box for a personalized and adorable touch.
- Potted Plant Decor: Gently place them at the base of your indoor plants or spring flowers for a whimsical accent.
Conclusion: Your Handmade Easter Masterpiece
Congratulations! You’ve successfully crafted your very own adorable yarn pom-pom chick. This project proves that with a little yarn and creativity, you can produce beautiful, heartwarming decorations that bring joy to your home. Whether you made one or a whole flock, each chick is a testament to your crafting skills and a lovely addition to your seasonal decor.
Embrace the satisfaction of handmade items and let these fluffy little friends brighten your Easter and spring season. Don’t hesitate to share your creations and inspire others!
*All images in this tutorial are credited to Crafts & Ribbon Art via YouTube. We highly recommend visiting their channel and subscribing for more inspiring craft tutorials!