
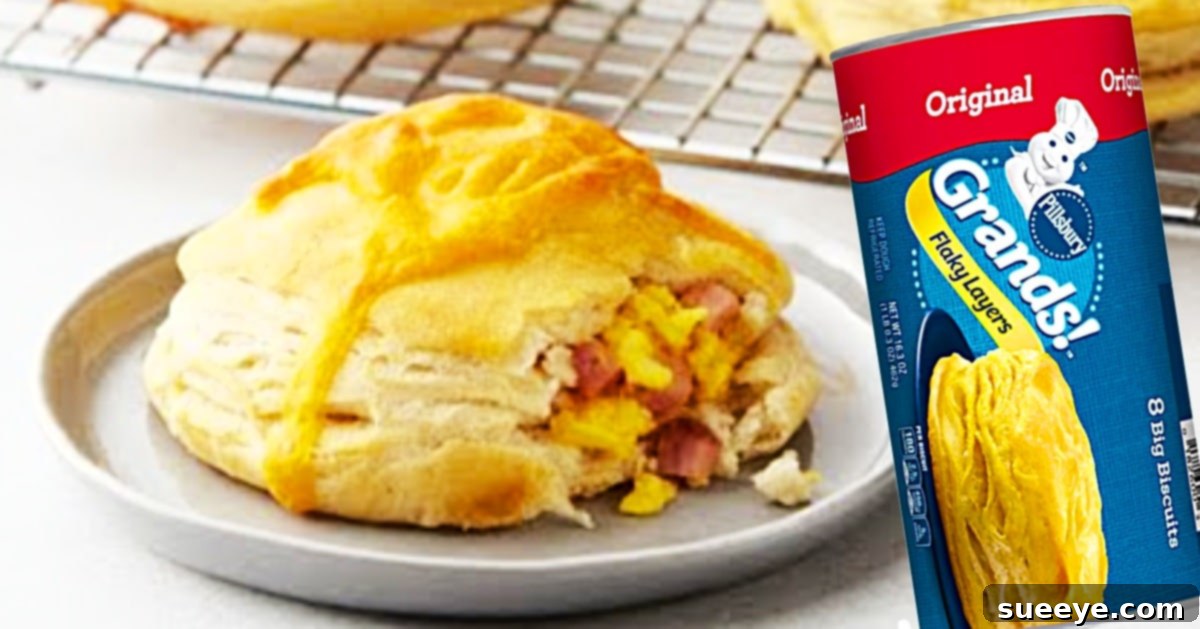
Freezer-Friendly Breakfast Bombs: Your Ultimate On-The-Go Meal Prep Solution
Are your mornings a frantic dash, leaving little time for a nutritious meal? If so, you’re not alone. The quest for quick, satisfying, and wholesome breakfast options often leads to compromises. But what if you could have a warm, homemade breakfast ready in minutes, even on the busiest days? Enter the marvelously simple and incredibly delicious **Freezer-Friendly Breakfast Bombs**, a true game-changer for anyone seeking efficiency without sacrificing flavor.
Inspired by ingenious recipes like the one shared by Pillsbury on YouTube, these canned biscuit breakfast bombs are the ultimate solution for busy families and individuals. Imagine your favorite breakfast components – fluffy eggs, savory meats, and fresh veggies – all neatly tucked inside a golden-brown biscuit crust. The best part? You can prepare a large batch, freeze them, and simply reheat whenever hunger strikes. This isn’t just a recipe; it’s a lifestyle upgrade for stress-free mornings and healthy eating on the go.
Why You’ll Love These Canned Biscuit Breakfast Bombs
There are countless reasons why these breakfast bombs will quickly become a staple in your kitchen. Beyond their incredible convenience, they offer a host of benefits that cater to modern, fast-paced living:
- Unbeatable Convenience: Say goodbye to skipping breakfast or settling for unhealthy drive-thru options. With these bombs, a hot, satisfying meal is just a microwave or oven away. Perfect for school mornings, work commutes, or even a quick snack.
- Effortless Meal Prep: Dedicate an hour or two on a weekend, and you’ll have a week’s worth, or even a month’s worth, of breakfasts ready to go. This significantly reduces morning stress and helps maintain healthy eating habits.
- Infinitely Customizable: The beauty of this recipe lies in its versatility. While eggs and cheese are classics, you can experiment with a wide array of fillings to suit any dietary preference or craving. This keeps breakfast exciting and prevents meal fatigue.
- Kid-Friendly & Family Approved: Kids adore these handheld pockets of deliciousness. They’re fun to eat, easy to hold, and you can involve them in the preparation process, making for a fun family activity. Plus, it’s an excellent way to sneak in some extra protein and veggies.
- Budget-Friendly: Making breakfast at home using readily available ingredients like canned biscuits and eggs is significantly cheaper than daily café runs or pre-packaged meals. This recipe helps you save money without compromising on quality or taste.
- Delicious Homemade Taste: Despite their simplicity, these breakfast bombs taste wonderfully homemade. The flaky biscuit exterior perfectly complements the warm, savory filling, creating a comforting and satisfying start to your day.
Ingredients For Your Perfect Breakfast Bombs
The magic of these breakfast bombs begins with a few simple, accessible ingredients. The base is the trusty canned biscuit, a convenience product that transforms into something extraordinary with a little creativity. Here’s what you’ll need, along with suggestions for customization:
- 1 (16.3 oz) Can of Pillsbury Grands Biscuits: The star of the show! These large, flaky biscuits are ideal for holding generous fillings. Their pre-made nature is key to the recipe’s speed and simplicity.
- 3 to 4 Large Eggs: Scrambled eggs form the creamy, protein-packed heart of your bombs. You can increase or decrease the quantity based on how many bombs you’re making and how egg-heavy you want them.
- 4-6 Strips of Bacon: Cooked crispy and crumbled, bacon adds a smoky, salty punch. Alternatively, you can use pre-cooked bacon bits for even quicker prep.
- 4 oz Diced Ham: Pre-cooked and diced ham brings another layer of savory goodness. Leftover holiday ham works wonderfully here, or you can grab pre-packaged diced ham from the grocery store.
- ¼ Cup Chopped Green Onions: These add a mild onion flavor and a touch of freshness that brightens the entire bomb.
- ¼ Cup Diced Tomatoes: For a burst of juiciness and a hint of acidity, diced tomatoes are a great addition. Make sure to deseed them slightly to avoid excess moisture.
- Optional: ½ Cup Shredded Cheese (Cheddar, Mozzarella, or a blend): Cheese is always a welcome addition, melting into a gooey, savory layer within the bomb.
- Optional: Other Fillings You Choose: This is where you can truly make the recipe your own! (See “Delicious Variations” below for ideas).
- Salt and Black Pepper: To taste, for seasoning your eggs and fillings.
Equipment You’ll Need
- Large Baking Sheet
- Parchment Paper or Silicone Baking Mat
- Large Skillet (for cooking fillings)
- Mixing Bowl (for scrambling eggs)
- Measuring Cups and Spoons
- Spatula

Step-by-Step Directions for Delicious Breakfast Bombs
Making these breakfast bombs is incredibly straightforward. Follow these detailed steps to ensure perfectly cooked, savory pockets every time:
- Preheat Oven & Prep Baking Sheet: Begin by preheating your oven to 350°F (175°C). Line a large baking sheet with parchment paper or a silicone baking mat. This prevents sticking and makes cleanup a breeze.
- Prepare Your Fillings:
- Cook Bacon: In a skillet over medium heat, cook the bacon until crispy. Remove from skillet, drain excess fat, and crumble. Set aside.
- Cook Ham: If using fresh ham, cook it lightly in the same skillet until warmed through. If using pre-cooked, simply dice it.
- Scramble Eggs: In a mixing bowl, whisk together the eggs with a pinch of salt and pepper until well combined. Cook in the skillet (add a touch of butter or oil if needed) over medium-low heat until just set and fluffy. Do not overcook, as they will cook more in the biscuit.
- Chop Veggies: Chop your green onions and tomatoes (and any other vegetables you choose) into small, manageable pieces.
- Combine Fillings: In a medium bowl, gently mix the scrambled eggs, crumbled bacon, diced ham, green onions, and diced tomatoes. If using, stir in the shredded cheese.
- Prepare the Biscuits: Open the can of Pillsbury Grands Biscuits. Carefully separate each biscuit. On a clean, lightly floured surface or a piece of parchment paper, gently flatten each biscuit with your hands or a rolling pin into a disk approximately 4-5 inches in diameter. Don’t make them too thin, or they might tear.
- Assemble the Breakfast Bombs:
- Spoon about 2-3 tablespoons of the prepared filling mixture into the center of each flattened biscuit. Be mindful not to overfill, as this makes sealing difficult and can cause the bombs to burst during baking.
- Carefully bring the edges of the biscuit up and over the filling, pinching them together tightly at the top to completely seal the bomb. Ensure there are no gaps or holes where the filling could escape.
- Once sealed, gently roll the biscuit in your hands to create a smooth, round ball. Place the sealed bomb seam-side down on your prepared baking sheet.
- Bake to Golden Perfection: Place the baking sheet in the preheated oven. Bake for approximately 15 to 18 minutes, or until the biscuits are golden brown and cooked through. The exact time may vary depending on your oven and the size of your bombs.
- Cool Slightly: Once baked, remove the breakfast bombs from the oven and let them cool on the baking sheet for a few minutes before serving. They will be very hot!
Pro Tips for Perfect Breakfast Bombs
- Don’t Overfill: This is crucial. Too much filling will make it impossible to seal the biscuit properly, leading to messy leaks during baking.
- Seal Tightly: Pinch the seams firmly. You can even crimp the edges with a fork after sealing for extra security and a decorative touch.
- Small Pieces: Ensure all your filling ingredients are chopped into small, bite-sized pieces for even distribution and easier sealing.
- Cool Fillings: Allow cooked fillings (like eggs and bacon) to cool slightly before adding them to the biscuits. Hot fillings can make the biscuit dough sticky and harder to work with.
- Pre-cook Everything: All meat and most vegetables should be pre-cooked before going into the biscuit. Raw ingredients won’t fully cook inside the short baking time of the biscuit.
- Egg Consistency: Don’t cook your scrambled eggs until they are completely dry; a slightly softer scramble will yield a moister filling.
- Don’t Crowd the Pan: Give each bomb enough space on the baking sheet to allow for even airflow and browning.
Freezing and Reheating Instructions
The true genius of these breakfast bombs lies in their freezer-friendly nature. Proper freezing and reheating techniques ensure they taste just as good as when they were freshly baked.
How to Freeze Breakfast Bombs:
- Cool Completely: This is paramount. Ensure the baked breakfast bombs are cooled completely to room temperature before wrapping. Freezing them while warm will cause condensation, leading to soggy biscuits and potential freezer burn.
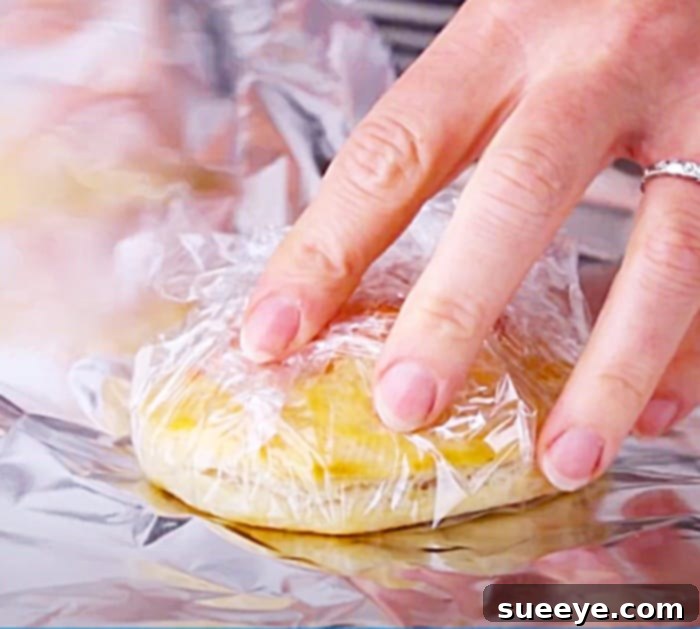
- Individual Wrapping (Plastic Wrap): For best results, wrap each individual breakfast bomb tightly in plastic wrap. This acts as the first layer of protection against freezer burn.
- Foil Wrap: Follow the plastic wrap with a layer of aluminum foil. This provides an additional barrier and helps prevent odor absorption from other freezer items.
- Freezer Bag Storage: Once individually wrapped in both plastic and foil, place all the breakfast bombs into a large, heavy-duty freezer-safe ziplock bag or an airtight container. Squeeze out as much air as possible before sealing.
- Label and Date: Don’t forget to label the bag or container with the date. These breakfast bombs can be stored in the freezer for up to 2-3 months.
How to Reheat Frozen Breakfast Bombs:
- Microwave Method (Quickest):
- Remove the plastic wrap and foil from a frozen bomb.
- Place it on a microwave-safe plate.
- Microwave on high for 60-90 seconds, or until heated through. Cooking time may vary depending on your microwave. For a crispier texture, you can finish it in a toaster oven or air fryer for a few minutes after microwaving.
- Oven Method (For Best Texture):
- Preheat your oven or toaster oven to 300-325°F (150-160°C).
- Remove the plastic wrap and foil from the frozen bomb.
- Place the frozen bombs directly on a baking sheet.
- Bake for 15-20 minutes, or until warmed through and the biscuit is crisp again. The exact time will depend on how many you’re reheating.
Delicious Variations to Try
While the classic egg, bacon, and cheese combination is undeniably delicious, these breakfast bombs are a blank canvas for your culinary imagination. Don’t be afraid to experiment!
- Meat Lovers:
- Sausage & Gravy: Cook crumbled breakfast sausage and mix with a tiny bit of pre-made gravy (ensure it’s thick enough not to leak) and cheese.
- Chorizo & Pepper Jack: For a spicy kick, use cooked chorizo sausage and spicy pepper jack cheese.
- Turkey Sausage: A leaner alternative to pork sausage or bacon.
- Vegetarian Options:
- Spinach & Feta: Sautéed spinach (ensure all moisture is squeezed out) with crumbled feta and a touch of sun-dried tomatoes.
- Mushroom & Swiss: Sautéed mushrooms and onions with shredded Swiss cheese.
- Roasted Veggie Delight: Small pieces of roasted bell peppers, zucchini, and onions with mozzarella.
- Potato & Cheese: Cooked and finely diced potatoes (like hash browns) with cheddar cheese.
- Cheese, Please!
- Beyond cheddar, try mozzarella, Gruyere, Monterey Jack, colby, or a Mexican blend for different flavor profiles.
- Spice It Up:
- Add a dash of hot sauce to your egg mixture, or a pinch of red pepper flakes.
- Incorporate chopped jalapeños (fresh or pickled) for a fiery kick.
- A sprinkle of smoked paprika or garlic powder can add depth.
- Southwestern Twist:
- Add cooked black beans, corn, and a pinch of chili powder to your eggs. Serve with salsa or avocado after reheating.
Commonly Asked Questions (FAQs)
Here are answers to some frequently asked questions about making and storing breakfast bombs:
- Can I use other types of canned biscuits?
- Yes, while Pillsbury Grands are recommended for their size and flakiness, you can use other brands or even crescent roll dough. Just be aware that smaller biscuits may yield smaller bombs or require less filling, and crescent rolls will have a different texture.
- Can I make these vegetarian?
- Absolutely! Simply omit the bacon and ham, and load up on vegetables, cheese, and even plant-based sausage crumbles for a delicious meat-free option.
- How long do the breakfast bombs last in the freezer?
- When properly wrapped and stored, they can last up to 2-3 months in the freezer. Beyond that, they are still safe to eat, but the quality might start to decline.
- Can I bake them from frozen?
- Yes, you can! This is a great option if you prefer an oven-baked texture. Remove the plastic and foil, and bake in a preheated oven at 300-325°F (150-160°C) for about 20-25 minutes, or until heated through and golden. They might take slightly longer than reheating already thawed bombs.
- Are these breakfast bombs healthy?
- The healthfulness depends on your chosen fillings. You can make them healthier by using lean meats like turkey sausage, loading them with vegetables, and opting for whole-grain biscuits if available. They offer a good source of protein to start your day.
- Can I make the filling ahead of time?
- Yes, you can cook and combine all your filling ingredients a day or two in advance and store them in an airtight container in the refrigerator. This will make assembly even quicker on prep day.
Conclusion: Your New Go-To Breakfast Solution
These **Freezer-Friendly Breakfast Bombs** are more than just a recipe; they are a strategic tool for conquering busy mornings with delicious, homemade goodness. They embody convenience, customization, and culinary satisfaction in one easy-to-grab package. Whether you’re a student, a parent, or simply someone who appreciates a good breakfast without the fuss, these canned biscuit bombs are guaranteed to become a cherished addition to your meal prep repertoire.
So, gather your ingredients, unleash your creativity with fillings, and get ready to transform your breakfast routine. Say goodbye to rushed meals and hello to delightful, savory bombs that are ready whenever you are. Give this recipe a try, and taste the difference that a little planning and a lot of flavor can make!