
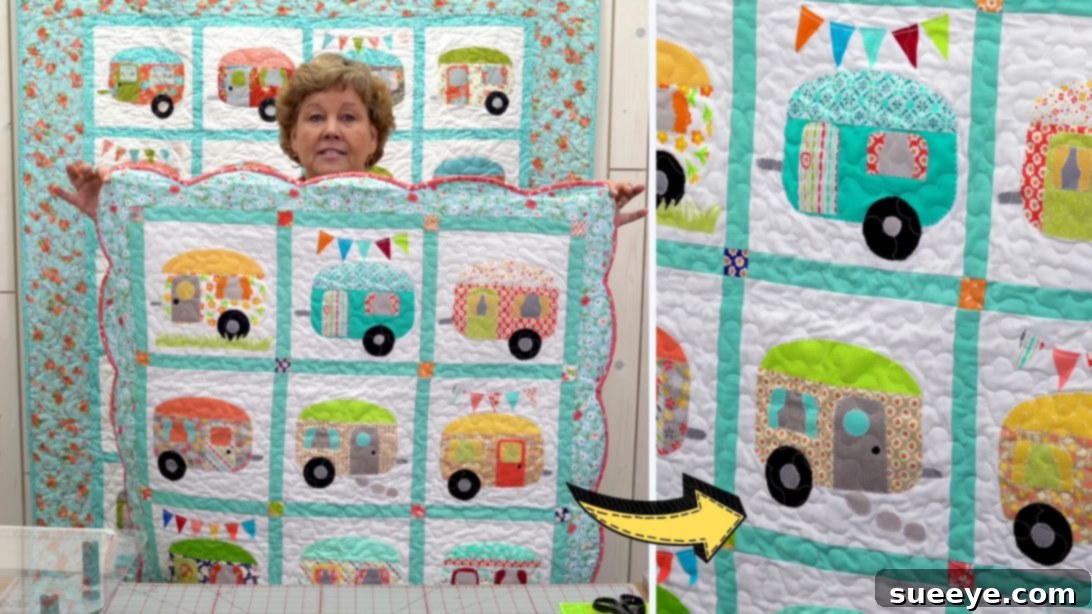
Create a Charming Cute Camper Quilt: An Easy Applique Sewing Tutorial
Embark on a delightful and creative journey with this super adorable sewing project, perfect for adding a touch of personalized charm to your home. Inspired by the fantastic work of the Missouri Star Quilt Company on YouTube, this “Cute Camper” quilt is designed to spark your imagination and elevate your quilting skills. Don’t let the intricate look of applique intimidate you; this project is surprisingly straightforward and accessible for quilters of all levels. Dive into this fun and rewarding craft, and you’ll soon have a unique piece that celebrates wanderlust and cozy comfort.
Whether you’re an experienced quilter looking for a refreshing new design or a beginner eager to try applique for the first time, this tutorial provides clear, simple steps to guide you. It’s a fantastic way to keep your hands busy, relax your mind, and create something beautiful that will be cherished for years to come. Imagine this charming camper gracing a bedroom, living room, or even acting as a snuggle blanket for your next camping trip. Let’s gather our supplies and get ready to stitch up some joy!
Why Choose the Cute Camper Quilt Project?
Quilting is more than just sewing fabric pieces together; it’s a creative expression, a therapeutic hobby, and a way to create lasting treasures. This particular “Cute Camper” quilt project stands out for several reasons:
- Unique Design: The camper motif is whimsical and nostalgic, appealing to travelers, RV enthusiasts, or anyone who loves a touch of vintage charm. It makes for a wonderful conversation piece.
- Applique Mastery: It offers an excellent introduction to applique techniques, allowing you to create detailed images on your quilt top. You’ll learn how to work with fusible web, giving you confidence for future applique projects.
- Skill Development: Beyond applique, you’ll practice essential quilting skills such as accurate cutting, consistent seam allowances, sashing, border application, and basic quilting.
- Personalization Potential: The design invites creativity. Choose fabrics that reflect your personality, whether vibrant and playful or subtle and serene, to make the camper truly yours.
- Rewarding Outcome: The satisfaction of completing a handmade quilt, especially one as adorable as this camper, is immense. It’s a project that brings joy during creation and long after it’s finished.
This project is not just about following instructions; it’s about enjoying the process, learning new techniques, and creating a piece that tells a story. It’s an ideal gift for a loved one or a fantastic addition to your own home decor.
Essential Materials for Your Camper Quilt
Before we begin stitching, it’s crucial to gather all your materials. Having everything ready ensures a smooth and enjoyable crafting experience. Here’s a detailed list of what you’ll need, along with some helpful notes:
- 1 pack of 10″ print squares: Often referred to as “Layer Cakes,” these pre-cut fabric packs offer a beautiful variety of coordinating prints, saving you time on fabric selection and cutting. Choose a collection that complements the whimsical theme of your camper.
- 1 pack of 10″ background squares: These will form the base for your applique blocks. Opt for a solid, light-colored fabric (white, cream, light gray) to make your camper design truly pop and stand out.
- ¼ yard black fabric: Essential for the camper’s wheels and other small, contrasting details. A solid black will provide the best definition.
- ¼ yard gray fabric: Perfect for the camper’s hitch and other metallic-looking accents. A medium to dark gray will work well.
- ¾ yard sashing fabric – includes inner border: Sashing strips are sewn between your quilt blocks to frame them and create visual separation. This fabric will also form the narrow inner border around your assembled quilt top. Choose a color that ties your print and background fabrics together.
- 1¼ yards outer border fabric: The outer border frames the entire quilt, giving it a finished and polished look. This is an opportunity to use a coordinating print or solid that complements your main fabrics.
- ¾ yard binding fabric: Binding is the strip of fabric sewn around the edges of the finished quilt to encase the raw edges and batting. It provides durability and a beautiful final touch.
- 3½ yards backing fabric: This is the fabric for the underside of your quilt. It can be a wide-back fabric (typically 108″ wide) to avoid seams, or standard quilting cotton pieced together.
- 3 yards heat n bond lite: This is a lightweight fusible web, crucial for applique. It allows you to iron fabric shapes onto your background squares, making them secure for stitching.
- Iron, for pressing: An absolute necessity for flat seams and perfectly fused applique. A good steam iron is recommended.
- Scissors: Sharp fabric scissors are vital for precise cutting. A rotary cutter, mat, and ruler are highly recommended for faster and more accurate cutting of squares and strips.
- Needle and thread: For the blanket stitching around your applique pieces. You can use a sewing machine with a blanket stitch setting or hand stitch for a more traditional look. Choose thread that matches or subtly contrasts with your applique fabrics.
- Pattern: (click here to download and print the free template) This downloadable template contains all the shapes for your camper applique. Make sure to print it at 100% scale for accurate sizing.
Gathering these materials meticulously will set you up for success and allow you to fully immerse yourself in the creative process without interruptions.
Step-by-Step Guide: Crafting Your Cute Camper Quilt
Phase 1: Preparing Your Applique Pieces and Blocks
This phase focuses on creating the individual camper blocks, which are the heart of your quilt’s design. Precision and patience here will lead to beautiful results.
Step 1: Download, Trace, and Fuse Your Templates
Begin by downloading and printing the free “Cute Camper” template. Ensure it prints at 100% scale to maintain the correct dimensions. Carefully trace each template piece onto the paper side of your heat n bond lite. You will need to trace the number of pieces required for each of your 20 blocks. For example, if the camper body is one piece, trace it 20 times.
Next, roughly cut out each traced heat n bond piece, leaving a small margin around the traced lines. Place the rough side (the side with the adhesive) of the heat n bond onto the wrong side of your chosen patterned fabrics. For the wheels and other small details of the truck, use your plain black and gray fabrics to ensure they stand out. Follow the manufacturer’s instructions for your heat n bond lite to fuse these pieces onto the fabric using a hot iron. Apply even pressure for a few seconds until the heat n bond is securely attached.
Once fused and cooled, meticulously cut out each fabric piece along the traced lines. This precision is vital for a clean applique design. Now, peel off the paper backing from each piece. You’ll be left with fabric shapes that have a sticky, adhesive side. Carefully assemble these pieces onto one of your 10″ background squares, arranging them to form the complete camper design. Take your time to get the placement just right, ensuring good spacing and alignment.
Once you are satisfied with the arrangement, place a pressing cloth over your assembled camper and press firmly with a hot iron for a few seconds. This heat will permanently fuse the applique pieces to the background fabric. Finally, to secure the edges and add a decorative touch, blanket stitch all around the applique pieces, including any smaller details like windows or hubcaps. You can use a sewing machine with a blanket stitch setting for speed or hand stitch for a more traditional, charming look. Choose a thread color that either blends with or subtly contrasts with your applique fabrics.
Phase 2: Assembling the Quilt Top and Finishing
This phase brings all your individual camper blocks together to form a cohesive quilt top, adding borders and preparing for the final quilting.
Step 2: Constructing Your Quilt Top
Repeat the entire process described in Step 1 to create a total of 20 applique camper blocks. Consistency in your applique placement and stitching will contribute to a more polished final quilt. Once all 20 blocks are completed and stitched, it’s time to assemble your quilt top.
First, cut the necessary strips of your sashing fabric. These strips will be sewn between your blocks, both horizontally and vertically, to create a grid-like structure. Arrange your 20 blocks into a layout you like – typically a 4×5 grid for a rectangular quilt, or adjust as desired. Carefully sew the blocks together in rows, inserting the sashing strips between each block. Maintain a consistent ¼-inch seam allowance throughout this process to ensure your rows are the correct length. Press your seams open or to one side to reduce bulk and keep your quilt top flat.
After your rows are assembled with sashing, cut longer sashing strips to sew between each completed row. This creates the vertical sashing. Once all rows are sewn together with sashing, your quilt top will begin to take shape. Next, attach the inner border strips around the perimeter of your assembled block grid. This border helps to frame the central design and add a subtle transition before the main outer border.
Once the inner border is complete, measure and cut your outer border strips. Attach these strips to the outer edges of your quilt top, ensuring they lie flat and are evenly distributed. Take care when adding borders; measuring the quilt top in several places and cutting borders to the average length can prevent wavy edges. Press all seams meticulously.
With your quilt top fully assembled, it’s time to create the “quilt sandwich.” Lay your backing fabric flat on a large surface, wrong side up. Smooth out any wrinkles. Place your batting on top of the backing, centered. Finally, lay your assembled quilt top (right side up) on top of the batting. Carefully smooth out all three layers, ensuring there are no puckers or wrinkles. Baste these three layers together using your preferred method – safety pins, basting spray, or long hand stitches – to prevent shifting during the quilting process.
Now, you’re ready for the actual quilting! “Sew some patterns all over the whole patchwork” can be interpreted in many ways. You could do simple straight-line quilting using a walking foot on your machine, stitch-in-the-ditch along your sashing and border seams, or try free-motion quilting with decorative patterns like stippling, loops, or echoing the camper shape. The quilting process secures all three layers together and adds texture and dimension to your quilt. Don’t be afraid to experiment and choose a quilting design that you enjoy and feel comfortable with.
For more intricate details on assembling, basting, and quilting techniques, we highly recommend watching the full video tutorial from Missouri Star Quilt Company.
Tips for a Successful Quilting Project
To ensure your “Cute Camper” quilt project goes smoothly and yields results you’ll be proud of, consider these helpful tips:
- Pre-wash Your Fabrics: While not always necessary for pre-cuts, pre-washing your yardage (backing, binding, sashing, borders) can prevent shrinkage and color bleeding after the quilt is finished.
- Accuracy is Key: In quilting, a small inaccuracy repeated many times can lead to significant problems. Use a rotary cutter, mat, and ruler for precise cuts. Measure twice, cut once!
- Consistent Seam Allowance: Master the ¼-inch seam allowance. Use a seam guide on your machine or mark it with tape to ensure all your seams are uniform. This is crucial for blocks and rows to fit together perfectly.
- Press, Don’t Iron: When joining pieces, “press” your seams by lifting and placing the iron, rather than “ironing” (gliding the iron), which can stretch and distort your fabric.
- Organize Your Pieces: Keep your cut pieces organized, especially when dealing with multiple applique shapes or sashing strips. Labeling can be very helpful.
- Take Breaks: Quilting can be time-consuming. If you feel tired or frustrated, step away for a bit. A fresh perspective can often resolve issues.
- Embrace Imperfections: Remember, it’s a handmade item! Minor imperfections add character and show the love and effort you put into it. Don’t strive for machine-made perfection; aim for heartfelt craftsmanship.
- Watch Tutorials: For specific techniques like blanket stitching, making a quilt sandwich, or binding, watch additional video tutorials from reputable sources like Missouri Star Quilt Company for visual guidance.
Conclusion: Your Adorable Camper Quilt Awaits!
Congratulations on embarking on or completing your very own “Cute Camper” quilt! This project is a wonderful testament to your creativity and dedication. From meticulously cutting your applique pieces to blanket stitching each detail and finally assembling your quilt top with sashing and borders, you’ve woven not just fabric, but also time, effort, and love into a beautiful and functional piece of art.
The charm of this camper quilt lies in its unique design and the personal touch you’ve infused into every stitch. It’s perfect for cozying up at home, bringing warmth to a camper van, or gifting to a fellow adventurer. We hope you found this tutorial clear, enjoyable, and inspiring. Remember, every quilt tells a story, and your “Cute Camper” quilt is ready to tell tales of comfort, travel, and the joy of handmade creation.
Once again, all credit for the original design and inspiration goes to the fantastic Missouri Star Quilt Company via YouTube. We encourage you to follow and subscribe to their channel for more incredible quilting tutorials and boundless inspiration. Now, go forth and enjoy your charming new camper quilt!