
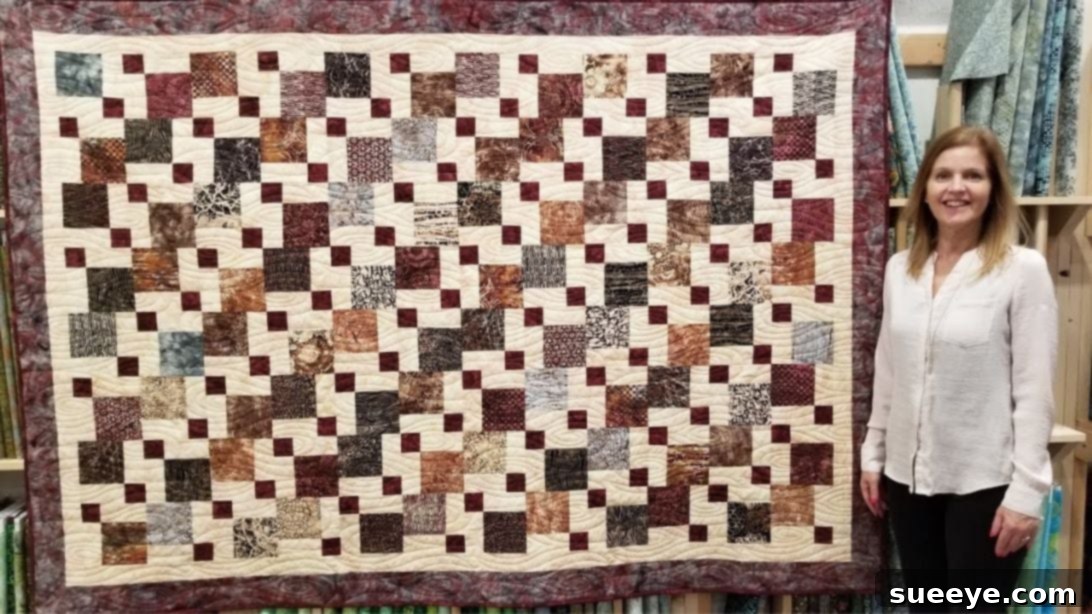
Embarking on the wonderful world of quilting can seem daunting at first, but with the right project, it quickly becomes an incredibly rewarding journey. For many aspiring quilters, finding that perfect first “big project” is key to building confidence and honing essential skills. My own quilting adventure truly began when I discovered the mesmerizing Disappearing Nine-Patch Quilt tutorial by Jordan Fabrics. From the moment I saw its innovative design, I was utterly captivated – the way simple squares transform into an intricate, eye-catching pattern is nothing short of magical.
This particular design immediately resonated with me as the ideal candidate for my inaugural substantial quilting endeavor. Its blend of visual complexity with a surprisingly straightforward construction method makes it incredibly beginner-friendly, allowing you to achieve stunning results without feeling overwhelmed. I wasted no time in gathering the necessary fabrics, eager to dive into this creative challenge. The initial blocks required careful attention and took a bit of time to master, but as I settled into the rhythm of cutting, piecing, and pressing, the process became progressively smoother and faster. The joy of watching the quilt top come together, block by block, was immense. This project proved to be not only an excellent learning experience but also genuinely fun to sew.
If you’re ready to create your own Disappearing Nine-Patch Quilt, you’ve come to the right place. This comprehensive guide will walk you through every step, from selecting your materials to the final binding, ensuring a successful and enjoyable quilting experience. Whether you prefer to read detailed instructions or follow along visually, we’ve got you covered. Get ready to discover the “disappearing” magic and embark on a fulfilling quilting journey. Happy quilting!
Why the Disappearing Nine-Patch is Perfect for Beginners
The Disappearing Nine-Patch Quilt is widely celebrated in the quilting community, especially among newcomers, for several compelling reasons. Its genius lies in its simplicity, making it an accessible entry point for learning fundamental quilting techniques while producing a sophisticated-looking finished product. Here’s why it’s an excellent choice for your next project:
- Dramatic Visual Impact: Despite its simple construction, the “disappearing” effect created by strategic cuts and rearrangements gives the illusion of intricate piecing. This yields a quilt that looks much more complex than it actually is, providing a huge sense of accomplishment for beginners.
- Skill-Building Foundation: This pattern teaches crucial quilting skills such as accurate cutting with a rotary cutter, precise 1/4-inch seam allowances, efficient chain piecing, and effective pressing techniques. These are foundational skills that will serve you well in all future quilting projects.
- Fabric Versatility: It’s a fantastic pattern for showcasing a variety of fabrics. You can use pre-cut charm squares (5-inch squares), fat quarters, or scraps from your stash. The interplay of light and dark fabrics, as well as patterned and solid prints, significantly contributes to the “disappearing” effect and allows for endless creative combinations.
- Relatively Quick to Assemble: Once you get the hang of making the initial nine-patch blocks and understand the cutting and reassembly process, the quilt top comes together quite rapidly. This quick gratification helps maintain motivation, especially for those new to the craft.
- Adaptable in Size: The block-based nature of this quilt means you can easily adjust its size. Want a smaller baby quilt or a larger bedspread? Simply make more or fewer blocks to suit your desired dimensions.
Choosing the Disappearing Nine-Patch is choosing a path to success, creativity, and the joy of making something beautiful with your own hands.
Essential Materials and Tools:
To embark on your Disappearing Nine-Patch Quilt adventure, you’ll need a selection of fabrics and a few essential quilting tools. The quantities listed below are tailored for a project similar to the one described in the original tutorial, which yields a sizable throw quilt.
- 96 pieces of 5″ charm squares: These will form the central, “accent” prints of your initial nine-patch blocks. Charm squares are pre-cut fabric squares, often sold in bundles, making them convenient for this project. Choose prints that complement each other or tell a story.
- 24 pieces of 5″ squares – dark accent: These squares will define the corners of your initial nine-patch blocks. Opt for a fabric with a darker value or a contrasting color to create visual depth and frame your charm squares.
- 96 pieces of 5″ squares – light accent: These squares will fill the spaces between your dark corners and charm center. A lighter, perhaps solid or subtle print fabric, will provide a necessary contrast to the dark squares and allow your charm prints to pop.
- 7 pieces of 2 1/2″ width of the fabric for inner border: These strips will create a crisp inner frame around your pieced quilt top. “Width of the fabric” (WOF) typically refers to the selvage-to-selvage measurement of fabric as it comes off the bolt, usually around 42-44 inches.
- 5/8 yard for binding: The binding is the final strip of fabric that encases the raw edges of your quilt, giving it a neat, professional finish. This yardage is usually sufficient for a standard throw quilt.
- 5 1/2 yards for backing: The backing fabric forms the underside of your quilt. You’ll need a generous amount to accommodate the quilt top and any necessary seam allowances for piecing the backing if it’s not wide enough in one piece.
- Batting: The middle layer of your quilt, providing warmth and dimension. Choose a batting type (e.g., cotton, polyester, blend) and size appropriate for your quilt top.
- Coordinating Thread: High-quality polyester or cotton thread that matches or blends with your fabrics.
Recommended Tools:
- Sewing Machine: A reliable machine with a 1/4-inch piecing foot is highly recommended for consistent seam allowances.
- Rotary Cutter: Essential for accurate and efficient fabric cutting. A 45mm or 60mm cutter is standard.
- Self-Healing Cutting Mat: Protects your work surface and the blade of your rotary cutter.
- Quilting Rulers: Clear acrylic rulers, especially a 6.5″ x 24.5″ ruler, are invaluable for straight, precise cuts. A smaller square ruler can also be very helpful.
- Fabric Scissors: Sharp scissors dedicated solely to fabric.
- Iron and Ironing Board: Crucial for pressing seams flat and accurate block construction.
- Seam Ripper: For those inevitable (and completely normal!) mistakes.
- Fabric Markers or Chalk: For marking lines if needed.
- Quilting Pins or Wonder Clips: To hold fabric pieces together before sewing.
Having these materials and tools ready before you begin will ensure a smooth and enjoyable quilting process.
Step-by-Step Guide to Your Disappearing Nine-Patch Quilt:
Follow these detailed instructions to construct your captivating Disappearing Nine-Patch Quilt. Precision in cutting and sewing is key to achieving the desired “disappearing” effect and a beautiful final product.
Step 1: Constructing the Initial Nine-Patch Blocks
The foundation of this quilt is the traditional nine-patch block. For this project, you will create 24 such blocks, each serving as the starting point for the intricate design. Accuracy in this step is crucial for the magic to happen later.
Begin by selecting your squares: take 4 light squares, 4 dark squares, and 1 charm square. Lay them out on a flat surface to form a 3×3 grid. The arrangement is as follows: place the 4 dark squares on each of the four corners, the 4 light squares in the middle positions of each side, and your unique charm square in the very center. This arrangement creates a striking contrast that will beautifully transform once cut.
Now, it’s time to sew. Working row by row, carefully sew the squares together with a precise 1/4-inch seam allowance. This measurement is standard in quilting and ensures your blocks will size correctly when assembled. After sewing each row, take it to your ironing board. Ironing seams flat is critical – it helps the blocks lay flat, prevents bulk, and contributes to the overall neatness of your quilt. You can press seams open or to one side (towards the darker fabric is often preferred to prevent “shadowing” of seams through lighter fabrics). Once all three rows are sewn and pressed, join the rows together, again using a 1/4-inch seam allowance, to complete your first nine-patch block. Press the final seams flat.
Repeat this process until you have a total of 24 perfectly constructed nine-patch blocks. Take your time with each one, ensuring accurate seams and thorough pressing. This repetitive process helps build muscle memory and improve your piecing skills.
Step 2: The Magical “Disappearing” Cut
This is where the magic truly happens and the nine-patch block begins its transformation into a “disappearing” design. Take one of your completed and pressed nine-patch blocks. Lay it flat on your cutting mat, ensuring it is perfectly squared up.
Using a quilting ruler and a sharp rotary cutter, make two crucial cuts. First, cut the block precisely in half horizontally, directly through the center. Second, cut the block precisely in half vertically, again through the center. These cuts should intersect at the very center of the block. You will now have 4 smaller, identical blocks, each a quarter of the original nine-patch. The strategic placement of your original squares will now be evident in these new smaller units, revealing the intricate patterns that will form your quilt.
Step 3: Rearranging and Reassembling the Blocks
Now comes the creative part – arranging your newly cut blocks to form the “disappearing” effect. Take the 4 smaller blocks you just created from a single nine-patch. Play around with their orientation on your cutting mat. The goal is to rotate and arrange them to match a specific pattern, typically one that shifts the original corner squares into new, visually dynamic positions. Refer to the pattern below or the video tutorial for the precise arrangement.
Once you are satisfied with the new arrangement, carefully sew these four smaller blocks back together, again using a 1/4-inch seam allowance. Just like with the initial nine-patch, sew them into rows first, press the seams (often pressing outwards from the center for these), and then join the rows. Pay close attention to nesting your seams where possible; this means aligning seams so they lock together, creating perfect points and reducing bulk. Press the finished block flat. You will now have a new, transformed block that looks nothing like the original nine-patch – this is your “disappearing” nine-patch block.
Step 4: Assembling the Quilt Top
Repeat Steps 2 and 3 for all 24 of your initial nine-patch blocks. You will now have 24 unique Disappearing Nine-Patch blocks. The next step is to arrange these completed blocks into the full quilt top. For a quilt of the size demonstrated in the tutorial, you’ll arrange your 24 blocks into a 4 x 6 block grid (4 blocks wide by 6 blocks long). Lay them out on a floor or design wall to experiment with different orientations and ensure the pattern flows as you desire. This allows you to visualize the final layout and make any adjustments before sewing.
Once you are happy with the arrangement, begin sewing the blocks into horizontal rows. Sew 4 blocks together to form each of your 6 rows, maintaining that consistent 1/4-inch seam allowance. Press the seams within each row. A common practice is to press the seams of alternating rows in opposite directions (e.g., press seams in row 1 to the right, row 2 to the left, and so on). This technique, known as “nesting seams,” helps the seams interlock when you join the rows, resulting in flatter intersections and more accurate alignment.
Finally, sew your 6 completed rows together, matching up all the seam intersections as precisely as possible. Pinning extensively at these junctions can greatly help. Once all rows are joined, give your entire quilt top a good final press to ensure it lays perfectly flat and square. This is an exciting milestone – your quilt top is complete!
Step 5: Adding Borders, Quilting, and Binding
With your quilt top assembled, it’s time to add the finishing touches that will transform it into a functional and beautiful quilt.
Adding Borders: Begin by attaching the inner border strips. Measure the length and width of your quilt top carefully. Cut your 2 1/2-inch WOF strips to fit these dimensions. A common method is to measure the center of the quilt and cut your border strips to that measurement, then sew them to the opposite sides, pressing seams towards the border. Then, measure the new length (including the first two borders), cut the remaining border strips to fit, and sew them to the remaining two sides. This helps to prevent wavy borders. Apply the outer border (if desired, using additional fabric) in the same manner. Borders help to frame your pieced design and provide additional dimensions to the quilt.
Quilting: This is the process of sewing through all three layers of your quilt: the quilt top, the batting, and the backing, to hold them together and add texture. You can choose to quilt it however you like! Options include:
- Straight-line quilting: Using your sewing machine to stitch parallel lines, grids, or cross-hatching. This is a great option for beginners.
- Free-motion quilting: A more advanced technique where you “draw” designs with your machine by moving the fabric freely.
- Hand quilting: For a traditional, soft look, though it requires significant time and patience.
Before quilting, you’ll need to “baste” your quilt sandwich – temporarily securing the three layers together with safety pins, basting spray, or long stitches.
Binding: The final step, binding, encloses the raw edges of your quilt for a clean, durable finish. Prepare your 5/8 yard of fabric by cutting it into 2 1/2-inch wide strips. Sew these strips together end-to-end to create one long continuous strip. Press the strip in half lengthwise, wrong sides together. Attach the binding to the front edge of your quilt, aligning raw edges, and sew with a 1/4-inch seam. Once sewn all around, fold the binding over to the back of the quilt and secure it either by hand stitching or by machine stitching. This creates a neat frame around your beautiful Disappearing Nine-Patch Quilt.
Essential Tips for Quilting Success
To ensure your quilting journey is as smooth and enjoyable as possible, keep these valuable tips in mind, especially when tackling a pattern like the Disappearing Nine-Patch:
- Accurate Cutting is Paramount: The phrase “measure twice, cut once” is a quilter’s mantra. Use a sharp rotary cutter, a non-slip ruler, and a self-healing mat. Even a slight inaccuracy in cutting can lead to misaligned blocks later on.
- Master the 1/4-inch Seam: Consistency is key. Practice sewing a perfect 1/4-inch seam allowance. Many sewing machines have a 1/4-inch foot, or you can use masking tape as a guide on your machine’s throat plate.
- Pressing, Not Ironing: When quilting, we “press” seams, which means lifting the iron, placing it on the seam, and then lifting it again. “Ironing” involves pushing the iron back and forth, which can stretch and distort your fabric. Pressing creates flat, crisp seams without warping your blocks.
- Chain Piecing for Efficiency: To save time and thread, sew multiple identical units (like your initial nine-patch rows) one after another without lifting the presser foot or cutting the thread between them. This is called chain piecing.
- Stay Organized: Keep your cut fabric squares and assembled blocks organized. Labeling rows or stacks can prevent confusion, especially during the rearrangement phase of the Disappearing Nine-Patch.
- Embrace the Learning Curve: Everyone makes mistakes, especially when learning a new craft. Don’t be afraid to use your seam ripper! It’s a tool for perfection, not failure.
- Watch the Video Tutorial: While written instructions are thorough, a visual guide like the Jordan Fabrics tutorial can clarify steps and techniques, especially for the cutting and rearrangement stages.
- Take Breaks: Quilting requires focus. If you feel tired or frustrated, step away for a bit. A fresh perspective can often solve a problem.
Fabric Selection and Color Play for a Striking Disappearing Nine-Patch
The magic of the Disappearing Nine-Patch isn’t just in the cuts and rearrangements; it’s profoundly influenced by your fabric choices. Thoughtful fabric selection can elevate your quilt from good to truly stunning. Here are some considerations:
- Contrast is Key: For the “disappearing” effect to be prominent, you need good contrast between your light, dark, and charm squares. If all your fabrics are similar in value (how light or dark they are), the design might get lost. Aim for a clear distinction between the dark corner squares and the light accent squares, allowing the central charm squares to pop.
- Variety in Prints: Don’t be afraid to mix prints! A combination of large-scale prints, small-scale prints, and even solids can add visual interest and depth. The charm squares are perfect for showcasing your favorite patterns.
- Color Palette: Decide on a color scheme before you start. Do you want a vibrant, multi-colored quilt, or a more subdued, harmonious palette? Sticking to a limited range of colors can create a sophisticated look, while a scrappy approach offers a playful charm.
- The “Accent” Square’s Role: The central charm square in your initial nine-patch is crucial. It becomes the focal point after the block is cut and rearranged. Choose prints that you want to highlight and that will stand out against the surrounding light and dark fabrics.
- Pre-Cuts for Convenience: Charm packs are ideal for this pattern as they provide a curated selection of 5-inch squares that are often designed to coordinate. This takes some guesswork out of fabric selection for beginners.
Expanding on Your Disappearing Nine-Patch Journey
Once you’ve mastered the basic Disappearing Nine-Patch, you’ll discover a world of possibilities for customization and variation:
- Alternate Block Arrangements: After cutting your initial nine-patch, experiment with different ways to rearrange the four smaller units before sewing them back together. You can create various secondary patterns within the block simply by rotating the pieces differently.
- Varying Block Sizes: Don’t feel limited to 5-inch squares. You can start with larger (or smaller) squares for your initial nine-patch to create bigger (or smaller) finished Disappearing Nine-Patch blocks. Just remember that the cutting measurements will adjust proportionally.
- Combining with Other Blocks: Integrate your Disappearing Nine-Patch blocks with other simple quilt blocks, such as solid squares or half-square triangles, to create even more complex and unique quilt designs.
- Quilt Size Adjustments: Easily scale your project up or down. For a baby quilt, you might only need 12-16 blocks. For a king-sized quilt, you’ll need significantly more, along with broader borders.
- Creative Quilting: Once the quilt top is complete, consider how your quilting stitches can enhance the “disappearing” effect. You might choose to outline certain shapes or use different quilting patterns in the light and dark areas.
Your Quilt, Your Masterpiece
Congratulations on making it through this detailed guide! The Disappearing Nine-Patch Quilt is truly a testament to how simple techniques, combined with a clever design, can yield extraordinarily beautiful results. What might seem like a complex pattern at first glance is, at its heart, a series of straightforward steps that build upon one another, making it a perfect project for honing your quilting skills.
From choosing your fabrics to the final stitch of binding, every step in creating your Disappearing Nine-Patch is an opportunity for creativity and precision. The sense of accomplishment that comes from holding a finished quilt, knowing you’ve transformed individual pieces of fabric into a warm, artistic heirloom, is incredibly rewarding. Whether this is your very first quilt or another cherished addition to your collection, each stitch tells a story of dedication and passion.
We hope this guide has empowered you to confidently tackle this engaging pattern. Don’t forget to revisit the Jordan Fabrics video tutorial if you need visual reinforcement for any step. Now, go forth and create! Share your beautiful Disappearing Nine-Patch quilts with the world, and continue to explore the endless creative possibilities that quilting offers.