
Master the Disappearing Churn Dash Quilt: An Easy Tutorial for All Skill Levels
Are you searching for your next captivating quilting adventure? Look no further! This comprehensive guide will walk you through creating a stunning Disappearing Churn Dash Quilt, a project renowned for its simplicity and endless design potential. Whether you’re a seasoned quilter or a complete beginner picking up a needle for the first time, this easy-to-follow tutorial, inspired by the fantastic work of Teresa DownUnder, is designed for you. We recently crafted this block with friends, and the joy of discovering the myriad of patterns achievable from a single block was truly inspiring. Get ready to transform basic fabric squares into a dynamic and visually rich quilt with surprisingly little effort. Let’s dive into the world of creative quilting!
Why the Disappearing Churn Dash Quilt is a Must-Try
The Churn Dash quilt block is a classic, beloved for its traditional appeal and geometric charm. But what makes the “Disappearing” version so special? It’s the magical transformation that occurs when a completed Churn Dash block is strategically cut and rearranged. This simple technique elevates the traditional block into something entirely new and modern, creating intricate secondary patterns that appear much more complex than they are to construct. It’s an ideal project for developing your quilting skills, from accurate cutting and precise seaming to mastering the art of the Half-Square Triangle (HST). Plus, its versatility allows for endless creativity, making each quilt truly unique. This makes the Disappearing Churn Dash an excellent choice for using up fabric scraps, experimenting with color combinations, and achieving a professional-looking result without advanced techniques.
Essential Materials for Your Quilt Project
Before we begin, gather all your materials. Having everything prepared ensures a smooth and enjoyable quilting process. For one Disappearing Churn Dash block, you will need the following:
- 2 pieces of 4 7/8″ grey squares: These will form half of your Half-Square Triangles. Choose a solid or a subtle print that complements your main colors.
- 2 pieces of 4 7/8″ white squares: These will form the other half of your Half-Square Triangles. A light, contrasting color works best here to highlight the churn dash design.
- 2 pieces of 9 x 2 1/2″ blue strips: These strips will create the “churn” part of your block. A vibrant blue can add a striking pop of color.
- 2 pieces of 9 x 2 1/2″ orange strips: Complementary to the blue, these strips will complete the “churn” and offer another layer of visual interest.
- 1 piece of 4 1/2″ square for the center: This central square can be a focal point. Consider a coordinating print or a solid color that ties everything together.
Additional Tools: While not listed, essential quilting tools like a rotary cutter, self-healing mat, quilting ruler, fabric scissors, sewing machine, thread, iron, and pressing mat are highly recommended for precision and ease.
Step-by-Step Disappearing Churn Dash Quilt Tutorial
Let’s embark on the journey of creating your very own Disappearing Churn Dash quilt block. Follow these detailed instructions carefully for the best results.
Step 1: Crafting Your Half-Square Triangles (HSTs)
Half-Square Triangles are fundamental units in many quilt patterns, including the Churn Dash. Precision here is key for a well-aligned block.
- Take your two 4 7/8″ white squares and, on the back (wrong side) of each, use a ruler and a fabric marking tool to draw a diagonal line from one corner to the opposite corner.
- Place each grey square on top of a marked white square, right sides together. Ensure all edges are perfectly aligned. Pin them in place to prevent shifting during sewing.
- Using your sewing machine, stitch a seam 1/4 inch away from the drawn line on both sides. You will have two lines of stitching parallel to your drawn line.
- With a rotary cutter and ruler, carefully cut directly on the drawn diagonal line. This will yield two units from each pair.
- Trim the corners of these newly formed half-square triangle units to reduce bulk.
- Open each unit and press the seam allowance towards the darker fabric (grey in this case). This helps hide the seam and creates a crisper edge.
- Finally, square up each of your four HST units to 4 1/2 inches using your quilting ruler and rotary cutter. Accurate squaring is crucial for your block to come together perfectly.
Step 2: Assembling the Center Strips
These strips will form the ‘arms’ of your churn dash block, connecting to the central square and the outer HSTs.
- Take your two 9 x 2 1/2″ blue strips and your two 9 x 2 1/2″ orange strips.
- Place one blue strip and one orange strip right sides together, aligning the long edges. Stitch them together along one long edge using a 1/4-inch seam allowance. Repeat with the other blue and orange strips. You will now have two long, bicolor rectangles.
- Press the seams open or to one side, depending on your preference. For this project, pressing towards the darker fabric (if applicable) often works well.
- Using your quilting ruler and rotary cutter, cut each of these bicolor rectangles into two 4 1/2″ squares. You will end up with a total of four 4 1/2″ bicolor squares.
Step 3: Constructing the Initial Churn Dash Block
Now that you have your individual components ready, it’s time to arrange them into the classic 9-patch Churn Dash pattern. This is where your block starts to take shape.
- Lay out your nine prepared squares on a flat surface or design board in a 3×3 grid.
- Place your single 4 1/2″ center square in the very middle of your grid.
- Position two of your HSTs in the top-left and bottom-right corners, ensuring the darker triangle points towards the outside of the block.
- Place the remaining two HSTs in the top-right and bottom-left corners, with their darker triangles also pointing outwards, creating a contrasting corner effect.
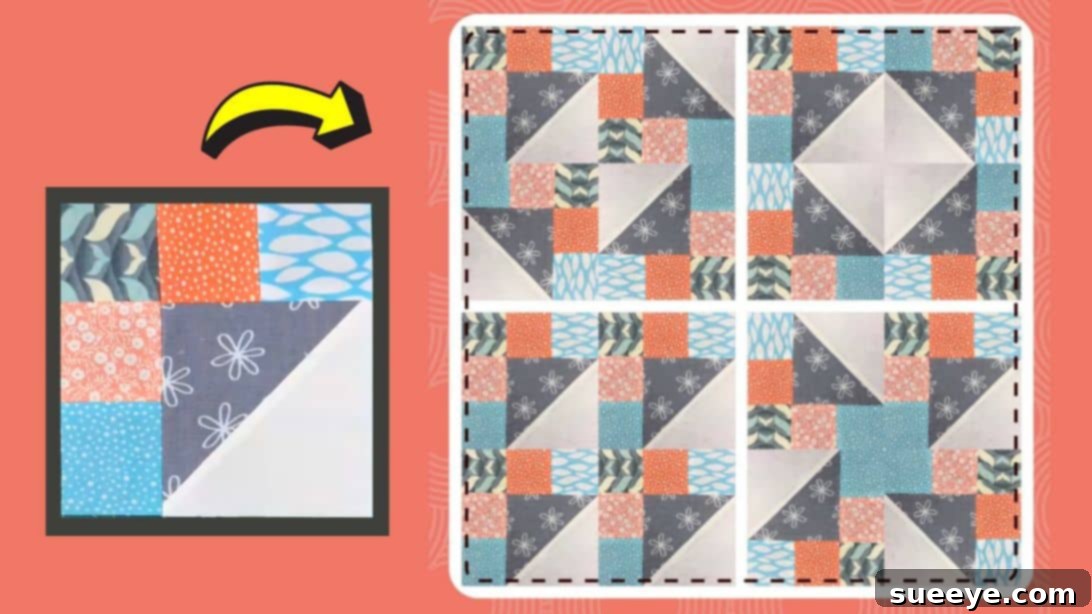
- Fill the remaining four spots (top-center, mid-left, mid-right, bottom-center) with your four 4 1/2″ bicolor squares. Ensure the blue and orange segments are oriented consistently to form the ‘churn’ around the center. Refer to the image below for the correct arrangement.
- Once satisfied with your layout, sew the squares together in rows using a 1/4″ seam allowance. Start with the top row, then the middle row, and finally the bottom row.
- After sewing each row, press the seams. For the top and bottom rows, press the seams in one direction (e.g., to the right). For the middle row, press the seams in the opposite direction (e.g., to the left). This technique, called “nesting seams,” helps the seams interlock perfectly when joining the rows, reducing bulk and improving accuracy.
- Finally, sew the three rows together. Make sure to align your nested seams precisely at each intersection. Pin generously to keep everything in place.
- Press your completed 9-patch block flat. You now have a traditional Churn Dash block!
Step 4: The “Disappearing” Transformation
This is the exciting part where the magic happens! We will cut and rearrange your traditional Churn Dash block to create the “disappearing” effect, yielding four smaller, unique blocks.
- Begin by carefully measuring and marking the exact center of each side of your completed Churn Dash block. Use a ruler and a fabric marker or a small snip in the seam allowance.
- With your rotary cutter and a long ruler, cut the block into two equal parts horizontally, directly through the center marks. Ensure your cut is perfectly straight.
- Next, cut the block into two equal parts vertically, again through the center marks.
- You will now have four smaller, equal-sized square units. These units contain segments of your original Churn Dash block, but their internal arrangement has been disrupted, leading to unexpected and beautiful new patterns.
Step 5: Exploring Design Possibilities and Final Assembly
The beauty of the Disappearing Churn Dash lies in its versatility. These four new units can be arranged in countless ways to form a truly unique block or a section of a larger quilt.
- Take your four newly cut units and experiment with their arrangement. Rotate them, flip them, and move them around on your design surface. You’ll be amazed at the variety of secondary patterns that emerge just by changing the orientation of these four squares. This is where your personal creativity shines!
- For a clearer visual demonstration of various design options, we highly recommend watching the video tutorial by Teresa DownUnder. She provides excellent examples that can spark your imagination.
- Once you’ve settled on your desired arrangement, sew the four units back together. First, sew the top two units together (right sides facing, 1/4″ seam allowance), then sew the bottom two units together. Press your seams.
- Finally, join the top combined unit to the bottom combined unit, aligning seams carefully. Stitch with a 1/4″ seam allowance.
- Press your finished Disappearing Churn Dash block. Marvel at the intricate design you’ve created from a simple start!
Tips for Quilting Success: Achieving Flawless Blocks
Creating beautiful quilt blocks is a blend of art and precision. Here are some essential tips to help you achieve professional-looking results with your Disappearing Churn Dash Quilt:
- Accurate Cutting is Paramount: The foundation of any well-made quilt block is precise cutting. Invest in a good quality rotary cutter, a self-healing mat, and a clear acrylic ruler. Always double-check your measurements before making a cut. Even a slight inaccuracy can lead to wonky blocks and difficulty matching seams later on.
- Maintain a Consistent 1/4″ Seam Allowance: The “scant 1/4 inch” seam is the gold standard in quilting. Practice on scraps to ensure your machine consistently stitches exactly 1/4 inch from the fabric edge. A magnetic seam guide or a specialized 1/4-inch presser foot can be incredibly helpful. Consistency is key when joining multiple blocks together.
- Pressing Matters: Don’t underestimate the power of proper pressing! Pressing your seams after each step, rather than ironing back and forth, helps set the stitches and flatten your fabric. For this block, pressing seams open or to the darker fabric (as instructed) helps reduce bulk and creates crisper points and straighter lines. A hot, dry iron is usually best.
- Chain Piecing for Efficiency: If you’re making multiple blocks, consider chain piecing. This technique involves feeding multiple units through your sewing machine consecutively without cutting the thread in between. It saves time, thread, and increases efficiency, especially for repetitive steps like making HSTs.
- Fabric Selection: Choose good quality 100% cotton quilting fabric. These fabrics are easier to work with, less prone to fraying, and hold their shape better. Pre-wash your fabrics if you’re concerned about shrinkage or color bleeding, especially if using a mix of light and dark colors.
- Pin Generously: When joining fabric pieces, especially those with intersecting seams, pin them securely. Placing pins perpendicular to your seam line, particularly at intersections, will help keep your fabric from shifting and ensure your points align beautifully.
- Take Your Time: Quilting is a journey, not a race. Enjoy the process! If you feel frustrated, step away for a bit and come back with fresh eyes. Precision comes with patience and practice.
Expanding Your Disappearing Churn Dash Designs
The beauty of the Disappearing Churn Dash doesn’t end with a single block. Once you’ve mastered one, consider making several more and joining them to create a larger quilt top. The magic truly unfolds when multiple blocks are sashed, rotated, and pieced together, revealing a dazzling array of secondary patterns across the entire quilt. Experiment with different color palettes – try a monochromatic scheme for a subtle effect, or a rainbow of colors for a vibrant statement. You can also vary the contrast between your fabrics to emphasize certain elements of the design. This pattern is also fantastic for creating smaller projects like placemats, table runners, or even decorative pillows, allowing you to practice and perfect the technique before committing to a full-sized quilt.
Conclusion: Your Journey to a Beautiful Quilt Begins Here
Congratulations! You’ve successfully navigated the steps to create a gorgeous Disappearing Churn Dash quilt block. This pattern is a testament to how simple techniques can yield stunning and intricate results, making it an incredibly rewarding project for quilters of all levels. From mastering Half-Square Triangles to witnessing the fascinating “disappearing” transformation, you’ve gained valuable skills that will serve you in many future quilting endeavors. Remember, practice makes perfect, and every stitch brings you closer to a beautiful, handmade heirloom. We wholeheartedly recommend exploring more of Teresa DownUnder’s YouTube channel for a wealth of inspiring video tutorials and further quilting adventures. Happy sewing, and may your creative spirit continue to flourish!