
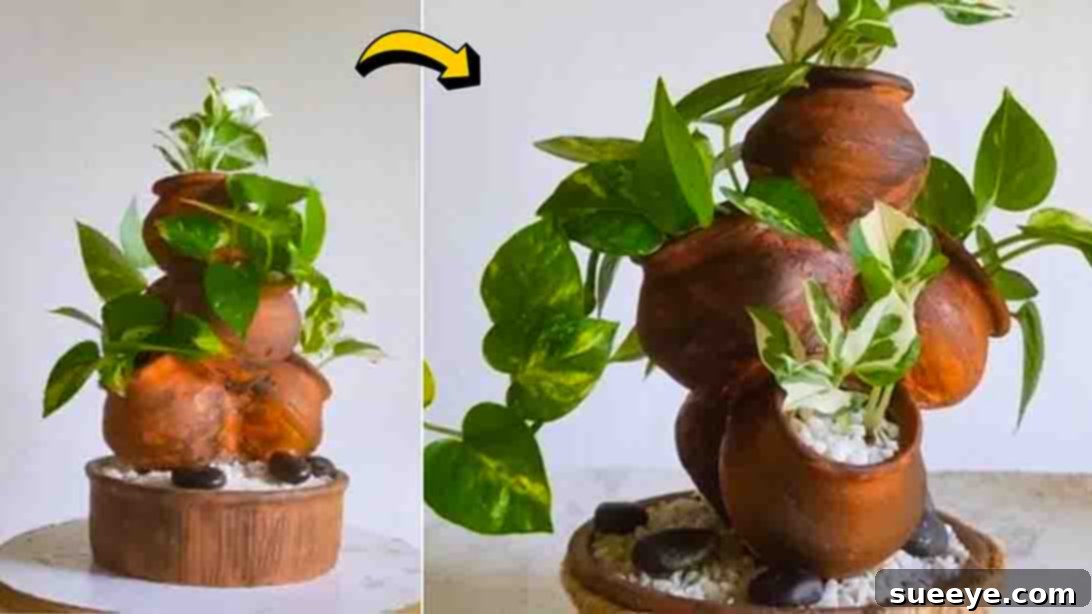
Transform your home into a verdant oasis with a charming **DIY Tabletop Indoor Garden**. Imagine a lush miniature landscape gracing your coffee table, bookshelf, or office desk, bringing a slice of the outdoors right into your living space. This delightful project, inspired by creative insights like those from Green Decor on YouTube, offers a simple yet profoundly rewarding way to infuse natural beauty and tranquility into your everyday environment. Utilizing nothing more than a few small clay pots, some basic crafting materials, and your chosen indoor greenery, you can craft a truly gorgeous and personalized decor piece that reflects your unique style.
Whether you are a seasoned horticulturist with a well-developed green thumb or someone just beginning to explore the therapeutic world of indoor plants, this project is designed for you. It’s an accessible and deeply satisfying endeavor that not only enhances your decor but also offers a mindful connection to nature. The tactile experience of working with soil and plants, combined with the creative freedom of design, provides a wonderful escape from daily stresses. Forget sterile spaces; embrace the vibrant life that a DIY indoor garden can bring. What are you waiting for? Dive into the details below to discover the step-by-step instructions and cultivate your very own serene tabletop sanctuary!
Why Create a DIY Tabletop Indoor Garden?
Beyond mere aesthetics, a tabletop indoor garden offers a myriad of benefits. It’s a fantastic solution for those with limited space, bringing the joy of gardening to apartments, small homes, or even just a corner of a room. Indoor plants are known to boost mood, reduce stress, and even improve air quality by filtering toxins. Crafting your own garden allows for unparalleled customization, ensuring your creation perfectly complements your existing home decor. It’s a statement piece, a conversation starter, and a personal haven, all rolled into one delightful project. Furthermore, the act of creation itself is therapeutic, providing a sense of accomplishment and a unique connection to your home environment.
RELATED: Elevate Your Decor with DIY Hanging Ring Plants Tutorial
Essential Materials for Your Clay Pot Indoor Garden Project
Gathering your materials is the first exciting step towards bringing your indoor garden vision to life. Most items are readily available at craft stores, nurseries, or home improvement centers.
- Small Clay Pots: These are the stars of your garden! Opt for various sizes and shapes to add visual interest and depth to your design. Clay is breathable, which is excellent for plant health.
- Clay Bowl: This will serve as the sturdy base for your entire garden structure. Choose a size that accommodates your desired number of small pots and fits your chosen tabletop area.
- Plastic Sheet: Essential for preventing the cement from adhering permanently to your base bowl, making removal easy. A simple plastic bag or cling wrap works perfectly.
- Large Container: You’ll need this for mixing your cement. Ensure it’s sturdy and disposable or easily cleaned.
- Cement Mixture: A quick-setting cement or craft-specific cement mixture is ideal for this project. Always follow the manufacturer’s instructions for preparation and safety.
- Water-Soluble Paint: Unleash your creativity! Water-soluble paints like acrylics or chalk paints offer a wide range of colors to personalize your garden’s aesthetic.
- Paintbrush: A medium-sized brush is generally suitable for painting both the base and individual pots.
- Potting Soil: Choose a high-quality indoor potting mix that provides excellent drainage and nutrients for your chosen plants.
- Indoor Plants: This is where your garden truly comes alive! Select small, slow-growing indoor plants that thrive in similar light and humidity conditions. Succulents, small ferns, air plants, or miniature herbs are excellent choices.
- White Gravel: Used for decorative top dressing and to help with drainage. You can also experiment with other colors or small decorative pebbles.
Directions: Crafting Your DIY Tabletop Indoor Garden Step-by-Step
Patience and creativity are key as you follow these detailed steps to construct your beautiful indoor garden. Remember to work in a well-ventilated area and wear gloves when handling cement.
Step 1: Preparing the Base and Arranging Your Clay Pots
Begin by taking your chosen clay bowl, which will form the foundation of your garden. Carefully line the inside of the bowl with a plastic sheet, ensuring it covers the entire interior surface. This crucial step prevents the cement from bonding directly with the bowl, allowing you to easily remove your finished garden base once dry. Smooth out any major wrinkles in the plastic. Set this prepared bowl aside.
Next, in a large, designated mixing container, prepare your cement mixture according to the specific instructions provided by the manufacturer. Pay close attention to the water-to-cement ratio to achieve the correct consistency – typically a thick, workable paste that isn’t too runny. Once thoroughly mixed, carefully pour the prepared cement into the plastic-lined clay bowl. Ensure the bottom is covered with a layer of cement, about 1 to 2 inches thick, depending on the size of your base. Allow this initial layer of cement to dry sufficiently, usually for several hours or overnight, until it is firm to the touch.
Once the base cement has dried, gently remove it from the clay bowl. You will find that the plastic sheet makes this process incredibly easy. Carefully cut away any excess plastic sheet that extends beyond the edges of your newly formed cement base. This creates a clean and tidy foundation.
Now comes the exciting, creative part: arranging your small clay pots. Mix another fresh batch of cement mixture. Use this new batch to adhere and assemble your small clay pots onto the cement base. This is where your artistic vision comes into play! You can design and place the clay pots according to your preference, creating a unique layout. Consider varying heights, grouping pots, or creating a symmetrical or asymmetrical design. Experiment with different arrangements before applying cement to find the look you love. Once you’ve decided on the placement for each pot, apply a dollop of cement to the bottom of each pot and firmly press it onto the base. For added stability, you can also apply cement to the sides where pots touch each other. Hold each pot firmly in place for approximately five minutes after setting it down to allow the cement to begin tightening and bonding, ensuring a secure attachment. Continue this process until all your small clay pots are securely affixed to the base.
Step 2: Finishing Touches, Painting, and Planting Your Greenery
After the pots are firmly in place and the cement has fully dried (this may take 24-48 hours depending on the cement type and humidity), it’s time to refine the structure. Mix a third, smaller batch of cement. Use this to fill any visible gaps or seams between the clay pots and the base, as well as between the pots themselves. This step not only adds structural integrity but also creates a more cohesive, finished look, giving your garden a more polished and unified appearance. Use a small trowel or even your gloved finger to smooth the cement, blending it seamlessly. Allow this final layer of cement to dry completely.
Once your entire cement and pot structure is thoroughly dry and hardened, it’s time to add a splash of color! Using your water-soluble paint and paintbrush, paint the entire project. You can choose a single solid color for a minimalist look, or get creative with multiple colors, patterns, or even a distressed finish. Apply thin, even coats, allowing each layer to dry before applying the next, if necessary. For added durability and to protect the paint, you might consider applying a clear sealant once the paint is fully dry.
With the structure complete and painted, the most exciting part begins: planting! Carefully fill each small pot with your chosen potting soil. Ensure the soil level leaves enough space for your plants. Gently remove your small indoor plants from their nursery pots, being careful not to damage the root ball. Place one plant into each pot, centering it, and then gently firm the soil around the base of the plant. If you’ve chosen plants with specific care needs, ensure their spacing and individual requirements are met.
For an added decorative touch and improved aesthetics, put some white gravel (or pebbles of your choice) at the bottom base of the entire arrangement, around the pots, and on top of the soil in each pot. This not only looks neat and polished but can also help deter pests and retain soil moisture.
Finally, give your newly planted indoor garden its first watering. Be mindful not to overwater, especially with succulents or plants that prefer drier conditions. Place your completed DIY tabletop indoor garden in your desired location, considering the light requirements of your plants. Revel in the beauty and satisfaction of your handcrafted green sanctuary!
Care and Maintenance Tips for Your Indoor Garden
Once your beautiful tabletop garden is complete, ongoing care is essential to ensure your plants thrive. Here are some key tips:
- Watering: The most common mistake is overwatering. Check the soil moisture regularly by sticking your finger about an inch deep. Water only when the top inch of soil feels dry. Ensure adequate drainage to prevent root rot, though this design is largely decorative.
- Light: Most indoor plants require bright, indirect light. Observe your plants for signs of too much or too little light (e.g., scorched leaves, leggy growth). Rotate your garden periodically to ensure all plants receive even light exposure.
- Humidity: Some indoor plants, especially tropical varieties, prefer higher humidity. If your home air is very dry, consider misting your plants occasionally or placing a small humidifier nearby.
- Fertilizing: During the growing season (spring and summer), feed your plants with a diluted liquid fertilizer every 2-4 weeks. Reduce or stop fertilizing in fall and winter when plant growth slows.
- Pest Control: Regularly inspect your plants for any signs of pests like spider mites, mealybugs, or aphids. Early detection makes treatment much easier. Use organic pest control methods like neem oil or insecticidal soap.
- Dusting: Dust can accumulate on plant leaves, hindering photosynthesis. Gently wipe leaves with a damp cloth every few weeks to keep them clean and healthy.
- Pruning: Trim any yellowing, dead, or overgrown leaves to encourage new growth and maintain the garden’s neat appearance.
Customization and Creative Ideas for Your Tabletop Garden
The beauty of a DIY project lies in its potential for personalization. Don’t stop at the basic design; let your imagination flourish!
- Theme Gardens: Create a succulent desert garden, a miniature herb garden for your kitchen, a tranquil zen garden with tiny rakes and pebbles, or a whimsical fairy garden with small figurines.
- Paint Finishes: Beyond solid colors, experiment with distressed looks, ombre effects, or stencil patterns on the base and pots. Metallic paints can add a touch of modern elegance.
- Decorative Elements: Incorporate natural elements like moss, small polished stones, sea glass, or even tiny driftwood pieces. Miniature garden tools, small animal figurines, or decorative markers for herbs can add charm.
- Lighting: Integrate tiny LED fairy lights around your garden for an enchanting glow, especially lovely in the evenings.
- Different Pots: While clay pots offer a classic look, consider mixing in small ceramic pots, recycled tin cans painted, or even unique found objects to hold plants, adding eclectic flair.
- Verticality: Introduce varying heights not just with different sized plants, but also by stacking some pots or incorporating a small elevated platform for one or two plants within the design.
Troubleshooting Common Indoor Garden Issues
Even with the best intentions, indoor plants can sometimes face challenges. Here are a few common issues and how to address them:
- Yellowing Leaves: Often a sign of overwatering or nutrient deficiency. Check soil moisture, adjust watering, and consider a balanced fertilizer.
- Wilting or Drooping: Can indicate underwatering (soil is very dry) or overwatering (roots are suffocating). Feel the soil and adjust accordingly.
- Brown or Crispy Leaf Tips: Usually points to low humidity or inconsistent watering. Increase humidity and maintain a consistent watering schedule.
- Leggy Growth (Stretching): Your plant is reaching for more light. Move it to a brighter location.
- Pests: Sticky residue, small webbing, or visible insects are signs of pests. Isolate the plant and treat with appropriate organic pesticides.
- Cracked Cement: Minor cracks can sometimes appear. For structural cracks, a small amount of fresh cement mixture can be used to fill and smooth them. For cosmetic cracks, they can often be painted over or incorporated into a rustic design.
DIY Tabletop Indoor Garden Using Small Clay Pots: Your Personal Green Retreat
Crafting your own DIY tabletop indoor garden using small clay pots is more than just a home decor project; it’s an invitation to cultivate serenity and natural beauty within your personal space. From the thoughtful selection of materials to the creative arrangement of plants, each step offers an opportunity for personal expression and a connection to the natural world. This miniature ecosystem not only enhances the aesthetic appeal of any room but also brings with it the calming presence and air-purifying benefits of living greenery. Whether it’s a vibrant display of succulents or a collection of delicate ferns, your handmade garden will serve as a constant source of joy and a testament to your creativity. Embrace the therapeutic process of nurturing your plants and transforming a simple idea into a thriving, personalized green retreat. Share your unique creations and inspire others to embark on their own journey into the wonderful world of indoor gardening!