
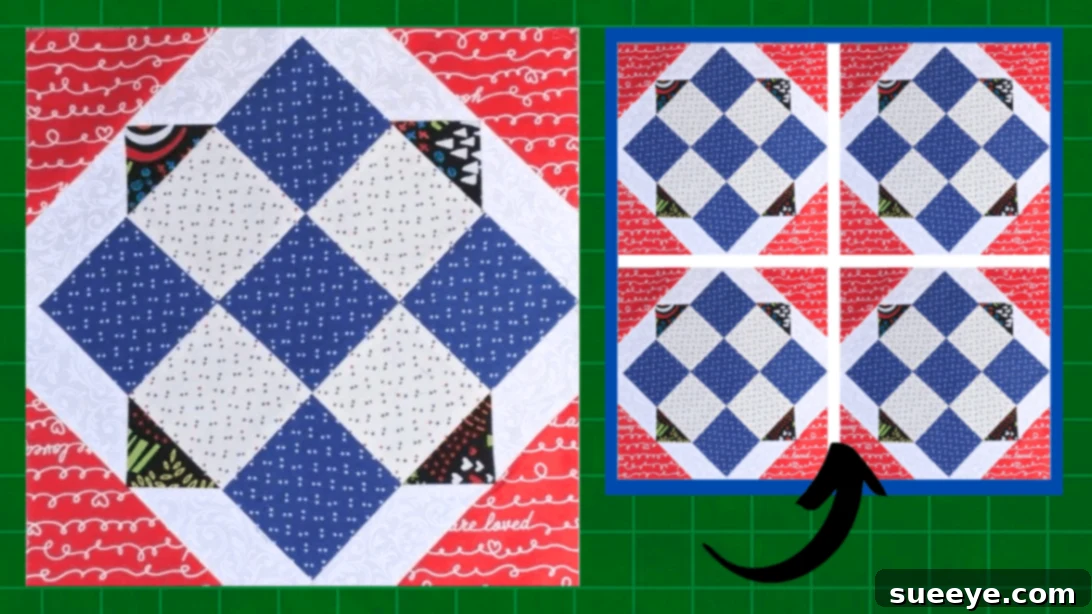
Master the Block and Tackle Quilt Block: An Easy Quilting Project for Beginners
Are you looking for a rewarding quilting project that looks complex but is surprisingly simple to create? The Block and Tackle Quilt Block is an absolute gem, renowned for its dynamic, geometric design that gives the illusion of intricate piecing. Despite its sophisticated appearance, this block is incredibly straightforward, making it an ideal choice for both novice quilters embarking on their creative journey and seasoned sewers seeking a quick yet satisfying make.
What makes the Block and Tackle Quilt Block particularly appealing is its versatility and charm. It’s not just a beautiful design; it’s also a fantastic opportunity to breathe new life into your collection of leftover fabric scraps from previous sewing or quilting ventures. Imagine transforming those treasured remnants into a cohesive and visually striking component of a larger quilt, a decorative pillow, or even a unique tote bag. This project is a testament to sustainable crafting, allowing you to create something beautiful while minimizing waste.
RELATED: How to Make a Jackknife Quilt Block
This tutorial will guide you through each step of crafting your very own Block and Tackle Quilt Block. We’ll break down the process into clear, manageable instructions, ensuring you gain confidence and master essential quilting techniques along the way. We’re especially thrilled to feature the expert guidance of Carol Thelen, whose clear and concise video tutorial on YouTube provides an invaluable visual aid for every stage of this exciting project. Get ready to impress yourself with what you can create!
Why Choose the Block and Tackle Quilt Block for Your Next Project?
There are numerous reasons why the Block and Tackle Quilt Block stands out as a must-try for any quilting enthusiast:
- Perfect for Beginners: Don’t let its intricate look intimidate you. This block is designed with simple shapes and repetitive stitching, making it a fantastic learning experience for those new to quilting. You’ll build fundamental skills like accurate cutting, precise piecing, and effective pressing, setting a strong foundation for future projects.
- Excellent Scrap Buster: Every quilter accumulates a stash of fabric scraps. This block is a perfect solution for utilizing those smaller pieces, transforming them into a harmonious design. It encourages creativity in fabric selection and promotes sustainable crafting by giving a purpose to every last scrap.
- Visually Dynamic Design: The interlocking triangles and squares create a sense of movement and depth, making the Block and Tackle a captivating pattern. By strategically choosing contrasting fabrics, you can enhance this visual appeal, leading to stunning results that draw the eye.
- Versatile Application: Once you’ve mastered this block, the possibilities are endless! Use multiple blocks to create a full-sized quilt, a cozy throw, decorative cushion covers, placemats, or even unique wall hangings. Its adaptability means it can fit into a wide array of home decor styles and personal projects.
- Quick and Rewarding: Because the construction is relatively straightforward, you’ll find yourself completing this block in a reasonable timeframe, offering immediate gratification and a boost to your quilting confidence.
Essential Materials for Your Block and Tackle Quilt Block
Gathering the right tools and fabrics before you begin is crucial for a smooth and enjoyable quilting experience. Here’s everything you’ll need to make your beautiful Block and Tackle Quilt Block:
- 2 Contrasting Fabrics for the Center Block: Choose fabrics that offer a clear visual distinction. One lighter and one darker fabric will emphasize the interlocking pattern and create a striking focal point. High-quality quilting cotton is recommended for its ease of use and durability.
- 2 Contrasting Fabrics for the Corners: Similar to the center, select fabrics that complement each other and provide sufficient contrast to define the corner elements. These can either match your center fabrics or introduce new coordinating colors.
- Background Fabric: This fabric provides visual breathing room and helps the patterned elements pop. A solid or subtly textured fabric often works best here, allowing the intricate block design to take center stage. Ensure it contrasts well with your chosen center and corner fabrics.
- Marking Pen, Pencil, or Chalk: Essential for transferring pattern lines onto your fabric accurately. A water-soluble pen or tailor’s chalk is ideal as it can be easily removed after stitching.
- Ruler: A clear acrylic quilting ruler with precise measurements is indispensable for accurate cutting. A 6×24 inch ruler is versatile, but smaller squares are also helpful.
- Scissors or Rotary Cutter and a Cutting Mat: For precise and efficient fabric cutting. While sharp fabric scissors will work, a rotary cutter combined with a self-healing cutting mat is highly recommended for speed and accuracy, especially when cutting multiple layers or long strips.
- Fabric Pins: High-quality, sharp pins are vital for holding fabric layers together securely before stitching, preventing shifting and ensuring accurate seams.
- Needle and Thread: A universal sewing machine needle (size 80/12 is common) and good quality 100% cotton thread will ensure strong, durable seams that blend seamlessly with your fabric.
- Iron, for Pressing: A good quality iron and an ironing board are non-negotiable in quilting. Proper pressing after each seam helps your block lie flat, reduces bulk, and ensures precise alignment of subsequent pieces.
- Pattern (Click here to download the pattern): Don’t forget to download and print the provided pattern pieces. This will be your blueprint for accurate cutting and assembly.
Preparation is Key: Setting Up for Success
Before you even think about stitching, a little preparation goes a long way in ensuring your Block and Tackle Quilt Block comes out perfectly. First, wash and press all your fabrics to pre-shrink them and remove any wrinkles. This step is crucial for maintaining the integrity and shape of your finished block over time. Next, download and print the pattern pieces from the link provided. Accurately cut out each paper pattern piece. Remember, precision at this stage directly impacts the final appearance of your quilt block. Take your time to align your fabric grains correctly and cut carefully, using your rotary cutter and ruler for the cleanest edges possible.
How to Make the Block and Tackle Quilt Block: Step-by-Step Tutorial
Follow these detailed steps to construct your beautiful Block and Tackle Quilt Block. Remember to maintain a consistent 1/4-inch seam allowance throughout, unless otherwise specified by the pattern, and press after each seam for flat, professional results.
Step 1: Precision Cutting and Initial Assembly of Corner Units
Begin by meticulously downloading the pattern and cutting all your chosen fabrics according to the instructions provided. Organize your cut pieces, paying close attention to which fabrics are designated for the center and which for the corners, as well as the background fabric. Now, take the specified triangle pieces intended for the inner corners. For each of these triangles, carefully place a piece of background fabric on either side, right sides together, aligning the edges precisely. Stitch these three pieces together using your consistent 1/4-inch seam allowance. Once stitched, gently press the seams open or to one side, whichever the pattern recommends for reducing bulk, ensuring the unit lies perfectly flat. Next, take the corresponding piece for the outer corner. Position this piece above the strip you just created, again with right sides facing and edges aligned. Stitch this connection and press the seam nicely. This completes one of your corner units.
Step 2: Completing All Corner Units and Preparing for the Center Block
Repeat the process outlined in Step 1 for all the remaining corner units, ensuring each one is constructed identically and pressed flat. Take your time with each unit to maintain consistency in size and shape. With all corner units prepared, shift your focus to the center block. Refer to the video tutorial by Carol Thelen for a clear visual guide on how to arrange the various square pieces that form the core of your Block and Tackle design. This arrangement is crucial for creating the intended visual flow. Once you are satisfied with the layout, begin stitching the squares together per row. After completing each row, carefully press the seams. Then, join these rows to each other, making sure to align the seams perfectly to prevent bulk and create a seamless look. Press these connecting seams thoroughly.
Step 3: Assembling the Block: Joining Side Units to the Center
With your completed center block lying flat, it’s now time to incorporate the side units (your previously assembled corner units) around it. Carefully lay out these side units, positioning them around the center block as demonstrated in the video. Pay attention to the orientation of each unit to ensure the Block and Tackle pattern forms correctly. Once all units are precisely arranged and aligned, begin to stitch them together. You’ll typically attach the side units to the left and right of the center block first, press those seams, and then attach the top and bottom units. Work methodically, pinning carefully to keep all layers from shifting. Stitch with your consistent 1/4-inch seam allowance, making sure to match all points and seams as you go.
Step 4: The Finishing Touches and Trimming for Perfection
After all the side units have been stitched to the center block, you should have a complete, albeit possibly slightly irregular, Block and Tackle Quilt Block. The final crucial step is to trim off any excess fabric and square up your block. Using your rotary cutter, ruler, and cutting mat, carefully trim the block to the exact dimensions specified in your pattern. This squaring-up process ensures that all your blocks will be uniform in size, making it much easier to assemble them into a larger quilt later on. Give the entire finished block one last, good press to set all the seams flat and crisp. Stand back and admire your beautifully crafted Block and Tackle Quilt Block!
Tips for Quilting Success with Your Block and Tackle
To ensure your Block and Tackle Quilt Block turns out beautifully every time, keep these expert tips in mind:
- Accuracy is Paramount: The foundation of a perfect quilt block lies in precise cutting and a consistent 1/4-inch seam allowance. Use a ruler and rotary cutter for exact measurements, and double-check your seam allowance before stitching.
- Press, Don’t Iron: When quilting, we “press” rather than “iron.” Ironing involves sliding the iron, which can distort your fabric pieces. Instead, gently lift and place the iron, holding it in place to set the seams flat and crisp without stretching the fabric.
- Starch for Stability: For fabrics that tend to stretch or fray, consider using a light fabric starch before cutting. This adds stability, making cutting and piecing more accurate.
- Chain Piecing for Efficiency: If you’re making multiple blocks, consider chain piecing. Stitch several sets of pieces one after another without lifting the presser foot or cutting the thread between them. This saves time and thread.
- A Good Seam Ripper is Your Friend: Even experienced quilters make mistakes. Don’t be afraid to unpick and re-sew a seam if it’s not perfect. It’s better to fix it now than to have a crooked block in your finished quilt.
- Experiment with Color: While contrasting fabrics are key, don’t limit yourself to just two or three. Try a variety of prints and solids to create unique effects and truly personalize your Block and Tackle.
Transforming Your Blocks into Stunning Projects
Once you’ve successfully created one Block and Tackle Quilt Block, you’ll likely want to make more! Here are some inspiring ideas for what you can create with a collection of these beautiful blocks:
- Classic Quilts: Assemble multiple blocks into a full-sized quilt for your bed, a cozy lap quilt for the sofa, or a charming baby quilt. The dynamic pattern looks fantastic when repeated.
- Decorative Pillows: One or two blocks can form the front of a striking throw pillow, adding a touch of handmade elegance to any room.
- Table Runners or Placemats: A series of blocks sewn together can create a beautiful table runner, or individual blocks can be finished as unique placemats, perfect for gifts or special occasions.
- Tote Bags or Pouches: Incorporate a Block and Tackle design into the front panel of a handmade tote bag, giving it a distinctive and personal touch.
- Wall Hangings: A single, well-executed block, perhaps framed or simply bordered, makes for lovely fabric art to adorn your walls.
Conclusion: Your Quilting Journey Awaits!
The Block and Tackle Quilt Block is a testament to the fact that beautiful quilting doesn’t have to be overwhelmingly complicated. It’s a delightful project that offers a perfect blend of challenge and accessibility, making it an excellent stepping stone for anyone keen to delve deeper into the art of quilting. By following Carol Thelen’s expert guidance and the detailed steps outlined in this tutorial, you’ll not only create a stunning quilt block but also develop valuable skills that will serve you well in all your future sewing endeavors.
So, gather your fabrics, set up your sewing machine, and prepare to be amazed by what you can accomplish. This block is not just about stitching fabric; it’s about crafting something beautiful with your own hands, fostering creativity, and finding joy in the process. Dive in, have fun, and proudly showcase your handmade Block and Tackle Quilt Block!
*All these amazing techniques and insights are thanks to Carol Thelen via YouTube. We highly recommend visiting her channel to explore more of her fantastic quilting tutorials and inspiration!