
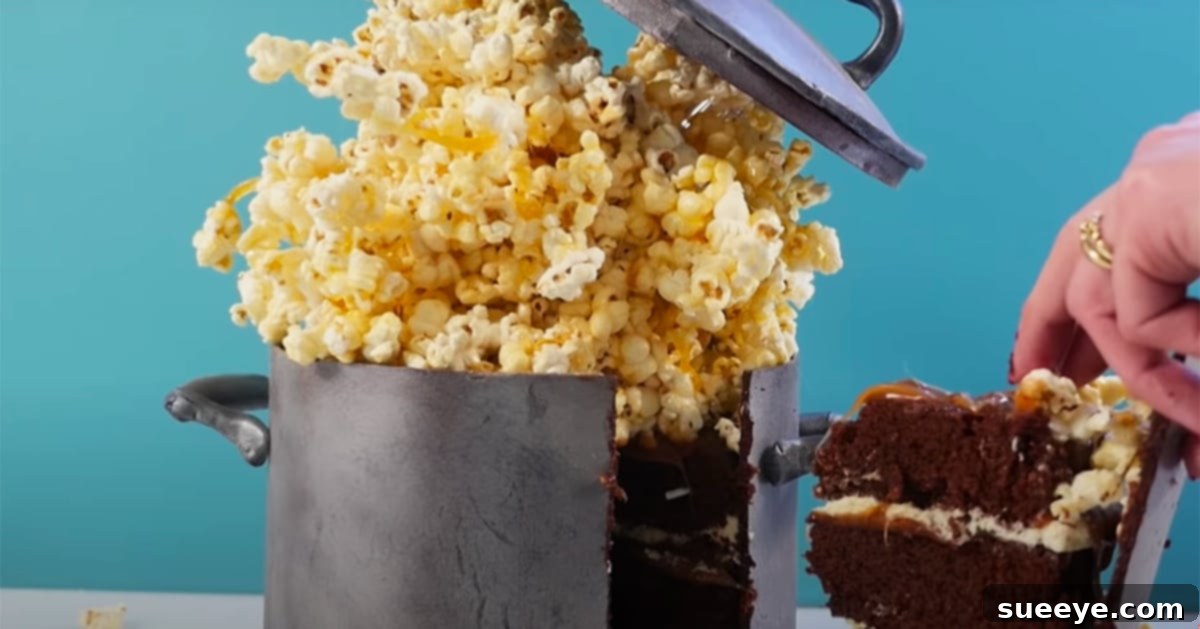
Prepare to have your culinary perceptions redefined as we delve into the mesmerizing world of the gravity-defying caramel popcorn cake. This isn’t just a dessert; it’s an edible masterpiece that defies expectations, captivating onlookers with its illusion of exploding popcorn seemingly suspended in mid-air. When I first encountered this astonishing creation, my mind was truly blown – it looked less like a traditional cake and more like a vibrant, kinetic sculpture crafted entirely from delicious ingredients. The brilliance behind this innovative concept comes from the renowned YouTube channel, How To Cook That, spearheaded by the incredibly creative Ann Reardon. Her tutorials are legendary for transforming complex baking ideas into achievable projects, and this caramel popcorn cake is a prime example of her genius. I’ve explored countless cake designs, but never before have I witnessed a cake that combines such playful whimsy with sophisticated engineering. Ann Reardon’s channel is a treasure trove of unbelievable cakes, each meticulously crafted and flawlessly presented, demonstrating a level of skill that truly sets her apart.
Crafting a cake of this caliber demands patience, precision, and a willingness to embrace a detailed process. However, aspiring bakers need not be intimidated. Ann’s exceptional ability to explain each step with clear, detailed instructions throughout her video tutorial makes even the most intricate techniques surprisingly accessible. Her patient guidance simplifies what might otherwise seem daunting, empowering bakers of all levels to embark on this extraordinary baking adventure. This comprehensive guide will walk you through the essential components and techniques needed to recreate this gravity-defying marvel in your own kitchen, ensuring a truly impressive and delicious result that will be the talk of any gathering.
The Gravity-Defying Caramel Popcorn Cake: An Artistic and Delicious Challenge
The allure of the gravity-defying caramel popcorn cake lies not only in its delicious components but also in its spectacular, almost magical presentation. Imagine a seemingly overturned pot, miraculously suspended, overflowing with golden, sticky caramel popcorn – every single element made entirely of edible ingredients. This visual illusion makes it an absolute showstopper, perfect for birthdays, holidays, themed parties, or any event where you want to leave a lasting, unforgettable impression. While it appears incredibly complex at first glance, the entire process is thoughtfully broken down into manageable stages, each contributing to the final breathtaking effect. From the precise art of tempering chocolate to creating perfect, silken caramel and meticulously arranging the popcorn, every step is an opportunity to delve into advanced baking techniques that yield extraordinary and deeply rewarding results. Get ready to elevate your baking prowess and create something truly spectacular. Let’s gather our tools and ingredients and prepare to embark on this thrilling culinary endeavor.
Essential Ingredients for Your Culinary Masterpiece
Precision is paramount when embarking on a complex baking project like the Gravity-Defying Caramel Popcorn Cake. Using high-quality ingredients will not only enhance the flavor profiles of your dessert but also critically contribute to the structural integrity and overall success of your awe-inspiring creation. Below is a comprehensive list of everything you’ll need, meticulously categorized for ultimate clarity and ease of preparation. Ensure all your ingredients are measured accurately and are at the appropriate temperature before you begin, as this will significantly impact the outcome.
For the Cake Structure and Artistic Decoration:
- 600mL (20.29 fluid ounces) Heavy Cream: This essential ingredient is typically used to create a rich, stable ganache or buttercream, which will form the crucial binding agent and foundational structure of your cake. Its high fat content ensures stability.
- Robust Cake Support System: This is the absolute core of your gravity-defying illusion. It could involve a custom-engineered food-safe armature, a combination of sturdy dowels, and a secure cake board. Ann Reardon’s original tutorial provides indispensable specific guidance on how to construct and integrate this vital structural element.
- 800g (28.22 ounces) High-Quality Chocolate: Whether you opt for dark, milk, or a blend, the quality of this chocolate is paramount. It will be meticulously tempered to form the glossy, durable pot lid. High-quality chocolate ensures both superior taste and optimal tempering success, providing a beautiful snap and sheen.
- 150g (5.29 ounces) Black Fondant: This pliable sugar paste is used to sculpt the decorative rim around the chocolate pot lid. It adds definition, a touch of realism, and helps visually ground the “pot” element of the design.
- 4 Lollipop Sticks (or sturdy food-safe wooden/bamboo skewers): These versatile sticks are often strategically incorporated into the internal support structure of the cake or used to firmly secure lighter, individual elements of popcorn or other decorations, providing hidden stability.
- Edible Silver Luster Dust: This fine, shimmering dust is applied with a soft brush onto the fondant rim or other designated elements to impart a realistic, metallic, aged “pot-like” appearance, enhancing the visual illusion significantly.
- Acetate Sheets: These clear, flexible sheets are incredibly versatile. They can be used for shaping tempered chocolate, creating precise templates for fondant cutting, or providing a perfectly smooth, non-stick surface for working with delicate edible components.
For the Luscious Salted Caramel:
This rich, velvety, and perfectly balanced salted caramel is not merely an adhesive; it’s a key flavor component. It will be generously used both to secure the popcorn and as a delectable filling or topping within the cake itself. Crafting homemade caramel guarantees a superior flavor and a luxuriously smooth texture far beyond store-bought alternatives.
- 2 cups or 500mL (16.91 fluid ounces) Heavy Cream: It is crucial that this cream is warmed gently before being incorporated into the hot sugar mixture. This prevents the mixture from seizing and ensures a smooth, homogenous caramel.
- 2 tsp Pure Vanilla Extract: The addition of pure vanilla extract infuses the caramel with a beautiful aromatic depth and warmth, perfectly complementing the sweetness.
- 300mL (10.14 fluid ounces) or 1 1/4 cups Water: Initially used to dissolve the sugar completely, creating a syrup that helps prevent premature crystallization during the cooking process.
- 430g (15.17 ounces) or 2 cups Caster Sugar (Superfine Sugar): Caster sugar, with its finer granules, dissolves more easily and cooks much more evenly than standard granulated sugar, leading to a smoother caramel.
- 1 tsp Fine Sea Salt: This is a critical ingredient for the “salted” caramel. It expertly balances the intense sweetness of the sugar and significantly enhances the overall depth and complexity of the caramel’s flavor.
- 40g (1.41 ounces) or 2 tablespoons Glucose Syrup: A truly vital ingredient in caramel making. Glucose syrup acts as an anti-crystallization agent, ensuring your caramel remains smooth, pliable, and free from grainy sugar crystals.
For the Golden Caramel Popcorn (Prepare Two Separate Batches for Optimal Freshness and Quantity):
The “exploding” golden caramel popcorn is undeniably the star of this show-stopping cake. Making two separate batches, rather than one large one, is a strategic choice. This ensures you have an ample supply of freshly coated, crisp popcorn for the dramatic visual effect, maintaining its optimal texture and preventing it from becoming soggy or clumping excessively.
- 70g (2.47 ounces) Unpopped Popcorn Kernels: Select high-quality, fresh kernels for maximum “pop” and to minimize the number of unpopped duds, ensuring a generous yield.
- 210g (7.41 ounces) or 1 cup Granulated Sugar: This sugar forms the sweet, crunchy, and irresistible coating that transforms plain popcorn into a gourmet treat.
- 100mL (3.38 fluid ounces) Water: Used to create a sugar syrup base for the caramel coating, ensuring even distribution and a glassy finish.
- 15g (0.53 ounces) or 1 Tablespoon Unsalted Butter: The addition of butter adds a rich, luscious flavor and a desirable silky texture to the popcorn caramel, making it even more delectable.
Step-by-Step Guide to Crafting Your Gravity-Defying Masterpiece
Creating this spectacular cake involves several distinct and intricate stages, each requiring meticulous attention to detail and a steady hand. Follow these directions carefully, and do not hesitate to refer back to Ann Reardon’s invaluable visual tutorial for clarification on specific techniques, especially for the nuanced structural elements. Her video provides crucial visual cues that complement these written instructions beautifully.
Phase 1: Constructing the Edible Pot Lid – A Foundation of Chocolate
The very first step in bringing your gravity-defying vision to life is crafting the prominent dome-shaped lid of the pot from perfectly tempered chocolate. This component serves not only as a striking visual element but also as an absolutely crucial part of the optical illusion, contributing significantly to the overall aesthetic.
- Prepare Your Mold with Precision: Begin by selecting a heat-resistant, dome-shaped bowl or a suitable pot lid that will serve as your primary mold. Lightly spray the entire inside surface with a fine mist of cooking oil. Immediately thereafter, gently wipe off the excess oil with a clean paper towel. This crucial step leaves an incredibly thin, almost invisible layer of oil, which is absolutely vital for the effortless and clean release of the tempered chocolate later on. Without this precise, thin layer, your delicate chocolate lid might unfortunately stick and risk breakage during removal.
- Master the Art of Tempering Chocolate: Tempering chocolate is a highly critical technique that ensures your finished chocolate lid will possess a beautiful, professional, and glossy finish, a satisfying, audible snap when broken, and excellent stability at room temperature. While the full tempering process (which typically involves carefully melting, cooling, and then gently re-heating chocolate to very specific temperature points) is comprehensively detailed in Ann Reardon’s tutorial, the general principle is to meticulously melt your 800g of high-quality chocolate to its ideal working temperature, maintaining its crystalline structure.
- Form the Pot Lid with Care: Once your chocolate is perfectly tempered and at the correct working temperature, carefully and steadily pour it into the prepared, thinly oiled dome mold. Gently tilt and rotate the mold in various directions to spread the chocolate evenly across the entire interior surface. The goal is to create a consistent, uniform thickness throughout the lid. This uniformity is paramount for ensuring both structural integrity and a balanced aesthetic.
- Allow the Chocolate to Set Completely: Once the chocolate is evenly distributed, carefully place the chocolate-filled mold into the refrigerator. Allow it ample time to set completely until it is firm, rigid, and fully hardened. This setting process typically takes at least 30 to 60 minutes, though the exact time may vary depending on the thickness of your chocolate layer and the ambient temperature of your refrigerator. Patience here prevents premature cracking.
Phase 2: Preparing the Cake Base and Artfully Decorating the Lid
With the chocolate lid now firmly setting, our attention turns to the cake itself – the delectable foundation of this impressive creation – and the meticulous finishing touches for the pot lid, preparing it for assembly.
- Bake Your Robust Cake Base: While the specific cake batter recipe is a flexible element designed to complement the structural work rather than be a fixed rule, the paramount importance of a sturdy, dense cake base cannot be overstated for any gravity-defying design. A rich chocolate mud cake, a dense vanilla pound cake, or a firm carrot cake often work exceptionally well, providing the necessary stability and structural integrity to confidently support the entire upper structure without collapsing. For precise, step-by-step instructions on preparing a cake base ideally suited for this particular design, please refer directly to Ann Reardon’s comprehensive How To Cook That tutorial on YouTube. It is absolutely crucial that your cake is fully cooled and perhaps even chilled for easier carving, frosting, and handling during the assembly phase.
- Carefully Release the Chocolate Lid: Once the chocolate lid is completely set, firm, and fully detached from the mold (indicating it’s ready), proceed with extreme care. Gently run your fingernail or a thin, very blunt, food-safe tool around the very edge of the chocolate. This action helps to break any lingering suction or adhesion to the mold. Then, with a steady hand, carefully invert the mold onto a clean, flat, and protected surface. The chocolate lid should detach smoothly and cleanly, thanks to the precise prior oiling. Always handle it with utmost care, as tempered chocolate, while robust, can still be brittle at its delicate edges.
- Decorate with Artistic Fondant: Take your 150g of black fondant. If you possess a fondant extruder, feed the fondant through it to create a long, perfectly even “snake” or rope of fondant. If an extruder is unavailable, carefully hand-roll the fondant to achieve as much consistency as possible. This uniform rope is then meticulously wrapped around the rim of your chocolate lid. This step is crucial, as it creates a realistic “seal” or a definitive edge for your pot lid, significantly enhancing its authentic, three-dimensional appearance. Ensure the fondant adheres smoothly, neatly, and without any visible gaps.
- Apply a Metallic Sheen with Luster Dust: Using a soft, clean food-grade brush, gently but thoroughly apply the edible silver luster dust to the black fondant rim. This specialized dust will instantly impart a realistic, metallic, and slightly aged “pot-like” appearance, adding another layer of visual authenticity to your edible prop. For an even more sophisticated effect, you can also brush a very light, almost imperceptible layer over select parts of the chocolate lid itself, creating a subtle sheen that convincingly mimics the texture and reflection of a real metal pot.
Phase 3: Crafting the Exquisite Salted Caramel – A Sweet and Salty Delight
This exquisite salted caramel is a cornerstone of this cake, serving a dual purpose: it acts as a robust adhesive to hold the popcorn in place, and it infuses the entire dessert with an incredible depth of rich, buttery, and perfectly balanced sweet-and-salty flavor. Making your own homemade caramel from scratch guarantees a superior texture and unparalleled taste.
- Prepare the Cream Mixture: In a small, clean saucepan, gently warm the 500mL (2 cups) of heavy cream together with the 2 tsp of pure vanilla extract. The goal is to warm it until it is steamy to the touch, but it should never be allowed to boil. Once warmed, set this mixture aside, keeping it warm to prevent it from seizing when added to the hot sugar.
- Master the Art of Caramelizing Sugar: In a separate, significantly heavier-bottomed saucepan (this is important for even heat distribution), combine the 430g (2 cups) of caster sugar, the 300mL (1 1/4 cups) of water, and the 40g (2 tbsp) of glucose syrup. Place the saucepan over medium heat. Crucially, resist the urge to stir the mixture initially with a spoon. Instead, swirl the pan gently and occasionally to ensure the sugar dissolves evenly. Continue cooking, observing closely, until the sugar syrup transforms into a beautiful, deep amber color. This stage demands patience and unwavering vigilance, as sugar can transition from perfectly caramelized to burnt very rapidly once it begins to change color.
- Carefully Combine and Finish the Caramel: Once the sugar syrup reaches your desired rich amber color, immediately remove it from the heat. With extreme caution, very slowly and steadily pour the previously warmed cream mixture into the intensely hot caramel while continuously whisking. Be prepared for a vigorous bubbling and steaming reaction – this is normal but requires care. Continue whisking diligently until the mixture is completely smooth and thoroughly combined. Finally, remove the saucepan entirely from the heat and stir in the 1 tsp of fine sea salt. Allow the finished salted caramel to cool slightly before it is used for assembly; it will naturally thicken to a perfect consistency as it cools.
Phase 4: Making the Golden Caramel Popcorn – The “Explosion” Effect
The “exploding” popcorn effect is undeniably central to this cake’s charm and visual impact. Remember, for the best results in terms of crispness, quantity, and overall effect, you will be making two separate batches of this delicious caramel popcorn.
- Efficiently Pop the Popcorn Kernels: Utilizing your preferred method – whether it’s an air popper, a traditional stovetop method, or even a microwave – pop the 70g (2.47 ounces) of unpopped popcorn kernels. It is vital that you use plain popcorn, completely devoid of any added butter or salt, as we will be creating our own custom caramel coating. Once popped, meticulously remove any unpopped kernels or “old maids” to ensure a pleasant eating experience.
- Prepare the First Batch of Popcorn Caramel: In a clean, medium-sized saucepan, combine 210g (1 cup) of granulated sugar and 100mL (3.38 fluid ounces) of water. Place this mixture over medium heat, swirling the pan occasionally, until all the sugar is completely dissolved and the syrup begins to take on a delicate, light amber color. Remove the saucepan immediately from the heat and stir in the 15g (1 tbsp) of unsalted butter until it is fully melted and thoroughly incorporated into the sugar syrup.
- Evenly Coat the First Popcorn Batch: Without delay, pour the hot, freshly made caramel over the first batch of popped popcorn, which should be in a large, heat-resistant bowl. Using a sturdy spatula or spoon, quickly and gently toss the popcorn to ensure each piece is coated as evenly as possible with the luscious caramel. Once coated, spread this batch of caramel popcorn onto a baking sheet that has been lined with parchment paper or a silicone mat. Allow it to cool completely and harden. Crucially, repeat steps 12-14 meticulously for the second batch of popcorn and its caramel coating. This method of making two separate batches guarantees maximum freshness, optimal crispness, and a sufficient quantity for the dramatic “exploding” effect.
Phase 5: Assembling the Gravity-Defying Structure – The Grand Finale
This is the magical phase where all the meticulously prepared components converge to create the stunning, gravity-defying illusion. This intricate phase is heavily reliant on the specific, often ingenious, techniques brilliantly demonstrated in Ann Reardon’s comprehensive video tutorial regarding the internal cake support system. Her visual guidance is indispensable here.
- Prepare the Robust Cake Base: Carefully place your completely cooled and precisely carved cake onto a sturdy, level cake board. If necessary, apply a thin, even layer of ganache (which can be made from your 600mL cream and additional chocolate) or a firm buttercream to smooth the cake’s surface. This not only creates a polished finish but also provides a stable, adhesive base for the main support structure and subsequent decorations.
- Integrate the Crucial Cake Support: Following Ann Reardon’s tutorial with utmost precision, carefully integrate your pre-constructed cake support system directly into the cake. This system, which might include internal food-safe dowels, a central rod, or a specifically designed armature, is the invisible yet foundational element that creates the illusion of a “floating” pot lid and popcorn. The lollipop sticks can be strategically utilized at this stage to add supplementary support or to help firmly secure individual elements if required, ensuring overall stability.
- Precisely Position the Chocolate Lid: With extreme care and a steady hand, delicately attach or position the beautifully decorated chocolate pot lid onto the pre-installed cake support structure. The visual goal here is to convincingly create the illusion that the pot is dramatically tipping over, with its delicious contents seemingly spilling out. Use a small amount of melted tempered chocolate or a very sturdy royal icing as an effective adhesive to firmly secure the lid in its desired gravity-defying angle.
- Artistically Arrange the Popcorn for the “Explosion”: This is arguably the most artistic and visually impactful part of the entire assembly. Begin meticulously arranging the caramel popcorn around the base of the “pot” and extend it outwards in a natural, dynamic flow, creating the powerful illusion of an explosion or overflowing effect. Use some of your perfectly prepared salted caramel (gently re-warmed slightly if its consistency has become too firm) as an edible glue to firmly secure individual popcorn pieces together and to the cake itself. Gradually build up layers, strategically allowing some pieces to extend higher and further out, truly selling the gravity-defying and dynamic effect. The overarching goal is to make it look abundant, organic, and incredibly dramatic.
- Apply the Final, Polishing Touches: Step back from your creation and take a moment to assess the overall aesthetic. Identify and fill in any visible gaps with additional popcorn, ensuring a seamless and natural flow. For an extra touch of visual appeal and flavor, you can artfully drizzle a little extra salted caramel over the arranged popcorn, which will add both an inviting sheen and an intensified flavor dimension. Finally, meticulously ensure that all structural elements and support systems are completely well-hidden by the popcorn or expertly integrated within the cake itself, maintaining the magical illusion.
The Ultimate Showstopper: A Testament to Culinary Creativity and Engineering
The Gravity-Defying Caramel Popcorn Cake is far more than just a dessert; it stands as a magnificent testament to the boundless possibilities of culinary art, ingenuity, and a touch of playful engineering. Ann Reardon’s unparalleled skill, extraordinary talent, and groundbreaking creativity, so vividly evident in every meticulous detail of this innovative cake, truly deserve a place alongside the greatest cake artists, perhaps even gracing the screens of renowned shows like “Cake Boss” or similar programs featured on The Food Network. Her remarkable ability to conceptualize, design, and flawlessly execute such elaborate, yet incredibly fun and engaging designs, is nothing short of profoundly inspiring.
The sheer impressiveness of a cake that features edible popcorn seemingly erupting from a dramatically tilted, entirely edible pot is guaranteed to captivate, astonish, and utterly delight anyone who has the pleasure of witnessing it. It’s not just a dessert; it’s an instant conversation starter, a magnificent centerpiece that commands attention, and ultimately, a truly unforgettable treat that tastes as incredible as it looks. While embarking on this ambitious project undoubtedly demands a certain level of commitment, meticulous attention, and a generous amount of patience, the profound satisfaction of successfully creating such a unique, visually stunning, and structurally ingenious dessert is truly immeasurable. This project transcends mere baking; it’s an exhilarating journey about pushing the very boundaries of what’s possible in the kitchen and astonishing your guests with a truly magical and edible creation. So, arm yourself with enthusiasm, refer to Ann Reardon’s fantastic visual tutorial for expert guidance, and prepare to amaze everyone with your very own gravity-defying caramel popcorn cake!