
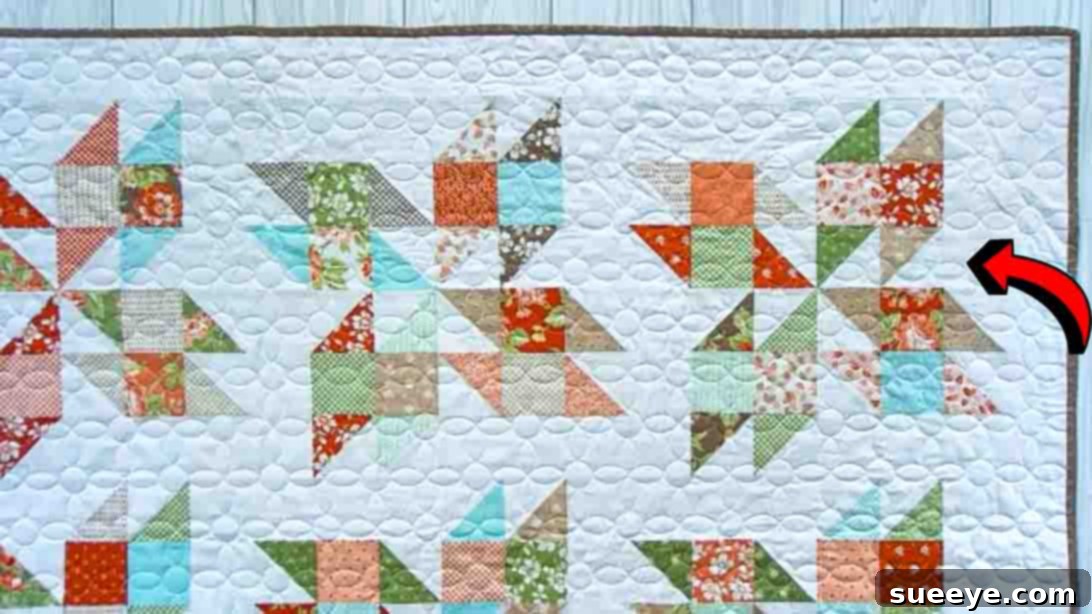
Are you searching for an exciting and rewarding new quilt project that’s perfect for a weekend craft session? Look no further! We highly recommend the delightful Layer Cake Latte Shortcut Quilt, a fantastic creation from the experts at Fat Quarter Shop. This unique quilt pattern is not only fun to make but also incredibly beginner-friendly, making it an ideal choice whether you’re new to quilting or a seasoned pro seeking a quick and charming design. Especially if you have a soft spot for coffee-themed crafts, this latte-inspired quilt will surely capture your heart and imagination.
This particular shortcut quilt pattern has quickly become a favorite among quilters for its ability to produce stunning results with remarkable speed. It’s designed to be a project you can comfortably complete over a weekend, providing a satisfying sense of accomplishment without requiring weeks of dedicated work. The clever use of fabric layer cakes simplifies the cutting process significantly, allowing you to jump straight into the fun of piecing. Plus, Fat Quarter Shop generously provides a free downloadable pattern along with their comprehensive video tutorial. Be sure to check out the video below for a visual guide that walks you through every step of this charming quilt construction.
Why Choose the Layer Cake Latte Shortcut Quilt?
The Layer Cake Latte Shortcut Quilt stands out for several compelling reasons, making it an excellent choice for your next creative endeavor. Firstly, its “shortcut” nature means you spend less time on intricate steps and more time enjoying the actual quilting process. This is achieved through the smart design that maximizes the potential of pre-cut fabric bundles, specifically 10-inch layer cake squares. These pre-cuts eliminate the need for extensive initial cutting, which can often be the most daunting part for new quilters, allowing you to start sewing much sooner.
Secondly, the design itself is inherently appealing. Inspired by the comforting layers of a latte, the quilt features a beautiful, repeating block that creates a sense of warmth and coziness. The contrast between print and solid fabrics, particularly when chosen in coffee-like tones (creams, browns, muted colors), evokes the very essence of a delicious coffee drink. However, the beauty of this pattern is its versatility; you can easily customize it with any color palette to match your personal style or home decor. Whether you prefer vibrant hues, soft pastels, or modern geometrics, the latte block will shine.
Moreover, this quilt project is incredibly gratifying. In just a weekend, you can transform a stack of fabric into a tangible work of art. This rapid turnaround is a huge motivator, especially for beginners who want to see quick progress and build confidence. The clear, concise instructions from Fat Quarter Shop, combined with the visual aid of the YouTube tutorial, ensure that every step is easy to follow. You’ll learn valuable quilting techniques like making half-square triangles (HSTs) and assembling units, all while creating a beautiful and functional item for your home or as a thoughtful gift.
RELATED: Layer Cake Shake Shortcut Quilt Tutorial
Getting Started: Essential Preparation for Your Latte Quilt Project
Embarking on any quilting journey begins with careful preparation. For the Layer Cake Latte Shortcut Quilt, taking a few moments to organize your workspace and materials will make the entire process smoother and more enjoyable. Ensure you have a well-lit area with enough space to spread out your fabrics and cutting mat. Gathering all your tools before you start, such as a rotary cutter, cutting mat, quilting ruler, sewing machine, and iron, will prevent interruptions once you get into the rhythm of creating.
One of the beauties of using layer cakes for this project is the inherent consistency of the fabric sizes, which helps ensure accurate piecing. However, even with pre-cuts, it’s always a good idea to briefly press your fabrics before cutting to remove any creases or wrinkles that could distort your measurements. This small step can make a significant difference in the precision of your final blocks. Labeling your cut pieces (Fabric A, B, C, etc.) as you go is also a highly recommended practice, especially for projects with multiple fabric types and sizes, helping you stay organized and avoid confusion later on.
Essential Materials for Your Layer Cake Latte Quilt
The Layer Cake Latte Shortcut Quilt leverages the convenience of pre-cut fabrics, making material gathering a breeze. Here’s what you’ll need to create your beautiful quilt top. Remember, you can always substitute these with yardage if you prefer, but layer cakes offer a fantastic head start!
- (Click here for the free Layer Cake Latte Quilt pattern PDF)
- One Print Layer Cake: This typically includes 42 coordinating 10-inch squares. For this pattern, you will specifically use thirty-six 10-inch print squares. If you’re cutting from yardage, ensure you have enough fabric to yield this quantity. The print fabrics will form the decorative elements of your espresso and cappuccino units, bringing visual interest to your quilt.
- One Solid Layer Cake: Similar to the print layer cake, this consists of 42 solid 10-inch squares. You will need thirty-six 10-inch solid squares for this project. These solid squares will provide a lovely contrast to your prints and help define the distinct “latte” layers within your quilt blocks.
- 7/8 Yard Background Fabric: This fabric will be used for strips that help define the blocks and provide negative space, enhancing the overall design. Choosing a solid or a subtle tone-on-tone print for your background can make your main blocks truly pop.
- 5/8 Yard Binding Fabric: The binding is the finishing touch that frames your quilt and protects its edges. Select a fabric that complements your quilt top, either by matching a color, adding a contrasting pop, or using a unifying print.
- 4 Yards Backing Fabric: The backing is the bottom layer of your quilt. You can choose a single fabric for a cohesive look or piece together leftover fabrics for a scrappy back. Consider something soft and comfortable, as this will be against the skin.
Precise Cutting: The Foundation of Your Quilt
Accurate cutting is paramount in quilting; it ensures that all your pieces fit together perfectly, resulting in crisp points and straight seams. Take your time with this step, use a sharp rotary cutter, and ensure your ruler is securely placed before making each cut. Precision here will save you frustration later when you’re piecing your blocks together.
Preparing Your Print & Solid Squares
You’ll begin by taking your carefully selected 10-inch print and solid squares and breaking them down into the smaller components needed for your units. Remember to trim carefully for the most accurate results.
- From thirty-six 10″ print squares:
- Cut each 10″ square into two 4″ squares. This will yield a total of 72 pieces, which we’ll refer to as Fabric A.
- Cut each 10″ square into two 3½” squares. This will yield a total of 72 pieces, which we’ll refer to as Fabric B.
- From thirty-six 10″ solid squares:
- Cut each 10″ square into two 4″ squares. This will yield a total of 72 pieces, which we’ll refer to as Fabric C.
- Cut each 10″ square into one 3½” x 9½” rectangle. This will yield a total of 36 pieces, which we’ll refer to as Fabric D.
Cutting Background & Binding Fabric
Next, you’ll prepare your background and binding fabrics. “WOF” stands for “Width of Fabric,” which is typically 42-44 inches wide after selvages are trimmed.
- From your 7/8 yard background fabric:
- Cut seven 3½” x WOF strips. These strips will be designated as Fabric E.
- From your 5/8 yard binding fabric:
- Cut seven 2½” x WOF strips. These strips will be designated as Fabric F. These will be sewn together later to create your continuous binding strip.
Step-by-Step Latte Quilt Construction
With all your fabrics precisely cut and organized, you’re ready to dive into the exciting part: assembling your quilt! Throughout the following steps, remember the importance of a consistent ¼-inch seam allowance. This is crucial for ensuring your blocks come out to the correct size and fit together neatly. Use an accurate quilting foot on your sewing machine if you have one, and always press your seams carefully to achieve flat, professional-looking blocks.
Step 1: Building Espresso and Cappuccino Units
To begin, ensure all your fabric pieces are labeled and readily accessible. We’ll start by creating the foundational half-square triangles (HSTs) that add dynamic angles to our design. Take one Fabric A (a 4-inch print square) and one Fabric C (a 4-inch solid square). Place them right sides together, ensuring their edges are perfectly aligned. Using a fabric-friendly pen or pencil, draw a diagonal line from one corner to the opposite corner on the back of one of the squares (it doesn’t matter which one, but consistency helps). This line will be your guide.
Now, sew a ¼-inch seam allowance away from this drawn diagonal line on both sides. Once both seams are sewn, carefully cut along the original drawn diagonal line, separating the two stitched sections. Open these units up and press the seams open or to the darker fabric, whichever you prefer, to create two perfectly formed half-square triangles. Trim any “dog ears” (small triangular bits of fabric extending beyond the square) and square up each HST to 3½ inches. You will need a total of 144 of these HSTs, so repeat this process until all your Fabric A and C squares are transformed.
Next, we will assemble the “espresso units.” For each espresso unit, take one Fabric B (a 3½-inch print square) and place it in the middle of two of your newly made half-square triangles. The solid portion of the HSTs should face inwards towards the Fabric B square, creating a pleasing contrast. Sew these three components together with a ¼-inch seam allowance, pressing your seams as you go. You will create 72 of these espresso units.
Finally, we move on to the “cappuccino units.” Take two of your completed espresso units. Position them side-by-side, and then place one Fabric D (a 3½-inch x 9½-inch solid rectangle) on top of them, aligning the long edges. The Fabric D rectangle will span across the two espresso units. Sew these pieces together with ¼-inch seams. This combination will form one complete cappuccino unit. You will need to make 36 of these cappuccino units in total.
Step 2: Assembling Latte Units and Completing Your Quilt Top
Now that you have all your cappuccino units ready, it’s time to bring the “latte” design to life. To form a “latte unit,” you will combine four cappuccino units. Lay out these four units in a 2×2 grid, much like a traditional four-patch block. Pay very close attention to the orientation of each unit – specifically the white (or solid) part of the design. You will rotate every other unit to create the distinctive swirling pattern that defines the latte block. Experiment with the rotation until you achieve the visual effect shown in the tutorial or pattern. This rotation is key to forming the elegant, interconnected look of the final quilt.
Once you are satisfied with the arrangement, sew the two top cappuccino units together, and then sew the two bottom cappuccino units together, using your consistent ¼-inch seam allowance. Press these horizontal seams open or to one side to reduce bulk. Then, join these two rows of cappuccino units together to complete one full latte unit. When joining these larger units, try to nest your seams (aligning the pressed seams so they lock together) to ensure your points match up perfectly. Press the final seam of the latte unit. Repeat this process until you have created all your latte units.
With all your latte units completed, the next stage involves assembling them into rows. Lay out your finished latte units according to the quilt layout provided in the free pattern, forming horizontal rows. Carefully sew the latte units within each row together, maintaining that crucial ¼-inch seam allowance. Once all the units for a row are joined, press the seams in alternating directions for adjacent rows. For example, press seams in Row 1 to the right, Row 2 to the left, Row 3 to the right, and so on. This technique helps seams “nest” when you join the rows, reducing bulk and allowing for flatter, more precise intersections.
Finally, sew these completed rows together, one by one, to construct your full quilt top. Take your time, matching up the intersections of your blocks as precisely as possible. Pinning generously at these points can be very helpful. Once all the rows are sewn together, give your entire quilt top a final, thorough press. Step back and admire your beautiful Layer Cake Latte Shortcut Quilt top! It’s now ready for the next steps of quilting, batting, backing, and binding to become a finished masterpiece.
Tips for a Perfect Layer Cake Latte Shortcut Quilt
To ensure your Layer Cake Latte Quilt turns out beautifully, here are a few expert tips that can enhance your quilting experience and results:
- Pressing Matters: Don’t underestimate the power of a good iron! Pressing seams after each step, rather than just ironing, helps set the stitches and flatten your blocks. Consider “pressing open” for less bulk, especially where multiple seams meet, or “pressing to the dark side” to prevent lighter fabrics from showing through.
- Accurate Seam Allowance: A consistent ¼-inch seam allowance is the golden rule in quilting. Even a slight variation can cause blocks to be misaligned. Use a dedicated ¼-inch quilting foot for your sewing machine, or measure precisely from your needle to ensure accuracy.
- Chain Piecing: To speed up your assembly, especially when making numerous identical units like HSTs or espresso units, try chain piecing. Sew one unit, then without cutting the thread, feed the next unit directly under the needle. This saves time and thread.
- Stay Organized: With many small pieces, it’s easy to get confused. Use small containers or trays to keep cut pieces labeled (Fabric A, B, etc.), and arrange your assembled units on a design wall or floor before sewing them into rows.
- Test Your Stitch: Before you begin sewing your actual quilt pieces, do a quick test stitch on a scrap of fabric to ensure your machine’s tension is correct and your stitches are even.
Fabric Selection: Unleash Your Creativity
While the traditional “latte” palette of creams, browns, and warm neutrals is undeniably charming for this quilt, don’t be afraid to experiment with your fabric choices to make this project uniquely yours. The beauty of the Layer Cake Latte Shortcut Quilt pattern lies in its adaptability. Imagine a version made with vibrant jewel tones against a crisp white solid for a modern aesthetic, or perhaps a collection of soft floral prints paired with a light grey for a delicate, romantic feel. Holiday-themed fabrics could transform it into a festive wall hanging or lap quilt.
Consider the contrast between your print and solid layer cakes. A strong contrast will make the geometric design pop, while a more subtle difference will create a softer, more blended look. Think about the scale of your prints too; a mix of large and small patterns can add visual depth. By thoughtfully selecting your fabrics, you can dramatically alter the mood and style of your finished quilt, ensuring it perfectly suits your taste or the recipient’s preferences.
Beyond the Quilt Top: Finishing Your Masterpiece
Once your Layer Cake Latte Shortcut Quilt top is complete, you’ve achieved a significant milestone! However, the journey isn’t quite over. To transform your quilt top into a cozy, finished quilt, you’ll need to add a few more layers and steps. This includes preparing your quilt sandwich by layering the backing fabric, a layer of batting (for warmth and dimension), and your quilt top. These layers are typically basted together to prevent shifting during the quilting process.
Next comes the actual quilting, which involves stitching through all three layers to secure them together and add texture. This can be done by hand or machine, with various techniques from simple straight lines to intricate free-motion designs. Finally, the binding, made from your Fabric F strips, is sewn around the perimeter of the quilt, neatly encasing all the raw edges and providing a beautiful, durable finish. While this tutorial focuses on the quilt top, remember these subsequent steps are vital for creating a truly finished and lasting quilt.
Your Next Quilt Project Awaits: The Layer Cake Latte Quilt!
Embarking on the Layer Cake Latte Shortcut Quilt project is more than just making a quilt; it’s an opportunity to create something truly special with your own hands. This pattern from Fat Quarter Shop provides an accessible and enjoyable path for quilters of all levels to create a stunning, coffee-inspired masterpiece. Whether you’re drawn to its beginner-friendly approach, the speed of its “shortcut” construction, or the appealing aesthetic of its latte-themed blocks, this quilt promises a satisfying creative experience.
So, gather your beautiful layer cakes, set up your sewing space, and get ready to stitch up a storm. Don’t forget to grab the free pattern and watch the detailed video tutorial provided by Fat Quarter Shop to guide you every step of the way. We can’t wait to see your finished Layer Cake Latte Shortcut Quilt – a cozy, handmade addition to your home or a heartfelt gift for someone special. Happy quilting!