
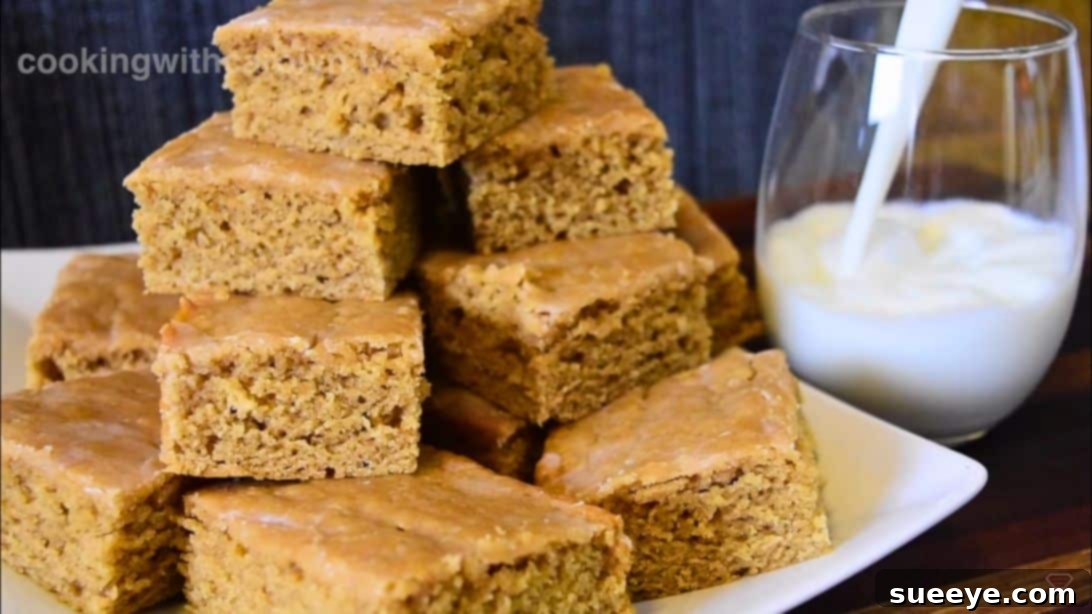
Rediscover a Timeless Treat: The Classic LA School Peanut Butter Bread Recipe
Step back in time and savor the taste of nostalgia with this iconic old-school recipe. Decades ago, students across Los Angeles schools eagerly lined up for a slice of this delightful peanut butter bread. It wasn’t just a simple breakfast item; it was a beloved staple, a comforting start to the day that forged lasting memories. Now, thanks to the wonderful guidance from CookingWithCarolyn, you can recreate that exact taste and experience right in your own kitchen. This isn’t just a recipe; it’s a journey back to simpler times, a delicious piece of history that brings smiles and fond recollections.
Alongside other cafeteria favorites like the beloved coffee cake (check out this No-Bake Cold Coffee Cake Recipe), the LA School Peanut Butter Bread held a special place in many hearts. Its unique texture and unmistakable flavor made it an instant hit, and its simplicity ensured it was a consistent feature on school menus. Whether you remember it from your own school days or are simply curious about this legendary treat, preparing it at home is a truly rewarding experience. It’s surprisingly easy to make, calling for basic pantry ingredients, and the result is a tender, flavorful loaf that’s perfect for any time of day.
Why This Old-School Peanut Butter Bread Still Charms Hearts
The allure of the LA School Peanut Butter Bread isn’t just about its delicious taste; it’s deeply rooted in its simplicity, accessibility, and the wave of nostalgia it brings. For many, it represents a cherished part of their childhood, a comforting and reliable treat in the bustling environment of school. What makes this recipe truly stand out is its straightforward approach – anyone, regardless of their baking experience, can achieve fantastic results at home.
Moreover, this recipe is remarkably versatile. While the classic version uses peanut butter and whole milk, it’s easily adaptable for various dietary preferences. Looking for a healthier twist? Almond butter and almond milk are excellent substitutions, offering a slightly different flavor profile while maintaining that desirable moist texture. Some enthusiasts even sprinkle chopped peanuts on top before baking for an extra crunch and intensified peanut flavor. Enjoy a slice with your morning coffee for a satisfying start, pair it with a tall glass of cold milk for a classic snack, or even serve it as a light dessert. If you’re a peanut butter aficionado, this treat is an absolute must-try!
The Authentic LA School Peanut Butter Bread Ingredients
Crafting this nostalgic bread requires a straightforward list of ingredients, most of which you likely already have in your pantry. Using room temperature ingredients is key for a smooth, well-combined batter, leading to a perfectly textured loaf.
For the Classic Peanut Butter Bread:
- 4 tablespoons (1/2 stick) Unsalted Butter: Ensure it’s at room temperature for easy creaming. Unsalted butter allows you to control the overall saltiness of the bread.
- 1 1/4 cups Turbinado Sugar: This coarser sugar adds a subtle caramel note and a slight chewiness. However, regular granulated white sugar works perfectly well as a substitute, maintaining the classic sweetness.
- 1 1/4 cups Creamy Peanut Butter: Opt for a standard creamy peanut butter for the authentic texture. While natural peanut butter can be used, its oil separation might require extra mixing for consistency.
- 2 Large Eggs: Also at room temperature. Eggs act as a binder, provide structure, and contribute to the richness and moisture of the bread.
- 2 teaspoons Pure Vanilla Extract: A good quality vanilla extract elevates all the flavors in the bread, adding warmth and depth.
- 2 1/4 cups All-Purpose Flour: The foundation of our bread, providing structure and body.
- 1 3/4 teaspoons Baking Powder: This leavening agent is crucial for giving the bread its rise and a light, airy texture.
- 1/4 teaspoon Fine Sea Salt: A small amount of salt balances the sweetness and enhances the overall flavor profile of the bread.
- 12 ounces (approx. 1 1/2 cups) Milk: 2% or whole milk is recommended for richness. Room temperature milk incorporates more easily into the batter.
For the Simple Sweet Glaze (Optional but Recommended!):
- 3/4 cup Powdered Sugar (Confectioners’ Sugar): Essential for a smooth, lump-free glaze.
- 3 tablespoons Milk: Any milk (2% or whole) works here, used to achieve the desired drizzle consistency.
Important Notes & Easy Substitutions:
- Peanut Butter Alternatives: If you have a peanut allergy or simply prefer other flavors, almond butter, cashew butter, or even sunflower seed butter can be used as a 1:1 substitute. Be mindful that the flavor profile will shift, but the texture should remain similar.
- Milk Alternatives: Almond milk, soy milk, or oat milk can be used in place of dairy milk, making this recipe more accessible for those with lactose intolerance or seeking a dairy-free option.
- Adjusting Sweetness: If you prefer to skip the icing and enjoy a less sweet bread, increase the sugar in the bread batter to 1 1/2 cups (instead of 1 1/4 cups). This ensures the bread itself is adequately sweet without the additional glaze.
Step-by-Step Guide: How to Make LAUSD Peanut Butter Bread at Home
Creating this classic treat is a straightforward process that yields incredibly delicious results. Follow these steps carefully to ensure your homemade peanut butter bread is just as good, if not better, than you remember!
Step 1: Prepare Your Oven and Pan
Begin by preheating your oven to 350°F (175°C). This ensures the oven is at the correct temperature when the bread goes in, which is crucial for even baking and proper rise. While the oven preheats, prepare a 9 x 13-inch baking dish. Lightly spray the entire interior of the dish with a non-stick baking spray or grease it with butter and dust with flour. This prevents the bread from sticking and ensures easy removal after baking.
Step 2: Sift and Combine Dry Ingredients
In a large mixing bowl, combine the all-purpose flour, baking powder, and salt. It’s highly recommended to sift these ingredients together. Sifting helps to aerate the flour, break up any lumps, and ensures that the leavening agent and salt are evenly distributed throughout the mixture. This step contributes to a lighter, more uniform crumb in your finished bread. Once sifted, set this bowl aside.
Step 3: Cream the Wet Ingredients
In the bowl of a stand mixer fitted with the paddle attachment, or a large mixing bowl if using a hand mixer, add the room temperature butter, turbinado sugar (or granulated sugar), and creamy peanut butter. Beat these ingredients together on medium speed for about 3 to 4 minutes. The goal is to achieve a light, fluffy, and well-combined mixture. This creaming process incorporates air into the butter and sugar, which is vital for the bread’s texture.
Step 4: Incorporate Eggs and Vanilla
With the mixer still running on low speed, add the eggs one at a time, allowing each egg to fully incorporate into the mixture before adding the next. This ensures a stable emulsion. Once both eggs are mixed in, add the pure vanilla extract and mix until just combined. Be careful not to overmix at this stage; you just want to ensure everything is homogenous.
Step 5: Alternate Dry and Wet Additions
Now, it’s time to bring the dry and wet ingredients together. Add approximately half of the sifted dry ingredients to the wet mixture in the mixer bowl. Mix on low speed until just incorporated, stopping as soon as no dry streaks are visible. Next, pour in all of the milk. Mix until the milk is mostly combined. Stop the mixer occasionally and use a rubber spatula to scrape down the sides and bottom of the bowl, ensuring everything is thoroughly mixed. Finally, add the remaining half of the dry mixture. Mix on low speed *just* until combined. It’s crucial not to overmix the batter at this stage, as overmixing can develop the gluten in the flour, resulting in a tough or dense bread. The dough should be slightly thick and uniform.
Step 6: Bake the Peanut Butter Bread
Carefully transfer the prepared dough into your greased 9 x 13-inch baking dish. Use a spatula or the back of a spoon to gently spread the dough evenly across the bottom and into all the corners of the pan. Place the dish into your preheated oven and bake for approximately 20 to 25 minutes. Begin checking for doneness around the 20-minute mark. To test, insert a clean toothpick into the center of the bread. If it comes out clean or with only a few moist crumbs attached, the bread is ready. If it comes out wet, continue baking for a few more minutes and test again.
Step 7: Cool the Bread Properly
Once baked, remove the bread from the oven and let it cool in the baking pan for about 5 minutes. This allows the bread to set slightly and makes it easier to handle. After 5 minutes, carefully invert the bread onto a wire cooling rack. Allow it to cool completely on the rack. Cooling completely is important not only for structural integrity but also for the icing to set properly without melting.
Step 8: Prepare and Drizzle the Icing
While the bread cools, prepare your simple glaze. In a small bowl, whisk together the powdered sugar and milk until the mixture is completely smooth and free of lumps. You’re looking for a consistency that is thick enough to drizzle but still pourable. If it’s too thick, add a tiny bit more milk (1/2 teaspoon at a time); if too thin, add a bit more powdered sugar. Once the bread is fully cooled, generously drizzle the icing over the top. Allow the icing to set for a few minutes before slicing into squares. Serve and enjoy this timeless LA school treat!
Expert Tips for Perfect Old-School Peanut Butter Bread
Achieving that perfect, tender, and flavorful peanut butter bread is easy with a few key baking tips:
- Room Temperature Ingredients are Essential: Butter, eggs, and milk at room temperature emulsify better, creating a smoother, more uniform batter and preventing curdling. This leads to a finer, more tender crumb.
- Accurate Measuring: Baking is a science! Use proper measuring cups and spoons. For flour, spoon it into your measuring cup and level it off with a straight edge to avoid packing too much in, which can result in a dry bread.
- Don’t Overmix the Batter: Especially after adding the flour, mix only until the dry ingredients are just incorporated. Overmixing develops gluten, which can make your bread tough and chewy instead of tender.
- Scrape Down the Bowl: Regularly scrape the sides and bottom of your mixing bowl while creaming butter and sugar and after adding liquids. This ensures all ingredients are fully combined and no pockets of unmixed batter remain.
- Prepare Your Pan Thoroughly: A well-greased and floured pan (or one sprayed with baking spray) is crucial for easy release. Nothing is more frustrating than a delicious bread stuck to the pan!
- Test for Doneness Reliably: The toothpick test is your best friend. Remember that ovens can vary, so the baking time is a guideline. Always trust the toothpick!
- Cool Completely Before Icing: Applying icing to warm bread will cause it to melt and run off, creating a mess instead of a beautiful glaze. Patience is key for that perfect finish.
Delicious Variations and Serving Suggestions
While the classic LA School Peanut Butter Bread is perfect as is, you can easily customize it to suit your preferences or add new twists:
Variations:
- Chocolate Chip Peanut Butter Bread: Fold in 1/2 to 1 cup of mini chocolate chips or regular chocolate chips with the dry ingredients for a delightful chocolatey addition.
- Nutty Crunch: For extra texture and peanut flavor, sprinkle 1/2 cup of finely chopped roasted peanuts or other nuts (like walnuts or pecans) over the top of the batter before baking.
- Different Nut Butters: Experiment with almond butter, cashew butter, or even sunflower seed butter for unique flavor profiles. Just ensure they are creamy varieties for the best texture.
- Spiced Peanut Butter Bread: Add 1/2 teaspoon of ground cinnamon or a pinch of nutmeg to the dry ingredients for a warm, spiced flavor.
- Swirled Jam: After spreading the batter in the pan, dollop spoonfuls of your favorite fruit jam (like grape or strawberry, a classic pairing with peanut butter!) over the top and gently swirl with a knife before baking.
- Chocolate Glaze: Instead of a vanilla milk glaze, create a simple chocolate glaze by whisking powdered sugar with cocoa powder and a little milk.
Serving Suggestions:
- Classic Breakfast: Enjoy a warm slice with a cup of coffee, tea, or a glass of cold milk.
- Afternoon Snack: It’s a perfect pick-me-up during the day.
- Dessert Treat: Serve it slightly warm with a scoop of vanilla ice cream for an indulgent dessert.
- Toasted: Some enjoy toasting a slice and spreading a little extra butter or jam on it.
- Pack for Lunch: Just like in school cafeterias, it makes a great addition to a packed lunch.
Storage Instructions
To keep your homemade LA School Peanut Butter Bread fresh and delicious for as long as possible, follow these simple storage guidelines:
- Room Temperature: Store the bread in an airtight container at room temperature for up to 3-4 days. This helps maintain its moisture and prevents it from drying out.
- Refrigeration: While not strictly necessary, you can refrigerate the bread in an airtight container for up to a week, especially if your kitchen is particularly warm or humid. Be aware that refrigeration can sometimes slightly alter the texture, making it a bit firmer.
- Freezing for Longer Storage: This bread freezes beautifully! Once completely cooled, wrap individual slices or the entire loaf tightly in plastic wrap, then again in aluminum foil. Store in a freezer-safe bag or container for up to 2-3 months. Thaw at room temperature or gently warm in the microwave or oven before serving.
Frequently Asked Questions (FAQs)
- Q: Can I use natural peanut butter for this recipe?
- A: Yes, you can, but you might need to adjust the consistency slightly. Natural peanut butter tends to be oilier and can sometimes make the batter a bit looser. If using natural peanut butter, make sure it’s well stirred to combine any separated oil before measuring. You might also find the bread has a slightly different, denser texture.
- Q: My bread came out dry. What went wrong?
- A: Dry bread is often a result of overmixing the batter (developing too much gluten) or overbaking. Ensure you mix the dry ingredients into the wet only until just combined, and always rely on the toothpick test rather than just the clock for doneness.
- Q: Can I make this recipe gluten-free?
- A: While we haven’t tested it, you can likely substitute the all-purpose flour with a 1:1 gluten-free baking flour blend. Look for a blend that contains xanthan gum for best results. The texture might be slightly different, but it should still be delicious.
- Q: How long does the bread stay fresh?
- A: Stored properly in an airtight container at room temperature, the bread typically stays fresh and moist for 3-4 days. It can last up to a week in the refrigerator.
- Q: Can I bake this in a loaf pan?
- A: Yes, you can! A 9×5-inch loaf pan would likely require a longer baking time, possibly 50-60 minutes or more, at 350°F (175°C). Make sure to use the toothpick test for accurate doneness, checking the center of the loaf.
- Q: What if I don’t have turbinado sugar?
- A: No problem! Regular granulated white sugar is a perfectly fine substitute and will yield delicious results. Turbinado sugar just adds a slightly coarser texture and a hint of molasses flavor.