
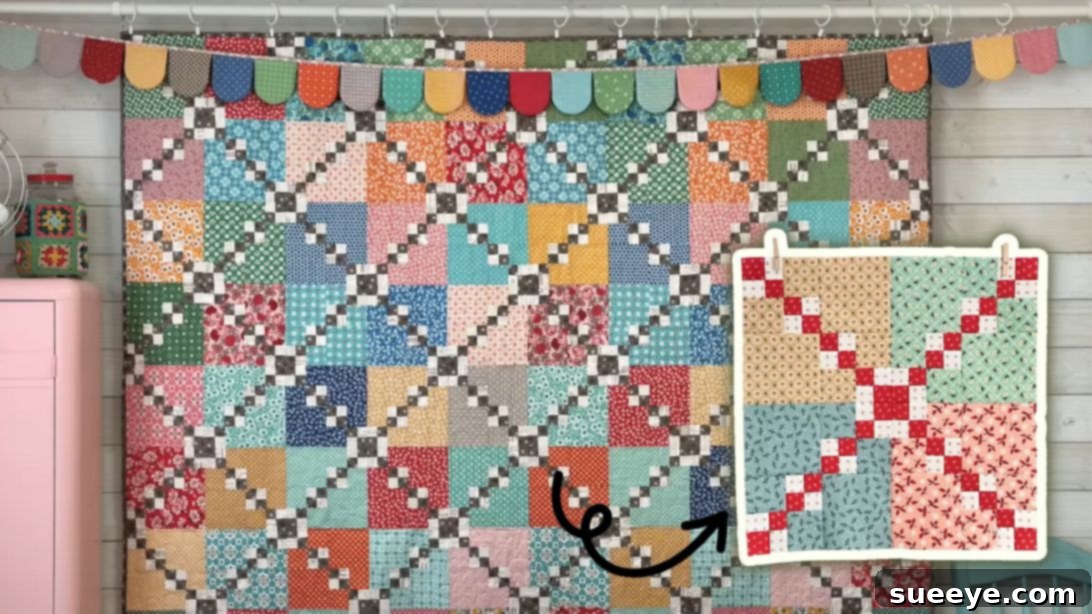
Embark on a delightful quilting journey with one of Lori Holt’s most charming and accessible designs: the Happy Trails Quilt Block. Lori Holt is renowned in the quilting community for her vibrant, whimsical patterns that infuse a sense of playfulness and creativity into every stitch. Her designs encourage quilters to experiment with colors and fabrics, making the process not just a craft, but a true form of artistic expression. The Happy Trails Quilt Block stands out as a particular favorite, especially for those new to the art of quilting, thanks to its straightforward construction and visually appealing checkerboard effect.
This block is a fantastic project for beginners looking to master fundamental quilting techniques, such as precise cutting, consistent seam allowances, and careful pressing. While seasoned quilters will appreciate its quick assembly and versatility for larger projects, its simplicity makes it an ideal starting point for anyone feeling intimidated by more complex designs. You’ll learn how to transform simple fabric strips and squares into an intricate-looking block that forms a striking pattern when multiple blocks are joined together. Prepare to fall in love with the process and the beautiful outcome!
Before you begin, ensure your sewing machine is in good working order and you have a fresh needle. A sharp rotary cutter, a self-healing mat, and a reliable quilting ruler will be your best friends for achieving accuracy. Gathering all your materials beforehand will streamline your workflow and make the creative process even more enjoyable. Let’s get started on creating your very own Happy Trails Quilt Block!
Materials: Crafting Your Happy Trails Quilt Block
Careful selection and preparation of your materials are key to a successful quilting project. For the Happy Trails Quilt Block, you’ll need a good contrast between your background and prominent colors to make the checkerboard effect truly pop. High-quality quilter’s cotton is always recommended for its durability and ease of handling.
For the Checkerboard Segments:
- Background Strips: 8 pieces, each 14 inches long. Choose a light, neutral, or subtle patterned fabric that will allow your prominent color to shine.
- Colored Strips: 8 pieces, each 14 inches long. Select a prominent, vibrant color or a striking print that will create a strong contrast with your background fabric.
Tip: Consider pre-washing and ironing your fabrics to prevent shrinkage and remove any sizing, ensuring consistent results.
For Each Background Square (You will make 4 blocks in total, each requiring these pieces):
- Large Background Squares: 2 pieces of 4 1/2″ squares. These will frame your checkerboard units.
- Small Background Squares: 4 pieces of 2 1/2″ squares. These act as cornerstones and connectors within the block.
Note: If you plan to make multiple blocks for a larger quilt, ensure you have enough yardage for all your desired units. For a complete 16″ block, you’ll need to repeat these measurements four times using four different prominent colors or variations of your chosen color palette for a diverse look.
Step-by-Step Guide to the Happy Trails Quilt Block
Follow these detailed instructions carefully to construct your Happy Trails Quilt Block. Remember, accuracy in cutting and a consistent quarter-inch seam allowance are the foundations of beautiful quilting.
Step 1: Preparing Your Checkerboard Strips
Begin by taking one of your 14-inch background strips and one of your 14-inch prominent colored strips. Place them right sides together, aligning the raw edges perfectly. Using your sewing machine, sew along one long edge with a precise quarter-inch seam allowance. This measurement is crucial in quilting, so make sure to maintain it consistently. Once sewn, carefully press the seam open. Pressing the seam open helps to reduce bulk, ensuring your block lays flat and square. Repeat this process for all 8 pairs of background and colored strips, creating 8 striped units. Next, take each striped unit and cut it into 8 segments, each 1 1/2″ wide. You will now have 64 small striped segments in total. Accuracy here is vital for the checkerboard effect.
Step 2: Assembling the Checkerboard Units
Now that you have your individual striped segments, it’s time to assemble them into small checkerboard squares. Take two of your 1 1/2″ wide segments. For the checkerboard pattern to emerge, one segment needs to be flipped so that its background color aligns with the prominent color of the other segment when placed side-by-side. Carefully align them, ensuring the striped patterns are reversed to create the desired checkerboard effect. Pin them if necessary for stability, then sew them together with a quarter-inch seam allowance. Once sewn, open the seams and press them flat. Repeat this process for all remaining segments. You should end up with 32 small checkerboard square units. These units will form the diagonal ‘trail’ in your block.
Step 3: Arranging the Diagonal Trail
Take eight of your newly created checkerboard square units. Lay them out on your workspace, arranging them into a diagonal line. The goal is to have the prominent color in the middle of this diagonal pathway. This means you need to be very mindful of the orientation of each checkerboard square. As you place each unit, ensure that the prominent color (from your colored strips) consistently faces towards the center line, creating a visually continuous diagonal ‘trail’. This step is crucial for achieving the signature “Happy Trails” look. Double-check your arrangement before proceeding to sew.
Step 4: Building the Quilt Block Around the Trail
This is where your block starts to take shape! You’ll now incorporate your background squares to frame the diagonal checkerboard trail. You will need four pieces of 2 1/2″ background squares and two pieces of 4 1/2″ background squares for each individual block you are constructing. First, take two of the 2 1/2″ squares and sew them together along one edge with a quarter-inch seam allowance. Press the seam open to reduce bulk. Flip this paired unit, then press the seam towards the solid (background) square. This helps in nesting seams later and ensures a tidy finish. Repeat this to create two identical paired units from your small squares.
Next, you’ll attach these small paired units to the sides of your diagonal checkerboard segment. Position the 2 1/2″ square units at the corners and along the sides of the diagonal trail you arranged in Step 3. The two 4 1/2″ squares will fill the remaining larger spaces. Carefully align the seams, paying special attention to where the diagonal segments meet the background squares. Sew the smaller 2 1/2″ squares together first, then attach them to the ends of your diagonal strip. Finally, sew the larger 4 1/2″ squares into place, creating the outer framework of your block. Make sure all seams are aligned perfectly. Press all seams open or towards the darker fabric to reduce bulk and ensure your block lies flat. At this point, your individual block should measure 8 1/2″ square, including seam allowances.
Step 5: Creating Multiple Blocks for a Full Quilt
The instructions up to Step 4 describe how to create a single 8 1/2″ square block. To create the full “Happy Trails” effect as intended by Lori Holt, you will need to repeat steps 1 to 4 three more times. This means you will ultimately create a total of four identical 8 1/2″ square blocks. If you are using different prominent colors for each set of strips, this is where your quilt will start to gain its unique color story and vibrancy. Consistency in each repetition is key to ensuring all four blocks will fit together seamlessly in the final assembly stage.
Step 6: Assembling the Final 16″ Quilt Block
Once you have four perfectly formed 8 1/2″ square blocks, it’s time to arrange and sew them together to form the larger 16″ square Happy Trails Quilt Block. Lay out the four blocks on your design wall or floor. Experiment with their orientation until they form a central square where the prominent colors meet, creating a larger, cohesive design. This arrangement is distinctive to the Happy Trails pattern and is where the “trail” truly becomes visible and impactful.
Once you are happy with the arrangement, sew the blocks together in pairs first. Take two adjacent blocks, place them right sides together, and sew along the common edge with a quarter-inch seam allowance. Press the seams open or towards the darker fabric to minimize bulk. Then, join these two paired units together to complete the 16″ square block. Again, ensure your quarter-inch seam allowance is consistent and your seams align precisely to avoid points being cut off or distortions. Carefully press the final seams. The finished Happy Trails Quilt Block should now measure a perfect 16″ square, ready to be incorporated into a larger quilt top or showcased on its own.
Beyond the Block: Tips for Successful Quilting
Mastering any quilt block requires patience and attention to detail. Here are some general tips to enhance your quilting journey:
- Accurate Cutting: Invest in a good rotary cutter, mat, and rulers. Always measure twice, cut once. Even a tiny deviation can throw off your block’s dimensions.
- Consistent Seam Allowance: The quarter-inch seam allowance is the holy grail of quilting. Practice sewing a perfect 1/4″ seam by using a quarter-inch foot or marking your machine bed.
- Pressing Matters: Don’t underestimate the power of proper pressing. Pressing seams open or to one side (usually the darker fabric) can make a huge difference in how your blocks lie flat and how well they join together.
- Chain Piecing: For repetitive steps, use chain piecing. This involves sewing multiple pieces in a continuous chain without cutting threads in between, saving time and thread.
- Test Block: If you’re new to a pattern, consider making a test block with scrap fabric first. It helps you work out kinks before committing to your good fabric.
Unleash Your Creativity: Variations and Project Ideas
The beauty of the Happy Trails Quilt Block lies not just in its simplicity but also in its versatility. Once you’ve mastered the basic block, the possibilities for customization are endless:
- Color Play: Experiment with different color palettes. Use analogous colors for a serene look, complementary colors for a bold statement, or a rainbow of hues for a vibrant, cheerful quilt.
- Fabric Prints: While a solid prominent color works wonderfully, try incorporating patterned fabrics. Small-scale prints or tone-on-tone fabrics can add texture and depth without overwhelming the design.
- Scrap Buster: This block is excellent for using up fabric scraps! The small pieces required make it perfect for utilizing those cherished remnants.
- Quilt Layouts: Once you have multiple 16″ Happy Trails blocks, consider various settings. You can arrange them in a straight set, alternate them with solid blocks, or rotate them to create even more intricate secondary patterns.
- Smaller Projects: A single Happy Trails block can be transformed into a charming cushion cover, a placemat, a tote bag panel, or even a mini wall hanging.
Happy Trails Quilt Block: A Rewarding Quilting Adventure
Congratulations! You’ve successfully navigated the joyful trails of creating Lori Holt’s Happy Trails Quilt Block. This project not only yields a beautiful, visually dynamic quilt block but also builds essential quilting skills that will serve as a foundation for countless future projects. From precise cutting to consistent seams and thoughtful pressing, each step contributes to the overall quality and aesthetic appeal of your work. The sense of accomplishment that comes from seeing your fabric pieces transform into a stunning design is truly unmatched.
Whether you’re crafting a single block for a small project or envisioning a large, intricate quilt, the Happy Trails design offers endless opportunities for creativity and personal expression. So, gather your fabrics, fire up your sewing machine, and get ready to enjoy the fulfilling world of quilting. Happy quilting, and may your trails always be happy!