
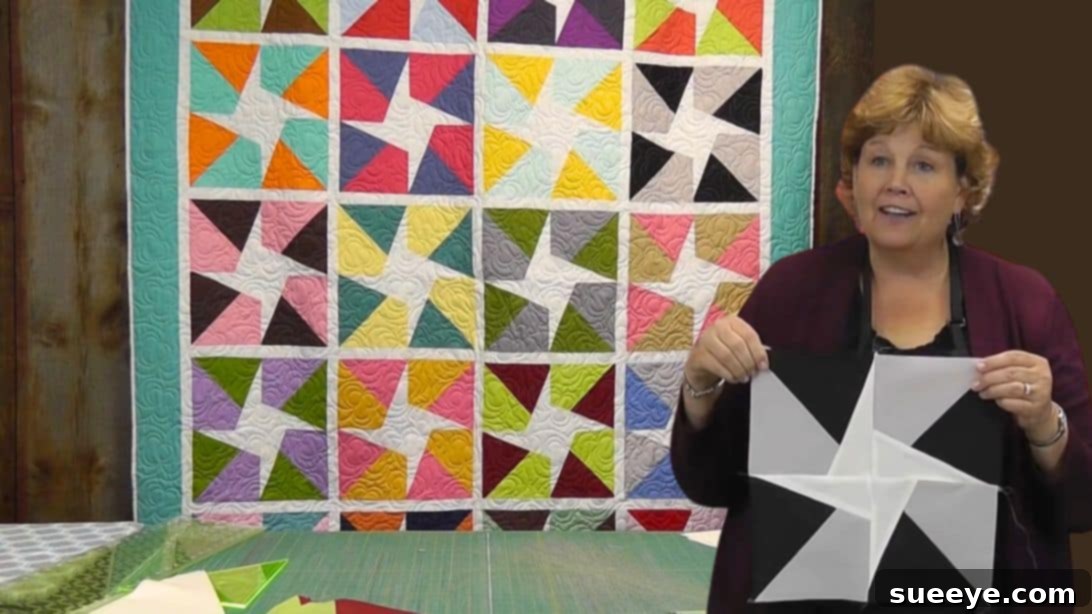
Are you searching for a quilt pattern that breaks away from the ordinary and truly captivates the eye? If your heart leans towards designs that are both dynamic and visually stunning, then the Wedge Star Quilt, a delightful creation from Missouri Star Quilt Company, is precisely what you need. This exquisite star pattern stands out with its intricate yet surprisingly accessible construction, diverging beautifully from traditional star blocks. It evokes the enchanting glow of celestial bodies scattered across a night sky, promising to be a showstopper that will garner numerous compliments and admiration.
The beauty of the Wedge Star Quilt lies not just in its compelling visual appeal but also in the ingenious techniques employed in its creation. With the guidance of quilting experts like Jenny Doan, even novice quilters can confidently embark on this journey. This pattern offers a refreshing take on star-themed quilts, making it a fantastic project for anyone looking to expand their quilting repertoire or simply create a piece that feels both classic and distinctly modern. Prepare to fall in love with a quilting process that is as rewarding as the finished product is breathtaking.
RELATED: Explore More Star Quilt Designs: Garden Stars Quilt With Jenny Doan
Unveiling the Wedge Star Quilt: A Unique Design Experience
The Wedge Star Quilt is a testament to how simple geometric shapes, when combined with thoughtful design, can create something truly extraordinary. Unlike conventional star patterns that often rely on squares and triangles, this design utilizes the specific angle of a wedge ruler to form radiating star points that give the quilt a wonderful sense of movement and depth. This technique allows for a more organic and flowing star shape, reminiscent of how light might shimmer from a distant star.
One of the most appealing aspects of this quilt is its versatility. While it shines brightly with high-contrast fabrics, creating a dramatic visual impact, it can also be softened with more subtle color palettes for a gentler, more ethereal feel. The method, popularized by Missouri Star Quilt Company, is renowned for its clear instructions and clever shortcuts, ensuring that even complex-looking patterns become manageable and enjoyable for quilters of all skill levels. It’s an ideal project for those who appreciate detailed designs but prefer a streamlined and efficient construction process.
What Makes the Wedge Star Quilt So Special?
- Distinctive Aesthetics: The unique wedge shape creates a star with radiating points, offering a sophisticated and eye-catching appearance that differentiates it from other star quilts.
- Accessible Techniques: Despite its intricate look, the pattern is broken down into manageable steps, making it achievable for confident beginners and experienced quilters alike.
- Design Versatility: Easily adaptable to various fabric choices and color schemes, allowing for endless customization to match any decor or personal style.
- Engaging Process: The cutting and piecing of the wedges are incredibly satisfying, leading to a sense of accomplishment with each block completed.
- High Compliment Factor: This quilt is a true showpiece that is sure to draw admiration and inquiries from friends and family.
Essential Tools and Materials for Your Wedge Star Quilt Journey
Embarking on the Wedge Star Quilt project requires a few key items that will significantly streamline your process and enhance your results. The most crucial of these is the wedge ruler, a specialized tool that transforms the cutting process from complicated to remarkably simple. Without this ruler, achieving the precise angles needed for the star points would be significantly more challenging, if not impossible for many.
For your fabric selection, pre-cut 10-inch squares, often sold as “layer cakes,” are highly recommended. These convenient fabric packs eliminate the need for extensive cutting at the start, allowing you to jump straight into the fun of piecing. Choosing a clear distinction between your solid (star point) fabrics and your background fabrics is key to making your stars pop. The contrast will define the star shape, making the design truly shine.
Materials You’ll Need:
- 10″ squares or layer cake (solids): Approximately 1-2 layer cakes (or 40-80 individual 10-inch squares) for the star points, depending on the desired quilt size. Opt for a variety of colors or a cohesive color story to create your unique design.
- 10″ squares or layer cake (background): An equal amount of 10-inch squares for the background of your blocks. A light, solid color like white, cream, or light grey will make your star points stand out beautifully, mimicking stars against the night sky.
- Wedge ruler: This specialized ruler (often a 10-degree or 22.5-degree wedge ruler, depending on the specific pattern variation) is indispensable for accurately cutting the wedge shapes. Its design allows for quick, repetitive, and precise cuts, which is vital for the intricate star points.
- Basic quilting supplies: Rotary cutter, cutting mat, quilting ruler, sewing machine, thread, iron, ironing board, fabric scissors, pins or wonder clips.
- Sashing fabric: For the strips between your finished blocks (e.g., 1 1/2″ wide strips). This helps frame each star and adds to the overall design cohesion.
- Border fabric: For the outer edges of your quilt (e.g., 4″ wide strips). This provides a polished finish and can anchor the entire design.
- Batting and backing fabric: To complete your quilt sandwich.
The choice of fabric colors is where your personal style truly comes to life. Imagine vibrant jewel tones against a crisp white background for a dynamic effect, or soft pastels for a more serene and dreamy quilt. The beauty of this pattern is its adaptability; it will look stunning with almost any combination you choose, as long as there is sufficient contrast between the star and background fabrics.
Step-by-Step Guide: Crafting Your Own Wedge Star Quilt
Creating the Wedge Star Quilt is a journey of precision and creativity. Each step builds upon the last, culminating in a magnificent star block that forms the foundation of your quilt. Following these instructions carefully will ensure your star points align perfectly, creating a visually stunning effect. Remember, accuracy in cutting and a consistent 1/4-inch seam allowance are paramount for a professional finish.
Step 1: Preparing Your Half-Square Triangle Units
Begin by taking two solid 10-inch squares, which will eventually form part of your star points. Place these squares right sides together, aligning all edges perfectly. Using your sewing machine, stitch a precise 1/4-inch seam all the way around the outside edge of the sandwiched squares. This creates a secure perimeter that will hold the fabric pieces together during the next cutting phase. Ensure your stitches are even and consistent for the best results.
Step 2: Cutting and Pressing Half-Square Triangles
With your sewn square still intact, carefully cut it diagonally from corner to corner in both directions. This will yield four individual half-square triangle (HST) units from each original pair of squares. Once cut, take each HST unit and press them open. It’s crucial to press all of them in the same direction—either towards the darker fabric or towards the lighter fabric—to ensure consistent bulk and flatter seams later on. Stacking these pressed units, all facing the same direction, will help maintain organization and prepare them for the subsequent steps.
Step 3: Crafting the Wedge Shapes
Now, it’s time to create the distinctive wedge elements using your background fabric and the specialized wedge ruler. Stack four pieces of your background 10-inch squares neatly, ensuring they are perfectly aligned. Place your wedge ruler on top of the stacked squares, positioning it precisely according to the pattern’s guide (or as demonstrated in the accompanying visual aid). Make your first cut along the edge of the ruler. Then, reposition the ruler to the opposite side of the square and make your second cut. This technique efficiently yields multiple wedge pieces at once, saving significant time and ensuring uniformity. Precision here is key to achieving sharp star points.
Step 4: Preparing the Wedges for Attachment
Once your wedges are cut, take each individual wedge piece and fold it in half lengthwise. Press this fold firmly with a hot iron. This crease will serve as a crucial guide for sewing in the next step, ensuring accurate placement and a clean finish. The pressing also helps to set the fabric, making it easier to handle and preventing distortion as you attach it to the half-square triangle units.
Step 5: Attaching Wedges to Half-Square Triangles
Select one of your prepared half-square triangle units and one folded wedge. Align the folded edge of the wedge along the raw edge of the HST, positioning it carefully as shown in the pattern’s visual instructions (similar to the provided image below). The folded line of the wedge should guide your seam. Sew directly on this folded line, securing the wedge to the HST. After sewing, carefully fold the triangle back, away from the wedge, and trim off any excess fabric from the wedge beyond the seam line. Finally, open up the stitched edge and trim 1/4-inch away from the stitch line, ensuring a neat and consistent seam allowance. This creates the distinctive pointed tip of your star block.
Step 6: Repetition for Consistency
The beauty of quilting often lies in repetition. Continue to repeat steps 1 through 5 for all your remaining solid squares and background wedges. This systematic approach ensures that you produce a consistent number of identical star point units, which are essential for assembling your larger quilt blocks. Batching these steps can make the process more efficient and help maintain your sewing rhythm.
Step 7: Assembling the Star Blocks and Quilt Top
Once you have a sufficient number of completed star point units, it’s time to assemble them into full star blocks. Take four of these units and arrange them like a classic four-patch block, ensuring that the background fabric areas meet precisely in the middle. This arrangement will reveal the full star design. Carefully sew these four units together, paying close attention to your 1/4-inch seam allowance and matching the seams at the center for a crisp star point. Repeat this process until all your star blocks are complete.
With your individual star blocks ready, you can now begin to assemble your quilt top. Start by adding 1 1/2-inch sashing strips in between each block. Sashing not only provides a visual break between blocks, allowing each star to stand out, but also helps to square up your quilt top and can add an additional design element. Finally, once your blocks are sashed and sewn into rows, and your rows are joined, add a generous 4-inch wide border around the entire perimeter of your quilt. The border frames your design beautifully, giving it a finished, polished look and providing an opportunity to incorporate another coordinating fabric.
Once the quilt top is assembled, layer it with your chosen batting and backing fabric, quilt as desired, and bind the edges to complete your stunning Wedge Star Quilt!
Design Tips and Customization for Your Wedge Star Quilt
The Wedge Star Quilt is a fantastic canvas for creative expression. While the core pattern provides a solid foundation, there are countless ways to infuse your personality into the design through fabric choices, color placement, and finishing touches. Consider these tips to make your quilt truly unique:
- Color Play: Experiment with your fabric selections. Instead of just two contrasting colors, try using a gradient of colors for your star points, transitioning from light to dark or cool to warm hues. This can create a dazzling, dimensional effect. Alternatively, use scrappy 10-inch squares for your star points for a wonderfully eclectic and vibrant quilt.
- Background Variations: While a solid background allows the stars to pop, a subtly patterned background (like a tone-on-tone print or a very small geometric) can add texture and interest without detracting from the main design.
- Sashing and Border Impact: The sashing and border are more than just functional elements; they are integral design components. A contrasting sashing color can make your blocks stand out even more, while a border in a complementary shade can tie the entire quilt together. Consider using a pieced border for an extra touch of complexity.
- Quilting Designs: The quilting itself can enhance the star motif. Straight-line quilting within the star points can emphasize their angularity, while a swirling or stippled pattern in the background can add softness and movement, mimicking the night sky.
- Size Adjustments: This pattern is easily scalable. Adjust the number of blocks you create to make a smaller throw, a twin-sized quilt, or even a king-sized masterpiece. Remember to adjust your fabric requirements accordingly.
Embracing these design possibilities will not only make your Wedge Star Quilt a reflection of your personal style but also elevate it into a cherished heirloom.
The Enduring Appeal of the Wedge Star Quilt with Jenny Doan
The enduring popularity of the Wedge Star Quilt, especially through tutorials from Jenny Doan and Missouri Star Quilt Company, stems from its ability to merge stunning design with approachable techniques. Jenny Doan has a remarkable talent for breaking down complex quilting patterns into simple, digestible steps, making ambitious projects feel entirely achievable for her vast audience. Her clear, encouraging teaching style has demystified quilting for countless individuals, empowering them to create beautiful heirlooms.
This particular Wedge Star pattern is a prime example of Missouri Star’s philosophy: innovative designs made accessible. By leveraging tools like the wedge ruler and focusing on efficient cutting and piecing methods, Jenny ensures that the joy of quilting is maximized and frustration is minimized. The result is a quilt that looks intricately complex but is surprisingly straightforward to construct, leaving quilters with a profound sense of accomplishment and a truly magnificent finished piece.
Whether you’re a seasoned quilter looking for a fresh star pattern or a beginner eager to tackle a project that yields impressive results, the Wedge Star Quilt is an excellent choice. It combines the visual drama of a radiant star with the satisfying process of precision piecing, all under the expert guidance of one of quilting’s most beloved instructors. Dive into this project, enjoy the process, and soon you’ll have a stunning Wedge Star Quilt that will be cherished for years to come.