
Jelly Roll Race 3.0 Quilt: The Ultimate Guide for Beginners and Beyond
Have you been searching for an exciting yet incredibly simple quilting project? Look no further than the phenomenal Jelly Roll Race Quilt. This innovative and speedy pattern has revolutionized how quilters, especially beginners, approach quilt making. Originating from the brilliant minds at Missouri Star Quilt Company, popularized by the beloved Jenny Doan, this quilt uses pre-cut 2.5-inch fabric strips, famously known as “jelly rolls,” to create a stunning finished product in an astonishingly short amount of time. If you’re new to quilting or simply need a quick, satisfying project, the Jelly Roll Race Quilt is your perfect match.
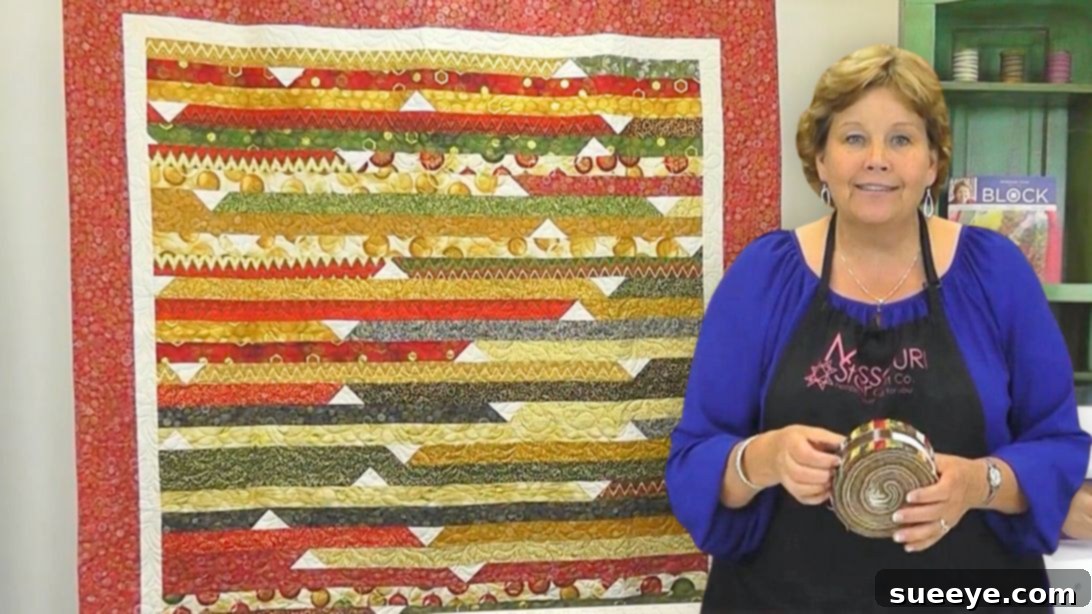
What makes this pattern so captivating is its simplicity and speed. Many quilters boast about finishing an entire quilt top in under an hour, earning it the affectionate “race” moniker. Today, we’re diving into an exciting evolution of this classic: the Jelly Roll Race 3.0. This version introduces a charming twist with added triangles between each strip, elevating the visual appeal and adding a touch of sophisticated flair without sacrificing the ease of construction. It’s the ideal pattern for a beautiful, last-minute quilt that looks far more complex than it actually is.
RELATED: Explore another fantastic project: Jelly Roll Rug With Jenny Doan
For more jelly roll inspiration, don’t miss this one: Hidden Log Cabin Jelly Roll Quilt Pattern
What is a Jelly Roll Race Quilt?
Before we delve into the 3.0 version, let’s briefly understand the foundation. A “jelly roll” is a pre-packaged collection of 40-42 fabric strips, each precisely cut to 2.5 inches wide by the width of the fabric (WOF), typically around 42-44 inches long. These strips are curated from a single fabric line, ensuring a beautifully coordinated color palette and design. The original Jelly Roll Race Quilt involves sewing all these strips together, end-to-end, to create one incredibly long super-strip. This super-strip is then folded, cut, and sewn repeatedly to form the quilt top in a rapid, almost assembly-line fashion. The beauty lies in its randomness and the way the fabrics interact to create a unique, dynamic design every time.
The Jelly Roll Race 3.0: An Enhanced Classic
The Jelly Roll Race 3.0 takes the beloved original concept and elevates it with a subtle yet impactful design element: strategically placed triangles. While the core “race” methodology remains, these small additions between the strips create a delightful secondary pattern, adding depth and visual interest that sets it apart from its predecessors. This version is perfect for those who love the speed and simplicity of the race quilt but desire a little extra touch of design sophistication. It’s still incredibly beginner-friendly, proving that adding intricate details doesn’t necessarily mean adding complex steps.
Why Choose the Jelly Roll Race 3.0 Quilt?
Beyond its charming aesthetic, the Jelly Roll Race 3.0 offers a multitude of benefits:
- Unbelievable Speed: True to its name, you can literally sew the quilt top in under an hour once your fabrics are prepared. It’s the ultimate instant gratification project!
- Perfect for Beginners: If you’re new to quilting, this pattern is a fantastic starting point. It teaches basic straight-line sewing, consistent seam allowances, and the satisfaction of finishing a large project quickly, building confidence for more complex endeavors.
- No Complex Cutting: Since you’re using pre-cut jelly roll strips, the most time-consuming part of quilting – precise fabric cutting – is already done for you. This means less measuring and more sewing!
- Effortless Fabric Coordination: Jelly rolls come pre-packaged with perfectly coordinated fabrics, eliminating the guesswork of choosing colors and prints that work well together.
- Versatile Design: The final look of your quilt is largely determined by the jelly roll you choose. From vibrant modern prints to subdued traditional patterns, the possibilities are endless. The added triangles in the 3.0 version offer another layer of customization with your background fabric choice.
- Ideal for Gifts: Need a last-minute baby shower gift, a cozy housewarming present, or a heartfelt holiday offering? The quick turnaround time of the Jelly Roll Race 3.0 makes it an excellent choice for handmade gifts.
Easy Jelly Roll 3.0 Quilt Materials
To embark on your Jelly Roll Race 3.0 quilting adventure, gather these essential materials. Remember, the estimated finished size for this quilt is approximately 70 by 75 inches, a generous throw size perfect for snuggling.
- One Jelly Roll Package: This is your star component! Choose a jelly roll with colors and patterns that speak to you. A typical jelly roll contains 40-42 strips, each 2.5 inches by the width of the fabric (WOF).
- 1 Yard of Background Fabric (e.g., White Fabric): This fabric will be used to create the signature triangles for the 3.0 version. White offers a crisp contrast that makes your jelly roll strips pop, but you can also experiment with other light neutrals or even a contrasting color for a bolder effect.
- 1 Yard of Border Fabric: This fabric will frame your quilt top, giving it a polished and finished look. You can choose a fabric that complements your jelly roll, matches your background fabric, or introduces a new accent color.
Additional Essential Quilting Supplies:
While not listed in the original materials, these tools are indispensable for any quilting project and will ensure a smooth process:
- Sewing Machine: A reliable machine with a 1/4-inch quilting foot is highly recommended for consistent seams.
- Rotary Cutter, Mat, and Ruler: For precise trimming and cutting of your background and border fabrics.
- Iron and Ironing Board: Essential for pressing seams flat, which contributes significantly to the neatness and accuracy of your quilt.
- Coordinating Thread: A good quality polyester or cotton thread that matches or blends with your fabrics. A neutral gray or beige often works well.
- Fabric Scissors: For snipping threads and minor fabric adjustments.
- Pins or Wonder Clips: To hold fabric strips securely in place before sewing.
- Seam Ripper: Every quilter needs one – just in case!
How to Make Jelly Roll 3.0 Quilt: A Step-by-Step Guide
Follow these detailed steps to create your beautiful Jelly Roll Race 3.0 Quilt. Precision in pressing and consistent seam allowances are key to a successful outcome.
Step 1: Prepare Your Jelly Roll Strips
Carefully open your package of jelly rolls. Unroll each strip and lay them flat on your work surface. Take a moment to admire the coordinated fabrics. While you don’t necessarily need to pre-wash jelly rolls (many quilters prefer not to as it can fray the edges), ensure they are smooth and wrinkle-free. If any strips are slightly creased, a quick press with a warm iron will help.
Step 2: Trim Selvage Edges
Take two jelly roll strips and stack them together, aligning the raw edges. Identify the selvage edges (the tightly woven edges that often have small white dots or manufacturer information). Using your rotary cutter, mat, and ruler, carefully trim off the selvage edge from both ends of the stacked strips. This ensures a clean, usable edge for consistent seam allowances. Repeat this process for all remaining jelly roll strips, stacking them in pairs to save time.
Step 3: Prepare Background Fabric for Triangles and Borders
From your chosen background fabric (e.g., white), you will need to cut strips for the triangles and potentially for an inner border if desired. The original design specifies:
- Cut four (4) strips measuring 2.5 inches by the full width of the fabric (WOF). These wider strips will be used to cut the individual triangle pieces.
- From these 2.5″ x WOF strips, you will then cut individual 2.5″ x 4″ rectangles. You will need approximately 40 of these 2.5″ x 4″ pieces to create a triangle between each of your 40 jelly roll strips. The original mentioned “10 pieces” in the materials, but for a triangle between *each* strip, you’ll need one piece per junction. So, cutting around 40 pieces from your 2.5″ x WOF strips is a good target.
From your border fabric, cut four (4) strips measuring 5 inches by the full width of the fabric (WOF). These will form the outer border of your quilt. Set these aside for later.
Step 4: Crafting the First Triangle Element
This is where the Jelly Roll Race 3.0 truly distinguishes itself. Pick up your first jelly roll strip. Now, take one of your prepared 2.5″ x 4″ background rectangles. Place this small rectangle on one end of your working jelly roll strip, right sides together. Position it vertically so that one 2.5-inch side of the rectangle is aligned with the end of your jelly roll strip, and the bottom edge of the rectangle is even with the bottom edge of the strip.
Using a fabric pen or pencil, draw a diagonal line from the outer corner of the rectangle down to the inner corner of the jelly roll strip (where the rectangle meets the strip’s bottom edge). Alternatively, you can fold the rectangle over to create a crease line and use that as your sewing guide. Sew precisely along this diagonal line.
Once sewn, trim off the excess fabric, leaving a 1/4-inch seam allowance. Press the seam open or towards the darker fabric (the jelly roll strip in this case) to make the triangle “pop out.” This creates your first decorative triangle element.
Step 5: Attaching Subsequent Triangles and Joining Strips
Now, take your next jelly roll strip. On one end of this new strip, you will attach another 2.5″ x 4″ background rectangle, following the same diagonal sewing technique as in Step 4. You’ll essentially be preparing one end of each jelly roll strip with a triangle.
Once you have a triangle on one end of your second strip, you’re ready to join it to your first strip. Place the end of the second strip (the one with the newly sewn triangle) onto the first strip (the one you’re currently working with). Position them right sides together, creating a 90-degree angle. Ensure the top edges of both strips are aligned.
Sew a diagonal seam from the inside top corner (where the two strips meet at a right angle) to the bottom outside corner of the overlapping fabric. Similar to Step 4, you can fold the fabric to create a crease as a sewing guide. Trim off the excess fabric beyond a 1/4-inch seam allowance and press the seam open or towards the darker fabric. This unique sewing method is what creates the “triangle between each strip” effect.
Repeat this process for every one of your jelly roll strips: prepare one end of a new strip with a triangle, then attach it to the growing super-strip using the 90-degree angle method. You will create one continuous, very long strip with beautiful triangle accents as you go.
Step 6: Creating the Continuous Loop and Racing Your Quilt Top
Once you have sewn all your jelly roll strips together, end-to-end, with the triangles incorporated, you will have one incredibly long super-strip. This is where the “race” truly begins!
First, cut approximately 18 inches off one end of this super-long strip. This small cut is important because it staggers your seams, preventing them from stacking up in the same spot when you start sewing in rounds, which can create bulk. Now, take the newly cut end and place it right sides together with the original beginning end of your super-strip, creating a massive loop. Sew these two ends together with a consistent 1/4-inch seam allowance.
You now have a giant, elongated fabric loop. Take this loop and fold it in half lengthwise, aligning the raw edges carefully. Start sewing along this raw edge with a 1/4-inch seam allowance. As you sew, you are essentially creating two parallel strips. Continue sewing all the way around the loop until you reach the point where you started. Once you’ve completed this seam, you will have a wider fabric loop that is half the length of your original loop, but twice as wide.
Without cutting your thread, if possible, or after a brief pause, repeat the process: fold this new, wider loop in half lengthwise again, aligning the raw edges. Sew along this raw edge with a 1/4-inch seam allowance. Continue to cut the loop in half (or simply fold and align, then sew) and sew until your quilt top reaches the desired width (approximately 70 inches). You will be amazed at how quickly your quilt top grows!
Step 7: Adding the Borders
Once your quilt top is the desired size, it’s time to add the borders using the 5-inch WOF strips you cut earlier. First, measure the length of your quilt top and cut two border strips to that exact length. Sew these to the two longer sides of your quilt top. Press the seams towards the border. Next, measure the width of your quilt top (including the newly added side borders) and cut your remaining two border strips to this length. Sew these to the top and bottom of your quilt. Press the seams towards the border. This completes your quilt top.
Step 8: Quilting and Binding (The Finishing Touches)
While the steps above complete your quilt top, a finished quilt requires three layers: the top, batting (the fluffy middle layer), and backing fabric. These layers are held together by quilting stitches, and then the raw edges are finished with binding.
- Prepare the Quilt Sandwich: Lay your backing fabric face down, then place the batting smoothly on top, and finally, center your finished quilt top face up on the batting. Secure these layers together with basting pins, spray basting, or long hand stitches.
- Quilt It: You can quilt your project yourself on a home sewing machine (using a walking foot is highly recommended for even feeding) with simple straight lines, a meandering design, or more intricate free-motion quilting. Alternatively, you can send it to a professional long-arm quilter.
- Add Binding: Once quilted, trim the excess batting and backing fabric even with the quilt top. Create binding strips (typically 2.5 inches wide, sewn together to form one long strip) and attach them around the perimeter of the quilt. Hand-stitch or machine-stitch the binding to the back for a clean finish.
Tips for Success with Your Jelly Roll Race 3.0 Quilt
- Consistent Seam Allowance: A 1/4-inch seam allowance is critical for accurate block construction and ensuring your quilt pieces fit together perfectly. Use a 1/4-inch foot on your sewing machine if you have one.
- Pressing is Key: Pressing seams after each step (not ironing, which stretches fabric) helps your quilt lie flat and contributes to accuracy. For this pattern, pressing seams open or towards the darker fabric (as suggested in the steps) can create a crisp look.
- Chain Piecing: To speed up the process even further, use chain piecing. Don’t cut your thread between sewing short seams when joining your jelly roll strips. Simply feed the next set of strips under the needle directly after the previous one.
- Choose Your Jelly Roll Wisely: The aesthetics of your quilt will largely depend on your jelly roll. Consider the overall mood you want to convey – bright and cheerful, calm and serene, or bold and modern.
- Safety First: Always use caution when working with a rotary cutter. Keep your fingers away from the blade and use a sharp blade for clean cuts.
Caring for Your Finished Quilt
Once your beautiful Jelly Roll Race 3.0 Quilt is complete, proper care will ensure it lasts for years to come. Machine wash on a gentle cycle with cold water, using a mild detergent. Avoid harsh chemicals or bleach. Tumble dry on low heat or air dry flat to prevent shrinkage and preserve the colors. A good soak with color catchers for the first wash can also help prevent any dye bleeding.
Variations and Customization
While the Jelly Roll Race 3.0 offers a unique look, don’t hesitate to experiment!
- Background Fabric: Instead of white, try a light gray, cream, or even a subtle patterned fabric for your triangles.
- Border Play: Experiment with different border widths or add multiple borders using complementary fabrics.
- Size Adjustments: To make a larger quilt, you can simply use two jelly rolls and combine them into one extra-long super-strip before starting the “race” steps. For a smaller quilt, you could use fewer strips.
- Quilting Designs: The simplicity of the quilt top makes it an excellent canvas for custom quilting designs, from simple meandering to intricate custom motifs.
Jelly Roll Race 3.0 Quilt With Jenny Doan
The techniques presented here draw heavily from the innovative and approachable methods championed by Jenny Doan and the Missouri Star Quilt Company. Their video tutorials are an invaluable resource for visual learners, breaking down complex steps into simple, manageable actions. While this guide provides comprehensive written instructions, watching Jenny demonstrate these steps can further enhance your understanding and confidence, particularly for the unique triangle piecing and the “racing” technique.
Start Your Quilt Race Today!
The Jelly Roll Race 3.0 Quilt offers a delightful blend of speed, simplicity, and sophisticated design. It’s a testament to how creative variations can breathe new life into beloved patterns. Whether you’re making your first quilt or simply enjoying the meditative rhythm of quick piecing, this project promises a rewarding experience and a beautiful, cozy finished product. Gather your jelly roll, set up your machine, and get ready to race your way to a stunning quilt!