
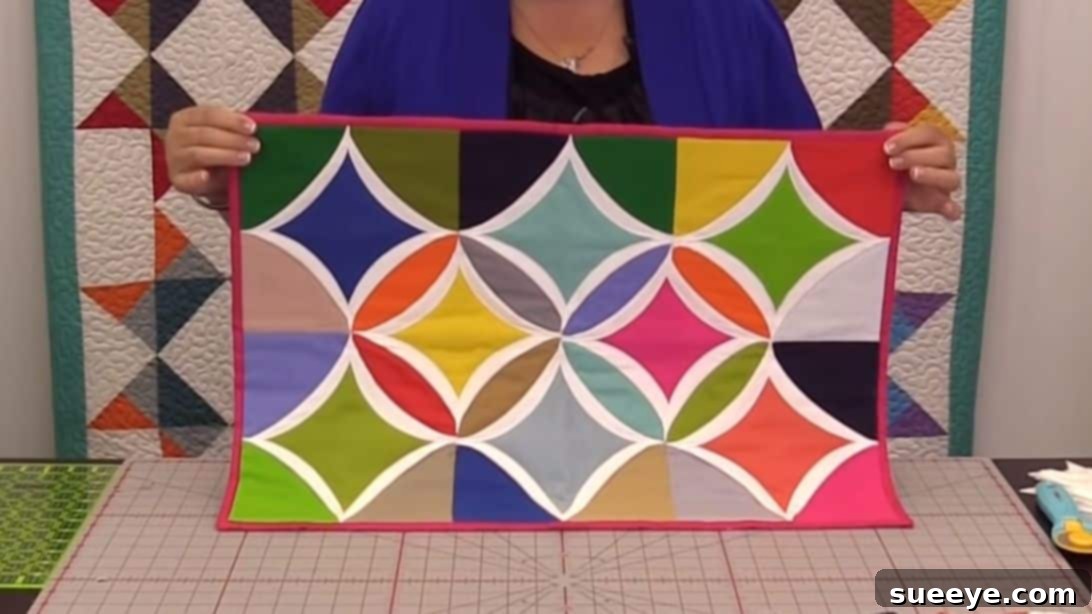
There are moments in life that spark profound creativity, and for me, one such moment unfolded during an early morning visit to a magnificent church. As I stepped through its grand entrance, my gaze was immediately drawn to the majestic cathedral windows. The morning sun, low and golden, streamed directly through the vibrant blue and yellow stained-glass panels, casting an ethereal glow across the entire sanctuary. It was a truly magical experience, filling the space with color and light, reminiscent of a meticulously crafted masterpiece. This breathtaking spectacle instantly ignited an idea for my next quilting project. I wanted to capture that same sense of awe and radiant beauty in fabric, transforming the celestial light of the windows into a tangible, cozy creation.
Driven by this inspiration, I embarked on a search for sewing projects that could replicate the distinctive charm and stained-glass effect of cathedral windows. It wasn’t long before I stumbled upon a fantastic, easy-to-follow Cathedral Window Quilt tutorial by the renowned Missouri Star Quilt Company. The design presented in their video was a perfect resemblance of what I envisioned – a classic quilting technique that creates a stunning three-dimensional look. I was absolutely thrilled; the moment I saw it, I knew this was the pattern I had to create. The joy of discovering a project that so perfectly aligns with a personal muse is truly unmatched in the world of quilting art. If you, too, are captivated by the elegance of cathedral windows and wish to create your own exquisite quilt, you’re in the right place. This guide will walk you through the process, building upon the excellent foundation provided by Missouri Star Quilt Company, ensuring you can bring this beautiful DIY quilt to life. Prepare to transform simple fabric squares into a timeless work of art that will illuminate your home and warm your heart. Happy quilting!
Essential Materials for Your Cathedral Window Quilt
Embarking on any quilting journey begins with gathering your supplies. For this stunning Cathedral Window Quilt, the materials are surprisingly straightforward, making it an accessible project for both novice and experienced quilters. Here’s a detailed list of what you’ll need to create your own piece of fabric art:
- 1 Pack of 5″ Fabric Squares (Charm Packs): These are often called “charm packs” in the quilting world and contain precisely cut 5-inch squares of various coordinating fabrics. The beauty of using pre-cut squares is the convenience they offer, saving you valuable time on cutting. For your cathedral window effect, consider a pack with a vibrant assortment of colors and patterns that will pop against your background. Think about how different colors will interact to create that stunning stained-glass illusion. If you prefer, you can also cut your own 5-inch squares from your favorite yardage, allowing for even greater customization in your handmade quilt.
- 1 Pack of 5″ White Fabric Squares: These white squares are crucial as they form the “windows” or the frame around your colorful fabric, enhancing the cathedral effect. The crisp white provides a beautiful contrast, allowing your chosen colors to truly shine. Opt for a good quality white or off-white solid fabric that will hold its shape well when pressed and sewn. Like the colored squares, these can be purchased as charm packs or cut from yardage.
- Quilt Batting: Batting is the soft, fluffy layer sandwiched between your quilt top and backing. It provides warmth, loft, and helps to give your quilt its finished texture and drape. There are various types of batting available, including cotton, polyester, wool, or blends. Cotton batting is a popular choice for its breathability and natural feel, while polyester can offer more loft. Choose a batting type that suits the desired warmth and thickness of your finished fabric art project. Ensure you have enough to cover the entire size of your assembled quilt top.
- Backing Fabric: The backing fabric is the material on the underside of your quilt, providing a finished look and adding durability. While it’s often hidden, a thoughtfully chosen backing can elevate your quilt’s overall appeal. You can select a wide-back fabric (which is usually 108 inches wide) to avoid piecing, or you can piece together standard width fabrics to create a unique back. Consider a fabric that complements your quilt top’s colors and patterns but doesn’t necessarily have to match perfectly. It’s a wonderful opportunity to add another layer of visual interest to your custom quilt.
In addition to these core materials, ensure you have your standard sewing tools readily available: a sewing machine with a fresh needle, good quality thread (matching your fabrics or a neutral color like white/grey), a rotary cutter, a self-healing cutting mat, quilting rulers for precise measurements, fabric scissors, an iron and pressing mat, and plenty of pins. These tools will ensure accuracy and ease throughout your Cathedral Window quilting adventure.
Step-by-Step Instructions: Crafting Your Cathedral Window Quilt
Now that you have your materials ready, let’s dive into the exciting process of constructing your beautiful Cathedral Window Quilt. This technique might seem intricate at first glance, but by following these detailed steps, you’ll be amazed at how easily the stunning three-dimensional effect comes to life. Precision in cutting and sewing is key for the best results, so take your time and enjoy each stage of this creative sewing project guide.
Step 1: Constructing Your Colored Base Block
Begin by selecting four distinct 5″ fabric squares from your colored charm pack. These will form the colorful center of your cathedral windows. Arrange them in a 2×2 grid on your workspace, experimenting with different color and pattern combinations until you find an arrangement that pleases your eye. The goal is to create a harmonious blend that will pop through the white frames. Once satisfied with your layout, sew the squares together in pairs first. Take the top left square and sew it to the top right square with a precise 1/4″ seam allowance. Repeat this for the bottom two squares. Press the seams open or to one side, whichever you prefer, to reduce bulk. Then, join the two resulting rows, again using a 1/4″ seam allowance, carefully aligning your seams at the center point to ensure a perfect square block. Press this final seam open as well. This completed 4-patch block forms the foundation of one ‘window’ unit.
Step 2: Preparing and Placing the White Window Frames
Next, take four of your 5″ white fabric squares. For each white square, fold it in half diagonally and press firmly to create a crisp crease. This fold is crucial as it will define the inner curve of your cathedral window. Now, carefully position one folded white square onto each of the four colored squares of your newly assembled block. The raw edges of the folded white squares should align with the raw edges of your colored block, with the top corner of each white triangle pointing towards the center of the block. This arrangement will create a distinctive diamond shape in the very center of your block, framed by the white fabric. Use pins to secure each white triangle in place, ensuring they don’t shift as you move to the next step. This precision will guarantee perfectly formed “windows.”
Step 3: Assembling the Block with White Frames
With your white triangles pinned in place, it’s time to sew the block together. Just as you did in Step 1, you’ll sew this larger block in two stages to maintain accuracy. First, sew the upper two units (the top left colored square with its white triangle and the top right colored square with its white triangle) together along their inner edges, using a 1/4″ seam allowance. Repeat this for the bottom two units. Once these two halves are sewn, carefully press the seams open to reduce bulk and help the fabric lie flat. This is particularly important for this pattern to ensure a smooth finish. Now, align the two completed halves, making sure your center seams match up perfectly, and sew them together with a 1/4″ seam. Press this final horizontal seam open. You now have a single, beautifully framed block, ready for the signature cathedral window effect.
Step 4: Creating the Dimensional Cathedral Window Effect
This is where the magic truly happens, transforming your flat block into a three-dimensional window. Take one of your colored squares that is visible beneath the white fabric. You will now create the curved “pane” for this window. Gently fold one of the white edges of the folded triangle toward the center of the block, creating a graceful curve. The folded edge should neatly cover the seam line of the colored square beneath it, creating a smooth, rounded arch. Secure this fold with a pin. Take your block to the sewing machine and stitch precisely along the very edge of this curved fold. As you reach the corner or pivot point, stop with your needle down, lift your presser foot, pivot the fabric to align with the next white edge, fold that second white edge towards the center to create another curve, and continue sewing along its edge. Repeat this process for all four white edges surrounding the colored square. The result will be a beautiful, raised windowpane effect, with the colored fabric peeking through like stained glass. This technique is applied to each of the four colored squares within the block, bringing the first individual cathedral window to life.
If you’re aiming to construct a larger and more intricate Cathedral Window Quilt, perhaps a throw or even a bed quilt, you’ll need to create multiple units of these individual blocks. For a stunning medium-sized quilt, we recommend making six of these blocks, but with a slight variation: do not sew down the white edges of the individual colored squares yet. These edges will be stitched down later as part of the overall quilting process. Once you have your six un-stitched blocks, it’s time for assembly. Arrange them into two rows, with three blocks in each row, ensuring the colored centers are aligned to your aesthetic preference. Secure these rows together with pins, then sew them with a 1/4″ seam allowance, pressing seams open. Now, sew the two rows together, again with a 1/4″ seam, taking care to align your seams perfectly to create a cohesive quilt top. At this stage, you’ll notice that the unique arrangement creates two prominent diamond shapes in the very center of your assembled quilt top, where four white triangles meet. These are critical for the larger window effect. Take two additional white 5″ squares, fold them diagonally, and place them precisely on top of these central diamonds. Pin them securely. Now, carefully sew the columns of your quilt top together, incorporating these central white diamonds into the seams. Once the rows and columns are fully joined, your quilt top will be complete, featuring a beautiful matrix of framed colored squares and central white diamonds.
The next step involves preparing your quilt for the final quilting process: creating the quilt sandwich. Lay your backing fabric flat, wrong side up, smoothing out any wrinkles. Place your batting directly on top of the backing, centering it evenly. Finally, position your assembled quilt top on top of the batting, right side up, ensuring all layers are flat and perfectly aligned. Use safety pins or basting spray to secure all three layers together, preventing any shifting during the quilting process. Now, with your quilt sandwich ready, you can begin the delightful process of sewing down the white edges – just like you did for the single block. Carefully fold each white edge towards the center of its respective colored square, forming a graceful curve, and stitch precisely along the fold. This top-stitching will not only secure the white fabric but also quilt your three layers together, creating that iconic puffed, dimensional cathedral window effect. Take your time with each curve, using a coordinating thread color, to achieve clean, crisp lines. This meticulous stitching is what gives the Cathedral Window quilting technique its distinctive charm and heirloom quality. Continue this process for all the individual colored squares and the central white diamonds, until every “window” is framed and stitched. Once all the windows are complete, trim any excess batting and backing fabric, and bind your quilt using your preferred binding method to give it a neat, professional finish. You have now created a magnificent, unique DIY quilting masterpiece!
Jenny Doan’s Easy Cathedral Window Quilt: A Timeless Classic for Every Home
The Cathedral Window Quilt pattern is a true testament to the enduring appeal of traditional quilting techniques. What makes Jenny Doan’s approach from Missouri Star Quilt Company so exceptional is her ability to simplify complex-looking designs, making them accessible and enjoyable for quilters of all skill levels. Her “Easy Cathedral Window Quilt” tutorial demystifies this classic, allowing anyone to achieve a breathtaking result that mimics the intricate beauty of stained glass. This quilt isn’t just a collection of fabric squares; it’s a labor of love, a piece of art that tells a story, and a cozy addition to any living space. The unique construction creates a captivating three-dimensional effect, where each “window” seems to softly glow, inviting closer inspection. Imagine this stunning creation draped over a sofa, adding a vibrant splash of color to your living room, or as a comforting throw on a chilly evening. It makes for an incredibly thoughtful handmade gift, an heirloom in the making, or a proud display of your quilting skills. Embracing this project allows you to engage with a rich history of textile art while creating something truly unique and personal. So, gather your fabrics, fire up your sewing machine, and embark on this rewarding journey to craft your very own Jenny Doan-inspired Cathedral Window Quilt. The satisfaction of turning simple squares into such an elegant and intricate design is an experience every quilter cherishes, proving that with a little guidance and creativity, you can achieve remarkable results.