
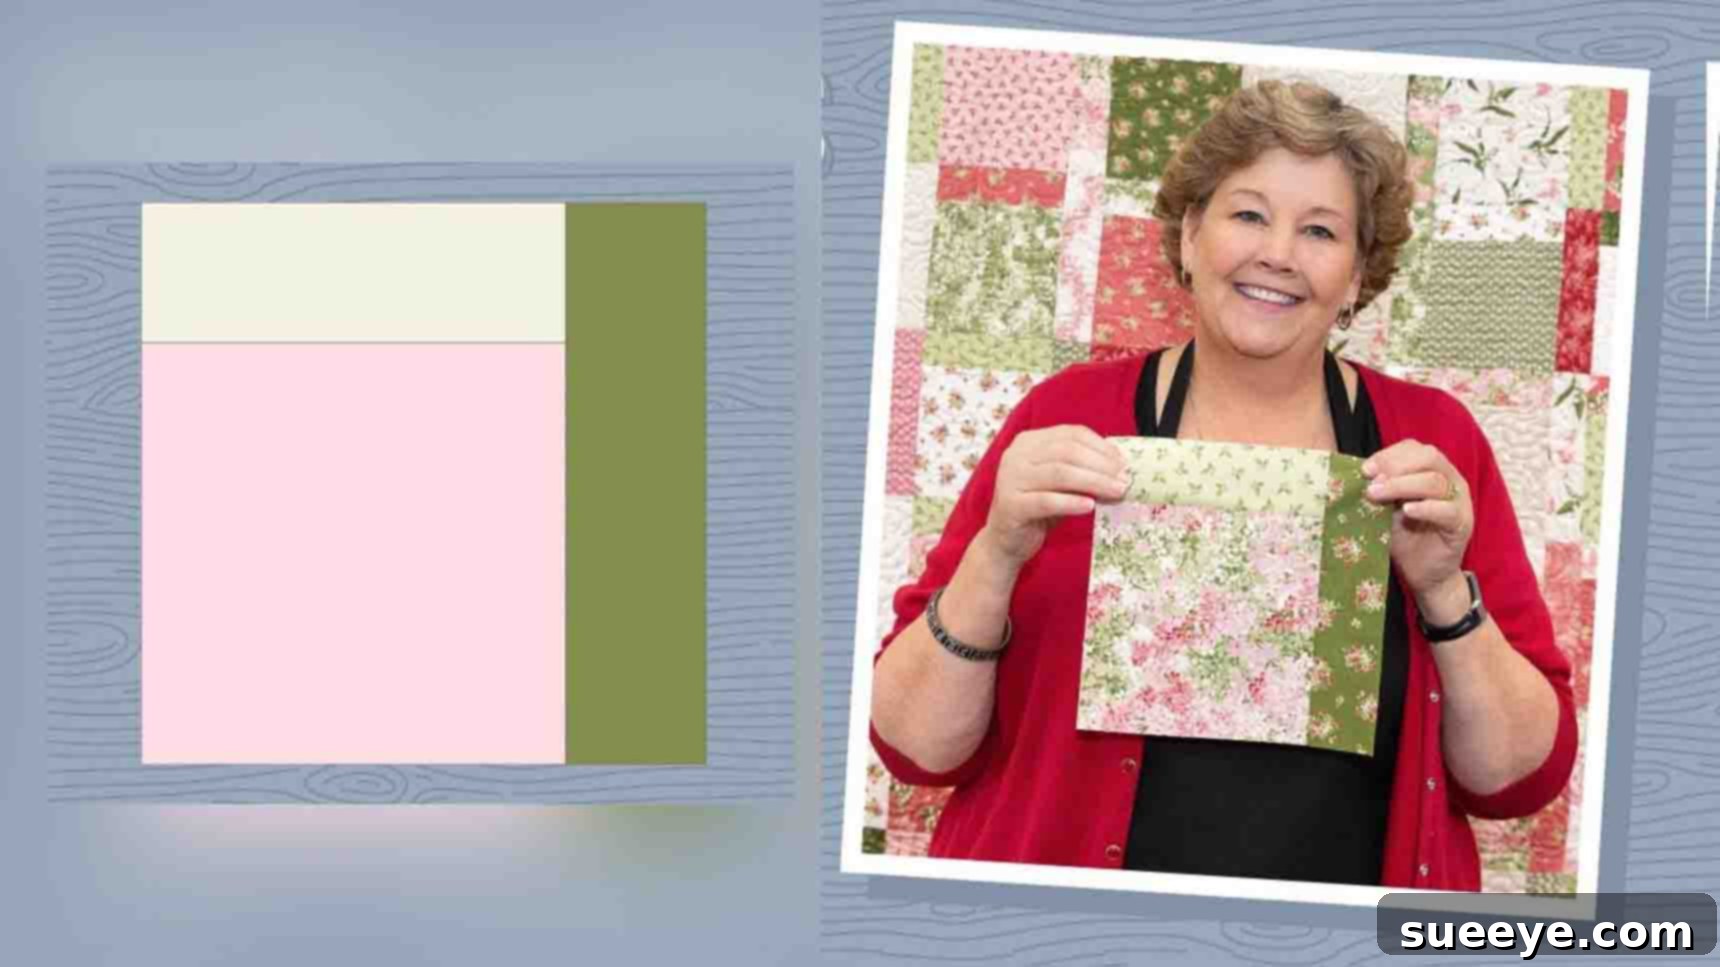
Mastering the Building Blocks Quilt: Your Perfect First Project
Welcome, aspiring quilter! If you’re eager to dive into the wonderful world of quilting but aren’t sure where to start, you’ve come to the right place. The “Building Blocks Quilt” is widely celebrated as an ideal first project, offering a fantastic blend of simplicity, versatility, and the opportunity to learn fundamental quilting techniques. Guided by the expertise of Jenny Doan from Missouri Star, this pattern is designed to build your confidence and create a stunning quilt that you’ll be proud of. Whether you envision a vibrant, scrappy masterpiece or a sleek, modern design, this pattern adapts beautifully to your personal style.
This comprehensive guide will walk you through every step of creating your own Building Blocks Quilt. We’ll cover essential tools, detailed instructions for cutting and piecing, and crucial tips to ensure your first quilting experience is enjoyable and successful. Get ready to transform a stack of fabric into a cherished handmade item!
Why the Building Blocks Quilt is Perfect for Beginners
There are countless quilt patterns available, but the Building Blocks Quilt stands out as a prime choice for newcomers for several compelling reasons:
- Simplicity in Design: The core of this quilt involves straightforward cutting and sewing of rectangular units, making it easy to grasp without complex techniques.
- Skill Building: While simple, it effectively teaches crucial quilting skills such such as accurate cutting, consistent 1/4-inch seam allowances, and proper pressing techniques – all vital for future projects.
- Pre-Cut Friendly: This pattern is perfectly suited for 10-inch print squares, often called “Layer Cakes.” Using pre-cuts saves significant time on initial cutting and often ensures a beautifully coordinated fabric palette, which is less overwhelming for beginners.
- Forgiving Nature: The “building block” style, especially when opting for a scrappy look, can be very forgiving of minor imperfections. This allows you to learn without the pressure of achieving absolute perfection on your very first try.
- Versatile Aesthetics: You can achieve vastly different looks simply by your fabric choices and how you arrange your blocks. Go bold and colorful, or serene and monochromatic – the design supports it all.
- Quick Gratification: Because the steps are manageable, you’ll see your quilt top come together relatively quickly, providing a wonderful sense of accomplishment and motivating you to continue your quilting journey.
Essential Materials for Your Building Blocks Quilt
Before you begin, gather all your materials. This list is designed for a finished quilt size of approximately 69″ x 78″. Remember, using good quality fabric and tools will significantly enhance your quilting experience.
For a 69″ x 78″ Quilt Size, You Will Need:
- 1 Package of 10″ Print Squares (Layer Cake): This typically contains 42 squares, offering a beautiful assortment of coordinated fabrics, perfect for a scrappy look.
- 3/4 Yard Inner Border Fabric: This fabric will frame your pieced quilt center, providing a subtle transition before the main outer border.
- 1 & 1/4 Yards Outer Border Fabric: The outer border adds significant size and a prominent frame to your quilt design. Choose a fabric that complements your 10-inch squares.
- 3/4 Yard Binding Fabric: This fabric will be cut into strips to create the binding, which finishes and protects the edges of your quilt.
- 5 Yards Backing Fabric: This will be the fabric for the back of your quilt. It’s often pieced together from wider yardage or can be a single, extra-wide fabric.
- Quilt Batting (approx. 73″ x 82″): This is the middle layer of your quilt, providing warmth and dimension. You’ll need a piece slightly larger than your quilt top.
Recommended Tools for Quilting Beginners:
- Sewing Machine: A basic machine capable of a straight stitch is all you need.
- Rotary Cutter: Essential for precise and efficient fabric cutting.
- Quilting Ruler (at least 6″ x 24″): A clear acrylic ruler for guiding your rotary cutter.
- Self-Healing Cutting Mat: Protects your work surface and extends the life of your rotary blade.
- Fabric Scissors: For general fabric trimming.
- Good Quality Thread: A neutral color (like white or light gray) often works well for piecing.
- Iron and Ironing Board: Crucial for pressing seams flat and accurately.
- Pins or Fabric Clips: To hold fabric pieces together before sewing.
- Seam Ripper: Every quilter needs one! It’s for carefully undoing stitches when mistakes happen (and they will!).
Step-by-Step Directions: Creating Your Building Blocks Quilt
Let’s get started on the fun part – bringing your quilt to life! Follow these detailed instructions carefully for the best results.
Step 1: Preparing Your Fabric Blocks – The Core of the Design
This initial step involves transforming your 10-inch squares into the unique “building block” units. Precision here will pay off in the final assembly.
- Layering and Initial Cuts:
- Take your package of 10-inch print squares. For efficiency and accuracy, layer about four squares at a time, making sure their edges are perfectly aligned. This saves time and ensures consistent cuts across multiple squares.
- Using your quilting ruler and rotary cutter, make your first cut: carefully trim a 2 & 1/2″ (2.5-inch) strip off one edge of the layered squares. Ensure your ruler is straight and you apply even pressure.
- Next, rotate your stack of squares by 90 degrees. Align your ruler and cut another 2 & 1/2″ strip off what is now the new “top” edge.
- Repeat this process for your entire pack of 10-inch squares. After these two cuts, each original 10-inch square will yield one 7 & 1/2″ square and two 2 & 1/2″ strips.
- Creating the Scrappy Borders:
- Now you have a collection of 7 & 1/2″ main squares and numerous 2 & 1/2″ strips. To achieve the “scrappy” building block look, it’s crucial to mix these up! Don’t put the strips back with their original squares.
- For each 7 & 1/2″ square, you will need two 2 & 1/2″ strips (one for the side and one for the top/bottom). Pick two different 2 & 1/2″ strips from your mixed pile. The more varied they are, the more dynamic your blocks will appear.
- Sewing the First Border Strip:
- Take one 7 & 1/2″ square and one of your chosen 2 & 1/2″ strips. Lay them right sides together, aligning one long edge of the strip with one edge of the 7 & 1/2″ square.
- Sew along this aligned edge using a consistent 1/4″ seam allowance. This seam allowance is standard in quilting and critical for your blocks to fit together correctly.
- After sewing, gently press the seam open or to one side (usually towards the darker fabric to prevent “shadowing”). Pressing is not ironing; gently lift and place your iron to flatten the seam without stretching the fabric.
- Attaching the Second Border Strip:
- With the first strip attached and pressed, you now have a rectangular unit. Take your second 2 & 1/2″ strip and lay it right sides together with the adjacent un-bordered side of your main 7 & 1/2″ square. It should form an “L” shape with the first border strip.
- Sew this second strip with a 1/4″ seam allowance.
- Press this seam as well. You will now have a building block unit with two 2 & 1/2″ strips attached to two perpendicular sides of the original 7 & 1/2″ square.
- Finally, trim any excess fabric from the ends of the 2 & 1/2″ strips so they are flush with the edges of your newly formed block. Your finished building block should now be approximately 9 & 1/2″ square.
- Repeat: Continue this process for all your 7 & 1/2″ squares until you have completed all your individual building blocks.
Step 2: Assembling Your Quilt Top – Layout and Piecing
With all your building blocks constructed, it’s time to arrange them into a cohesive quilt top. This is where your vision truly comes to life.
- Arranging Your Blocks:
- Find a large, flat surface – a design wall, a clean floor, or a large table – to lay out all your completed building blocks.
- The pattern calls for a layout of six blocks across and seven blocks down (6 x 7). Arrange your blocks in this grid.
- Pay close attention to contrast and color placement. Try to ensure that adjacent blocks have enough visual difference so the unique “building block” design is prominent. Step back frequently to view your layout from a distance. You can even take a photo of your layout to see it with fresh eyes.
- Experiment with rotating individual blocks. The border strips on each block create an interesting movement, and you can achieve different effects by changing their orientation.
- Sewing Blocks into Rows:
- Once you are satisfied with your layout, begin sewing the blocks together, one row at a time. It’s often helpful to keep your blocks in order by stacking them or using a design board.
- Take the first two blocks of your first row. Place them right sides together, aligning their edges.
- Sew along the shared edge with a precise 1/4″ seam allowance.
- Continue adding the remaining blocks to that row, one by one, always using a 1/4″ seam allowance.
- After completing each row, press the seams. For easier alignment when joining rows, it’s recommended to press the seams of alternating rows in opposite directions. For example, press seams in Row 1 to the right, seams in Row 2 to the left, Row 3 to the right, and so on. This allows the seams to “nest” together when you join the rows, creating perfectly matched intersections.
- Joining Rows Together:
- With all your rows sewn and pressed, it’s time to join them to form the full quilt top.
- Take the first two rows (Row 1 and Row 2) and place them right sides together. Carefully align all the seams where the blocks meet. Use pins liberally at these intersections to ensure they line up perfectly.
- Sew these two rows together using a 1/4″ seam allowance.
- Continue adding the remaining rows in the same manner, always pinning carefully at the seam intersections.
- Once all the rows are joined, give your entire quilt top a final, thorough press. This will flatten all the seams and ensure your quilt top lies beautifully flat.
Step 3: Adding the Borders – Framing Your Masterpiece
Borders add visual appeal, increase the quilt size, and provide a stable frame for your pieced center.
- Inner Border:
- Cut your 3/4 yard inner border fabric into 2 & 1/2″ wide strips. You will need enough strips to go around the entire perimeter of your quilt top. Sew strips together end-to-end (using a diagonal seam for less bulk) to create long continuous strips.
- Measure the length of your quilt top through the center. Cut two inner border strips to this exact length. Pin and sew one strip to each side of your quilt top using a 1/4″ seam. Press seams towards the border.
- Measure the width of your quilt top through the center (including the newly added side borders). Cut two inner border strips to this exact width. Pin and sew one strip to the top and one to the bottom of your quilt top. Press seams towards the border.
- Outer Border:
- Repeat the process for the outer border using your 1 & 1/4 yards of outer border fabric. You might choose a wider cut for your outer border strips (e.g., 4″ or 5″) to create a more substantial frame.
- Measure, cut, and attach the side outer borders first, then the top and bottom outer borders, just as you did with the inner border.
- Press all seams towards the border fabric for a crisp finish. Your quilt top is now complete!
Finishing Your Quilt: Basting, Quilting, and Binding
Completing a quilt involves three crucial steps after the top is pieced. These steps transform your pieced fabric into a durable, warm, and beautiful finished quilt.
Step 4: Basting Your Quilt Layers
Basting temporarily holds the three layers of your quilt (backing, batting, and quilt top) together so they don’t shift during the quilting process.
- Prepare Your Backing: If your backing fabric isn’t wide enough, seam two pieces together to create a piece larger than your quilt top (allow at least 4-6 inches extra on all sides). Press the seam open.
- Layering:
- Lay your backing fabric wrong side up on a clean, flat surface (floor or large table), smoothing out all wrinkles. Secure it in place with painter’s tape or clamps.
- Place your batting on top of the backing, centered, and smooth out any wrinkles.
- Finally, lay your quilt top right side up on top of the batting, centered and smooth. Ensure all layers are flat and wrinkle-free.
- Basting Method:
- Pin Basting: Use curved safety pins (specifically designed for quilting) and place them every 4-6 inches across the entire quilt, starting from the center and working outwards.
- Spray Basting: Use a temporary fabric adhesive spray to glue the layers together. Follow product instructions carefully, working in sections.
Step 5: Quilting Your Project
Quilting is the process of stitching through all three layers to secure them together and add texture and durability to your quilt. For beginners, simple straight-line quilting is often the easiest approach.
- Choose Your Design:
- Stitch-in-the-Ditch: Sew directly in the “ditch” (the seam line) created where your blocks or borders join. This is a subtle way to secure the layers.
- Straight Lines: Quilt parallel lines across your quilt, either horizontally, vertically, or diagonally. You can use your walking foot (highly recommended for quilting) and the edge of your presser foot or a quilting guide to keep your lines even.
- Quilting Process:
- Start quilting from the center of your quilt and work your way outwards. This helps prevent fabric shifting and puckering.
- Use a walking foot on your sewing machine if you have one; it helps feed all three layers evenly.
- Aim for consistent stitch length.
- When you finish quilting, remove all basting pins or allow spray baste to dissipate.
Step 6: Binding Your Quilt Edges
Binding is the final step that professionally finishes the raw edges of your quilt and protects them from wear.
- Trim and Square Up: After quilting, trim the excess backing and batting even with the edges of your quilt top using your ruler and rotary cutter. Make sure your quilt is square.
- Prepare Binding Strips:
- From your 3/4 yard binding fabric, cut 2 & 1/2″ wide strips across the width of the fabric.
- Sew these strips together end-to-end, usually with a diagonal seam, to create one continuous strip long enough to go around the entire perimeter of your quilt, plus about 10-12 inches extra. Press seams open.
- Fold the long binding strip in half lengthwise, wrong sides together, and press well.
- Attach Binding to Quilt:
- Starting on one side of your quilt (not a corner), align the raw edges of your folded binding strip with the raw edge of your quilt top. Leave a tail of about 8-10 inches of binding free.
- Sew the binding to the quilt using a 1/4″ seam allowance. When you reach a corner, stop 1/4″ from the edge, backstitch, and cut your thread. Fold the binding strip up at a 45-degree angle, then fold it back down, aligning the raw edges again, creating a mitered corner. Start sewing again from the edge.
- Continue around all four sides. When you return to your starting point, join the two ends of the binding strip together using a diagonal seam for a neat finish (many tutorials demonstrate this specific join).
- Finish the Binding:
- Flip the folded binding strip over to the back of the quilt.
- You can hand-stitch the folded edge of the binding to the back of the quilt for a traditional, invisible finish, or machine-stitch it for a quicker, more durable result.
Tips for a Successful First Quilting Experience
- Accuracy is Key: While the Building Blocks Quilt is forgiving, consistent 1/4-inch seam allowances and accurate cutting will make a huge difference in how well your blocks and rows come together. Practice on scraps if you need to!
- Press, Don’t Iron: When quilting, you “press” seams by lifting and placing the iron, rather than sliding it back and forth. This prevents distorting your fabric pieces.
- Embrace Your Seam Ripper: Everyone makes mistakes. Don’t be afraid to unpick stitches if something isn’t quite right. It’s part of the learning process.
- Watch the Original Tutorial: Jenny Doan’s video from Missouri Star is an invaluable visual guide. Watch sections as you work to ensure you understand each step.
- Good Lighting: Work in a well-lit area to minimize eye strain and see your fabric clearly.
- Take Breaks: Quilting should be enjoyable! Step away if you feel frustrated or tired.
- Enjoy the Process: Your first quilt is a milestone. It won’t be perfect, but it will be uniquely yours and full of heart.
Variations and Customization Ideas
The beauty of the Building Blocks Quilt is its adaptability. Once you’ve mastered the basic pattern, consider these ideas to make it uniquely yours:
- Size Adjustments: Easily change the quilt size by adding or removing blocks, or by adjusting the width of your inner and outer borders.
- Color Palettes: Experiment with solids for a modern, minimalist look, or choose themed prints for a playful, narrative quilt. Create a gradient effect by arranging blocks from light to dark or cool to warm colors.
- Border Treatments: Instead of solid borders, piece together smaller strips for a scrappy border, or add cornerstones for a more traditional look.
- Block Rotation: Play with the orientation of your blocks (the direction of the “L” shaped border strips) to create different secondary patterns when the blocks are joined.
- Quilting Designs: Beyond straight lines, try simple wavy lines, stippling, or loop-de-loops (if you’re feeling adventurous) for added texture.
Conclusion: Your Quilting Journey Begins Here!
Congratulations! By successfully completing the Building Blocks Quilt, you’ve taken a significant step into the rewarding world of quilting. You’ve learned essential techniques, created a beautiful and functional piece, and gained the confidence to tackle more projects.
This beginner-friendly pattern, championed by Missouri Star’s Jenny Doan, is more than just a quilt; it’s a foundation for a lifelong hobby. Every stitch tells a story, and this quilt is the beginning of yours. We encourage you to share your finished Building Blocks Quilt with fellow enthusiasts and keep exploring new patterns and techniques. Happy quilting!