
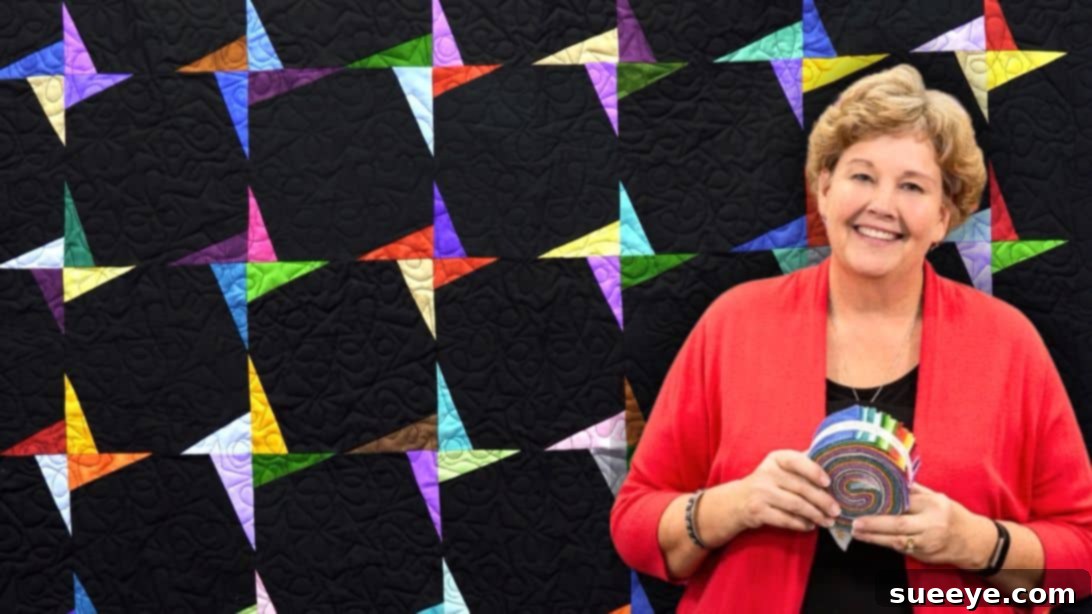
Are you captivated by the timeless beauty of star patterns and eager to create a stunning quilt without overwhelming complexity? The “All Stars Quilt” by the renowned Missouri Star Quilt Company offers a delightful and accessible path into the world of celestial fabric art. This particular block stands out as one of the easiest star designs you’ll ever encounter, perfect for anyone looking to add handmade charm to their home or create a cherished gift.
What truly differentiates this pattern is its remarkable flexibility. Unlike many traditional star quilt designs that demand meticulous strip measurements and perfectly uniform points, the All Stars Quilt embraces a relaxed approach. The magic lies in allowing your star points to vary slightly in size, which, surprisingly, adds a unique, handcrafted character and visual interest to your finished piece. This design freedom not only streamlines the construction process but also infuses a dynamic, whimsical feel into every star. Of course, if precision is your preference, you can certainly measure and aim for uniformity – the true joy of quilting lies in making each project uniquely yours!
This block is more than just easy; it’s a remarkably quick and beginner-friendly sewing project. Its straightforward nature means you can often complete a significant portion, or even the entire quilt top, in a single dedicated day. It’s an ideal project for building confidence in your quilting skills while still producing a gorgeous, high-impact result. We highly recommend you try this pattern at home; we are confident you will enjoy the process and cherish the beautiful All Stars Quilt you create.
Easy All Stars Quilt Tutorial: Create Stunning Star Patterns the Simple Way
Welcome to your comprehensive guide for crafting the mesmerizing All Stars Quilt, a design celebrated for its simplicity and striking visual appeal. Whether you’re a seasoned quilter seeking a fast, gratifying project or a complete novice ready to embark on your first major quilt, this tutorial, inspired by the ingenious techniques of Missouri Star, is crafted for you. We’ll meticulously walk you through each step, ensuring a smooth and enjoyable quilting experience as you bring your very own constellation of fabric stars to life.
The enduring charm of star quilts is undeniable; they evoke a sense of wonder, comfort, and timeless beauty in any setting. However, many traditional star patterns can often seem intimidating with their intricate piecing and stringent measurement requirements. This All Stars Quilt pattern ingeniously breaks that mold, presenting an innovative approach that prioritizes creative flow and ease over strict angular perfection. The delightful outcome is a quilt that feels organic, radiates warmth, and carries a truly unique, personal touch.
Why Choose the All Stars Quilt? A Beginner-Friendly Quilting Masterpiece
Beyond its undeniable aesthetic appeal, the All Stars Quilt offers several compelling advantages that make it a premier choice for quilters of all skill levels:
- Unmatched Simplicity: This pattern cleverly sidesteps complex measurements for the star points, dramatically simplifying both the cutting and piecing phases. This translates directly into less time spent on meticulous preparation and more time dedicated to the joyful act of sewing.
- Truly Beginner-Friendly: If you’re new to quilting, this project serves as an exceptional entry point. It expertly introduces fundamental quilting techniques, such as accurate strip piecing, consistent seam allowances, and efficient pressing, without overwhelming you with advanced skills.
- Remarkably Quick to Finish: Designed with efficiency in mind, many quilters report being able to complete a substantial portion, or even the entire quilt top, within a single focused quilting session. There’s immense satisfaction in witnessing your project rapidly take beautiful form.
- Incredibly Customizable Aesthetic: The inherent design gracefully allows for beautiful and subtle variations in star point sizes, imbuing your quilt with an artistic, one-of-a-kind character. This ensures that no two All Stars Quilts are ever exactly alike, each possessing its own distinct charm.
- Versatile Fabric Utilization: This pattern is an excellent way to make the most of convenient pre-cut fabrics, such as 2 1/2″ print strips (often called Jelly Rolls) and 10″ background squares (Layer Cakes). This approach makes fabric selection and preparation wonderfully effortless. It’s also a fantastic project for busting through your accumulated fabric stash!
- High-Impact Visual Results: Despite its straightforward construction, the finished All Stars Quilt boasts a sophisticated and intricate appearance, making it look far more challenging to create than it actually is. Prepare to receive numerous compliments on your beautiful handiwork!
Ready to embark on this incredibly rewarding quilting adventure? Let’s gather our essential supplies and begin the exciting process of creating a quilt that will shine brightly and bring joy in any setting.
Materials List for Your All Stars Quilt
Gathering your materials is the pivotal first step in any quilting journey. For this All Stars Quilt, we prioritize both convenience and efficiency by leveraging pre-cut fabrics, which not only save valuable preparation time but also guarantee consistency in strip and square sizes. Below is a comprehensive list of what you’ll need to create a beautiful quilt approximately 60×70 inches. Remember, you can always adjust these quantities to suit larger or smaller projects, or if you prefer a different border/binding style.
- 1 roll of 2 1/2″ print strips: Commonly known as a “Jelly Roll,” this typically contains 40-42 pre-cut fabric strips, each precisely 2 1/2 inches wide and usually 42 inches long. These vibrant strips will form the dynamic, colorful “points” of your stars. Choose a roll with a diverse array of prints and colors that resonate with your personal style, or opt for a themed roll for a perfectly cohesive aesthetic.
- 1 pack of 10″ background squares: Often referred to as a “Layer Cake,” this pack provides 40-42 pre-cut fabric squares, each measuring 10 inches by 10 inches. These squares will serve as the essential backdrop for your stars, allowing the print points to truly stand out and pop. A solid, light-colored fabric—such as crisp white, warm cream, or a soft gray—is frequently chosen for the background to maximize contrast and highlight your star points effectively.
- 3/4 yard of border fabric: This fabric will elegantly frame your quilt, providing a clean, polished finish and often serving as a beautiful visual transition between the main quilt top and the binding. Select a fabric that beautifully complements the colors and patterns of your star points and background, either by echoing a dominant color or introducing a harmonious accent.
- 3/4 yard of binding fabric: The binding represents the final decorative and functional edge finish for your quilt. It encases all the raw edges, adding crucial durability and a professional touch. The binding is typically chosen to either match or subtly contrast with your border fabric or the dominant colors within your quilt top.
- 4 1/2 yards of backing fabric: This generously sized fabric will form the entire underside of your quilt. You have the option to choose a single wide-back fabric (which minimizes seams) or piece together standard width fabrics to achieve the required size. This is a wonderful opportunity to select a fun, coordinating print or a luxurious solid fabric to make the back of your quilt as inviting and appealing as the front.
Before you begin any cutting or sewing, it is always a sound practice to pre-wash all your fabrics. This is especially important if you are mixing different fabric types or colors, as it helps prevent potential shrinkage disparities and guards against any unwanted color bleeding. After washing, meticulously press all your fabrics to ensure they are perfectly smooth and free of any wrinkles, which will significantly contribute to more accurate cutting and precise piecing throughout your project.
How to Make the Easy All Stars Quilt: A Step-by-Step Quilting Guide
With all your materials meticulously gathered and organized, it’s time to immerse ourselves in the exciting process of constructing your All Stars Quilt. Follow these detailed, step-by-step instructions carefully, and you will soon witness your beautiful star blocks magically emerge, bringing your vision to life!
Step 1: Constructing Your Star Blocks the Innovative Way
This initial step is where the distinctive charm and innovative simplicity of the All Stars Quilt truly come to the forefront, allowing for a creative and relaxed approach to forming your star points.
- Prepare Your Background Square: Begin by taking one of your 10-inch background squares. To establish helpful alignment guides, first fold the square precisely in half vertically, press firmly to create a sharp crease line, then unfold it. Repeat this exact process by folding it in half horizontally and pressing again. These two intersecting crease lines will accurately mark the exact center of your square, providing crucial reference points for strip placement.
- First Star Point Placement: Select one of your 2 1/2-inch print strips. Carefully lay this strip diagonally across one corner of your prepared background square. The core principle here isn’t about achieving an exact angle, but rather ensuring that when the strip is positioned, it effectively covers the entire corner. Place one end of the strip so it distinctly crosses the central point indicated by your creases and extends visibly past the edge of the square, thereby creating a “point.” You are encouraged to gently pull the strip over slightly, but always double-check that when it is ultimately folded back, it will fully cover that specific corner of the 10-inch square. Be mindful not to let the strip extend past its own 2 1/2-inch width, as this can introduce unnecessary bulk.
- Sewing the First Strip: Using a consistent and accurate 1/4-inch seam allowance, sew the print strip firmly onto the background square along the edge where it overlaps. Maintaining a precise 1/4-inch seam allowance is absolutely critical for achieving accurate piecing throughout your quilting project, so strive for utmost precision here.
- Trim and Press: Once sewn, meticulously trim away any excess fabric from the print strip, leaving only the portion that is securely attached to the background square with its designated seam allowance. Press the seam either open or, for reduced bulk and often better look, towards the darker fabric (typically the print strip in this scenario).
- Repeat for All Sides: Now, rotate your square 90 degrees and select another 2 1/2-inch print strip. Repeat steps 2 through 4 for the next corner. Continue this precise process until all four corners of your 10-inch background square have a print strip sewn diagonally across them, effectively forming a distinct star shape. Remember, the individual points do not need to be perfectly identical in size or exact in their extension; what’s important is that they all converge around the central point of the background square. This slight, inherent irregularity is precisely what lends the All Stars Quilt its unique, organic charm and handmade character!
- Construct All Blocks: Repeat this entire step-by-step process for all your remaining 10-inch background squares until you have successfully created a full set of star blocks. This will result in a visually dynamic collection where each star subtly tells its own unique story.
Step 2: Perfecting Your Blocks – Trimming and Pressing
Once your star points are securely sewn, the next critical step involves meticulously cleaning up and refining your blocks. This ensures they are perfectly square and consistently sized, ready for accurate assembly into your quilt top. This attention to detail will significantly enhance the overall flatness and professional appearance of your finished quilt.
- Set Your Seams: Before pressing the seams open, always make it a habit to “set” your seams. This simple but effective technique involves briefly pressing your hot iron directly onto the stitched line *before* opening the seam. This crucial step helps to fuse the stitches more deeply into the fabric fibers, resulting in a flatter, stronger, and more durable seam line.
- Press Strips Open: Carefully proceed to press each strip fully open, working diligently from the center of the block outwards towards the edges. Pressing seams open is highly beneficial as it helps to evenly distribute the bulk of the fabric, leading to flatter and less distorted blocks. Flatter blocks are considerably easier to join accurately in subsequent steps. Ensure your iron is at the appropriate temperature for your specific fabric type to prevent scorching or damage.
- Flip and Trim: Gently flip your entire block over to its backside. Using a high-quality, clear quilting ruler (preferably a square one that matches your finished block size) and a sharp rotary cutter, carefully trim off any excess fabric from the star points that extend beyond the precisely defined edges of your 10×10 inch block. This meticulous trimming guarantees that your block is perfectly square and consistently measures 10×10 inches. Accurate squaring is paramount for a smooth and even quilt top.
- Repeat for All Blocks: Systematically go through every single one of your constructed star blocks, diligently repeating the process of setting seams, pressing them open, and then trimming each block to precise dimensions. Consistency in this step is absolutely vital for achieving a beautifully flat, uniformly sized, and ultimately professional-looking quilt top.
Step 3: Preparing for Layout – Cutting Your Blocks
This strategic step introduces key cuts that will transform some of your full star blocks into versatile components, offering greater design flexibility and dimension for your final quilt layout.
- Cut Half Blocks: From your meticulously prepared collection of 10-inch star blocks, select 11 blocks. For each of these 11 chosen blocks, carefully cut them precisely in half. Depending on the desired visual effect for your quilt design, you can opt to cut them diagonally from corner to corner (creating two large triangles) or straight down the middle (creating two rectangles). The original Missouri Star design often favors diagonal cuts for these halves, as it tends to add another captivating layer of visual interest when the quilt is assembled. Utilize a rotary cutter and a long, stable ruler to ensure each cut is perfectly straight and accurate.
- Cut Quarter Blocks for Corners: Next, take one additional full star block from your remaining collection. This specific block will be designated for the critical corner positions of your quilt. Proceed to cut this block meticulously into fourths. This typically involves making one cut in half horizontally, followed by another cut in half vertically, resulting in four smaller, perfectly square pieces. These smaller quarter pieces will integrate seamlessly into the corner positions of your quilt top, providing a beautifully balanced and neatly finished look to the overall design.
At this point, you should have a diverse mix of full star blocks, half-star blocks (either triangular or rectangular, depending on your chosen cut), and quarter-star blocks. This thoughtful variety of components will enable you to create a dynamic and truly engaging quilt layout.
Step 4: Assembling Your Quilt Top – From Blocks to a Beautiful Design
This is the moment your quilt truly begins to materialize and shine! The thoughtful arrangement and precise assembly of these blocks are paramount in creating the overall pattern and visual impact of your finished project.
- Arrange Your Blocks: On a spacious, flat surface—such as a design wall, a clean floor, or a large table—begin the creative process of arranging your blocks. Start by laying out the full 10-inch star blocks to establish the primary body and central design of your quilt. This is your prime opportunity to experiment with the orientation of the stars, the placement of various fabric prints, and the interplay of colors. Continue experimenting until you discover an arrangement that is visually harmonious and deeply pleasing to your eye.
- Incorporate Half Blocks: Once the main full blocks are thoughtfully laid out, strategically place your half-star blocks. These versatile pieces typically fill in the top, bottom, and ends of your middle rows, forming the outer edges of your star clusters or cleverly filling gaps to generate intriguing secondary patterns. For instance, if you opted for diagonally cut half blocks, you might arrange them to create points that elegantly extend outwards from your main design, or to complete larger, more complex star shapes.
- Add Corner Pieces: Finally, carefully position your quarter-star pieces into the four outermost corners of your quilt top. These smaller, foundational pieces are essential as they help to precisely square off the entire quilt and provide a wonderfully neat and complete finish to the overall design.
- Sew Rows Together: Once you are entirely satisfied with your chosen layout, begin the systematic process of sewing the individual blocks together, working row by row. Pin each block meticulously, paying close attention to ensuring your 1/4-inch seam allowance remains perfectly consistent throughout. As you press the seams between blocks, alternate the direction for each successive row (e.g., press seams in row 1 to the right, seams in row 2 to the left). This technique allows for “nesting” when you eventually join the rows, which significantly aids in aligning your points flawlessly.
- Join Rows: After all your individual rows have been sewn and thoroughly pressed, carefully join the rows together. Pin extensively, especially at every seam intersection, to ensure perfect alignment. Sew these rows with a consistent 1/4-inch seam allowance. Press these final, long seams either open or to one side, whichever method you prefer and whichever creates the least amount of bulk in your quilt.
- Add the Border: With your quilt top now fully assembled, it’s time to add the border. Accurately measure the precise length and width of your quilt top. Cut your chosen border fabric into strips of your desired finished width (e.g., 3 inches, or any width you prefer for your design). First, sew the side borders onto the quilt, pressing the seams neatly towards the border fabric. Then, attach the top and bottom borders, pressing those seams again towards the border. The border serves a dual purpose: it beautifully frames your design and crucially helps to square up your entire quilt.
- Prepare for Quilting: At this stage, your quilt top is completely finished! The next step is to prepare your quilt sandwich. This involves carefully layering your backing fabric (placed right side down), your chosen batting, and then your completed quilt top (placed right side up). Smooth out all layers thoroughly, ensuring they are free of any wrinkles or puckers. Baste these layers together using your preferred method, whether it’s safety pins, basting spray, or thread basting, to secure them for the quilting process.
- Quilt and Bind: Finally, quilt all three layers together using your preferred quilting method—be it machine quilting, hand quilting, or sending it to a professional longarmer. Once the quilting is complete, meticulously trim away any excess batting and backing fabric. Then, prepare your binding strips (typically from your 3/4 yard binding fabric, usually cut into 2 1/2″ strips and sewn end-to-end to create one continuous strip). Attach the binding securely to all the edges of your quilt, either by machine stitching or by hand, to give it a clean, durable, and beautifully finished edge.
All Stars Quilt with Jenny Doan: Insights and Inspiration
The “All Stars Quilt” pattern, masterfully popularized by the incredibly talented Jenny Doan of Missouri Star Quilt Company, stands as a glowing testament to her guiding philosophy: making quilting accessible, enjoyable, and rewarding for absolutely everyone. Jenny’s famously clear, encouraging, and easy-to-follow video tutorials have inspired countless quilters across the globe, skillfully transforming what often appear to be complex patterns into wonderfully achievable projects. Her signature approach frequently incorporates clever shortcuts and innovative techniques that simplify the intricate piecing process without ever compromising on the finished quilt’s inherent beauty or exceptional quality.
When you watch Jenny Doan demonstrate the construction of this particular quilt (you can find her insightful tutorial here), you will immediately grasp the remarkable ease with which these charming star blocks come together. She consistently emphasizes the profound joy of the creative process and the immense satisfaction derived from witnessing mere fabric scraps transform into a beautiful, functional, and cherished piece of art. Her visual tutorials offer invaluable guidance, especially for understanding the nuanced diagonal placement of the fabric strips and embracing the relaxed, forgiving approach to matching the star points. While our comprehensive written instructions aim to be as thorough as possible, seeing Jenny’s method in action can undoubtedly clarify any lingering uncertainties and significantly boost your confidence.
This quilt is far more than just a collection of meticulously stitched fabrics; it is a profound reflection of your unique creativity, dedication, and personal style. The design’s inherent flexibility truly allows for an endless spectrum of variations. Imagine creating a vibrant, playful quilt bursting with bright, contrasting prints for a child’s bedroom, or perhaps a serene, sophisticated version using muted tones and elegant florals to grace a master bedroom. Consider embracing a patriotic theme with classic reds, whites, and blues, or crafting a festive holiday quilt adorned with charming seasonal fabrics.
Never shy away from experimenting boldly with your fabric choices. The background fabric, in particular, plays an enormous role in how your stars will visually appear. A dark background can dramatically make lighter stars truly pop, evoking the enchanting depth of a night sky, while a light background offers a fresh, airy, and more contemporary feel. Play with different textures and patterns within your 2 1/2-inch strips – skillfully mixing solids with busy prints, or geometrics with delicate florals, can introduce incredible depth, movement, and visual interest to your finished project.
The All Stars Quilt serves as a wonderful testament to the fact that quilting absolutely does not have to be a daunting endeavor. Instead, it can be an incredibly relaxing, fulfilling, and deeply therapeutic hobby that consistently results in tangible, cherished items that bring comfort and beauty. Each deliberate stitch you make is a meaningful step towards creating something truly beautiful and enduring. So, set up your sewing machine, lovingly choose your favorite fabrics, and allow the radiant stars to gracefully guide your creative journey. You are not merely making a quilt; you are meticulously crafting a legacy of warmth, comfort, and the irreplaceable touch of handmade love. We eagerly await to see your radiant All Stars Quilt!