
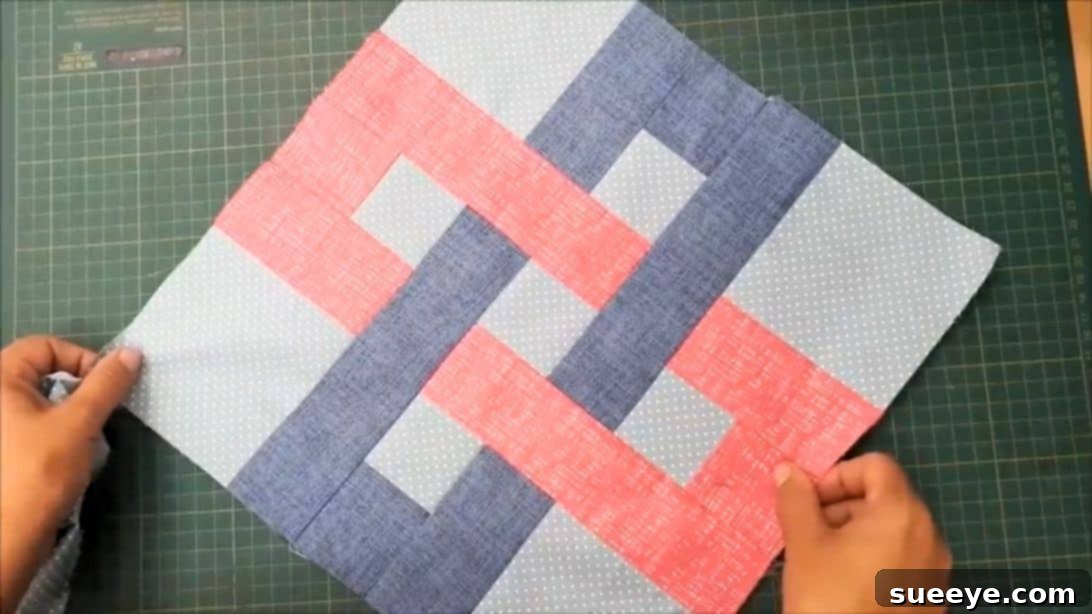
The intricate beauty of Celtic knot designs has captivated artists and craftspeople for centuries. These timeless patterns symbolize interconnectedness and eternity, making them a wonderfully meaningful addition to any textile art. While a Celtic knot might appear complex, creating a Celtic Knot quilt block is surprisingly accessible, even for those new to quilting. This particular block, inspired by a fantastic tutorial from Patchwork Fácil on YouTube, offers a stunning visual effect that belies its simple construction. If you’ve ever admired the interwoven lines of Celtic art and wished to incorporate them into your quilting, this project is the perfect starting point.
Many quilters are initially intimidated by patterns that look intricate, assuming they require advanced techniques or precise, complex cuts. However, the true magic of this Celtic Knot quilt block lies in its clever use of basic shapes – strips and squares – to form an illusion of sophisticated intertwining. The only part that might require a moment of careful thought is the final assembly of the individual units, as their arrangement is key to creating the iconic knot. But rest assured, with our comprehensive, step-by-step instructions and detailed guidance below, you’ll not only master this block but also gain confidence in tackling more visually complex designs in the future. Prepare to be amazed at how quickly you can create a piece that looks like it took days of intricate work!
This engaging block is ingeniously constructed from just two primary units. Each unit is built from a combination of fabric strips and squares, sharing a common underlying pattern. The clever twist, however, comes from using contrasting colors for each unit. This color differentiation is what creates the mesmerizing illusion of one unit weaving over and under the other, forming a true Celtic knot. Working on this quilt block is an incredibly rewarding experience, offering both creative satisfaction and a tangible, beautiful result. If you’re looking for a fresh, enjoyable sewing project to add to your crafting queue, this Celtic Knot quilt block should undoubtedly be at the top of your list. It’s not just a block; it’s a journey into the heart of a timeless design, made achievable and fun. While you’re exploring new patterns, don’t forget to check out these other fantastic quilting ideas:
- RELATED: Easy Block and Tackle Quilt Block
- RELATED: Air Castle Quilt Block
Why You’ll Love Making This Celtic Knot Quilt Block
There are numerous reasons why the Celtic Knot quilt block stands out as an exceptional project for quilters of all skill levels. Firstly, its striking visual appeal makes it a focal point in any quilt. The interwoven design creates a sense of depth and movement, drawing the eye and adding a sophisticated touch. Secondly, despite its intricate appearance, the construction process is surprisingly straightforward, relying on repetitive piecing of basic shapes. This makes it an excellent project for honing your precision cutting and sewing skills without feeling overwhelmed. You’ll learn how to manipulate color and contrast to create stunning optical illusions, a valuable skill in any quilter’s repertoire.
Beyond the technical aspects, there’s a deep satisfaction in crafting something that embodies such rich cultural history. Celtic knots have been used for centuries in art, symbolizing eternal life, love, and friendship, making any item featuring them a meaningful gift or cherished heirloom. This block offers an opportunity to merge traditional symbolism with modern quilting techniques. Plus, the modular nature of quilt blocks means you can easily integrate these Celtic Knot blocks into larger quilt designs, mix them with simpler blocks, or even use them as standalone decorative pieces. The versatility and inherent beauty of this pattern ensure that your efforts will result in a truly unique and admired creation.
Essential Materials for Your Celtic Knot Quilt Block
Before diving into the creative process, gathering all your materials is crucial for a smooth and enjoyable quilting experience. The beauty of this Celtic Knot quilt block lies in its simplicity, requiring just a few fabric choices to achieve its stunning effect. For optimal results and ease of handling, we highly recommend using high-quality quilting cotton fabrics. These fabrics are typically pre-shrunk, easy to press, and hold their shape well, ensuring your finished block is crisp and lies flat. Remember to pre-wash and press all your fabrics before cutting to prevent future shrinkage and ensure accurate measurements.
Here’s a detailed list of the materials you’ll need for one Celtic Knot Quilt Block:
- Red Fabric: Choose a vibrant, solid red or a red print with a subtle texture that won’t distract from the knot design. This will be one of your primary “knot” colors.
- Blue Fabric: Select a contrasting blue fabric, either solid or a subtle print, that complements the red. This will be your other primary “knot” color, essential for creating the interwoven illusion.
- Background Fabric: A light, solid color like white, cream, or a very light gray works best to make your red and blue knot stand out. This fabric will form the negative space that defines the knot’s shape. Ensure it provides good contrast with both your red and blue selections.
In addition to your fabrics, ensure you have your standard quilting tools ready:
- Rotary Cutter: For precise and efficient cutting of strips and squares.
- Self-Healing Cutting Mat: To protect your work surface and prolong the life of your rotary blade.
- Quilting Rulers: Clear acrylic rulers (e.g., 6″x24″ and a smaller square ruler) for accurate measuring and cutting.
- Sewing Machine: In good working order, threaded with a neutral-colored (e.g., white or light gray) 100% cotton thread suitable for quilting.
- Iron and Ironing Board: Essential for pressing seams flat and accurately.
- Fabric Scissors: For any quick snips or trimming.
- Pins or Fabric Clips: To hold fabric pieces together before sewing.
- Seam Ripper: Every quilter’s best friend, just in case!
Step-by-Step Guide: Crafting Your Easy Celtic Knot Quilt Block
Now that you have all your materials, let’s begin the exciting process of assembling your beautiful Celtic Knot quilt block. Remember, precision in cutting and consistent seam allowances are your best friends here. A standard ¼-inch seam allowance is crucial for ensuring your pieces fit together perfectly and your block measures correctly at the end.
Step 1: Preparing Your Foundation Squares
Start by preparing the small squares that will form the very core of your interwoven design. From your pre-cut 2.5-inch strips of red fabric, carefully cut two (2) perfect 2.5-inch squares. Repeat this process for your blue fabric strips, cutting two (2) 2.5-inch squares. You should now have two red squares and two blue squares of equal size. Next, take one red square and one blue square, and sew them together along one edge to form a pair. Repeat with the remaining red and blue squares to create a second identical pair. Press the seams open (or to one side, consistently) to reduce bulk and create flatter units. These small paired squares are the initial building blocks that will define the interlocking segments of your knot.
Step 2: Constructing the First Set of Units
Now, we’ll begin to expand on these foundation pairs. Take a 4.5-inch strip of your background fabric and a 2.5-inch strip of your red fabric. Align these two strips lengthwise, right sides together, and sew them along one long edge using a ¼-inch seam allowance. You now have a combined strip that is 6.5 inches wide (4.5″ + 2.5″ – 0.5″ for seam allowances). Press the seam towards the darker fabric (red, in this case) to help it lay flatter. Next, carefully place one of your red/blue paired squares from Step 1 on top of the red section of this newly formed strip, aligning the raw edges. Sew this pair to the red strip. Repeat this process with the second red/blue paired square on the remaining red strip. Once sewn, you will cut this longer piece into two equal units. These units will start to form one half of your ‘L’ shaped components.
Step 3: Completing the First ‘L’ Shaped Units
To finalize the first type of ‘L’ shaped unit, you will now attach a blue strip. Take one of the units you created in Step 2. Locate the long side where the small background square is positioned. Align a 2.5-inch blue strip, right sides together, along this long side. Sew the blue strip to the unit using a ¼-inch seam allowance. The crucial visual guide here is ensuring that the small background square you initially sewed in Step 1 ends up *beside* this newly attached blue strip, forming a distinct corner. Once sewn, carefully cut these longer pieces into individual ‘L’ shaped units. You will now have two identical units that showcase a specific color arrangement for the knot. Press all seams open or to one side, ensuring your units are as flat as possible. This step is critical for the crispness of your final block. Refer to the first image provided in the original content for a visual confirmation of what these units should look like after this step.
Step 4: Creating the Second Set of Units (Color Exchange)
To achieve the beautiful interlocking effect of the Celtic knot, you need a second set of units that are a mirror image in terms of color placement. Repeat Steps 1 through 3 precisely, but this time, you will exchange the primary knot colors. Wherever you used red fabric in the previous steps for the long strip, use blue fabric, and wherever you used blue fabric for the ‘L’ shape attachment, use red fabric. This means your 4.5-inch strip will still be background fabric, but the 2.5-inch strip attached to it will now be blue. The paired squares will still be red and blue, but their placement relative to the new long strip will create the reversed colorway. The final attachment will be a 2.5-inch red strip. After completing these steps, you should have two new units that are identical to the first set in shape but have the red and blue colors swapped. Again, press all seams open or to one side to ensure maximum flatness. These two sets of units, when combined, will form the complete Celtic Knot. The visual difference between the units created in Step 3 and those created in this step is crucial for the overall effect. The second image provided in the original content illustrates how these reversed units should look.
Step 5: Assembling Your Celtic Knot Quilt Block
This is where the magic truly happens! You now have four individual ‘L’ shaped units – two with one color arrangement and two with the reversed arrangement. Lay them out on a flat surface, such as your cutting mat or design wall, to match the configuration shown in the featured photo (or the final design image of a completed block). This arrangement is critical for forming the continuous, interwoven knot pattern. The units will effectively create a square grid. For the very center of your block, cut one (1) 2.5-inch square from your background fabric. Place this background square in the center of your layout.
Once you are satisfied with the arrangement, it’s time to sew the units together. The easiest way to do this is to assemble the block in three rows, and then sew the rows together.
- Sew the top row: Take the top-left unit and sew it to the top-middle unit (which will be one of your ‘L’ units). Then sew this combined piece to the top-right unit.
- Sew the middle row: Take the middle-left unit and sew it to the 2.5-inch background square in the center. Then sew this combined piece to the middle-right unit.
- Sew the bottom row: Take the bottom-left unit and sew it to the bottom-middle unit. Then sew this combined piece to the bottom-right unit.
Ensure your seams are consistent ¼-inch and match up where the pieces join. After each row is completed, press the seams in alternating directions to help them nest when you sew the rows together (e.g., press seams to the right for row 1, to the left for row 2, and to the right for row 3). Finally, sew your three completed rows together, carefully matching up all your seam intersections. Pin generously at the intersections to ensure they align perfectly. Once all rows are sewn, give your finished Celtic Knot block a final, thorough press. This last press will flatten all seams, crisp up the edges, and help your block lay perfectly flat, ready for inclusion in your next quilting project!
Tips for Success and Variations
Achieving a beautiful and precise Celtic Knot quilt block is all about attention to detail. Here are some extra tips to ensure your success:
- Accurate Cutting is Paramount: Use a sharp rotary blade and always double-check your measurements. Even a slight discrepancy can throw off the entire block.
- Consistent Seam Allowance: A perfect ¼-inch seam allowance is non-negotiable for traditional piecing. Consider using a ¼-inch presser foot on your sewing machine to maintain accuracy.
- Pressing Techniques: Pressing is as important as sewing. Press after every seam, not just at the end. For this block, pressing seams open generally helps to reduce bulk, especially where multiple seams meet. Alternatively, pressing to one side consistently (usually towards the darker fabric) can also work well, just ensure consistency.
- Starch Your Fabric: Using a light starch spray before cutting can add body to your fabric, making it easier to cut and sew accurately, and reducing stretch.
- Chain Piecing: If you’re making multiple blocks, use chain piecing for efficiency. Sew several small pieces one after another without lifting your presser foot, cutting the thread only after a few pieces are joined.
- Test Block: If you’re new to the pattern, consider making a single test block with scrap fabric first to get a feel for the process before committing to your final fabrics.
Variations for Your Celtic Knot Blocks:
- Color Play: Experiment with different color palettes. Instead of red and blue, try analogous colors (e.g., blues and greens), complementary colors (e.g., purple and yellow), or even a monochromatic scheme with varying shades for a more subtle effect.
- Fabric Prints: While solids highlight the knot best, small, non-directional prints can add texture. Ensure there’s enough contrast between your ‘knot’ colors and the background.
- Block Size: While this tutorial uses specific dimensions, you can scale the block up or down by adjusting the initial strip and square sizes proportionally. Remember to maintain the same ¼-inch seam allowance.
- Quilt Layouts: Combine multiple Celtic Knot blocks with solid squares, sashing, or other simple pieced blocks to create unique quilt tops. Imagine a quilt featuring several of these knots “floating” on a serene background, or a wall hanging made entirely of these intricate designs.
Where to Use Your Beautiful Celtic Knot Quilt Block
Once you’ve successfully crafted your Celtic Knot quilt block, you’ll discover its versatility extends far beyond just a traditional full-sized quilt. Its distinctive design makes it an excellent choice for a variety of creative projects, allowing you to showcase your newfound skills and the beauty of the knot in different contexts.
- Quilts and Throws: The most obvious application! Combine multiple Celtic Knot blocks to create a stunning full-sized quilt, a cozy lap quilt, or a decorative throw for your sofa. You can alternate them with solid blocks or simpler patterns to create visual breathing room.
- Wall Hangings: A single, perfectly pieced Celtic Knot block, perhaps framed with a simple border, makes an exquisite wall hanging. It’s a fantastic way to display your craftsmanship and add a touch of handcrafted art to any room.
- Pillow Covers: Transform your block into a unique pillow cover. The Celtic Knot design adds elegance and a personalized touch to any living space or bedroom.
- Table Runners or Placemats: Use one or more blocks to create a charming table runner or individual placemats. This is a great way to introduce handmade textiles into your dining decor.
- Tote Bags or Project Bags: Incorporate the block into the front panel of a tote bag or a specialized project bag. It’s a stylish way to carry your essentials and show off your quilting prowess.
- Apparel Accents: For the more adventurous, a small Celtic Knot block could be appliquéd onto a jacket, vest, or even a denim skirt for a unique fashion statement.
- Baby Quilts: While the design is intricate, using soft, playful colors can make a Celtic Knot quilt block suitable for a baby quilt, creating a heirloom piece.
No matter how you choose to use it, your Celtic Knot quilt block will undoubtedly be a conversation starter and a testament to your creativity and skill. This design brings a timeless appeal that transcends trends, ensuring your finished project will be cherished for years to come.
Conclusion: Embrace the Art of the Celtic Knot
Congratulations! You have now mastered the art of creating the stunning Celtic Knot quilt block. What once seemed like a complex design has been demystified into a series of achievable steps, transforming simple fabric pieces into a captivating symbol of interconnectedness. This project is a testament to how basic quilting techniques, combined with thoughtful design and precise execution, can yield truly spectacular results.
From carefully cutting your strips and squares to meticulously pressing your seams and assembling the ingenious units, each step in this journey contributes to the final, beautiful illusion of interwoven fabric. You’ve not only created a beautiful quilt block but also enhanced your precision quilting skills, which are invaluable for any future textile projects. We hope you found the process enjoyable and the outcome incredibly rewarding.
Now, with your new Celtic Knot quilt block in hand, the possibilities are endless! Whether you plan to create a grand quilt, a cozy throw, a decorative pillow, or a unique wall hanging, this block will infuse your project with elegance and a touch of ancient charm. Don’t hesitate to experiment with different color combinations and explore how this versatile design can adapt to your personal style. We encourage you to share your creations with the quilting community – your beautiful work might inspire others to embark on their own Celtic knot adventure. Happy quilting, and may your needle always fly true!