
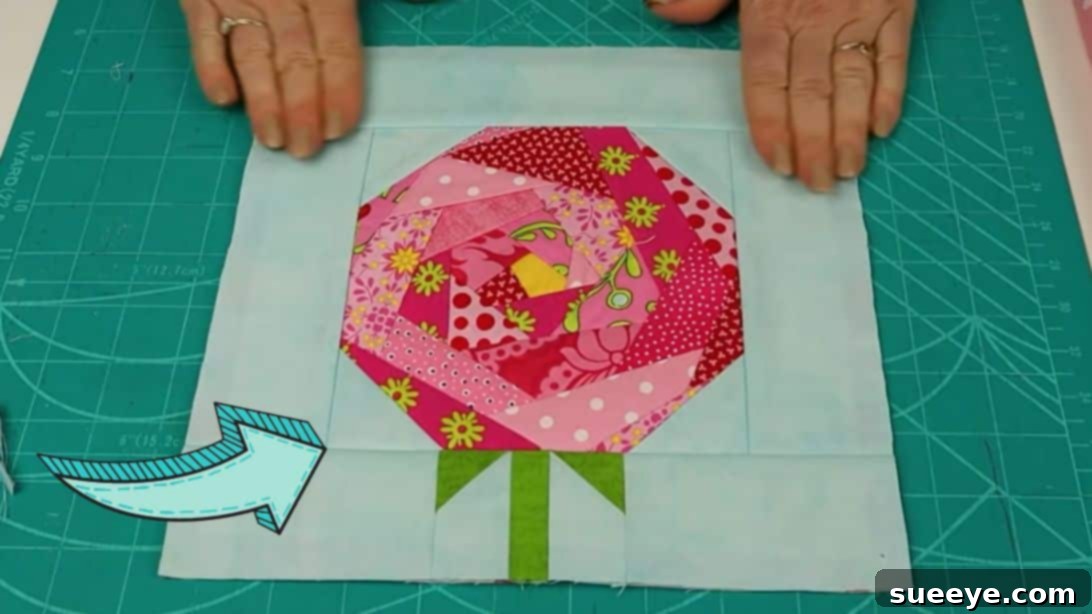
Do you love the timeless elegance of roses and the intricate beauty of patchwork? If so, prepare to be captivated by this delightful project: a Quilt-As-You-Go Crazy Patchwork Flower Block. This charming design allows you to transform your treasured fabric scraps into a stunning floral masterpiece, perfect for adding a touch of handmade artistry to any quilting project. Whether you’re an experienced quilter or looking for a rewarding new challenge, this tutorial will guide you through creating a unique rose-inspired block, as expertly demonstrated by Pattern Poole TV on YouTube. It’s an ideal opportunity to declutter your fabric stash and bring those forgotten remnants to life. Dive in and discover the joy of creating a beautiful, functional piece of art!
The “Quilt-As-You-Go” method simplifies the quilting process by layering the top fabric, batting, and backing for individual blocks before they are assembled, making the final construction much more manageable, especially for larger projects. Coupled with “Crazy Patchwork,” which embraces asymmetry and improvisation with fabric pieces, this project results in a truly one-of-a-kind creation. Each flower block you make will possess its own unique character, a testament to your creativity and the inherent charm of crazy quilting. Get ready to embark on a sewing adventure that’s both fun and rewarding!
Materials You’ll Need
Gathering your materials is the first step towards creating your gorgeous crazy patchwork flower block. The beauty of this project lies in its flexibility, allowing you to utilize fabric scraps you already have, making it a sustainable and cost-effective crafting endeavor. Here’s a detailed list:
- Fabric Scraps or 1 1/2″ Wide Strips: These will form the “petals” of your crazy patchwork flower. Dig through your stash for a variety of colors and patterns that evoke a floral feel. Fat quarters or jelly roll strips can also be cut down to size.
- 10″ Backing Square: Choose a sturdy, non-stretch fabric for the back of your block. This can be a solid color that complements your flower or a subtle print.
- 9″ Square Batting: This provides the necessary loft and warmth for your quilt block. Cotton or a cotton-poly blend batting works well for easy quilting.
- 7 1/2″ Square Plain Quilting Cotton: This square serves as the primary background for your flower, so a solid or very subtle tone-on-tone fabric in a light or neutral color is recommended to make your patchwork stand out.
- 2″ Square for the Center of the Flower: This small piece will be the focal point of your flower, so select a fabric with a strong color or pattern that you want to highlight.
For the Background Border and Sashing: These pieces will frame your beautiful flower and give the block its final dimensions. Precision in cutting these is key for a neat finish.
- 2 pieces of 3″ squares (both cut into diagonal)
- 1 piece of 2″ x 10 1/2″ rectangle
- 2 pieces of 2″ x 7″ rectangle
- 2 pieces of 2″ x 4 1/2″ rectangle
- 2 pieces of 2″ x 1 1/2″ rectangle
For the Leaves and Stem (Green Fabric): To give your rose block a natural touch, you’ll need a few pieces of green fabric. Varying shades of green can add depth and realism.
- 2 pieces of 1 1/2″ squares
- 1 piece of 1″ by 2 1/2″ strip
Essential Tools:
Beyond fabrics, a few standard quilting tools will make your crafting process smoother and more enjoyable:
- Sewing Machine: Equipped with a walking foot, if possible, for easier handling of multiple fabric layers.
- Iron and Ironing Board: For pressing seams flat and crisp, which is crucial for a professional look.
- Rotary Cutter, Cutting Mat, and Quilting Ruler: For accurate and efficient fabric cutting.
- Fabric Marker or Pencil: For precise marking on your fabrics.
- Sharp Scissors: For trimming threads and fabric.
- Quilting Glue Stick (washable): For temporarily securing fabric pieces.
- Basting Spray: To hold the layers of your quilt-as-you-go block together.
- Thread: Good quality cotton thread in a neutral color (e.g., beige, grey) for piecing, and a color that matches your flower for quilting.
Step-by-Step Instructions: Crafting Your Crazy Patchwork Flower Block
Follow these detailed instructions to create your stunning Quilt-As-You-Go Crazy Patchwork Flower Block. Remember, patience and precision are your best friends in quilting!
Step 1: Crafting the Octagon Template
To begin, we need a precise octagon template that will define the shape of your central flower. Take a plain piece of paper and carefully cut it into a 6 1/2-inch square. For accuracy, a rotary cutter and ruler are highly recommended. Next, fold this square in half vertically, then fold it in half horizontally again, creating four layers of paper. Locate the corner where both edges are unfolded (the ‘raw’ edges). From this specific corner, measure one and seven-eighths of an inch (1 7/8″) along one non-folded edge and make a clear mark. Repeat this measurement on the *other* non-folded edge. Use a pencil to connect these two marks with a straight line. This line defines the cut you’ll make to transform your square into an octagon. Carefully cut along this line to create your octagonal template. This template will serve as the foundational shape for your beautiful crazy patchwork flower, so ensure it’s cut as accurately as possible.
Step 2: Preparing the Background Square
Take your 7 1/2″ plain quilting cotton square, which will form the immediate background for your flower. To find its exact center, fold the square in half vertically, pressing a light crease. Then, unfold and fold it in half horizontally, pressing another light crease. The intersection of these two creases marks the precise center of your background square. This central point will be crucial for accurate placement of your template in the next step.
Step 3: Marking the Octagon on Your Fabric
Now, take your paper octagon template created in Step 1. Align the template perfectly in the center of your 7 1/2″ background square, using the creases you just made as a guide. Using a fabric-friendly marker or pencil, carefully trace all the way around the edge of your template onto the background fabric. This outline will serve as the guide for placing your crazy patchwork pieces. For a more pronounced line, you can flip the fabric over and trace the octagon again, ensuring the outline is clearly visible from both sides, although the initial tracing should suffice for placement.
Step 4: Creating the Flower’s Center
Pick up your 2″ square designated for the flower’s center. This piece will be the very heart of your rose. Instead of keeping it a square, we’ll transform it into a 5-sided shape (a pentagon) to create a more organic, flower-like core. To do this, you can freehand cut it into a rough pentagon, or for more precision, find the center of the square and trim off very small, equal corners from four sides, leaving one side untouched or minimally trimmed, to approximate a pentagon. Once shaped, carefully place this 5-sided piece directly onto the marked center of your 7 1/2″ background fabric. Using a small stitch length, stitch all around the edges of this central piece to secure it firmly in place. This piece forms the base upon which your patchwork petals will be built.
Step 5: Building the Crazy Patchwork Petals
This is where the “crazy patchwork” magic truly happens! Begin by selecting your smallest fabric scraps first – these are perfect for the initial rounds of petals. Take one small scrap and place it right sides together along one edge of your central 5-sided shape. Ensure the edges are aligned. Stitch a quarter-inch seam allowance along this edge. After stitching, cut your thread and remove the fabric from your machine. Carefully flip the first scrap piece over so the right side is facing up. Press this seam flat with an iron for a crisp finish. Continue this process, working clockwise around your central shape. For each subsequent piece, select another scrap, place it right sides together with the newly added piece, and stitch. Trim, flip, and press. The beauty of crazy patchwork is that the pieces don’t need to be uniform; varied shapes and sizes add to the charm. Keep adding scraps, gradually covering the background within your octagon outline, until your central flower shape begins to emerge.
Step 6: Refining the Flower Block
Once you’ve completely covered the marked octagon area with your crazy patchwork pieces, it’s time to refine the shape. Flip your patchwork assembly over to the wrong side. Take your original paper octagon template and place it on top of your patchwork, ensuring it aligns perfectly with the patchwork you’ve created. Double-check that the patchwork adequately covers the entire template. To secure the template in place, apply a couple of dabs of washable quilting glue stick to the back of the template and gently press it onto the patchwork. This temporary adhesive will hold it steady. Carefully trim away any excess fabric around the edge of your paper template, creating a perfectly shaped crazy patchwork octagon. This precise trimming ensures a clean and defined flower block.
Step 7: Preparing for Quilt-As-You-Go
This step initiates the “Quilt-As-You-Go” method for your block. Lay your 10″ backing square flat, wrong side up. Take your 9″ batting square and spray one side generously with basting spray. Carefully center the batting onto the backing square, ensuring it adheres smoothly without wrinkles. Next, on the right side of the backing fabric, mark a border all around the block. This border should be 1 3/4 inches away from the raw edge of the fabric on all four sides. Use a ruler and a light fabric marker, being careful not to make your lines too dark, as they are primarily for placement guidance and will eventually be covered or hidden. This marked area defines where your flower block will be placed.
Step 8: Integrating the Flower Block
Take your perfectly trimmed crazy patchwork octagon flower from Step 6. Carefully center it within the marked border on your basted backing and batting layers. Use a few pins or a temporary fabric adhesive (like a glue stick) to secure the flower in place, preventing it from shifting during sewing. Now, you’ll fill the triangular spaces on the outer edge of the octagon (between the flower and the marked border) with the pre-cut triangle fabric pieces (from the 3″ squares cut diagonally). Place these triangle pieces right sides together, aligning them with the octagon edge and the marked border line. Using a neutral thread that blends with your background fabric, sew these triangles with a precise quarter-inch seam allowance. This step begins to integrate the flower into its surrounding background and also starts the “quilting” aspect, as you’re stitching through all three layers (flower top, batting, backing).
Step 9: Attaching Background Sides (Part 1)
Now, let’s build out the sides of your block. Take one of your 7 1/2″ background rectangles. Place it right sides together with one of the side edges of your flower block assembly. Carefully align this rectangle with the previously marked lines on your backing fabric, ensuring it extends evenly beyond the flower. Sew this piece onto the flower assembly with a consistent quarter-inch seam allowance. Once sewn, trim any excess fabric from the ends and finger press the seam open or towards the background piece. Repeat this exact process on the opposite side of your flower block, attaching the second 7 1/2″ background rectangle. Finger pressing temporarily holds the seam, but a quick press with an iron will give a crisper finish.
Step 10: Attaching Background Sides (Part 2)
After attaching the side pieces, you’ll need to remark your top and bottom border lines if they’ve become less visible or shifted slightly. Take the longest background strip (2″ x 10 1/2″ rectangle). Place it right sides together with the top edge of your flower block assembly. Ensure it is perfectly level with your newly marked top border line, extending beyond the flower section to cover the entire width of the block. Sew it edge to edge with a quarter-inch seam allowance, stitching through all layers. After sewing, trim off any excess fabric from the ends and finger press the seam open or towards the background strip. Repeat this step for the bottom edge of the flower block, attaching the remaining longest background strip. This step completes the immediate framing of your flower.
Step 11: Creating the Leaves and Stem
This step adds the beautiful green leaves and stem to your rose. Take your two green 1 1/2″ squares and your small background rectangles (the 2″ x 1 1/2″ pieces). Place one green square right sides together with the shorter edge of one background rectangle. Repeat this with the other green square and background rectangle. Now, take your 1″ by 2 1/2″ green strip and place it in the middle, between these two units, creating a small “leaf” section. On the green square on the right, draw a diagonal line from the top-left corner to the bottom-right corner. On the left green square, draw an opposite diagonal line from the top-right corner to the bottom-left corner. Sew precisely along these drawn lines. Once sewn, press the seams flat. Trim a quarter of an inch away from each stitching line (towards the outside of the green fabric) and repress. This technique creates the pointed leaf shapes.
Step 12: Completing the Bottom Section
With your leaf and stem unit ready, take the remaining background rectangles (the 2″ x 7″ pieces and 2″ x 4 1/2″ pieces). Attach these to the sides of your newly created leaf and stem unit, placing them right sides together and sewing with a quarter-inch seam allowance. Press these seam allowances open or towards the background. Once the leaf unit is fully constructed and framed, carefully align it with the bottom edge of your entire flower block assembly. Place it right sides together and sew it onto the bottom edge of the flower block with a quarter-inch seam. Trim off any excess fabric, ensuring a clean edge, and then give your entire block a thorough final press with a warm iron. This final pressing will set your seams and give your block a professional, finished appearance.
Step 13: Final Trimming and Squaring Up
Your Quilt-As-You-Go Crazy Patchwork Flower Block is almost complete! The final step is to trim your block into a perfect square. Using your cutting mat, rotary cutter, and a large quilting ruler, carefully square up your block to your desired final dimension (e.g., 12 1/2 inches, depending on your overall design). Ensure all edges are straight and all corners are 90 degrees. This precise squaring up is vital for easy assembly if you plan to combine multiple blocks into a larger quilt or use it for another project. Take your time with this step to achieve a clean, professional finish.
Quilt-As-You-Go Crazy Patchwork Flower Block: Your Creative Journey
Congratulations! You’ve successfully completed a beautiful Quilt-As-You-Go Crazy Patchwork Flower Block. This project is more than just a quilt block; it’s a testament to your creativity, patience, and skill. The blend of the structured Quilt-As-You-Go technique with the spontaneous artistry of crazy patchwork yields a truly unique piece that reflects your personal touch. Each fabric scrap tells a story, and together they form a vibrant, blooming rose that will bring joy for years to come.
This versatile flower block can be incorporated into a multitude of projects. Imagine it as a central panel for a stunning throw pillow, a feature block in a larger quilt, part of a unique tote bag, or even as a decorative wall hanging. Don’t be afraid to experiment with different color palettes and fabric textures in future blocks to create a whole garden of crazy patchwork roses!
Remember, quilting is a journey of learning and discovery. If you encountered any challenges, view them as opportunities for growth. Practice truly makes perfect, and with each block you create, your confidence and technique will flourish. We encourage you to revisit the Pattern Poole TV tutorial on YouTube for visual guidance and inspiration. Share your beautiful creations with fellow quilters and inspire others with your unique interpretation of this fantastic project. Happy quilting!