
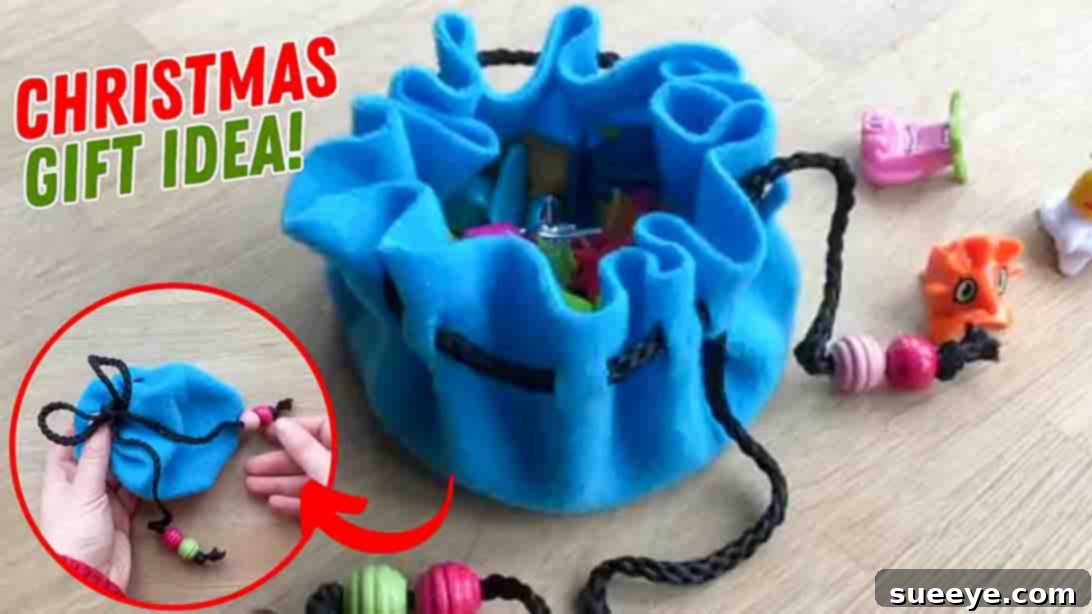
DIY No-Sew Mini Pouch: Easy Fleece Craft for Beginners & Handmade Gifts
Are you searching for a delightful and simple DIY project to spark your creativity this weekend? Look no further! This fantastic no-sew mini pouch, inspired by the ingenious minds at Red Ted Art on YouTube, is an absolute game-changer for crafters of all skill levels. Forget complicated patterns or intimidating sewing machines; this project requires absolutely no sewing at all! It’s a quick, easy, and incredibly satisfying craft that you can complete using just a handful of everyday materials found right in your home. Perfect for anyone who loves doing DIY crafts, this project is designed for maximum enjoyment and minimal fuss.
Whether you’re looking to create charming, personalized gifts for friends and family, organize your own collection of tiny treasures, or simply enjoy a relaxing crafting session, this DIY mini pouch is wonderfully versatile. Imagine crafting a batch of these adorable pouches as thoughtful make-ahead Christmas gifts, birthday presents, or unique party favors. They’re perfect for holding jewelry, coins, earbuds, small trinkets, or even a heartfelt handwritten note. Its simple design makes it an ideal choice for both adults and supervised children to tackle. Join us as we dive into the step-by-step instructions to create your very own stylish and functional no-sew mini pouch. A huge thank you to Red Ted Art for sharing this brilliant and accessible DIY project with the crafting community! Make sure to check their channel for more fantastic DIY ideas just like this one.
Why Choose a No-Sew Mini Pouch? The Ultimate Easy Craft
In a world often filled with complex DIY tutorials, the appeal of a no-sew project is undeniable. This mini pouch stands out for several compelling reasons, making it an ideal choice for both seasoned crafters and absolute beginners alike who are seeking a quick, rewarding craft project:
- Accessibility for All Skill Levels: The most significant advantage is the complete absence of sewing. This means no special equipment like a sewing machine is required, and you don’t need any prior sewing experience or intricate stitching skills. If you can confidently use scissors and a pencil, you possess all the fundamental abilities needed to make this charming pouch!
- Remarkably Quick and Efficient: This project is incredibly fast to complete. You can whip up a single mini pouch in under 30 minutes, making it perfect for last-minute handmade gifts, spontaneous crafting sessions, or when you need a small creative boost without committing to a lengthy, time-consuming project. Its speed makes it an excellent choice for crafting parties or group activities.
- Budget-Friendly and Sustainable: Most of the materials needed are inexpensive, and chances are you might even have them lying around your house. Fleece scraps, old fleece blankets, scarves, or even discarded fabric can be repurposed, making this an eco-conscious and highly cost-effective craft. It’s a wonderful way to give new life to forgotten textiles.
- Unmatched Versatility in Use: The uses for these DIY mini pouches are virtually endless! From organizing small items in your handbag, backpack, or travel luggage to serving as charming gift wrapping for jewelry, gift cards, or small candies, these pouches are incredibly functional. They can also be wonderful additions to party favor bags, advent calendars, unique wedding favors, or as little “treasure bags” for children to collect their small findings.
- Limitless Customization Potential: While simple in construction, the no-sew pouch offers a fantastic canvas for personalization. With a vast variety of fleece colors, patterns, different types of string, and an endless selection of beads, you can tailor each pouch to perfectly match the recipient’s personal style, a specific occasion, or even seasonal themes.
- Engaging and Family-Friendly Fun: This project is safe and engaging for older children (with appropriate adult supervision for cutting tasks), making it a wonderful activity to enjoy together as a family. It’s a fantastic way to introduce kids to the joys of crafting, fostering creativity and the satisfaction of creating something useful with their own hands.
Embracing a no-sew approach doesn’t mean compromising on charm, utility, or quality. In fact, it significantly broadens the appeal of crafting to a wider audience, proving that beautiful, handmade items can be created with minimal fuss, maximum enjoyment, and truly fantastic results.
Gathering Your Crafting Essentials: Materials for Your No-Sew Mini Pouch
One of the most appealing aspects of this DIY mini pouch is the simplicity of its material list. You won’t need to visit a specialized craft store for obscure or expensive items; most of these can readily be found in your home or are easily available at any general store or fabric shop. Here’s a detailed look at what you’ll need to get started on your no-sew crafting journey:
- Fleece Fabric: This is the cornerstone material for this project. Fleece is absolutely ideal because its cut edges naturally resist fraying, completely eliminating the need for hemming or traditional sewing. It’s wonderfully soft, comes in a vast array of colors, textures, and patterns, and is remarkably easy to handle. You can purchase new fleece fabric, or for a more sustainable approach, repurpose an old fleece blanket, a soft scarf, or even a cozy fleece sweater that’s no longer in use. A piece roughly 10 to 12 inches square is typically sufficient for one standard-sized mini pouch.
- Round Templates: You will need two different sizes of round objects. One larger template will be used for cutting the main body of the pouch, and a slightly smaller template will be used for marking the placement of the drawstring slits. Common household items like dinner plates, saucers, various-sized bowls, coffee cup lids, or even large cookie cutters make excellent, readily available templates. For those who prefer precision, a compass can also be used to draw perfect circles of any desired diameter.
- Scissors: A good pair of sharp fabric scissors will ensure clean, smooth cuts when you’re shaping the main fabric circle. Additionally, you will benefit significantly from a smaller, sharper pair of scissors, such as embroidery scissors, nail scissors, or detail scissors, for making the precise, small snips around the edge of the pouch that create the drawstring channel.
- Pencil or Fabric Marker: This is essential for accurately tracing your chosen templates onto the fleece fabric. A regular graphite pencil works surprisingly well on most lighter-colored fleece fabrics, creating clear lines. For darker fleece materials, a washable fabric marker, chalk pencil, or a white dressmaker’s pencil is an excellent alternative, ensuring your markings are visible and easy to follow.
- String or Cord: This material will serve as the functional drawstring for your mini pouch. You have a wide variety of choices, including thin satin ribbon, sturdy yarn, baker’s twine, embroidery floss, crochet thread, or even a section cut from an old shoelace. When selecting, choose a material that is durable enough to withstand repeated pulling and one whose color and texture aesthetically complement your fleece fabric. Approximately 18 to 24 inches of string is usually sufficient per pouch, but this can vary depending on the desired size of your pouch.
- Glue (Optional): While this is a no-sew project, a small amount of glue can be a helpful optional addition. A tiny dab of fabric glue or even hot glue (used carefully) can be very useful for securing knots, especially if you’re adding decorative beads, or for reinforcing any parts of the pouch you feel need a little extra strength or stability. If using glue, ensure it is suitable for fabric to ensure longevity.
- Pony Beads or Other Embellishments: These decorative items are used for personalizing your drawstring and adding a charming finishing touch. Pony beads are a popular and easy choice due to their ideal size and ease of threading onto most strings. However, you could also consider using wooden beads, small decorative charms, buttons with sufficiently large holes, or any other small decorative items that can be securely threaded onto your chosen drawstring material.
Having all your materials gathered, organized, and within easy reach before you begin will make the entire crafting process even smoother, more enjoyable, and ensure a seamless creative flow from start to finish.
Step-by-Step Guide to Crafting Your No-Sew Mini Pouch
Ready to transform your fleece fabric into a charming and highly functional mini pouch? Follow these detailed, easy-to-understand instructions, and you’ll have your finished creation in no time at all. This guide breaks down each stage into simple, manageable steps, ensuring a smooth crafting experience from start to finish.
Step 1: Preparing Your Fabric & Cutting the Main Circle
Begin by laying your fleece fabric out smoothly and flat on a clean, stable work surface. It’s crucial to ensure there are no wrinkles, creases, or folds in the fabric, as these could distort your cuts and affect the final shape of your pouch. Take your larger round template – for instance, a dinner plate, a large bowl, or a circular cutting board – and carefully place it on top of the fleece. Position it strategically to maximize your fabric usage, especially if you plan to make multiple pouches. Using your pencil or fabric marker, carefully trace around the entire outer edge of the template. Apply gentle, consistent pressure to create a clear, continuous, and unbroken line. Once traced, meticulously cut along this line using your sharp fabric scissors. Strive for a smooth, even circular cut; precision at this stage significantly contributes to the overall neatness and professional appearance of your finished pouch. This perfectly cut fleece circle will form the main body and foundation of your no-sew mini pouch.
Step 2: Marking the Drawstring Slits
Now, it’s time to prepare the channel for your drawstring. Take your smaller round template – a saucer, a smaller bowl, or even a large glass rim often works perfectly – and carefully center it on top of your recently cut fleece circle. The space or ring created between the edge of this smaller template and the outer edge of your fleece circle will define the width of the channel for your drawstring. Using your pencil or fabric marker, make small, short dash marks around the circumference of the inner circle defined by your smaller template. To ensure even spacing, a helpful technique is to start by placing marks at the “12 o’clock,” “3 o’clock,” “6 o’clock,” and “9 o’clock” positions. Then, add additional marks evenly in between these primary points. Typically, 8 to 12 marks are sufficient for a well-gathered pouch, but you can add more for a tighter gather. These marks should be small, roughly 0.5 to 1 inch long, and positioned perpendicular to the edge of the circle, pointing inwards towards the center. These lines precisely indicate where you will make your cuts for the drawstring to pass through.
Step 3: Creating the Drawstring Slits
With your marking complete, the next critical step is to create the openings for your drawstring. Grab your smaller, sharper pair of scissors – embroidery scissors or small detail scissors work wonderfully for this precise task. Carefully snip along each of the small pencil marks you just drew. It is absolutely crucial not to cut too deeply; you only want to create a small, neat slit that the string can easily pass through, typically about 0.5 to 0.75 inches deep. Strive for consistency with your cut length and depth to ensure a neat, even gathering effect when the drawstring is pulled taut. Take your time with this step, as precise, uniform cuts will result in a much more professional and attractive-looking finished pouch. The inherent beauty of working with fleece fabric is that these tiny slits will not fray, perfectly maintaining the integrity and neatness of your no-sew design, making it an ideal material for this specific craft.
Step 4: Threading the Drawstring
This is the exciting stage where your flat fleece circle truly starts to take on the form of a functional pouch! Take your chosen string or cord and prepare it for threading. A highly effective and recommended trick is to attach a small safety pin to one end of the string; this acts as a sturdy guide, making it significantly easier to push and pull the string smoothly through the fabric slits. Begin threading from the outside of one of the slits, push the string through, then come out through the next slit, and so on. Continue weaving it in and out, over and under, all the way around the entire circumference of your fleece circle. Ensure that both loose ends of your string eventually emerge from the same side (either both inside or both outside) of one of the slits. Once you have successfully threaded the string all the way around, you should have a complete loop of string running through the fabric casing, with both ends easily accessible and ready for the final touches.
Step 5: Decorating and Finishing Your Pouch
Now for the most enjoyable part – personalizing your mini pouch and bringing it to its final, delightful form! Before tying off the drawstring, take your pony beads or other chosen embellishments and carefully slide them onto the two loose ends of the string. You can opt for a minimalist approach with one bead on each end, or go for a more elaborate and decorative look by adding several beads or charms. Once you are completely satisfied with the arrangement and placement of your beads, tie a sturdy, secure knot at the very end of each string. This knot is essential for both securing the beads in place and preventing them from sliding off the string during use. You have the option to tie the two ends of the string together to create a single, continuous loop, or you can leave them separate, allowing you to pull both ends simultaneously to cinch the pouch closed. If desired, you can add a tiny drop of fabric glue to further reinforce these knots, which is particularly advisable if the pouch is intended for frequent use. Give your string a gentle tug, and watch with satisfaction as your flat fleece circle magically transforms into a charming, functional, and beautifully personalized mini pouch! Your DIY no-sew mini pouch is now complete, ready to be filled with cherished treasures or thoughtfully gifted to a loved one.
Creative Ways to Use Your DIY No-Sew Mini Pouches
Once you’ve crafted your beautiful no-sew mini pouches, you’ll quickly realize their incredible versatility and practical applications. These little bags are not just cute; they’re amazingly functional for a myriad of uses around the home, for travel, or as thoughtful gifts:
- Thoughtful Handmade Gifts: Elevate your gift-giving by filling these pouches with small candies, a delicate piece of jewelry, a gift card, or even a heartfelt handwritten note for a truly personal and memorable present. They make excellent stocking stuffers during the holidays, unique birthday presents, or charming party favors for any celebration.
- Efficient Travel Organizer: Say goodbye to tangled messes! Use these pouches to keep your earbuds, charging cables, USB drives, memory cards, or small travel-sized toiletries (like solid perfume, lip balm, or hair ties) neatly organized and protected within your handbag, backpack, or luggage.
- Practical Coin Purse: A simple yet highly effective way to keep loose change from rattling around in your pockets, purse, or car console. They’re also great for organizing foreign currency when traveling.
- Secure Jewelry Holder: Perfect for storing delicate earrings, rings, bracelets, or necklaces, whether you’re at home, keeping them safe on your nightstand, or ensuring they don’t get lost while traveling.
- Crafting Supplies Organizer: Ideal for sorting and storing small craft components such as buttons, beads, sequins, embroidery floss bobbins, or other tiny embellishments in your craft room or kit.
- Kids’ Treasure Bags: Children absolutely adore these pouches! They’re perfect for collecting small natural treasures like smooth pebbles, colorful leaves, acorns, or for holding their favorite tiny toys and figurines.
- Unique Party Favors: Create a personalized batch of pouches for birthdays, baby showers, bridal showers, or weddings, customized to perfectly match your event’s theme and color scheme.
- Lip Balm / Small Essential Oil Bottle Holder: Keep these frequently used personal items easily accessible, protected from scratches, and prevent them from getting lost at the bottom of a larger bag.
- Mini First Aid Kit: Store a few band-aids, antiseptic wipes, and pain relievers for on-the-go emergencies.
Their compact size, soft material, and customizable design make them ideal for protecting delicate items, keeping small essentials tidy, and adding a touch of handmade charm, making them a fantastic and indispensable addition to any home, travel kit, or gift-giving occasion.
Tips for Success and Personalization of Your Fleece Pouch
While this no-sew mini pouch project is incredibly straightforward and forgiving, a few extra tips can significantly enhance your crafting experience, help you avoid common pitfalls, and enable you to create truly unique and personalized pouches that stand out:
- Experiment with Fabric Types: While fleece is highly recommended for its excellent no-fray properties, don’t hesitate to experiment with other non-fraying fabrics like felt for a different texture and look. For a slightly more rustic or sophisticated aesthetic, you could even use thin faux leather or upcycle sturdy denim from old jeans (though denim might be tougher to cut and mark). If using stretchy fabrics like old t-shirts, be mindful that they might stretch more when pulling the drawstring, so careful, consistent cutting is key.
- Vary the Pouch Size: Don’t limit yourself to just one size! Use larger templates (like dinner plates) for bigger pouches suitable for carrying eyeglasses, sunglasses, small electronics, or a small snack. Use smaller templates (like coasters or jar lids) for tiny coin purses, jewelry bags, or even to hold a single piece of candy as a special treat.
- Creative Drawstring Alternatives: Beyond simple string or cord, consider using vibrant colorful ribbons, intricately braided embroidery floss, stylish baker’s twine, or even thin strips of matching or contrasting fleece fabric for a unique, integrated drawstring effect. The type of string can significantly alter the overall look and feel of your pouch.
- Embellish Beyond Simple Beads: Fabric markers can be used to add intricate patterns, personalized initials, or small doodles to your pouch. Small iron-on patches or fabric appliques can add character and theme. For a festive or glamorous touch, consider using glitter glue or even attaching small bells or charms to the drawstring ends.
- Reinforce for Enhanced Durability: If the pouch is intended for heavy or frequent use, a tiny drop of clear fabric glue applied discreetly on the knots of your drawstring and at the base of each slit (on the inside of the pouch) can help prevent stretching over time and significantly enhance the pouch’s overall durability and longevity.
- Pre-Measure Your String Accurately: To avoid running short in the middle of threading or having excessive waste, it’s wise to pre-measure your string. A good rule of thumb is to cut a piece of string that is at least twice the circumference of your fabric circle, plus an additional 6 to 8 inches (15-20 cm) for tying secure knots and accommodating any decorative beads.
- Involve Kids Safely in the Craft: This project is fantastic for engaging younger crafters. For very young children, an adult can pre-cut the main fabric circle and pre-mark all the slits. Kids can then safely snip along the marked lines (always with adult supervision) and will absolutely love the tactile experience of threading the string and proudly decorating their pouches with colorful beads.
By keeping these practical tips in mind, you can elevate your no-sew mini pouches from simple crafts to personalized, cherished items that not only serve a purpose but also beautifully reflect your unique style, creativity, and thoughtful effort. Happy crafting!
Your Next Favorite No-Sew DIY Project!
There you have it – a wonderfully simple, utterly charming, and incredibly useful no-sew mini pouch that you can create in minutes! This project truly embodies the spirit of accessible crafting, proving that you don’t need extensive skills, specialized equipment, or even a sewing machine to produce something beautiful, functional, and deeply satisfying. Whether you’re making one for yourself to organize tiny treasures and essentials, or crafting a whole batch as thoughtful handmade gifts for friends and family, this fleece pouch is sure to bring a smile to faces and add a touch of handmade warmth to any occasion.
We hope this detailed tutorial has inspired you to grab some fleece, string, and beads, and get crafting right away. It’s a perfect activity for a quiet afternoon, a creative break, or a fun project to share with others. Don’t forget to explore more fantastic DIY ideas and crafting inspiration from the brilliant minds at Red Ted Art, whose boundless creativity continues to inspire crafters worldwide to embrace the joy of making. Happy crafting, and enjoy your delightful new collection of no-sew mini pouches!