
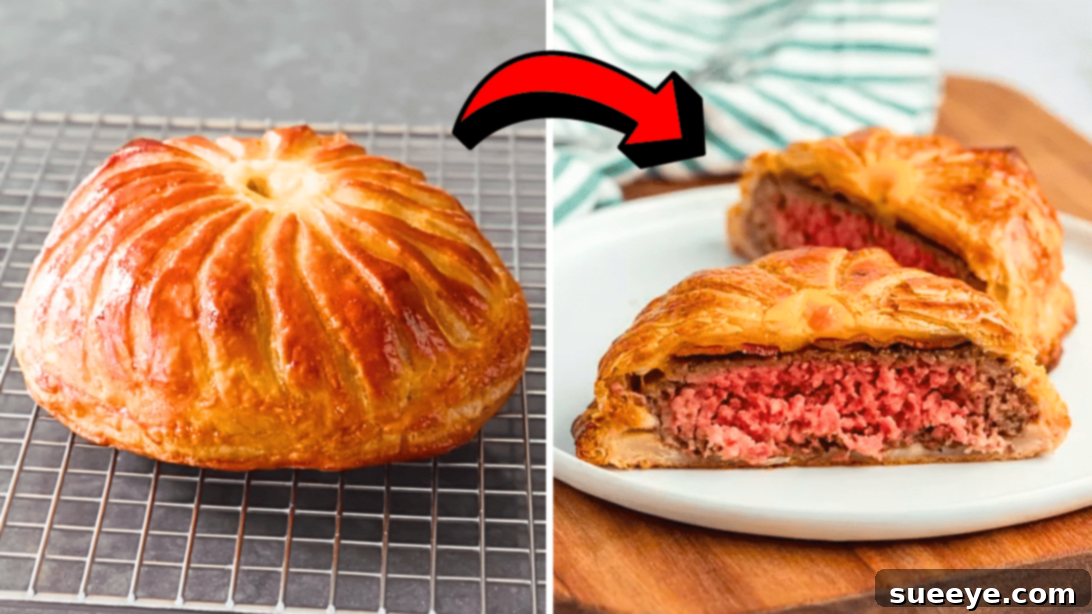
The very name “Beef Wellington” conjures images of luxurious holiday feasts and sophisticated dining experiences. Traditionally a grand centerpiece, featuring tender beef tenderloin coated in pâté and duxelles, then encased in flaky puff pastry, it’s a dish often reserved for special occasions due to its cost and perceived complexity. However, what if you could capture the essence of this culinary masterpiece – the delightful contrast of a savory filling cradled in golden, buttery pastry – without breaking the bank or spending hours in the kitchen?
Enter the ingenious “Poor Man’s Cheeseburger Wellington.” This brilliant adaptation takes the core concept of the classic – seared meat enveloped in a pastry shell – and transforms it into an incredibly accessible, budget-friendly, and utterly delicious meal perfect for any day of the week. Forget waiting for the holidays; with this recipe, you can enjoy a comforting, gourmet-style dish whenever the craving strikes. It’s so effortlessly appealing, with its perfectly seared patty, crisp bacon, and melted cheddar, all snugly nestled within a golden puff pastry, that it often disappears from the table almost as quickly as it’s served. It’s a testament to the fact that extraordinary flavor doesn’t always require an extravagant price tag.
This fantastic recipe, brought to us by the culinary wisdom of Food Wishes on YouTube, simplifies the Wellington concept into a straightforward cheeseburger format. It’s a game-changer for anyone looking to impress their family and friends with minimal effort and maximum flavor. Prepare to revolutionize your weeknight dinners with this easy-to-follow tutorial. No need for fancy ingredients or advanced culinary skills; just a passion for delicious, affordable food. Dive in and discover how you can create this show-stopping, yet incredibly humble, dish today!
Why the Poor Man’s Cheeseburger Wellington is a Culinary Revelation
This innovative take on Beef Wellington stands out for several compelling reasons, making it a must-try for home cooks:
- Budget-Friendly: Swapping costly beef tenderloin for humble ground beef significantly slashes the expense, making this a truly affordable gourmet experience. You get the sophisticated presentation without the premium price tag.
- Simplified Preparation: Traditional Wellington involves multiple intricate steps. This cheeseburger version streamlines the process, focusing on core flavors and textures, making it approachable for even novice chefs.
- Uncomplicated Ingredients: The ingredient list is short, simple, and readily available in any grocery store. No need to hunt for exotic items!
- Weeknight Feasible: Despite its impressive appearance, this recipe is designed for ease and speed, making it a viable option for a delicious and satisfying weeknight dinner, not just special occasions.
- Irresistible Flavor Profile: It combines the universally loved taste of a cheeseburger – savory beef, crispy bacon, and sharp cheddar – with the delightful flaky texture of puff pastry. The result is a comfort food masterpiece that satisfies on every level.
- Impressive Presentation: Even though it’s “poor man’s,” the golden, puffed pastry parcel has an undeniable “wow” factor, making it perfect for casual entertaining or a special family meal.
Ingredients for Poor Man’s Cheeseburger Wellington:
Gathering your ingredients is the first step towards creating this delightful dish. The beauty lies in their simplicity and accessibility:
- 6 oz (approx. 170g) of frozen puff pastry: Ensure it’s thawed according to package directions, but still cold, for the best results. Puff pastry is the magic ingredient that creates that iconic flaky crust.
- 1 slice of thick-cut bacon, cut in half: Bacon adds a crucial layer of smoky flavor and a pleasant textural contrast to the tender beef. Using a quality slice makes a difference.
- 8 oz (approx. 225g) of ground beef: Opt for a lean-to-fat ratio that you prefer, such as 80/20 or 85/15. This will be the hearty core of your Wellington.
- Salt, to taste: Essential for seasoning the beef and bringing out its natural flavors.
- Freshly ground black pepper, to taste: Adds a sharp, aromatic spice that complements the beef perfectly.
- Cayenne pepper, to taste: A touch of cayenne introduces a subtle warmth and gentle kick, elevating the flavor profile without overpowering it. Adjust to your heat preference.
- 1 tbsp of sharp cheddar cheese, shredded: Sharp cheddar melts beautifully and provides that quintessential tangy, rich cheeseburger flavor that binds everything together.
- 1 large egg: Beaten with a little water, this will create an “egg wash” for the pastry, giving it that gorgeous golden-brown, shiny finish when baked.
Essential Equipment for a Seamless Wellington Experience:
While this recipe is simple, having the right tools on hand will make the cooking process even smoother:
- Large skillet (preferably cast iron or heavy-bottomed for even searing)
- Spatula or tongs
- Plate lined with paper towels (for draining bacon)
- Rolling pin (for puff pastry)
- Round cookie cutters (or a sharp knife and a template for precise pastry circles)
- Small bowl (for egg wash)
- Pastry brush
- Baking sheet lined with parchment paper
- Wire cooling rack
- Measuring spoons
How to Make Poor Man’s Cheeseburger Wellington:
Follow these detailed steps to create your own irresistible Poor Man’s Cheeseburger Wellington:
Step 1: Crispy Bacon Preparation
Begin by placing a large, heavy-bottomed skillet – a cast iron pan works exceptionally well for even heating – over medium-high heat. Allow the pan to preheat thoroughly for a minute or two before adding the bacon. Carefully lay your slice of bacon into the hot pan. Cook the bacon for approximately 8 to 10 minutes, using tongs to turn it occasionally. The goal is to achieve a beautiful, even crispiness and a rich golden-brown color on both sides. This process renders out the fat and concentrates the smoky flavor, which is a key component of our Wellington. Once perfectly crisp, transfer the cooked bacon to a plate lined with paper towels. This crucial step helps to drain off any excess grease, ensuring the bacon remains delightfully crispy and doesn’t make your Wellington greasy. After removing the bacon, carefully pour out the rendered bacon grease from the pan, leaving only a very thin film or wiping it lightly with a paper towel. We want a clean surface for searing our burger patty to prevent the patty from tasting too much like bacon at this stage.
Step 2: Crafting the Perfect Burger Patty
Now, it’s time to prepare the star of our show: the ground beef patty. Take your 8 ounces of ground beef and gently shape it into a uniform patty. Aim for a thickness of about 1 inch and a diameter of roughly 4¼ inches. Be careful not to overwork the meat, as this can lead to a tough burger. Season both sides of the patty generously with salt, freshly ground black pepper, and a touch of cayenne pepper. The cayenne provides a subtle warmth that enhances the beef’s flavor. Return the patty to the same skillet you used for the bacon, which should still be moderately hot. Sear the patty for about 2 minutes per side. The goal here is to create a beautiful, flavorful crust on the exterior, not to cook it through completely. This searing locks in juices and builds flavor. Once seared, transfer the cooked burger to a clean plate. Allow it to cool slightly at room temperature, then place it in the refrigerator to cool completely. This cooling step is critical; a cold patty will prevent the puff pastry from cooking unevenly or becoming soggy when assembled.
Step 3: Preparing the Flaky Puff Pastry
While your burger patty cools, turn your attention to the puff pastry. If it was frozen, ensure it’s properly thawed in the refrigerator, but still cold to the touch. Lightly flour a clean work surface and your rolling pin. Take the puff pastry out of the freezer (or fridge, if thawing), and carefully roll it out into an even thickness of approximately 1/8 inch. Working quickly to keep the pastry cold is key to its flakiness. For the bottom layer of our Wellington, use a round cookie cutter or a sharp knife (with a template if you prefer) to cut out a 5¼ to 5½ inch round. For the top layer, you’ll need a slightly larger round, about 7¼ to 7½ inches in diameter. The larger size allows for crimping and a generous seal. Carefully transfer both cut pastry rounds onto a baking sheet lined with parchment paper and place them back in the freezer. Let them freeze until they are firm. This firming step is crucial for maintaining their shape and ensuring the pastry puffs beautifully in the oven.
Step 4: Assembling the Foundation
With the pastry firm and cold, take out the larger top piece of dough from the freezer. Using a small cookie cutter or a sharp knife, carefully cut a small hole in the very middle of this top dough piece. This vent hole is essential as it allows steam to escape during baking, preventing the pastry from bursting open prematurely and ensuring an even bake. Lightly score the surface of this top dough piece in a decorative pattern, perhaps a series of diagonal lines, as often demonstrated in culinary videos like Food Wishes. This scoring adds visual appeal and helps the pastry expand gracefully. Immediately return the scored top dough piece to the freezer to keep it cold. Now, retrieve the bottom piece of dough from the freezer. Place this smaller round of dough on your parchment-lined baking sheet. Carefully center the completely cooled, seared burger patty on top of the bottom dough. Then, lay the two halves of your crispy cooked bacon over the burger patty.
Step 5: Layering the Flavors and Sealing the Deal
Once the bacon is in place, evenly sprinkle the shredded sharp cheddar cheese over the bacon and burger. The cheese will melt into a luscious, savory layer. In a small bowl, whisk together the large egg with about a teaspoon of water to create your egg wash. Lightly brush the edges of the bottom dough round with this egg wash mixture. This acts as a ‘glue’ to seal the Wellington. Now, retrieve the larger, scored top piece of dough from the freezer and carefully place it over the fillings, ensuring it neatly covers everything. Gently press the edges of both doughs together, working your way around the entire circumference. Press firmly to create a tight seal. A tight seal is paramount to prevent the filling from leaking out during baking and to ensure the pastry puffs up beautifully. After sealing, return the assembled Wellington to the refrigerator to chill for at least 20 more minutes. This chilling period allows the pastry to relax and firm up, which helps it hold its shape in the hot oven. While your Wellington is chilling, preheat your oven to 450°F (230°C).
Step 6: Baking to Golden Perfection and Serving
Once the chilling time is complete and your oven is preheated, remove the Wellington from the refrigerator. For an extra touch of visual appeal and to reinforce the seal, use the tines of a fork to gently crimp the edges of the pastry all the way around. This creates a classic decorative finish and helps prevent any potential leaks. Brush the entire top surface of the pastry with the remaining egg wash. This egg wash is what will give your Wellington that irresistible golden-brown, glossy finish. Carefully transfer the baking sheet with the Wellington into the preheated oven. Bake for approximately 20 to 22 minutes, or until the pastry is beautifully puffed, deeply golden brown, and looks incredibly inviting. The precise baking time may vary slightly depending on your oven, so keep an eye on it. Once perfectly baked, remove the Wellington from the oven and carefully transfer it to a wire cooling rack. Allow it to cool for about 5 minutes before serving. This brief resting period allows the internal juices to redistribute and helps the pastry set, preventing a soggy bottom. Slice carefully and serve immediately. Enjoy this delightful, budget-friendly gourmet treat!
Tips for a Perfect Poor Man’s Cheeseburger Wellington:
Achieving Wellington perfection, even the “poor man’s” version, involves a few key considerations:
- Keep Pastry Cold: Puff pastry is temperamental. Always work with cold pastry. If it gets too warm and sticky, pop it back in the fridge or freezer for a few minutes to firm up. This ensures maximum puff and flakiness.
- Don’t Overwork the Dough: When rolling, use even pressure and avoid excessive handling. Overworked pastry can become tough and lose its ability to puff.
- Cool Everything Thoroughly: The burger patty and bacon must be completely cool before assembling. Warm ingredients will steam inside the pastry, making it soggy.
- Seal Tightly: A good seal around the edges is critical. If not sealed properly, the filling can leak out, and the pastry won’t puff as effectively. The egg wash is your best friend here.
- Ventilation is Key: Don’t skip the small hole in the top pastry. This allows steam to escape, preventing the pastry from exploding and ensuring even cooking.
- Egg Wash for Shine: A generous coating of egg wash provides that beautiful golden-brown color and appealing sheen, making your Wellington look as good as it tastes.
- Trust Your Oven: Ovens vary, so keep an eye on your Wellington during the final baking stage. It should be deeply golden and puffed, not just lightly browned.
- Rest Before Slicing: Allowing the Wellington to rest for 5 minutes after baking helps the juices settle and prevents the filling from spilling out, ensuring cleaner slices.
Variations and Customizations for Your Cheeseburger Wellington:
While the classic Poor Man’s Cheeseburger Wellington is delicious as is, feel free to experiment and make it your own:
- Cheese Choices: Instead of sharp cheddar, try smoked gouda, pepper jack for a kick, or even a classic American cheese for a truly retro diner feel.
- Add-Ins: Sautéed mushrooms, caramelized onions, or a thin layer of mustard or BBQ sauce could be spread on the patty before adding cheese for extra flavor dimensions.
- Spice it Up: Experiment with different seasonings for the ground beef. Garlic powder, onion powder, a pinch of smoked paprika, or a dash of Worcestershire sauce can enhance the flavor.
- Vegetarian Option: For a meat-free version, substitute the ground beef with a hearty vegetarian burger patty and opt for plant-based bacon alternatives.
- Mini Wellingtons: For appetizers or smaller portions, cut smaller rounds of puff pastry and form mini cheeseburger Wellingtons. Adjust baking time accordingly.
- Dipping Sauces: Serve with a side of ketchup, mayonnaise, a special burger sauce, or even a savory gravy for an extra touch of indulgence.
Serving Suggestions for a Complete Meal:
This hearty Wellington pairs beautifully with a variety of sides to create a well-rounded meal:
- Fresh Green Salad: A simple vinaigrette-dressed mixed green salad offers a light, refreshing contrast to the richness of the Wellington.
- Crispy French Fries: Embrace the cheeseburger theme with a side of perfectly golden, crispy fries.
- Steamed Vegetables: Green beans, asparagus, or broccoli provide a healthy and colorful accompaniment.
- Creamy Coleslaw: A tangy, crunchy coleslaw can cut through the richness and add another layer of texture.
- Roasted Potatoes: Roasted potato wedges or small roasted potatoes with herbs are a comforting and hearty side.
Storage and Reheating Your Cheeseburger Wellington:
If you’re lucky enough to have any leftovers, storing and reheating your Poor Man’s Cheeseburger Wellington properly will ensure it remains delicious.
Storage: Allow any leftover Wellington to cool completely to room temperature. Once cool, wrap it tightly in plastic wrap or aluminum foil, or place it in an airtight container. Store in the refrigerator for up to 2-3 days.
Reheating: For the best results and to revive the pastry’s crispness, reheating in an oven or air fryer is recommended. Preheat your oven to 300-325°F (150-160°C). Place the Wellington on a baking sheet and heat for 15-20 minutes, or until warmed through and the pastry is crisp again. Avoid microwaving, as this tends to make the pastry soggy.
The Poor Man’s Cheeseburger Wellington is more than just a recipe; it’s an invitation to elevate your everyday meals with creativity and simplicity. It’s a dish that proves culinary ingenuity knows no bounds, allowing you to experience the joy of a “Wellington” without the fuss or the hefty price tag. Whether you’re looking for a new family favorite, an impressive yet easy dish for guests, or simply a comforting meal that delivers on flavor, this recipe is sure to become a cherished addition to your culinary repertoire. Don’t hesitate to try it – you’ll be amazed at how such simple ingredients can come together to create something truly special and utterly delicious. Happy cooking!
*All these images are credited to Food Wishes via YouTube. Give his channel a visit and subscribe for more incredible culinary inspiration and innovative recipes!
Poor Man’s Cheeseburger Wellington Recipe