
Create Enchanting DIY Floating Candle Displays for a Serene Home Ambiance
Candles possess an unparalleled ability to instantly transform any space, imbuing it with warmth, comfort, and a touch of magic. While traditional candles offer their charm, there’s a unique allure to floating candles that elevates the experience, creating a mesmerizing visual spectacle. The gentle dance of flames on water has a profoundly calming effect, making them perfect for unwinding after a long day or setting a romantic mood. Instead of simply buying them, imagine crafting your own exquisite floating candle decor – a piece that not only relaxes your mind but also serves as a captivating conversation starter.
We recently stumbled upon an ingenious and incredibly stylish DIY project shared by TikTok creator @numbersixtysix. This creative individual showcased how to effortlessly transform ordinary glass containers into a breathtaking floating candle display, proving that elegant home decor doesn’t have to come with a hefty price tag. With just a few basic supplies and a dash of creativity, you can replicate this stunning project and infuse your home with a bespoke sense of tranquility.
Why Choose DIY Floating Candles?
Opting for a DIY approach to home decor offers numerous benefits. Firstly, it allows for unparalleled personalization. You get to choose the colors, sizes, and styles that perfectly complement your existing interior design. Secondly, it’s often a more cost-effective solution than purchasing high-end decor items, especially when you repurpose items you already own or find inexpensive containers at thrift stores. Beyond practicality, there’s immense satisfaction in creating something beautiful with your own hands. It’s a therapeutic process that taps into your creative spirit, culminating in a unique piece that reflects your personal taste and craftsmanship. This particular project is remarkably straightforward, making it an ideal entry point for beginners in DIY home decor while still offering a sophisticated result.
Essential Materials to Gather for Your Floating Candle Masterpiece
Before embarking on this creative journey, ensure you have all the necessary components. The beauty of this project lies in its simplicity and the accessibility of its materials. Here’s a detailed look at what you’ll need:
- Glass Containers: You’ll need two distinct sizes. A smaller, sturdy glass container will serve as the base, providing stability. A larger, wider glass bowl or vase will hold the water and the floating candles. Look for containers with smooth surfaces for optimal paint adhesion and a clean aesthetic. Thrift stores are excellent places to find unique and affordable glass pieces.
- Spray Paint: The original tutorial uses black spray paint for a sleek, modern look, but feel free to choose any color that matches your decor. Matte finishes offer a contemporary feel, while gloss can add a touch of sophistication. Consider using a paint + primer combination for better adhesion and durability on glass. Always opt for quality spray paint designed for glass or multi-surface application.
- Super Glue (or strong adhesive): This is crucial for securely bonding the base and the bowl. Ensure you use a strong, fast-drying adhesive formulated for glass or ceramics to create a lasting bond. Epoxy glue is another excellent option for extra durability.
- Floating Candles: These are the stars of your display. They come in various sizes, colors, and even scents. Choose high-quality floating candles that will burn evenly and provide a good duration of light. For an eco-friendly or flame-free option, consider battery-operated LED floating candles, which offer the same visual appeal without the open flame.
- Painter’s Tape: Essential for creating a clean, crisp line on the rim of your bowl, ensuring that only a specific portion gets painted.
- Cleaning Supplies: Rubbing alcohol or glass cleaner and paper towels for thoroughly cleaning your glass containers before painting.
- Protective Gear: Gloves and a face mask for spray painting, along with newspaper or a drop cloth to protect your work surface.
Step-by-Step Guide: Crafting Your Own Elegant Floating Candles
Recreating this stunning decor piece is incredibly simple, following these clear steps. The process is divided into preparation, painting, assembly, and the final decorative touches.
1. Prepare Your Glass Containers
The first step is critical for ensuring a professional finish. Begin by carefully peeling off any labels or stickers from both glass containers. For stubborn labels, warm soapy water, rubbing alcohol, or a specialized adhesive remover can work wonders. Once the labels are gone, thoroughly clean both containers with glass cleaner or rubbing alcohol to remove any grease, dust, or fingerprints. This ensures optimal adhesion of the spray paint. Allow them to dry completely.
Next, take your larger bowl and cover about an inch of its top rim with painter’s tape. Press the tape down firmly, making sure there are no air bubbles or gaps, as this will create a perfectly unpainted edge, adding a sophisticated contrast to the painted body of the bowl. This unpainted strip will allow the light to beautifully reflect through the glass when your candles are lit.
2. The Art of Spray Painting
With your containers prepped, it’s time for painting. Find a well-ventilated outdoor area or a garage with open doors. Lay down newspaper or a drop cloth to protect the surface from overspray. Wearing gloves and a mask is highly recommended for safety.
Place both the taped bowl and the smaller base container upside down on your protected surface. Holding the spray paint can approximately 8-12 inches away, apply thin, even coats of paint. It’s better to apply several thin coats than one thick coat, which can lead to drips and uneven coverage. Allow each coat to dry to the touch (usually 15-30 minutes, check your paint can instructions) before applying the next. Continue until both containers are fully and opaquely covered in your chosen color. Once satisfied, let them dry completely for several hours, or even overnight, to ensure the paint has fully cured and hardened. This prevents smudges and scratches during assembly.
Once the paint is thoroughly dry and cured, carefully peel off the painter’s tape from the rim of the larger bowl. You should be left with a perfectly clean and unpainted glass edge, creating a sharp and sophisticated contrast.
3. Assembling Your Masterpiece
Now that both containers are beautifully painted, it’s time to bring them together. Place the smaller, painted base container upside down on a stable surface. Apply a generous amount of super glue (or your chosen strong adhesive) to the center of the upside-down base. Ensure the glue covers enough surface area for a strong bond.
Next, carefully place the larger painted bowl, right side up, directly onto the glued center of the base. Take your time to ensure it is perfectly centered before applying firm pressure. Hold it in place for a few moments according to your adhesive’s instructions to allow the initial bond to set. Let the entire assembly dry undisturbed for the full curing time recommended by your glue manufacturer – this is crucial for the stability and longevity of your floating candle display. Patience here will prevent any mishaps later.
4. The Final Touch: Water and Floating Candles
Once the glue is completely dry and secure, your floating candle holder is ready to be filled. Carefully pour water into the larger bowl, filling it almost to the brim but leaving enough space for the floating candles without overflowing. For an extra touch of elegance, you can use distilled water to prevent mineral buildup or add a few drops of essential oils for a subtle fragrance. You might also consider adding decorative elements to the water, such as clear pebbles, glass gems, flower petals, or even a dash of food coloring for a vibrant effect.
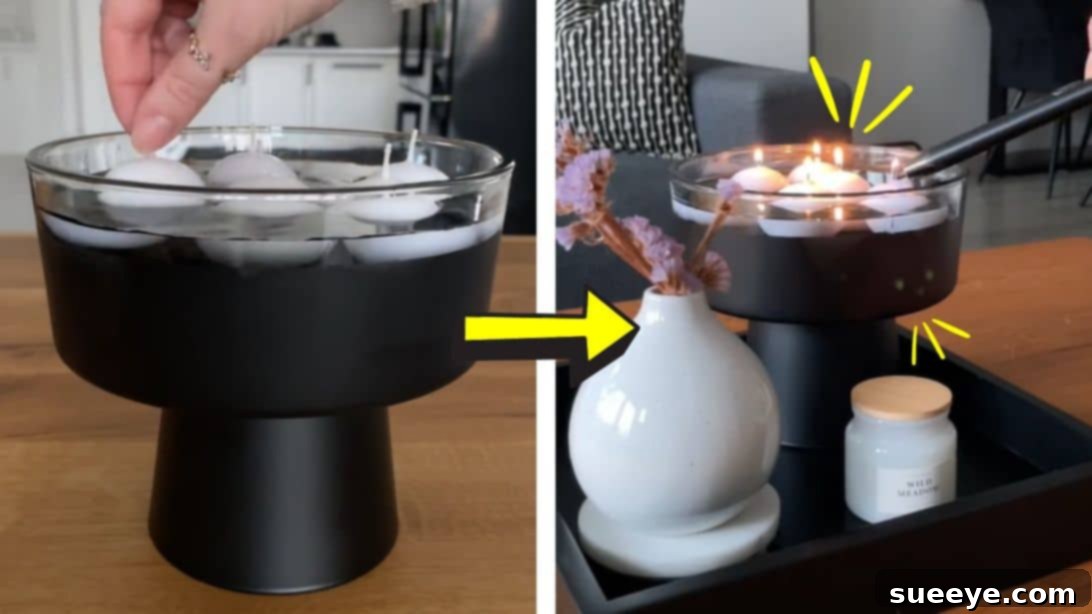
Finally, gently place your chosen floating candles onto the water’s surface. Watch as they naturally align, ready to cast their soft, flickering glow. And just like that, you’ve created a stunning and unique piece of decor that looks like it came straight from a high-end boutique! It’s a testament to how easy and rewarding DIY projects can be.
Styling Your Floating Candle Display: Ideas for Every Corner
The versatility of this DIY floating candle display allows it to seamlessly integrate into various settings, enhancing the ambiance with its subtle elegance. The TikTok creator beautifully showcased her finished piece on a sleek black tray, accompanied by a pristine white ceramic flower vase, creating a sophisticated monochromatic display. Here are more ideas to inspire your styling:
- Dining Table Centerpiece: Place it at the heart of your dining table for intimate dinners or festive gatherings. The soft glow will create a warm and inviting atmosphere, perfect for conversation.
- Coffee Table Accent: Elevate your living room’s focal point by placing the floating candles on your coffee table. It draws the eye and adds an element of refined comfort.
- Side Table Elegance: Adorn a bedside table or an entryway console table with this piece for a welcoming glow in often-overlooked spaces.
- Bathroom Oasis: Transform your bathroom into a spa-like retreat by placing the display near the tub or on the vanity. Pair it with fluffy towels and bath salts for ultimate relaxation.
- Outdoor Charm: On a warm evening, use it to illuminate your patio or deck. The flickering flames add a magical touch to outdoor entertaining (ensure it’s protected from wind).
- Seasonal Decor: Customize the water with seasonal elements. Think cranberries and pine sprigs for winter, small seashells for summer, or autumn leaves for fall. Colored floating candles can also match holiday themes.
- Paired with Other Elements: Combine your floating candle display with other textures and objects. Think alongside potted succulents, stacks of books, or art pieces to create a rich and layered look.
- Multiple Displays: For a grander statement, create a series of these floating candle holders in varying heights or sizes and arrange them together for a dramatic effect.
Safety First: Important Considerations for Burning Candles
While floating candles create a beautiful ambiance, it’s paramount to prioritize safety. Always keep these precautions in mind:
- Never Leave Unattended: Always extinguish candles before leaving a room or going to sleep.
- Keep Away from Flammables: Ensure your display is placed far from curtains, paper, books, furniture, and anything else that can catch fire.
- Stable Surface: Place your floating candle holder on a flat, heat-resistant, and stable surface where it cannot be easily knocked over.
- Out of Reach: Keep candles away from children and pets. Their curious hands or paws could easily lead to accidents.
- Avoid Drafts: Place candles away from open windows, vents, or fans, as drafts can cause uneven burning, excessive flickering, or even blow flames onto flammable objects.
- Maintain Water Level: Ensure there’s always enough water for the candles to float properly and to contain the flame.
- Trim Wicks: Before each lighting, trim the wicks to about 1/4 inch. This promotes a cleaner, brighter burn and prevents excessive smoke.
Embrace Your Inner Crafter and Elevate Your Home
We absolutely echo the sentiment shared in the original caption: “Obsessed with these floating candles!!” The transformation from simple glass containers to such an elegant and functional decor piece is truly remarkable. It’s a project that delivers maximum impact with minimal effort, making it perfect for anyone looking to add a touch of sophistication and serenity to their home without breaking the bank.
So, why not give this enchanting DIY floating candle project a try? Gather your materials, follow these straightforward steps, and prepare to be delighted by your own handcrafted creation. We’re confident you’ll love the peaceful glow and unique charm it brings to your living space. Share your beautiful creations with us!