
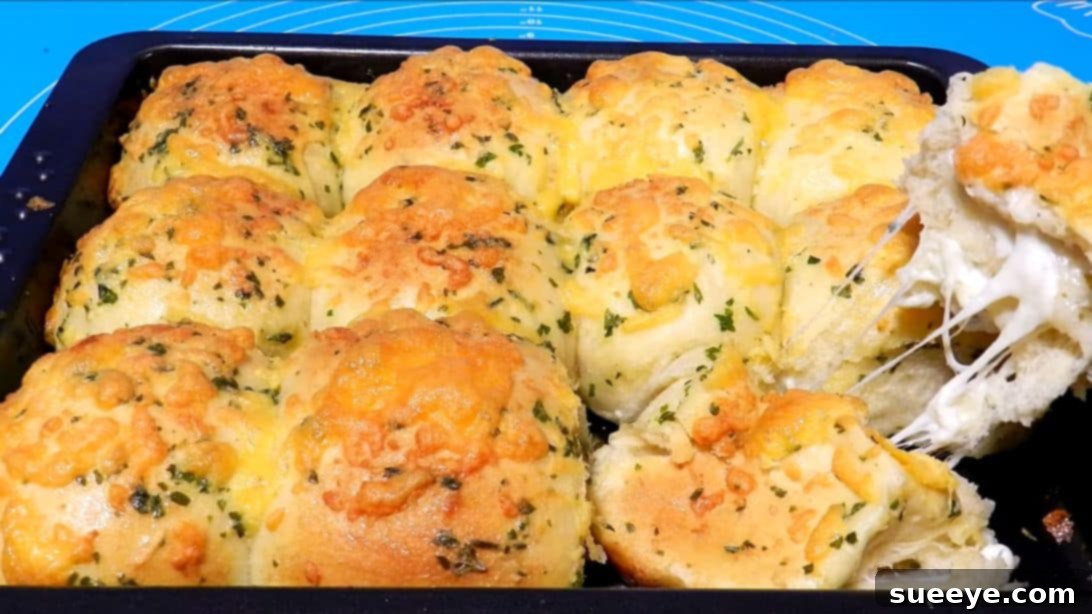
There’s an undeniable magic in freshly baked bread, and these homemade cheese butter garlic dinner rolls elevate that experience to a whole new level of deliciousness. Imagine soft, fluffy rolls, generously infused with aromatic garlic and rich butter, then taken a step further with a surprise: a warm, gooey mozzarella filling that stretches with every bite. To top it all off, a savory garlic butter spread and a sprinkle of grated cheese create an irresistible golden crust. These rolls are more than just a side dish; they’re a centerpiece, a conversation starter, and a comforting staple that perfectly complements a wide array of meals. Whether you’re serving them alongside a hearty pasta, a warming soup, a fresh salad, or a succulent stew, they are guaranteed to be a hit.
This exceptional recipe, brought to us by the talented Ninik Becker on YouTube, transforms simple ingredients into an extraordinary culinary delight. Get ready to impress your family and friends with these phenomenal, cheesy, garlicky, buttery dinner rolls. Follow our detailed instructions below, or watch Ninik’s video for a visual guide. Let’s get baking and fill your home with the most incredible aroma!
Why These Cheese Butter Garlic Rolls Are a Must-Try
In a world full of dinner roll recipes, what makes these stand out? It’s the harmonious blend of textures and flavors that creates an unforgettable experience. The dough itself is designed for maximum fluffiness and tenderness, a hallmark of well-made homemade bread. But the real game-changer is the hidden treasure within: a generous cube of melted mozzarella cheese. This unexpected gooey center adds a luxurious dimension, turning a simple roll into a cheesy delight that oozes with flavor. Beyond the filling, the external coating of melted butter, fragrant garlic, fresh parsley, and a final sprinkle of cheese bakes into a golden-brown crust that’s crisp on the outside and incredibly soft within. This combination not only enhances the taste but also provides a delightful contrast in every bite. They are incredibly versatile, serving as the perfect accompaniment to virtually any savory dish, making them an indispensable addition to your recipe repertoire.
Ingredients for Irresistible Dinner Rolls
Crafting these delectable dinner rolls requires a selection of fresh, high-quality ingredients. Each component plays a vital role in achieving the perfect texture, flavor, and aroma that will make these rolls an instant family favorite. Pay attention to the details of each ingredient, as they all contribute to the final masterpiece.
For the Fluffy Dough:
- 2.5 cups of All-Purpose Flour: The foundation of our rolls, providing structure and chewiness. Using all-purpose flour ensures a tender crumb.
- 1 teaspoon of Instant Dry Yeast: The leavening agent responsible for the rolls’ light and airy texture. Instant yeast is convenient as it doesn’t require proofing before mixing.
- 1 tablespoon of Sugar: Feeds the yeast, helping it activate and produce carbon dioxide, which makes the dough rise. It also adds a subtle sweetness to balance the savory flavors.
- 1/2 cup of Warm Milk: Provides moisture and richness to the dough. The warmth helps to activate the yeast effectively, but ensure it’s not too hot to kill the yeast.
- 1 large Egg (whisked): Adds richness, moisture, and helps create a softer, more tender crumb, contributing to the rolls’ golden hue.
- 3 tablespoons of Butter or Margarine: Incorporates flavor, tenderness, and a beautiful golden color to the crust. Using softened butter makes it easier to incorporate into the dough.
- 1 teaspoon of Salt: Essential for enhancing the flavor of the dough and controlling the yeast’s activity, preventing over-proofing.
For the Gooey Mozzarella Filling:
- Mozzarella Cheese: The star of our filling! Use a low-moisture mozzarella, cut into cubes, for the best melt and stretch. Its mild flavor pairs perfectly with the garlic and butter.
- Black Pepper: A touch of freshly ground black pepper adds a subtle kick and enhances the overall savory profile of the cheese.
- Fresh Parsley: Finely chopped fresh parsley adds a vibrant color and a fresh, herbaceous note to the cheese filling.
For the Aromatic Garlic Butter Spread:
This spread is brushed over the rolls before baking, creating an incredibly flavorful and visually appealing crust.
- Melted Butter: The base of our irresistible topping, providing a rich, golden finish and carrying the flavors beautifully.
- Fresh Garlic: Minced garlic is crucial for that classic, pungent garlic bread flavor. The more, the merrier for true garlic lovers!
- Salt: A pinch of salt in the spread helps to season the crust and bring out the flavors of the garlic and butter.
- Fresh Parsley: Adds a pop of color and a fresh, peppery note to the garlic butter, enhancing its aroma.
- Grated Cheese: A final sprinkle of grated cheese (like Parmesan or cheddar, or even more mozzarella) on top melts into a delightful, savory crust.
Step-by-Step Instructions for Perfect Dinner Rolls
Follow these detailed steps carefully to achieve light, fluffy, and utterly delicious cheese butter garlic dinner rolls. Precision in baking is key, especially when working with yeast dough, so take your time and enjoy the process!
Step 1: Preparing the Dough Base
In a large mixing bowl, combine 2.5 cups of all-purpose flour, 1 teaspoon of instant dry yeast, 1 tablespoon of sugar, 1/2 cup of warm milk, one large whisked egg, 3 tablespoons of softened butter, and 1 teaspoon of salt. Begin to mix these ingredients together using a spoon or a stand mixer with a dough hook attachment. Continue mixing until all the dry ingredients are fully hydrated and a shaggy dough starts to form. The dough should come together into a coherent mass.
Step 2: Kneading and First Proofing
Once your dough has formed, transfer it to a lightly floured work surface. Begin kneading the dough by hand for approximately 5 to 8 minutes. The goal is to develop the gluten, which will make the dough smooth, elastic, and less sticky. You’ll know it’s ready when it springs back slightly when poked and feels pliable. Form the kneaded dough into a smooth, round ball. Lightly grease a clean bowl with a little oil (vegetable or olive oil works well) and place the dough ball inside, turning it once to coat all sides. This prevents drying. Cover the bowl tightly with plastic wrap or a clean kitchen towel. Allow the dough to proof in a warm place for about 60 to 90 minutes, or until it has visibly doubled in size. This first proofing is crucial for developing flavor and creating a light texture.
Step 3: Shaping, Filling, and Second Proofing
Gently punch down the risen dough to release the air. Transfer it back to your lightly floured work surface. Divide the dough into 12 equal pieces. For best results, you can use a kitchen scale to ensure each piece is roughly the same weight, leading to uniformly sized rolls. Take each piece and flatten it slightly into a disc. Prepare your mozzarella by cutting it into 12 equal cubes. In a small bowl, lightly toss the mozzarella cubes with a pinch of black pepper and a sprinkle of chopped fresh parsley for an added layer of flavor. Place one seasoned mozzarella cube in the center of each dough disc. Carefully bring the edges of the dough up and around the cheese, pinching them firmly together to seal the filling completely inside. Shape each filled dough piece into a smooth ball. Arrange these shaped rolls in a baking pan that has been generously greased with butter. Ensure there’s a little space between each roll for them to expand. Cover the pan again with plastic wrap or a towel and let the rolls undergo a second proofing for about 30 minutes. They should appear noticeably puffier.
Step 4: Preparing and Applying the Garlic Butter Topping
While your rolls are undergoing their final proof, preheat your oven to 356 degrees F (180 degrees C). In a small heatproof bowl, combine your melted butter, finely minced garlic, a pinch of salt, and a generous amount of chopped fresh parsley. Stir everything together until well combined. This aromatic mixture will form the crust of your rolls. Once the rolls have finished their second proofing, gently brush this delightful garlic butter mixture generously over the top of each roll. Ensure every surface is coated to maximize flavor and create that beautiful golden-brown finish. After brushing, sprinkle a good amount of grated cheese (such as Parmesan or a sharp cheddar, or even more mozzarella) over the top of each roll. This will melt into a delicious, savory crust during baking.
Step 5: Baking to Golden Perfection
Carefully place the baking pan with your prepared rolls into the preheated oven. Bake for approximately 20 minutes. Keep a close eye on them; the baking time can vary slightly depending on your oven. The rolls are done when they turn a beautiful golden brown on top and the cheese has melted and bubbled. The internal temperature should reach about 200-210 degrees F (93-99 degrees C) if you use an instant-read thermometer. Once baked, remove the pan from the oven and let the rolls cool in the pan for a few minutes before transferring them to a wire rack. Serve them warm, as they are truly at their best when freshly baked and the cheese is still wonderfully gooey. Enjoy your incredible homemade cheese butter garlic dinner rolls!
Pro Tips for Perfect Dinner Rolls
Even experienced bakers can benefit from a few tricks of the trade. Here are some expert tips to ensure your cheese butter garlic dinner rolls turn out absolutely perfect every single time:
- Ingredient Temperature Matters: Ensure your milk is warm (not hot!) and your butter and egg are at room temperature. This helps the yeast activate properly and allows ingredients to combine smoothly, resulting in a more uniform dough.
- Don’t Skimp on Kneading: Kneading is vital for developing gluten, which gives the rolls their structure and chewiness. If kneading by hand, embrace the process; it typically takes 8-10 minutes until the dough is smooth and elastic. For stand mixers, follow manufacturer guidelines.
- The Ideal Proofing Environment: Yeast loves warmth! If your kitchen is cool, find a warm spot for proofing – perhaps in a turned-off oven with the light on, or near a sunny window. Avoid drafty areas. Proper proofing ensures light, airy rolls.
- Seal the Cheese Well: When filling the rolls, make sure to pinch the dough seams together very tightly. This prevents the melted mozzarella from oozing out during baking, keeping all that deliciousness inside.
- Don’t Overbake: Overbaking can lead to dry, tough rolls. Keep an eye on them towards the end of the baking time. They should be golden brown on top. A quick peek with an instant-read thermometer (200-210°F or 93-99°C) confirms doneness.
- Cool Slightly Before Serving: While tempting to devour immediately, allowing the rolls to cool for 5-10 minutes on a wire rack lets the cheese filling set slightly and prevents burns, making them easier to handle and enjoy.
Variations and Customizations
While the classic cheese butter garlic combination is a winner, feel free to get creative and customize your dinner rolls to your taste:
- Cheese Choices: Experiment with different cheeses for the filling! Provolone, Monterey Jack, or even a blend of mozzarella and cheddar can add new flavor dimensions. For the topping, Parmesan or Pecorino Romano offer a sharper, saltier kick.
- Herb Additions: Beyond parsley, consider adding other fresh herbs to the dough, filling, or garlic butter spread. Rosemary, thyme, oregano, or a mix of Italian herbs would be delicious complements.
- Spice It Up: For those who love a bit of heat, sprinkle a pinch of red pepper flakes into the mozzarella filling or the garlic butter spread.
- Onion & Chive Infusion: Add finely chopped chives or a tiny bit of grated onion to the garlic butter spread for an extra layer of savory flavor.
- Sweet Glaze Option (No Garlic): If you ever want to adapt the base dough for a sweet roll, skip the garlic and cheese in the topping and use a simple sugar glaze or cinnamon sugar for a different treat.
Serving Suggestions
These versatile cheese butter garlic dinner rolls are the perfect accompaniment to almost any meal. Here are some ideas to inspire your culinary pairings:
- Pasta Powerhouse: They are simply divine served alongside any pasta dish, from a rich lasagna to a light pesto pasta, perfect for soaking up every last drop of sauce.
- Soup & Stew Companion: A comforting bowl of soup (tomato, minestrone, chicken noodle) or a hearty stew (beef bourguignon, lentil stew) finds its ideal partner in these savory rolls.
- Main Course Marvel: Serve them with roasted chicken, grilled steak, or baked fish. The garlic and butter notes beautifully complement most proteins.
- Salad’s Best Friend: Turn a simple green salad into a more substantial meal by pairing it with these warm, cheesy rolls.
- Breakfast & Brunch Bliss: While traditionally dinner rolls, they can also be a delightful addition to a brunch spread, especially if you’re serving savory items like scrambled eggs or quiche.
- Snack Time Savior: They’re so good, they can easily be enjoyed on their own as a satisfying snack any time of day!
Frequently Asked Questions (FAQ)
Got questions about baking these incredible rolls? We’ve got answers!
Q: Can I use active dry yeast instead of instant dry yeast?
A: Yes, you can! If using active dry yeast, you’ll need to activate it first. Dissolve the yeast and sugar in the warm milk (ensure it’s around 105-115°F or 40-46°C) and let it sit for 5-10 minutes until foamy. Then, proceed with the recipe, adding this mixture to your dry ingredients.
Q: Can I prepare the dough ahead of time?
A: Absolutely! After the first proofing (Step 2), you can place the dough in an oiled bowl, cover it tightly, and refrigerate it overnight (up to 24 hours). The next day, let it come to room temperature for about 30-60 minutes before proceeding with Step 3.
Q: How do I store leftover dinner rolls?
A: Store cooled leftover rolls in an airtight container at room temperature for up to 2-3 days. For best freshness, you can gently reheat them in the oven or microwave before serving.
Q: Can I freeze these dinner rolls?
A: Yes! Once completely cooled, place the rolls in a freezer-safe bag or container. They can be frozen for up to 1-2 months. To reheat, thaw them at room temperature, then warm in a preheated oven at 300°F (150°C) for 10-15 minutes, or until heated through and soft.
Q: My dough isn’t rising. What went wrong?
A: Common reasons for dough not rising include using expired yeast, milk that was too hot (which kills the yeast) or too cold (which slows it down), or a proofing environment that is too cold. Ensure your yeast is fresh and your milk is just warm to the touch, not hot.
Conclusion: Your New Favorite Homemade Cheese Butter Garlic Dinner Rolls
And there you have it – a comprehensive guide to baking the most delightful and irresistible cheese butter garlic dinner rolls. This recipe promises not just a delicious addition to your meal but also a rewarding baking experience. The fluffy texture, the pungent garlic, the rich butter, and that glorious surprise of melted mozzarella all come together to create a side dish that often steals the show. Whether you’re a seasoned baker or just starting out, follow these steps and tips to achieve bakery-quality results right in your own kitchen. Don’t wait any longer; gather your ingredients and start baking these magnificent rolls today. Your taste buds (and your family!) will thank you for it!