
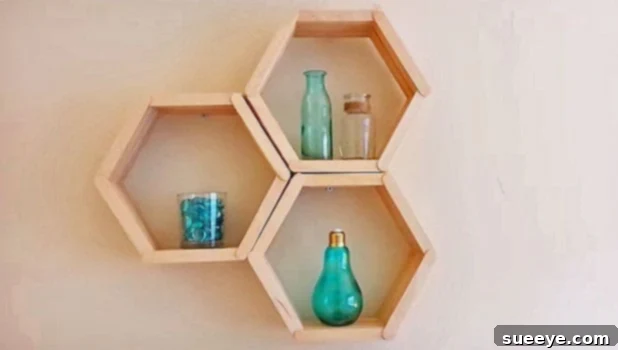
Craft Stunning DIY Hexagon Honeycomb Shelves from Popsicle Sticks: Your Ultimate Guide
Have you ever looked at a pile of leftover popsicle sticks from a children’s craft project and wondered what else they could become? Prepare to be amazed! These humble wooden sticks, combined with the magic of a hot glue gun, can be transformed into incredibly stylish and functional hexagon shelves. Often referred to as “honeycomb shelves” due to their natural tessellating pattern, these modern geometric accents have become a staple in contemporary home decor.
In recent years, hexagon shelves have soared in popularity, gracing the pages of home design magazines, inspiring displays in trendy furniture stores, and dominating social media feeds. Their clean lines, unique shape, and versatile nature make them a perfect fit for a wide range of interior styles, from minimalist to bohemian. They offer a super cute and practical way to display small decor items, beloved trinkets, or vibrant succulent arrangements. The best part? Creating them yourself is not only incredibly easy and budget-friendly but also deeply satisfying.
Why Embrace DIY for Your Hexagon Shelves?
Choosing to craft your own home decor pieces, especially something as chic as honeycomb shelves, comes with numerous advantages:
- Unbeatable Cost-Effectiveness: Popsicle sticks are one of the cheapest craft materials available. This project allows you to achieve high-end decorative results for a fraction of the cost of buying similar shelves commercially.
- Personalization at Its Best: Unlike mass-produced items, your DIY shelves can be fully customized. You have complete control over the size, depth, number of individual hexagons, and even the final finish – whether you prefer a natural wood look, a vibrant paint color, or a rustic stain.
- Accessibility for All Skill Levels: This project requires minimal tools and basic crafting skills, making it perfect for beginners and seasoned DIY enthusiasts alike. If you can use a hot glue gun, you can make these shelves!
- Sustainable Crafting: Repurposing popsicle sticks is an excellent way to engage in sustainable crafting, giving new life to materials that might otherwise be discarded. It’s a small step towards eco-conscious decorating.
- A Unique Decorative Statement: Handmade items always add a personal touch and unique character to a space that store-bought decor often lacks. Your guests will be amazed when you tell them these stunning shelves are made from popsicle sticks!
Essential Materials for Your Popsicle Stick Honeycomb Shelves
Before embarking on your crafting adventure, ensure you have all the necessary supplies ready. The beauty of this project lies in its simplicity and minimal material requirements:
- Popsicle Sticks (Craft Sticks): You will need a substantial quantity. For a single hexagon layer, you’ll use 6 sticks. To achieve a good depth (like the recommended 18 layers per shelf), you’ll need 108 sticks per hexagon. If you plan to create a cluster of three shelves, you’re looking at over 300 sticks. Standard or jumbo craft sticks can be used, with jumbo sticks yielding a larger, sturdier shelf.
- Hot Glue Gun and Glue Sticks: This is your primary bonding agent. A reliable hot glue gun with a fine tip will offer better precision. Stock up on plenty of glue sticks, as you’ll be using quite a few.
- Protected Work Surface: A craft mat, old newspaper, or cardboard will protect your table from hot glue drips.
- Ruler or Straight Edge (Optional but Recommended): Useful for ensuring consistent stick lengths and straight alignments, especially when creating the initial hexagon shapes.
- Craft Knife or Scissors (Optional): Handy for trimming any stray glue strings or making minor adjustments, though largely not essential.
- Clamps or Clothes Pins (Optional): Can be helpful for holding newly glued sections together while the glue cools and sets, particularly when joining multiple hexagons.
- Finishing Supplies (Optional):
- Paint: Acrylic craft paint or spray paint in your desired color.
- Wood Stain: For a richer, more natural wood finish.
- Clear Sealant: Products like Mod Podge, clear varnish, or polyurethane spray will protect the wood, add durability, and give a polished look.
Step-by-Step Guide: Crafting Your Easy Hexagon Shelves
This DIY project relies on a repetitive layering process that builds both structure and depth. Follow these detailed steps to bring your honeycomb shelves to life:
Phase 1: Constructing the Individual Hexagon Units
1. Forming the First Hexagon Layer
This is the foundation of your shelf. Accuracy here will ensure a symmetrical final product.
- Lay Out Your Sticks: Gather six popsicle sticks. Each stick will form one side of your hexagon.
- Create the First Joint: Take two sticks. Apply a small dot or thin line of hot glue to the end of one stick. Carefully press the end of the second stick onto it, forming a precise 60-degree corner (which makes a 120-degree internal angle for the hexagon). Aim for a neat, tight joint.
- Continue Adding Sticks: Proceed around, adding one stick at a time. Each new stick connects to the previous one, forming another corner. Continue until you have five sticks joined, creating an open ‘C’ or ‘U’ shape.
- Close the Hexagon: Take the sixth stick and use it to connect the two open ends of your shape. Apply glue to both ends and press firmly to complete the hexagon. Ensure it lies flat and all joints are secure before moving on. This is your first complete hexagon layer.
2. Building Depth Layer by Layer
Once your base hexagon is formed, the rest is a rhythmic process of stacking.
- Add the Second Layer: Apply a continuous bead of hot glue along the entire top edge of one side of your finished hexagon. Carefully place a new popsicle stick directly on top, aligning it perfectly with the stick beneath. Press gently and hold for a few seconds until the glue cools and sets.
- Repeat for the Entire Layer: Continue this process for all six sides of the hexagon. You will now have two layers of sticks, creating a slightly deeper hexagon.
- Continue Stacking for Desired Depth: This is where your shelf gains its strength and utility. Keep adding layers in the same manner. The original crafter used 18 layers to achieve a substantial and sturdy shelf depth. The more layers you add, the deeper and more robust your shelf will be. Consistency is crucial: ensure each new stick is aligned squarely with the one below it, and use a similar amount of glue for each joint to maintain a clean appearance.
- Create Additional Hexagon Units: Once your first deep hexagon is complete, use it as a guide to create two or more additional deep hexagon shelves. The tutorial suggests making two more, for a total of three individual hexagon units.
Phase 2: Assembling Your Honeycomb Display
3. Connecting the Individual Shelves
This step brings your individual hexagons together to form the iconic honeycomb cluster.
- Arrange Your Hexagons: Once all your individual deep hexagon shelves are fully cured (allow the glue to set completely, which takes only a few minutes for hot glue), arrange them in your desired honeycomb pattern. You can create a linear stack, a triangle, or any organic shape you prefer.
- Glue the Connections: Apply a generous amount of hot glue along the touching edges of two hexagons. Press them firmly together, ensuring they are perfectly aligned. Hold for several seconds until the glue creates a strong bond. Repeat this for all connecting points between your hexagon units. For maximum stability, apply glue along the full length of each shared side.
Phase 3: Finishing and Display
4. Optional Finishing Touches
These steps can elevate the look and durability of your handmade shelves.
- Painting: For a pop of color, paint your shelves using acrylic craft paints. Spray paint offers a smooth, even finish and is often quicker for intricate structures.
- Staining: If you prefer a more natural, rich wood appearance, apply a wood stain. This will enhance the grain and give a sophisticated touch.
- Sealing: A clear sealant (such as Mod Podge, clear varnish, or polyurethane spray) will protect the wood from moisture and dust, making your shelves easier to clean and significantly increasing their longevity. Apply several thin coats for best results.
Important Considerations: Safety and Weight Capacity
While these popsicle stick shelves are incredibly charming and structurally sound for their intended use, it’s vital to respect their limitations.
- Lightweight Items ONLY: These shelves are designed for decorative items, not heavy loads. They are perfect for displaying small air plants, tiny succulents, small framed photographs, miniature figurines, or other lightweight decorative accents.
- Avoid Heavy Objects: Do NOT place heavy books, large ceramic items, candles (unless battery-operated LED), or any substantial weight on these shelves. Hot glue, while strong for crafting, can become brittle or fail under excessive strain over time, especially with sudden impacts.
- Secure Mounting: When mounting your finished honeycomb display to the wall, use appropriate hardware. For very lightweight clusters, strong adhesive strips or small picture-hanging nails might suffice. For larger or slightly heavier configurations, consider using small L-brackets or strategically placed screws that can be attached to the sturdy parts of the shelf without compromising the individual stick structure. Always ensure the shelves are securely fastened to a wall stud or use proper drywall anchors.
Decorating Your New Honeycomb Display
Once your DIY hexagon shelves are complete and securely mounted, the most enjoyable part begins: styling them! Here are some ideas to make your new wall art truly shine:
- Greenery Galore: Small potted succulents, cacti, or artificial plants bring life and a touch of nature to your display.
- Miniature Collections: Showcase your favorite small figurines, ceramic animals, or treasured collectible miniatures.
- Framed Memories: Display tiny framed pictures of family, friends, or memorable travel moments.
- Scented Delights: Place small diffusers or decorative sachets (avoid anything that could leak or create heat).
- Thematic Vignettes: Group items that share a common theme, color palette, or aesthetic for a cohesive and visually appealing arrangement.
- Mix and Match: Don’t hesitate to combine different types of items for an eclectic and personalized look that truly reflects your style.
- LED Lighting: Consider adding small battery-operated LED strip lights or fairy lights around the inside edges for an enchanting glow, especially in the evening.
Conclusion: Transforming the Ordinary into Extraordinary
From a simple pile of crafting sticks to a stunning, modern home decor accent, this DIY project brilliantly illustrates the incredible potential of everyday materials. Creating these hexagon honeycomb shelves is not only a fantastic way to personalize your living space on a budget but also a deeply rewarding experience that allows you to tap into your innate creativity. These shelves are simple to make, highly customizable, and add a unique geometric flair that seamlessly complements a wide array of interior styles, from contemporary to rustic, minimalist to maximalist.
So, the next time you encounter an abundance of popsicle sticks – whether left over from a kid’s summer project or purchased specifically for this purpose – remember that you’re holding the very building blocks for beautiful and functional decor. Grab your trusty hot glue gun, unleash your inner crafter, and start building your own honeycomb masterpiece today. Just be sure to adorn your magnificent handmade shelves with light, cherished items to ensure they remain a charming and enduring feature in your home for years to come.
For a visual walkthrough of the crafting process, be sure to watch the helpful video tutorial below: