
Transform Your Holiday Decor: DIY Ball Ornament Garlands on a Budget
The holiday season brings a magical atmosphere, filled with warmth, joy, and, of course, enchanting decorations. But let’s be honest, refreshing your Christmas decor year after year can quickly become an expensive endeavor. If you find yourself dreaming of a new, captivating look for your home without emptying your wallet, then you’ve come to the right place. We’re about to unveil a brilliant, cost-effective way to elevate your festive display: crafting exquisite ball ornament garlands. This ingenious DIY project not only looks incredibly luxurious but also allows you to infuse your personal style into every corner of your home, all while keeping your budget happily intact.
Forget the days of repetitive decorations that lack pizzazz. This year, embrace creativity and transform simple, affordable ornaments into a stunning statement piece. The beauty of this project lies in its simplicity and the dramatic impact it creates. Imagine linking your Christmas tree and mantlepiece with a cohesive, flowing stream of vibrant ornaments, or draping your stairways with shimmering elegance. The possibilities are endless, and the result is a sophisticated, custom-made garland that rivals high-end store-bought options.
The Inspiration: Affordable Ornaments, Extraordinary Results
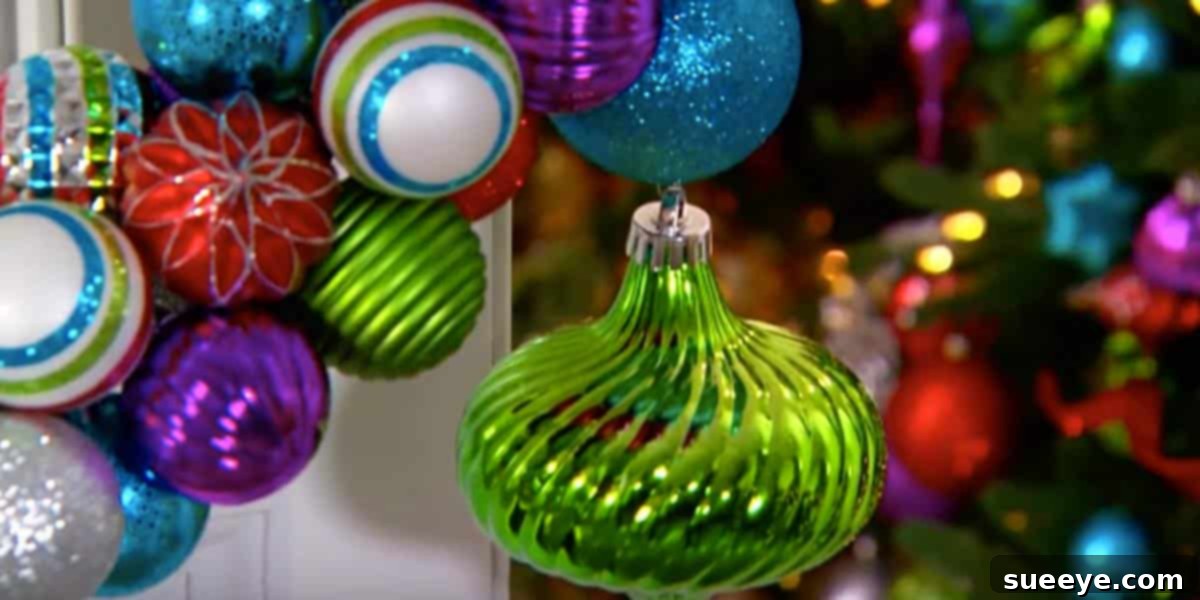
Our journey to budget-friendly brilliance began when we stumbled upon an incredible deal: a set of 50 multi-color ball ornaments for just $15 at Target! This kind of value is a game-changer for holiday decorating. While these ornaments are perfect for adorning your Christmas tree, we discovered a far more versatile and visually striking application. Thanks to a clever tutorial by the renowned Martha Stewart, we learned how to string these individual ornaments together, transforming them into magnificent, flowing garlands. This simple shift in perspective unlocks a world of decorative potential, proving that you don’t need a secret cash reserve to achieve a high-end holiday look.
The key to this project’s affordability is sourcing your ornaments wisely. While Target offered a fantastic deal, don’t limit your search. Many discount retailers, craft stores, and even dollar stores often carry large packs of unbreakable ball ornaments at incredibly low prices, especially during the pre-holiday season. Look for bundles that offer a variety of colors, finishes (matte, glossy, glitter), and even sizes to add depth and interest to your garland. These budget-friendly finds are the foundation of your stunning, custom-designed holiday decor.
Why a DIY Ornament Garland? Beyond the Tree
Garlands are an often-underestimated element in Christmas decoration, yet they hold immense power to tie an entire decorative theme together. They offer a fluid, continuous line of color and sparkle that can connect different areas of your home, creating a harmonious and inviting atmosphere. While traditionally used on Christmas trees, repurposing individual ornaments into a garland opens up a plethora of exciting possibilities:
- Cohesive Design: Create a seamless visual link between your Christmas tree and your fireplace mantle, windows, or doorways.
- Versatility: These garlands aren’t just for horizontal draping. They can cascade, wrap, and frame various architectural features.
- No Hooks Needed: When strung together, the ornaments form a self-supporting decorative chain, often eliminating the need for individual ornament hooks, simplifying the decorating process.
- Customization: Choose specific colors and finishes to match your existing decor or introduce a completely new holiday palette.
- Durability: Especially when using unbreakable ornaments, these garlands are robust and can be stored and reused for many seasons to come, adding to their cost-effectiveness.
Crafting Your Ornament Garland: A Step-by-Step Guide
Creating your own ball ornament garland is a straightforward and enjoyable process that requires minimal supplies. Here’s how you can do it:
Materials You’ll Need:
- A generous supply of unbreakable ball ornaments (50-100+ depending on desired length). Consider a mix of sizes for added visual interest.
- Floral wire, craft wire, or sturdy ribbon/string (e.g., fishing line, baker’s twine).
- Wire cutters (if using wire).
- Scissors (if using ribbon/string).
- Measuring tape.
- Optional: hot glue gun (for securing knots or ends, if desired).
Method 1: The Wire Technique (Martha Stewart’s Way)
This method, popularized by Martha Stewart, creates a very sturdy and structured garland, perfect for draping over mantles or around banisters.
- Measure Your Space: Determine the desired length of your garland. Add an extra foot or two for draping and securing.
- Cut the Wire: Cut a piece of floral or craft wire to your measured length. Choose a gauge that is strong enough to support the ornaments but flexible enough to work with.
- Start Stringing: Begin by threading the wire through the small loops at the top of each ornament. Push the ornaments snugly together along the wire.
- Continue Adding: Keep adding ornaments, pushing them tightly against each other to create a dense, full garland. The tighter they are packed, the fuller and more luxurious your garland will appear.
- Secure the Ends: Once you’ve reached your desired length, create a small loop at each end of the wire by twisting it back on itself. This provides a secure point for hanging and prevents ornaments from sliding off. You can also use pliers to crimp the wire tightly.
Method 2: Ribbon or String (A Simpler Approach)
This method is excellent for a softer drape and is often quicker for beginners. It’s also a great way to incorporate a complementary ribbon color into your design.
- Prepare Your String/Ribbon: Cut a piece of sturdy string, fishing line, or ribbon to your desired garland length, adding extra for knots and hanging.
- First Ornament: Thread one end of the ribbon through the loop of your first ornament. Bring the two ends of the ribbon together and tie a tight knot directly above the ornament. This secures the first ornament in place.
- Add More Ornaments: Continue threading subsequent ornaments onto the ribbon. After each ornament, tie another tight knot directly above it to hold it in position and prevent it from sliding down. Alternatively, for a slightly looser look, you can string several ornaments, then tie a knot to secure a small cluster.
- Maintain Consistency: Try to keep the spacing between ornaments consistent for an even look.
- Finish the Ends: Once all ornaments are added, tie a final knot at the end of the garland, leaving a bit of extra ribbon for hanging or tying off. You can also form loops with the ribbon for easy hanging. For extra security, a dab of hot glue on the knots can prevent them from unraveling.
Tips for Success:
- Unbreakable is Key: Always opt for unbreakable or shatterproof ornaments, especially if your garland will be placed in high-traffic areas or within reach of pets or children.
- Mix and Match: Don’t be afraid to combine different finishes (matte, shiny, glitter) or even slightly different sizes of ornaments for a richer, more dynamic visual effect.
- Test Fit: Before cutting your wire or ribbon, loosely arrange your ornaments along the area where the garland will hang to estimate the length you’ll need.
- Color Schemes: Stick to a consistent color palette or experiment with gradients and alternating colors for a truly personalized touch.
Creative Display Ideas for Your New Garland
Once your beautiful ornament garland is complete, the fun truly begins: deciding where to display your festive creation! Here are some popular and creative ways to showcase your DIY masterpiece:
The Classic Mantlepiece:
A draped garland instantly transforms a fireplace mantle into a captivating focal point. Let it gracefully swag across the front, perhaps with a slight dip in the center. You can enhance this display by adding LED fairy lights, pinecones, or fresh evergreen sprigs tucked into the garland for an extra touch of natural charm. Pair it with complementary stockings and candles for a quintessential Christmas scene.
Adorning Your Christmas Tree:
Move beyond traditional tinsel! A ball ornament garland can be spiraled around your Christmas tree, creating a continuous stream of color and sparkle that beautifully complements your other ornaments. It adds depth and a professional decorator’s touch, making your tree feel fuller and more integrated.
Stairway Banisters and Railings:
Transform your entryway or staircase into a grand festive pathway. Wrap the garland loosely around the banister, allowing it to gently cascade down the railing. Secure it at intervals with floral wire or festive ribbons. This instantly elevates a often-overlooked area of the home, greeting guests with holiday cheer.
Doorways and Archways:
Frame interior doorways or archways with your ornament garland to create festive thresholds. This is particularly effective for connecting two rooms or highlighting an architectural feature. It offers a warm, inviting welcome as you move from one space to another.
Table Centerpieces:
For a stunning dining table display, coil your garland into a decorative circle or snake it down the center of the table. You can place candles, a vase of flowers, or a bowl of holiday treats within or alongside it. This adds an instant touch of holiday glamour to your festive meals.
Window Dressings:
Drape the garland across window frames, either inside or outside. This creates a cheerful view for those looking in and out, spreading holiday cheer throughout your neighborhood. Combined with some string lights, it can create a truly magical glow.
The Budget-Friendly Advantage: Decorating Smart
One of the most appealing aspects of this DIY project is its incredible cost-effectiveness. Traditional garlands, especially those adorned with attractive embellishments, can be surprisingly expensive when purchased from retailers. By leveraging affordable bulk ornament sets, you drastically reduce your decorating expenses without compromising on aesthetics. This allows you to allocate your holiday budget to other important areas, or simply save money while still achieving a stunning, festive home.
Moreover, making your own garlands fosters a sense of accomplishment and allows for complete creative control. You’re not just buying decor; you’re crafting memories and personalized pieces that reflect your unique taste. These homemade garlands are also highly durable, especially if you select shatterproof ornaments, meaning they can be carefully packed away and brought out to delight year after year, further enhancing their value and sustainability.
Personalizing Your Garland: Making It Yours
While the multi-color ornaments offer a classic festive look, don’t hesitate to personalize your garland to perfectly match your home’s aesthetic. Consider these ideas:
- Theme-Specific Colors: Choose ornaments in a specific palette – perhaps elegant silver and gold, rustic reds and greens, or whimsical pastels.
- Add Embellishments: Weave in small bows, faux berries, jingle bells, or tiny pinecones between the ornaments for added texture and charm.
- Varying Sizes: Create a more dynamic look by alternating between larger and smaller ball ornaments along the strand.
- Textural Mix: Combine glossy, matte, and glitter-finished ornaments for a rich visual tapestry.
Beyond Ball Ornaments: Other DIY Garland Ideas
While ball ornament garlands are exceptionally beautiful and easy to make, the principle of stringing items together for a festive display can be applied to many other materials. Once you’ve mastered the ornament garland, you might be inspired to try:
- Popcorn and Cranberry Garlands: A timeless classic that adds a rustic, natural touch, perfect for indoor or outdoor use (though they are biodegradable!).
- Dried Orange Slice Garlands: Create beautiful, aromatic garlands by drying orange slices and stringing them together with cinnamon sticks and bay leaves.
- Felt Ball Garlands: Soft, colorful felt balls can be strung together for a cozy, playful look, ideal for children’s rooms or a Nordic-inspired decor.
- Pinecone Garlands: Collect pinecones, attach small loops of wire, and string them together for a beautiful, natural, and free garland.
Conclusion: Elevate Your Holiday Spirit with DIY Charm
This holiday season, step away from the mundane and embrace the joy of creating something truly special. Crafting your own ball ornament garlands is a simple yet impactful way to infuse your home with festive cheer, elegance, and a touch of personalized magic, all while staying within a sensible budget. With readily available and affordable ornaments from stores like Target or your local dollar store, you can transform ordinary items into extraordinary decorations.
Whether you choose Martha Stewart’s sturdy wire method or the simpler ribbon technique, the satisfaction of seeing your handmade garland adorn your mantle, tree, or stairway is truly rewarding. It’s a wonderful project to do alone for some peaceful crafting time, or to share with family, creating new holiday traditions. So, gather your supplies, let your creativity flow, and prepare to impress your guests with a stunning display that looks far more expensive than it actually was. Don’t forget to watch Martha Stewart’s tutorial with The Home Depot for visual guidance and more inspiration. Happy decorating!