
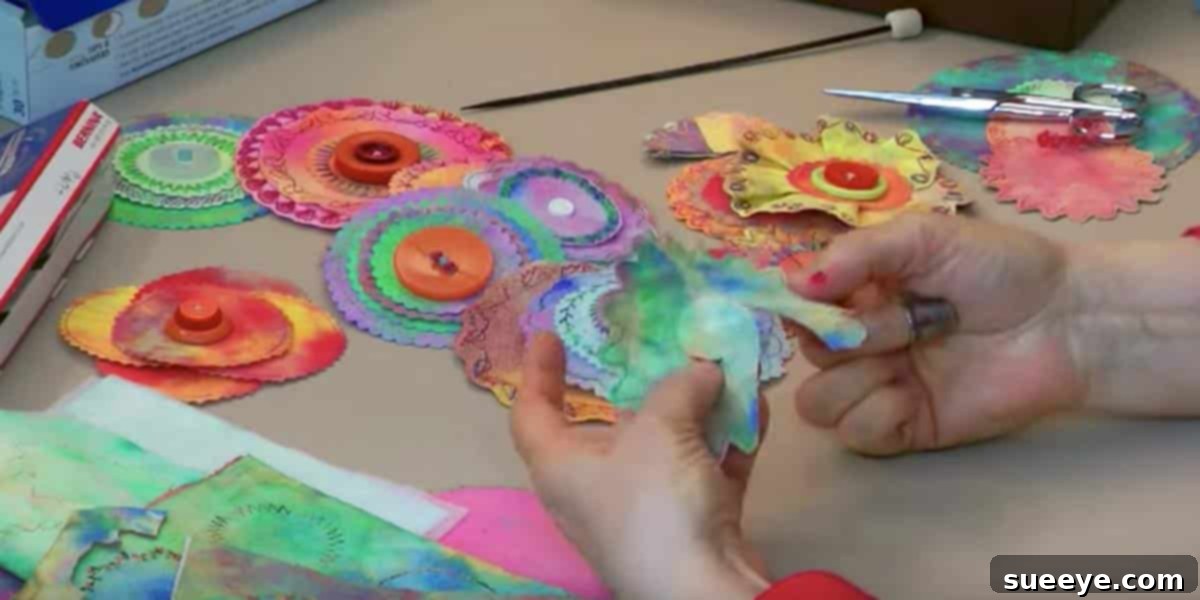
Unleash Your Creativity: Crafting Exquisite DIY Flowers from Paper Napkins
Imagine transforming an everyday item like a paper napkin into a vibrant, three-dimensional floral masterpiece. This isn’t just a craft project; it’s an invitation to explore a world of creative possibilities, resulting in truly unique and charming decorations. While many crafts utilize traditional fabrics, the ingenious method of creating exquisite flowers from paper napkins offers a fresh, accessible, and incredibly rewarding experience. These handmade floral embellishments are not only a joy to create but also incredibly versatile, lending a touch of personalized beauty to almost anything they adorn.
The beauty of this particular DIY paper napkin flower project lies in its surprising elegance and the delightful intricacy achieved through a clever combination of painting, stitching, and layering. What begins as a simple napkin evolves into a delicate blossom, rich with texture and vibrant color. Prepare to be inspired as we delve into this fascinating craft, making it an ideal activity for crafters of all skill levels looking for unique craft ideas and beautiful handmade embellishments.
The Allure of Handmade Floral Embellishments: Why This Craft Shines
There’s an undeniable charm that comes with handmade items, and these paper napkin flowers are no exception. Unlike mass-produced decorations, each flower you create will carry its own unique character, reflecting your personal touch and creative vision. This project stands out for several compelling reasons. Firstly, it utilizes readily available and inexpensive materials, making it an incredibly budget-friendly endeavor. You likely already have many of the supplies needed right at home, transforming something ordinary into something extraordinary. This aspect alone makes it a fantastic sustainable crafting option, giving new life to simple paper products.
Secondly, the resulting flowers are surprisingly robust and incredibly versatile. Their delicate appearance belies their potential for use in a wide array of applications, from enhancing home decor to personalizing gifts and even adorning fashion accessories. Their inherent brightness and cheerful disposition make them perfect for adding a pop of color and joy wherever they are placed. The elaborate stitching technique, which might seem daunting at first glance, is actually quite approachable and adds a sophisticated, intricate detail that truly elevates these flowers from a simple paper craft to a work of art. The added button center serves not only as a structural element, holding the layers together, but also as a delightful focal point, completing the flower’s charming aesthetic.
Materials You’ll Need: Gathering Your Creative Toolkit for Paper Napkin Flowers
Embarking on this creative journey requires a few simple materials, most of which you might already have on hand. The beauty of a DIY craft tutorial like this is its accessibility, ensuring that anyone can participate in the joy of making. To create these beautiful handmade fabric flowers (or rather, “fabric-like” paper flowers), gather the following supplies:
Essential Supplies for Your Crafting Session:
- Paper Napkins: Opt for multi-ply paper napkins, as they tend to hold up better to misting and painting. Plain white or light-colored napkins are ideal as they allow the paint colors to truly shine. Avoid overly textured or heavily patterned napkins, as they might interfere with the painting and stitching process. The absorbency of paper napkins is key to how they take the paint.
- Acrylic Paints: Choose a selection of acrylic paints in complementary color families. Working within a specific color palette (e.g., various shades of pinks and purples, or blues and greens) will create harmonious and visually appealing flowers. Acrylics are preferred for their vibrancy, quick drying time, and durability once dry.
- Water Mister/Spray Bottle: A fine mist of water is crucial for preparing the napkins and helping the paint blend. This helps to soften the paper fibers, allowing for a more natural and artistic diffusion of color.
- Sewing Machine or Hand Needle & Thread: The stitching is a signature element of this project. A sewing machine will make the process faster and more uniform, but hand stitching with a sharp needle and durable thread (embroidery floss or regular sewing thread) is equally effective and adds an even more personal, artisanal touch. The thread color can either match your paint palette or provide a subtle contrast.
- Scissors: You’ll need a good pair of sharp scissors for cutting. Pinking shears are highly recommended for creating decorative, zig-zag edges around your petals, adding to the intricate look of the finished flowers. However, regular scissors will also work perfectly for creating smooth, clean-cut shapes. Experiment with both to see which effect you prefer for your unique home decor accents.
- Decorative Buttons: A small, attractive button for the center of each flower is essential. It not only provides a decorative finish but also serves the practical purpose of holding all the layered petals together securely. Buttons come in countless designs, colors, and materials, allowing for endless customization.
Step-by-Step Guide: Crafting Your Beautiful Paper Napkin Flowers (Inspired by Barb Owens)
Now, let’s walk through the enchanting process of bringing these paper napkin flowers to life, following the innovative method pioneered by Barb Owens. Her approach ensures a stunning outcome every time, transforming simple materials into exquisite handmade embellishments. This comprehensive craft tutorial will guide you through each stage, making it easy to replicate her success.
Step 1: Preparing Your Napkins with Vibrant Hues
The foundation of these beautiful flowers lies in how the napkins are prepared and painted. Begin by gently misting your chosen paper napkins with water from your spray bottle. The goal is to dampen them slightly, not soak them. This initial misting helps to soften the paper, making it more receptive to the paint and allowing for beautiful color blending. Next, prepare your paints by adding a small amount of water to your selected acrylic colors. This dilutes the paint, creating a more watercolor-like effect that will absorb beautifully into the damp napkin fibers. Now, take a small brush or even your fingertip and begin dabbing different sections of the damp napkins with your diluted paints. Focus on using colors from the same family or complementary hues to achieve a harmonious blend. The dampness of the napkin will allow the colors to bleed and blend naturally, creating organic, soft transitions. Once painted, set the napkins aside to dry completely. This step is crucial, as the dried, painted napkin will be much more durable for the subsequent sewing and cutting steps, laying the groundwork for your creative paper craft.
Step 2: Adding Intricate Stitches for Texture and Definition
Once your painted napkins are fully dry, it’s time to add the defining element: the elaborate stitching. This step is what truly gives these flowers their unique texture and intricate appearance. Using either a sewing machine or a needle and thread, begin to sew various designs onto your painted napkin. Think of organic shapes, swirling patterns, or concentric circles that will eventually form the petals of your flower. The stitching doesn’t have to be perfect; slight imperfections often add to the handmade charm. Barb Owens’ technique involves creating patterns that you will then cut around, so consider how your stitching will frame the eventual flower shape. You can use a straight stitch, a zig-zag stitch, or even experiment with decorative stitches if using a machine. For hand sewing, backstitch or running stitch can create lovely outlines. The thread acts as an outline, giving definition and structure to the delicate paper, making these truly unique home decor accents.
Step 3: Shaping Your Petals with Precision
With your stitched designs in place, the next exciting step is to cut out your flower shapes. Carefully cut around the stitching you’ve created. This is where you can truly customize the look of your DIY paper napkin flowers. You can create different shapes – circular, oval, star-like, or abstract. If you have pinking shears, this is the perfect opportunity to use them. The zig-zag edge created by pinking shears adds an immediate touch of intricate detail and texture, making the petals look more complex and artisanal. Alternatively, regular scissors will yield a clean, smooth edge. Experiment with various sizes and shapes for your individual “petals” or flower layers. The more variety you have in shape and size, the more realistic and dynamic your finished flower will appear. This freedom in cutting allows for truly personalized gifts and decorative floral accents.
Step 4: Layering for a Realistic, Dimensional Effect
To give your paper napkin flowers a lifelike, three-dimensional quality, you’ll need to layer your cut-out shapes. Select several different flower shapes and sizes – perhaps three to five layers work best. Start with the largest shape as your base, then stack progressively smaller shapes on top, ensuring the centers align. Slightly rotating each layer as you stack will help create a fuller, more natural bloom, mimicking the way real flower petals overlap. This layering technique is fundamental to achieving the impressive depth and realism that characterizes these handmade fabric flowers. It’s also where you can play with color variations, placing lighter shades on top of darker ones, or vice versa, to create visual interest and highlight the intricate stitching.
Step 5: The Finishing Touch – A Charming Button Center
The final step in crafting your beautiful paper napkin flower is to secure all the layers together with a decorative button. Once your layers are stacked and aligned to your liking, carefully push a needle and thread through the center of all the layers, then thread it through your chosen button. Sew the button firmly in place, ensuring that it securely holds all the paper layers together. The button not only provides structural integrity but also serves as a delightful embellishment, adding a pop of charm and a finished look to your blossom. Choose a button that complements your flower’s colors and style – a vintage button for an antique feel, or a bright, modern button for a playful touch. This simple craft idea culminates in a sturdy yet delicate flower ready for display.
Beyond the Basics: Unleashing the Versatility of Your Handmade Flowers
Once you’ve created a collection of these delightful DIY paper napkin flowers, you’ll discover their endless applications. Their charm and handmade quality make them perfect for adding a personal touch to almost any item or setting. These decorative floral accents are truly versatile:
Home Decor Accents:
- Vases and Arrangements: Group several flowers together in a small vase for a charming tabletop display, or scatter them creatively across a mantelpiece.
- Wreaths and Garlands: Attach them to a plain wreath base or string them together to create a whimsical garland for special occasions or everyday cheer.
- Wall Art: Mount them on a painted canvas for a unique mixed media art piece, creating textural wall decor.
- Lampshade Embellishments: Glue them sparingly around the base of a lampshade for a subtle, elegant upgrade.
- Curtain Tie-Backs: Fasten them to the center of your curtain tie-backs for a fresh, floral touch.
Fashion and Accessories:
- Brooches and Hair Clips: Attach a safety pin or a hair clip backing to transform them into wearable art.
- Bag and Jacket Adornments: Sew them onto fabric bags, denim jackets, or scarves for a personalized style statement.
Personalized Gifts and Packaging:
- Specialized Cards: Affix them to handmade greeting cards for an extra dimension of thoughtfulness and beauty, making your card truly stand out.
- Gift Wrap: Use them as a unique and elegant topper for wrapped gifts, replacing traditional bows with a personal touch.
- Gift Tags: Glue smaller flowers onto gift tags for a delightful embellishment.
Mixed Media and Scrapbooking:
- Art Journals: Incorporate them into your art journal pages for added texture and visual interest.
- Scrapbook Layouts: Use them to enhance scrapbook pages, adding a tactile element to your cherished memories.
Event and Party Decorations:
- Table Decor: Scatter them on tables for weddings, baby showers, or birthday parties.
- Centerpieces: Use them to embellish simple centerpieces, adding color and charm.
- Party Favors: Attach them to party favors as a memorable keepsake for your guests.
The Joy of DIY: Why This Project is a Must-Try
Beyond the beautiful outcome, the process of creating these DIY paper napkin flowers offers numerous benefits. Crafting is a wonderful way to de-stress and engage in a mindful activity, allowing you to focus on the present moment and enjoy the creative flow. There’s immense satisfaction in seeing an idea come to fruition through your own hands, transforming simple materials into something truly special. This project encourages experimentation with colors, shapes, and textures, fostering a deeper connection with your artistic side. Furthermore, creating personalized gifts and home decor items imbues them with a unique story and heartfelt sentiment that mass-produced items simply cannot replicate. It’s an eco-friendly way to craft, breathing new life into paper products that might otherwise go unused. Embrace the journey of crafting with napkins, and discover the joy of making something beautiful from scratch.
Discovering the Artistry of Barb Owens
This ingenious method of crafting flowers from paper napkins owes its unique charm to the creative vision of Barb Owens. Her step-by-step tutorial demystifies what might seem like a complex process, breaking it down into manageable and enjoyable stages. Her approach of painting, stitching, and layering is truly innovative, resulting in flowers that are far more intricate and visually appealing than standard paper crafts. If you’re looking for visual guidance and an in-depth walkthrough of each technique, seeking out Barb Owens’ original tutorial is highly recommended. Witnessing her process firsthand can provide invaluable insights and tips to further enhance your crafting experience, helping you master these simple craft ideas and create truly stunning pieces.
So, why wait? Gather your supplies, clear your crafting space, and prepare to embark on a delightful journey of creativity. These darling DIY paper napkin flowers are more than just a craft; they are a celebration of ingenuity, beauty, and the simple joy of making. Whether you’re decorating your home, personalizing a gift, or simply seeking a relaxing and rewarding activity, these handmade embellishments will undoubtedly bring a smile to your face and a burst of color to your surroundings. Start crafting today and discover the magic within everyday napkins!