
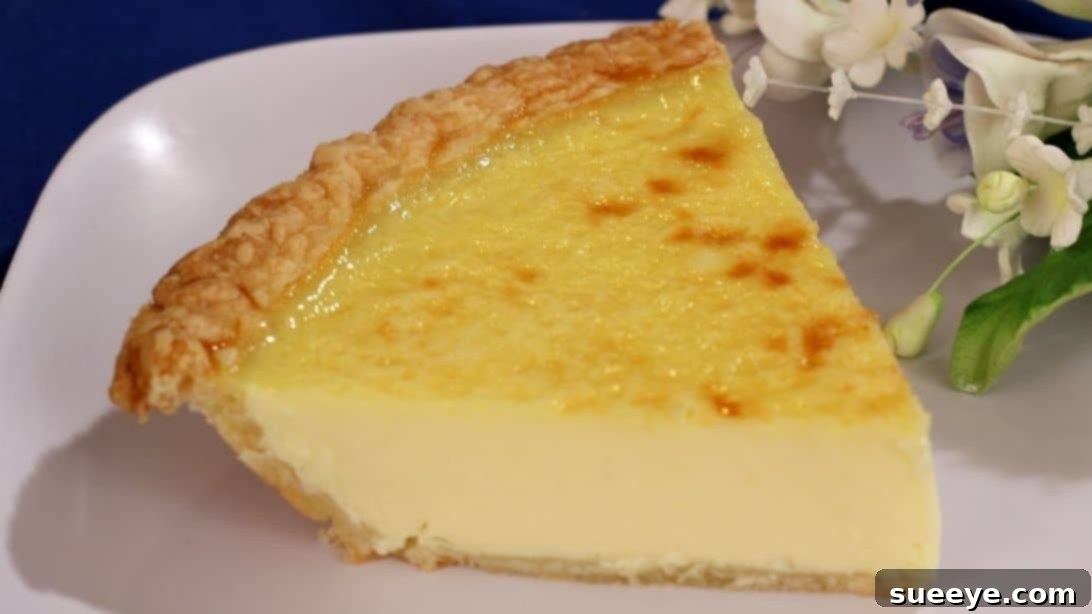
There are few desserts that evoke a sense of warmth, nostalgia, and simple comfort quite like an old-fashioned custard pie. Its rich, silky smooth filling, nestled within a flaky, golden crust, is a testament to the timeless appeal of classic baking. For many, it’s a taste of childhood, a staple at family gatherings, or simply the ultimate comforting treat. If you’ve been on a quest to recreate this culinary masterpiece in your own kitchen, you’re in the right place. Recently, I embarked on the very same journey, seeking that perfect, foolproof recipe. My search led me to an incredibly straightforward and effective tutorial from Amy Lynn’s Kitchen on YouTube. Her insights and simple approach yielded a deliciously satisfying result, proving that baking this classic at home is not only achievable but immensely rewarding. This guide will walk you through the process, incorporating those valuable tips to help you bake a custard pie that’s both easy and extraordinarily tasty.
Custard pie, with its humble origins and wholesome ingredients, represents the heart of traditional American baking. It’s a dessert that doesn’t rely on complex flavors or elaborate decorations, but rather on the purity of its components and the simple magic of baking. Our goal here is to demystify the process, ensuring that even novice bakers can achieve a perfectly set, creamy custard and a beautifully baked crust. Prepare to delight your family and friends with a pie that truly tastes like it came straight from Grandma’s kitchen.
Essential Ingredients for Your Classic Custard Pie
Crafting the perfect old-fashioned custard pie begins with selecting the right ingredients. Each component plays a vital role in achieving that signature smooth texture and delicate flavor. Here’s what you’ll need, along with a brief explanation of why these specific choices are important:
- 2½ cups of whole milk, scalded: Whole milk is crucial for the richness and creaminess of the custard. Its higher fat content contributes significantly to the luxurious mouthfeel. Scalding the milk is a traditional technique that helps to prevent the proteins from curdling when mixed with the eggs, resulting in a smoother custard. It also allows the milk to infuse flavors more effectively and ensures even cooking.
- 4 large eggs, lightly beaten: Eggs are the primary thickening agent for custard, providing structure and contributing to its velvety texture. Using large eggs ensures the right consistency and richness. Lightly beating them just enough to combine the yolks and whites is important; over-beating can incorporate too much air, leading to a bubbly or porous custard.
- ¾ cup of granulated sugar: Sugar not only sweetens the pie but also contributes to the custard’s tender texture and helps with browning. This amount strikes a perfect balance, allowing the other flavors to shine without being overly sweet.
- ¼ teaspoon of salt: A small amount of salt is a game-changer in baking. It doesn’t make the pie salty, but rather enhances and balances the sweetness of the sugar, making the overall flavor profile more complex and delicious.
- 1 teaspoon of pure vanilla extract: Vanilla is the quintessential flavor for classic custard pie, adding a warm, aromatic depth that is instantly recognizable and comforting. Be sure to use pure vanilla extract for the best flavor; imitation vanilla can sometimes leave an artificial aftertaste.
- 1 (9-inch) unbaked, deep-dish pie shell: The foundation of your pie! An unbaked deep-dish shell provides ample space for the generous custard filling. You can opt for a high-quality store-bought crust for convenience, or if you’re feeling ambitious, a homemade flaky pie crust will elevate your pie to an even higher level. Ensure it’s deep-dish to hold all the delicious filling.
Using quality ingredients will undoubtedly make a significant difference in the final taste and texture of your old-fashioned custard pie. Fresh eggs, good quality milk, and pure vanilla are investments that pay off in flavor.
Step-by-Step Guide to Baking Your Perfect Custard Pie
Baking a classic custard pie is a rewarding process that combines simple techniques with a little bit of patience. Follow these detailed steps to achieve a perfectly smooth and delectable pie:
Step 1: Preparing the Custard Base
Begin by preparing your milk. Pour 2½ cups of whole milk into a medium saucepan. Place the saucepan on your stove over medium heat. Stir the milk frequently to prevent it from scorching at the bottom and to ensure even heating. You’ll know the milk is scalded when small bubbles begin to form around the edges of the pan and steam gently rises from the surface. It’s important not to let the milk come to a full boil. Once scalded, immediately remove the pan from the heat. Set it aside and allow it to cool slightly while you prepare the remaining ingredients. This brief cooling period helps prevent the eggs from scrambling when combined.
Next, grab a large mixing bowl. Crack the four eggs into the bowl and beat them thoroughly with a whisk or fork until the yolks and whites are fully combined and slightly frothy. Then, add the ¾ cup of sugar, ¼ teaspoon of salt, and 1 teaspoon of vanilla extract to the beaten eggs. Whisk these ingredients together until they are well combined and the sugar has largely dissolved. This mixture forms the flavorful base of your custard.
Now, it’s time to combine the warm milk with the egg mixture. This step is critical and requires a technique known as “tempering” to prevent the eggs from cooking prematurely. Slowly and gradually pour the slightly cooled scalded milk into the egg mixture while continuously whisking. The constant whisking is essential to evenly distribute the heat and prevent the eggs from scrambling. Continue whisking until the entire mixture is smooth and uniform, ensuring there are no lumps.
Step 2: Baking Your Custard Pie to Perfection
Preheat your oven to 400 degrees Fahrenheit (200 degrees Celsius). This initial high temperature helps to set the crust quickly and achieve a golden color.
To prevent the delicate edges of your pie crust from over-browning or burning during the baking process, a simple trick is to create a foil shield. Take a sheet of aluminum foil, scrunch it slightly, and carefully mold it around the edge of the pie shell. This protects the crust while allowing the custard to bake evenly. If you prefer a darker, crispier crust, you can remove the foil during the last 10 to 15 minutes of baking.
Carefully pour the prepared custard mixture into your unbaked deep-dish pie shell. Place the pie gently into your preheated oven. Bake for approximately 40 to 50 minutes. The exact baking time can vary depending on your oven, so it’s important to keep an eye on it. The pie is ready when the center is mostly set but still has a slight, delicate jiggle when gently shaken. A knife inserted near the center should come out clean (or with just a few moist crumbs, but no liquid). Be careful not to overbake, as this can lead to cracks in the custard or a rubbery texture.
Once baked, remove the pie from the oven. Carefully transfer it to a wire rack and allow it to cool completely at room temperature. This cooling process is crucial for the custard to fully set and firm up. Rushing this step can result in a runny or crumbly pie. Once cooled, you can refrigerate it for a few hours before serving to ensure it’s perfectly chilled and firm. Serve slices as desired, perhaps with a sprinkle of nutmeg for an authentic touch.
*These amazing images are all credited to Amy Lynn’s Kitchen via YouTube. Check her other content and follow for more delightful recipes!
Tips for the Perfect Old-Fashioned Custard Pie
Achieving that picture-perfect, smooth, and crack-free custard pie is easier than you think with a few expert tips:
- Don’t Overbake: This is perhaps the most crucial tip. Overbaking is the primary cause of cracks and a rubbery texture. The pie should still have a slight “jiggle” in the very center when you take it out of the oven, as it will continue to set as it cools.
- Cool Slowly and Completely: Resist the urge to cut into the pie immediately. Custard needs time to set properly. Allow it to cool on a wire rack at room temperature for at least 2-3 hours, then refrigerate for another few hours until fully chilled and firm.
- Temper Your Eggs: As mentioned in the directions, slowly adding the warm milk to the egg mixture while whisking is vital. This gradually raises the temperature of the eggs, preventing them from scrambling and ensuring a smooth custard.
- Prevent a Soggy Bottom: While this recipe uses an unbaked crust, a good trick for a crispier bottom is to brush the bottom of the crust with a lightly beaten egg white before pouring in the filling. This creates a barrier. Another option is to par-bake (blind bake) the crust for 10-15 minutes before adding the filling, though it’s not strictly necessary for custard pie if you follow the baking temperature correctly.
- Use a Pie Shield: The aluminum foil trick described is a simple DIY pie shield. You can also purchase reusable silicone pie shields if you bake pies frequently.
- Oven Temperature Matters: Ensure your oven is accurately calibrated. An oven thermometer can be a valuable tool. The initial higher temperature helps set the crust and edges, while the rest of the baking is a gentler process.
- Filter the Custard (Optional but Recommended): For an ultra-smooth custard, you can strain the mixture through a fine-mesh sieve before pouring it into the pie shell. This removes any potential bits of cooked egg or undissolved sugar, resulting in a silkier texture.
Variations and Serving Suggestions
While the classic old-fashioned custard pie is perfect in its simplicity, there are several ways to customize it and enhance your serving experience:
- Spice It Up: A sprinkle of freshly grated nutmeg is traditional and highly recommended. You could also experiment with a pinch of cinnamon or cardamom for a different aromatic profile. Add these directly to the custard mixture before pouring into the shell.
- Citrus Zest: For a brighter flavor, add a teaspoon of finely grated lemon or orange zest to the egg mixture. This adds a subtle, refreshing counterpoint to the richness of the custard.
- Almond Extract: Replace half of the vanilla extract with almond extract for a delicate, nutty flavor. Start with a small amount as almond extract can be potent.
- Crust Variations: While a traditional pastry crust is classic, consider a graham cracker or shortbread crust for a different texture and flavor profile, especially if you enjoy a sweeter base.
- Individual Custard Tarts: For portion control or a more elegant presentation, bake the custard in individual tart shells. Adjust baking time accordingly.
Serving Your Custard Pie
Custard pie is delightful on its own, but these additions can elevate the experience:
- A Dusting of Nutmeg: This is the most classic accompaniment, enhancing the pie’s inherent warmth.
- Fresh Whipped Cream: A dollop of lightly sweetened homemade whipped cream adds a luxurious touch and balances the richness of the custard.
- Fresh Berries: A side of fresh raspberries, blueberries, or sliced strawberries provides a lovely color contrast and a burst of tartness.
- Fruit Compote: A simple berry or cherry compote can add a sophisticated fruit element.
- Ice Cream: A scoop of vanilla bean ice cream creates a delicious hot-cold contrast, especially if serving the pie slightly warm.
However you choose to serve it, remember that an old-fashioned custard pie is best enjoyed with loved ones, perhaps after a hearty meal, or as a comforting afternoon treat with a cup of coffee or tea.
The Enduring Charm: A Brief History of Custard Pie
Custard pie, in its many forms, has been a beloved dessert for centuries, tracing its roots back to medieval European cuisine. Early custards were often savory, but by the Renaissance, sweet versions made with eggs, milk, and sugar began to emerge. These early custards were a luxurious treat, often reserved for nobility, as sugar and spices were expensive commodities. Over time, as ingredients became more accessible, custard pies made their way into the kitchens of ordinary households.
In America, particularly in the Southern states and during colonial times, custard pie became a quintessential comfort food. It was a practical dessert, utilizing readily available farm ingredients like milk and eggs. The “old-fashioned” aspect speaks to a time when baking was simpler, relying on wholesome, fundamental ingredients to create something truly delicious and satisfying. It’s a testament to the enduring appeal of traditional recipes that prioritize flavor and texture over elaborate presentation. This humble pie has gracefully traversed generations, remaining a steadfast favorite for its creamy texture, delicate sweetness, and the comforting sense of home it brings with every bite.
Storage and Troubleshooting Common Problems
Storing Your Custard Pie
To ensure your delicious custard pie remains fresh and safe to eat, proper storage is key:
- Refrigeration is Essential: Due to its egg and dairy base, custard pie must be refrigerated. Once completely cooled to room temperature, cover the pie loosely with plastic wrap or aluminum foil and store it in the refrigerator.
- Shelf Life: A homemade custard pie will typically last for 3-4 days when properly stored in the refrigerator.
- Freezing: Custard pie does not freeze well. The texture of the custard can become watery and grainy upon thawing, so it’s best to enjoy it fresh.
Troubleshooting Common Custard Pie Problems
Even seasoned bakers encounter hiccups. Here are solutions to common custard pie issues:
- Cracks in the Custard: This is usually a sign of overbaking or cooling too quickly. Remember to pull the pie from the oven when it still has a slight jiggle. Also, allow it to cool gradually at room temperature before refrigerating.
- Watery or Runny Custard: This indicates underbaking. The custard simply didn’t cook long enough to set. Next time, bake for a few more minutes until the center is mostly firm. Make sure your oven temperature is accurate.
- Soggy Bottom Crust: This often happens when the filling is too wet or the crust isn’t adequately protected. Ensure your oven is hot enough to set the crust quickly. You can also try brushing the bottom of the crust with a whisked egg white before adding the filling to create a moisture barrier.
- Rubbery or Too Firm Custard: Another symptom of overbaking. A perfectly baked custard is silky and tender, not tough or bouncy.
- Uneven Browning of Crust: Use a pie shield (aluminum foil around the edges) to prevent the edges from burning while the center cooks through. Remove it during the last 10-15 minutes if you want more browning.
Don’t be discouraged if your first attempt isn’t absolutely perfect. Baking is a learning process, and with each pie, you’ll gain more experience and confidence. Soon, you’ll be baking perfect old-fashioned custard pies every time!

Old-Fashioned Custard Pie Recipe: Your New Favorite Dessert
This recipe for old-fashioned custard pie is more than just a list of instructions; it’s an invitation to connect with a timeless baking tradition. With its straightforward ingredients and simple techniques, you’ll be able to create a dessert that is profoundly satisfying and remarkably delicious. Whether you’re a seasoned baker or just starting your culinary journey, this guide provides all the knowledge you need to bake a custard pie that will be cherished by everyone who tastes it. So gather your ingredients, preheat your oven, and prepare to bring a piece of comforting history into your home.